background image

15

OPERATION

SEQUENCE OF OPERATION

Typical Control/Appliance Operating Sequence

1. When the control is powered, it should first display “0”, then the input

line voltage (“120”), the calibration setting (12), then the actual water

temperature in the tank.

2. If the control determines that the actual water temperature inside the

tank is below the programmed temperature setpoint less the differential,

a call for heat is activated.

3. The control then performs selected system diagnostic checks. This

includes confirming the proper state of the air switch and ECO limit

device.

4. If all checks are successfully passed, the combustion blower is

energized for the pre-purge cycle.

5. When the pre-purge cycle is complete, power is applied to the ignitor

element for the ignitor warm-up period.

6. At the conclusion of the igniter warm-up period, the gas valve will open,

allowing gas to enter the burner chamber.

7. The igniter will remain on for a short predetermined time period, then will

be turned off.

8. After an additional 2 seconds, the control will monitor the flame sense

probe to confirm a flame is present. If a flame is not verified within this

time period, the gas valve will immediately be closed, and the blower will

continue to run for approximately 10 seconds. The control will then

return to step 2.

9. If a flame is confirmed, the control will enter the heating mode where it

will continue heating the tank water until the setpoint temperature plus

differential is reached. At this point, the gas valve is closed and the

control enters the post-purge cycle.

10.The combustion blower will run for the duration of the post purge cycle

to purge the system of all combustion  gases. When the post purge

cycle is complete, the blower is de-energized and will coast to a stop.

11. The control will now enter the idle state while continuing to monitor the

internal tank water temperature and the state of other system devices.

If the temperature drops below the setpoint value less differential, the

control will automatically return to step 2 and repeat the entire operating

cycle. During this idle state, if the control detects an improper operating

state for external devices such as the ECO switch, vent switch, pressure

switch, etc., the appropriate LED(s) on the Display Board will be

illuminated indicating the nature of the fault.

SELF DIAGNOSTIC CONTROLLER

This controller is designed for ignition lockout after three consecutive failed

attempts to light. If lockout occurs, the display lights will match Figure 18.

Along with this, a numeric message will appear in the display. The following

list of ERROR CODES illustrates possible numeric failures.

FIGURE 18

GAS VALVE LED FLASHING

This condition results from a failure to establish burner ignition after three

successive trials. In such cases:

1. Investigate the possible cause and remedy any observations.

2. Momentarily depress the button on the display panel to reset the lockout

condition.

3. Confirm proper appliance operation.

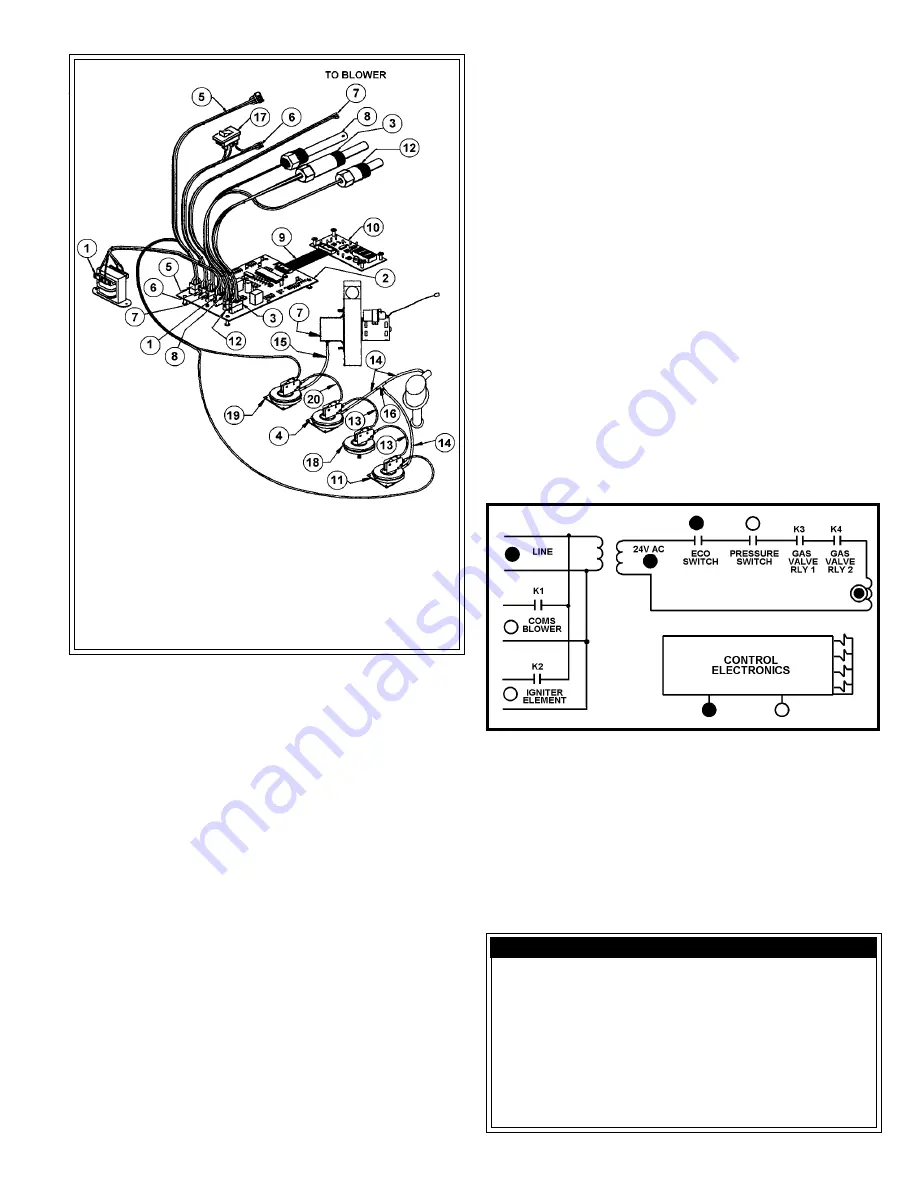
FIGURE 17

14. Tubing-Pressure

15. Tubing-Pressure

16. Connector-Tubing

17. Switch-On/Off

18. Low Gas Pressure

Switch

19. Bocked Inlet Switch

20. Wire Assembly-Air

Flow Switch

ITEM DESCRIPTION


 1. Transformer

  2. Control Board

  3. E.C.O./Temperature Probe

  4. Blower Proving Air Switch

  5. Low Voltage Cable Assembly

  6. Line Voltage Cable Assembly

  7. Blower/Motor Assembly

  8. Igniter Assembly

  9. Cable To Control Display Board

10. Control Display Board

11. Blocked Outlet Exhaust Switch

12. Lower Temperature Probe

13. Wire Assembly-Gas Pressure

Switch

Possible Cause

    Remedy

1. Burner ground wire broken

1. Check wire and connection

or corroded

at burner

2. Connectors unplugged

2. Check connections

3. Igniter broken

3. Replace igniter

4. Flame probe faulty

4. Replace flame probe

5. Gas shut off

5. Turn on gas supply

6. Clogged gas valve

6. Replace gas valve

7. Faulty gas valve

7. Replace gas valve

8. Defective control

8. Replace control

9. Burner improperly adjusted

9. Adjust burner

10. Dirty burner

10. Clean burner

Summary of Contents for BTH 120 - 250

Page 1: ...any electrical switch do not use any phone in your building Immediately call your gas supplier from a neighbor s phone Follow the gas supplier s instructions If you cannot reach your gas supplier cal...

Page 2: ...20 125 000 Nat 60 475 356 285 237 203 178 158 142 129 119 110 102 BTH 120 120 000 L P 60 456 342 274 228 195 171 152 137 124 114 105 98 BTH 150 150 000 Nat 100 570 427 342 285 244 214 190 171 155 142...

Page 3: ...hecking the proper functioning of the heater In addition to these instructions the equipment shall be installed in accordance with those installation regulations in force in the local area where the i...

Page 4: ...r may be able to make minor operational adjustments and save himself unnecessary service calls However the user should not attempt repairs which are not listed in this section WATERTEMPERATURECONTROL...

Page 5: ...personal injury or death Do not apply insulation to the top or the upper 15 of the water heater as this will interfere with safe operation Do not cover the temperature pressure relief valve Do not cov...

Page 6: ...TEDTOTHEOUTDOORS AND HAS ADEQUATE AIR SUPPLY TO AVOID RISKS OF IMPROPER OPERATION FIRE EXPLOSIONORASPHYXIATION VENT PIPE TERMINATION NOTE Before installing venting determine place of vent pipe termina...

Page 7: ...E ON AIR INTAKE TERMINAL DIRECT VENT HORIZONTAL VENT FIGURE 6 DO NOT TERMINATE EXHAUST OVER PUBLIC AREA WHERE CONDENSATE OR VAPOR CAN CAUSE NUISANCE OR HAZARD EXHAUST VENT HOOD MUST BE LOCATED 1 MINIM...

Page 8: ...n the vent system layout so that proper clearances are maintained from plumbing and wiring Vent pipes serving power vented appliances are classified by building codes as vent connectors Required clear...

Page 9: ...the holes by drilling a hole through the center of the template from the inside through to the outside The template can now be positioned on the outside wall using the drilled holes as a centering po...

Page 10: ...ith a plumbing roof boot or equivalent flashing 3 The intake vent termination and the exhaust vent termination must penetrate the same side of roof 4 The center line of the intake vent termination and...

Page 11: ...intake and six 6 on the exhaust A 90 elbow is equal to five 5 equivalent feet of pipe One 1 90 elbow is equal to two 2 45 elbows Any venting configuration using less than 50 equivalent feet should use...

Page 12: ...improvements have been made to strengthen the igniter it is still fragile and care must be taken when handling the igniter to prevent breakage GAS PIPING Contact your local gas service company to ensu...

Page 13: ...rements of all other gas fired equipment supplied by the meter If the gas meter is too small ask the gas company to install a larger meter having adequate capacity GAS PRESSURE REGULATION Main line ga...

Page 14: ...Sensitive If the Hot and Neutral Supply Voltage is reversed the controller will not sense flame Verify polarity before connecting the unit WATER LINE CONNECTIONS This manual provides detailed install...

Page 15: ...the state of other system devices If the temperature drops below the setpoint value less differential the control will automatically return to step 2 and repeat the entire operating cycle During this...

Page 16: ...ate 3 Not Implimented h s 240 Executed State 4 Not Implimented h s 210 Executed State 10 Not Implimented h s 213 Executed State 13 Not Implimented h s 214 Executed State 14 Not Implimented h s 216 Exe...

Page 17: ...ol problem 2 Water in tank above freezing 2 Temperature probe out of tolerance replace temp probe PossibleCause Remedy 1 Water in tank is low probe 1 Fill tank immersed in steam 2 Probe wiring shorted...

Page 18: ...unit is equipped with the correct orifice PRIOR TO START UP REQUIREDABILITY INSTALLATIONORSERVICEOFTHISWATERHEATERREQUIRESABILITY EQUIVALENT TO THAT OF A LICENSED TRADESMAN IN THE FIELD INVOLVED PLUM...

Page 19: ...19 FOR YOUR SAFETY READ BEFORE OPERATING WARNING If you do not follow these instructions exactly a fire or explosion may result causing property damage personal injury or loss of life...

Page 20: ...below 160 F HIGH ALTITUDE INSTALLATIONS WARNING BTH HEATERS ARE CERTIFIED FOR USE WITHOUT MODIFICATION FOR ALTITUDES UP TO 6500 FEET INSTALLATIONS ABOVE 6500 FEET MAY REQUIREREPLACEMENTOFTHEBURNERORIF...

Page 21: ...drain valve when finished flushing 4 Turn on the heater electrical disconnect switch DRAINING The heater must be drained if it is to be shut down and exposed to freezing temperatures Maintenance and s...

Page 22: ...operation and a tank explosion In areas with poor water conditions it may be necessary to inspect the T P valve more often than every three years CAUTION BEFOREMANUALLYOPERATINGTHEVALVE MAKESURETHATA...

Page 23: ...WATER SUPPLIED TO FIXTURES PIPE TO OPEN DRAIN INSTALL IN ACCORDANCE WITH LOCAL CODES CAUTION IF BUILDING COLD WATER SUPPLY HAS A BACK FLOW PREVENTER CHECK VALVEORWATERMETERWITH CHECK VALVE PROVISIONS...

Page 24: ...GER TEMPERATURE SETTING SHOULD NOT EXCEED SAFE TEMPERATURE AT FIXTURES SEE WATER TEMPERATURE CONTROL WARNING ON PAGE 4 IF HIGHER PREHEAT TEMPERATURES ARE NECESSARY TO OBTAIN ADEQUATE BOOSTER OUTPUT AD...

Page 25: ...NIFOLD KIT SPECIFICATIONS PAGE28 CAUTION IF BUILDING COLD WATER SUPPLY HAS A BACK FLOW PREVENTER CHECK VALVE OR WATER METER WITH CHECK VALVE PROVISIONSFORTHERMALEXPANSIONOFWATERINTHEHOTWATER SYSTEM MU...

Page 26: ...RCULATINGLINEOF180 FORBOOSTEDWATER IF USED TOINLETWATERLINETOBOOSTER INSTALLINACCORDANCEWITHLOCALCODES TWO TEMPERATURE TWO HEATERS ONE PRE HEATER ONE BOOSTER HEATER WITH OR WITHOUT BUILDING RECIRCULAT...

Page 27: ...INTHETANK NOTE4 IFTEMPEREDWATERISRECIRCULATED RETURNLINESHOULD BECONNECTEDATPOINTA DANGER TEMPERATURESETTINGSHOULDNOTEXCEEDSAFETEMPERATUREAT FIXTURES SEEWATERTEMPERATURECONTROLWARNINGONPAGE5 IF HIGHER...

Page 28: ...er heating and storage potential of the system cannot be achieved Plus the units with the higher water flow may have a shortened life Unions shown in piping diagrams are not included in the manifold k...

Page 29: ...leaned Refer to MAINTENANCE for details 2 Some of the electrical components of the water heater make sounds which are normal Contacts click or snap as the heater starts and stops Transformers often hu...

Page 30: ...0 W C or lower than the minimal gas supply pressure as shown in Table 4 that is for Natural Gas 5 0 W C for BTH 120 250 or 4 5 W C for BTH 150 199 or for L P Gas 11 0 W C pressure Also the manifold p...

Page 31: ...r the limited warranty the warrantor will provide only a replacement water heater or part thereof The owner is responsible for all other costs Such costs may include but are not limited to a Labor cha...

Page 32: ...32 A O SMITH WATER PRODUCTS CO INC 5621 W 115TH STREET ALSIP ILLINOIS 60803 PHONE 1 800 433 2545 FAX 1 800 433 2515 WWW HOTWATER COM E MAIL PARTS HOTWATER COM...

Reviews: