Club ToasTer CTX-200l
13
P/N 1011038 06/09
McDonald’s
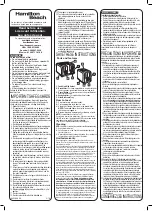
MaINteNaNCe (continued)
lift both bottom rollers up and
pull down to lock into place. this
tightens belt Wraps.
figure 14. restoring belt Wrap tension
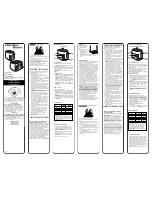
INstallING belt WraPs
Follow this procedure to install new Belt Wraps.
Note: Install belt Wraps with the studs facing the
INsIde of the unit. belt Wraps
must
be installed
so that the gap of one belt Wrap is located in the
opposite position of the gap on the other belt Wrap
(figure 13).
1. Wipe both sides of the new Belt Wraps with
KaYQuat II™ sanitizer (HCs)
and allow to air
dry.
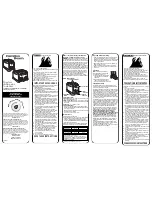
Connecting
point should
be at this
position
figure 12 Installing belt Wraps
Lower Belt
Connection
Point
Upper
Belt
Connection
Point
Studs MUST face
inside of Belt Wrap
figure 13. Proper belt Wrap Installation
Note: to obtain new belt Wraps, contact the
factory at 1-877-392-7854 (North america only) or
630-784-1000.
2. Ensure that both lower rollers are locked in the
upper position (Figure 10).
3. Install the front Belt Wrap around the top front
roller with the Connecting Pin towards the bottom
of the unit (Figure 12).
4. Thread the Belt Wrap through the toaster and pull
it around the lower front roller (Figure 12).
Note: Make sure the front belt Wrap is threaded
uNder the support rod. also, make sure that the
belt Wrap studs are facing the INsIde (figure 12).
5. Connect the ends of the Belt Wrap by sliding the
top end over both sides of the Connecting Pin
(Figures 12 and 13).
the top belt Wrap Must
be installed under the
support rod.
Note: refer to figure 13 for the proper connection
point locations when installing belt Wraps.
Note: the bottom belt Wrap should be installed
by threading the belt Wrap around the bottom rear
roller, up through the unit, and around the back top
roller. the connecting pin must face the bottom of
the unit. the connection point must match figure
14.
6. Return the lower rollers to full tension by lifting up
and then pulling down on each roller to lock it in
place (Figure 14).
7. Close the Top Cover and Front Cover and reat-
tach the Bun Feeder and Bun Buffer.
8. Press
CT
to resume belt rotation. Place the unit
back into operation.