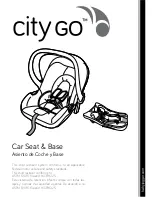
Base Overview
10
11
BASE OVERVIEW
D
H
F
E
G
A
B
C
A. Vehicle Belt Path
Location to route vehicle belt when manually installing the base.
B. LATCH Manual Override
Press to unlock the LATCH connectors for a manual, un-powered latch
installation.
C. Battery Door
Holds 8 D-cell batteries. May be opened by turning a coin in the coin
slot to replace batteries.
D. Level Manual Override
Press to manually adjust the base level during a manual installation.
E. LATCH Connectors (2)
The LATCH connectors on both sides snap onto the vehicle LATCH
anchors in the seat crease during a LATCH installation.
F. Level Line (2)
This line should always be parallel with ground when the child restraint
is installed with base.
G. Control Panels (2)
The control panel on either side of the base includes screens, buttons,
and speakers that provide guidance for a powered installation.
H. Shoulder Belt Lock Off (2)
Place shoulder belt in this slot to hold vehicle belt tight when installing
with lap and shoulder belt.