• Where a backflow prevention device is installed on a water system, a device for controlling pressure due to thermal
expansion must be installed. Contact a plumbing professional if you are uncertain how to select/install/maintain a
thermal expansion device.
• Where a booster pump is installed on a water system, you must maintain and inspect the attached pressure switch
regularly in accordance with the booster pump manufacturer’s instructions. Contact a plumbing professional if you
are uncertain how to maintain your booster pump system.
• Where a booster pump is installed on a water system, you must install an appropriate pressure relief valve.
Pressure relief valve must be maintained and inspected every 6 months. Contact a plumbing professional if you are
uncertain how select/install/maintain a pressure relief valve.
• Where a booster pump is installed on a water system, you must install an appropriate pressure regulating valve and
regulate water pressure to <80psi. Contact a plumbing professional if you are uncertain how select/install/maintain
a pressure regulating valve.
• Mount filter in such a position as to prevent it from being struck by other items used in the area of installation.
• Ensure that the location and fasteners will support the weight of the system when installed and full of water.
• Ensure all tubing and fittings are secure and free of leaks.
•
Do not
install unit if collet is missing. Contact 1-800-222-7880 if collets are missing from any fittings.
• SHUT OFF FUEL OR ELECTRIC POWER SUPPLY TO WATER HEATER after water is shut off
.
To reduce the risk of water leakage or flooding, and to ensure optimal filter performance:
• Change the disposable filter cartridge every six months or sooner if you observe a noticeable reduction in water
flow rate.
• Failure to replace the disposable filter cartridge at recommended intervals may lead to reduced filter performance
and cracks in the filter housing, causing water leakage or flooding.
• For questions or concerns, please contact Customer Service at 1-800-222-7880.
NOTICE
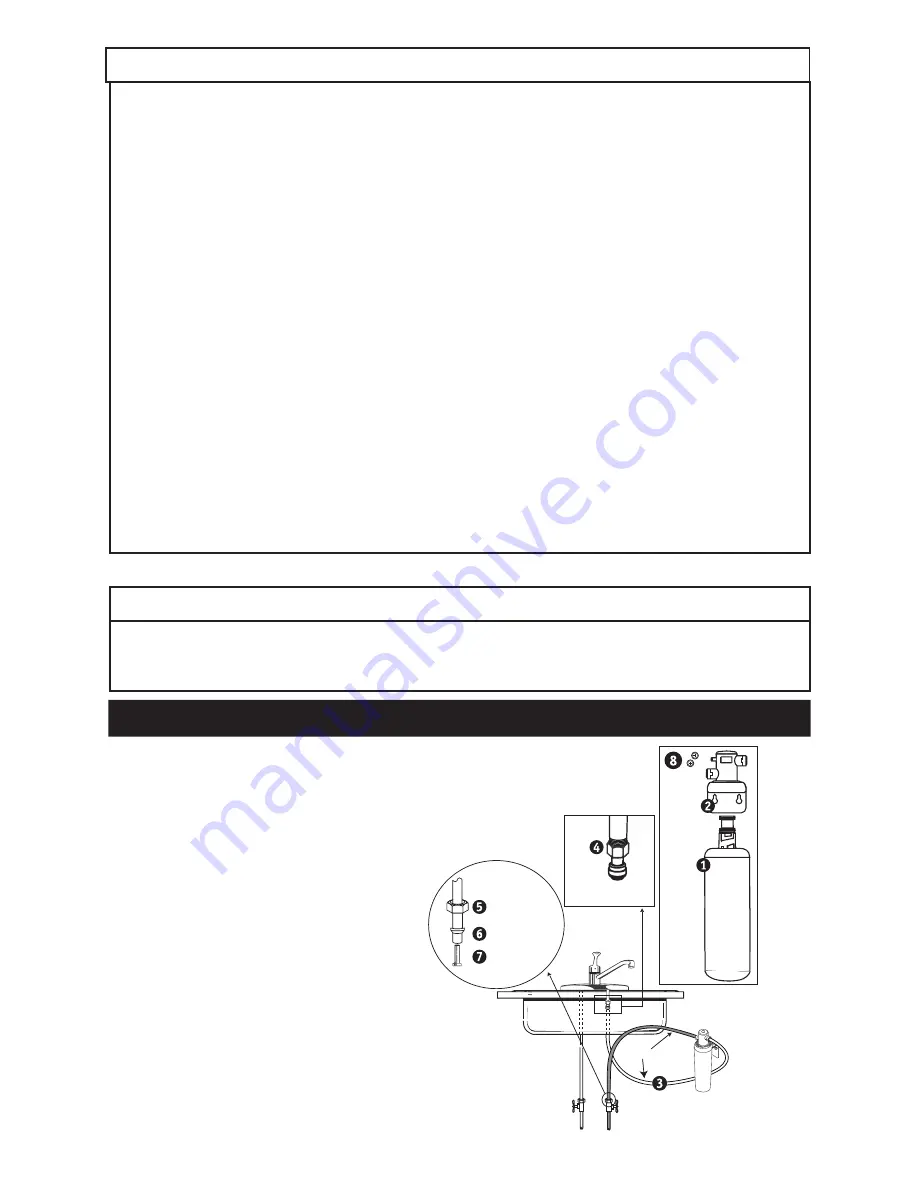
Parts and Materials Included:
1. Filter Cartridge
2. Filter Head Assembly
3. 3/8” Tubing
4. 3/8” x 1/2” Faucet Adapter
5. 3/8” Compression Hex Nut
6 3/8” Ferrule
7. 3/8” Tube Insert
8. #2 Phillips Mounting Screws
Tools Required (not included):
• Drill (Cordless recommended)
• Adjustable wrench
• Phillips head screwdriver
• Razor knife or tube cutter
Hot
Cold
3/8" Tubing
Filter
Head
Assembly
#2 Phillips
Mounting
Screws
Filter
Cartridge
3/8"x1/2"
Faucet Adapter
3/8" T
3/8" Compression
Hex Nut
3/8" Ferrule
ube Insert
GETTING STARTED
• Failure to follow instructions may void warranty.
• Allow a minimum of 2” (5 cm) clear space under filter to facilitate cartridge change.
• Install with the inlet and outlet ports as labeled. Make sure not to reverse connections.
IMPORTANT NOTES


