background image

page


92

PalmPilot Handbook

Each time you create a new memo, the first line of text from the
memo page appears in the Memo List.  This makes it easy to
locate and review any of your memos.

Reviewing Memos

All of the memos that you create appear in the Memo List screen.

To review the contents of a memo:

1.

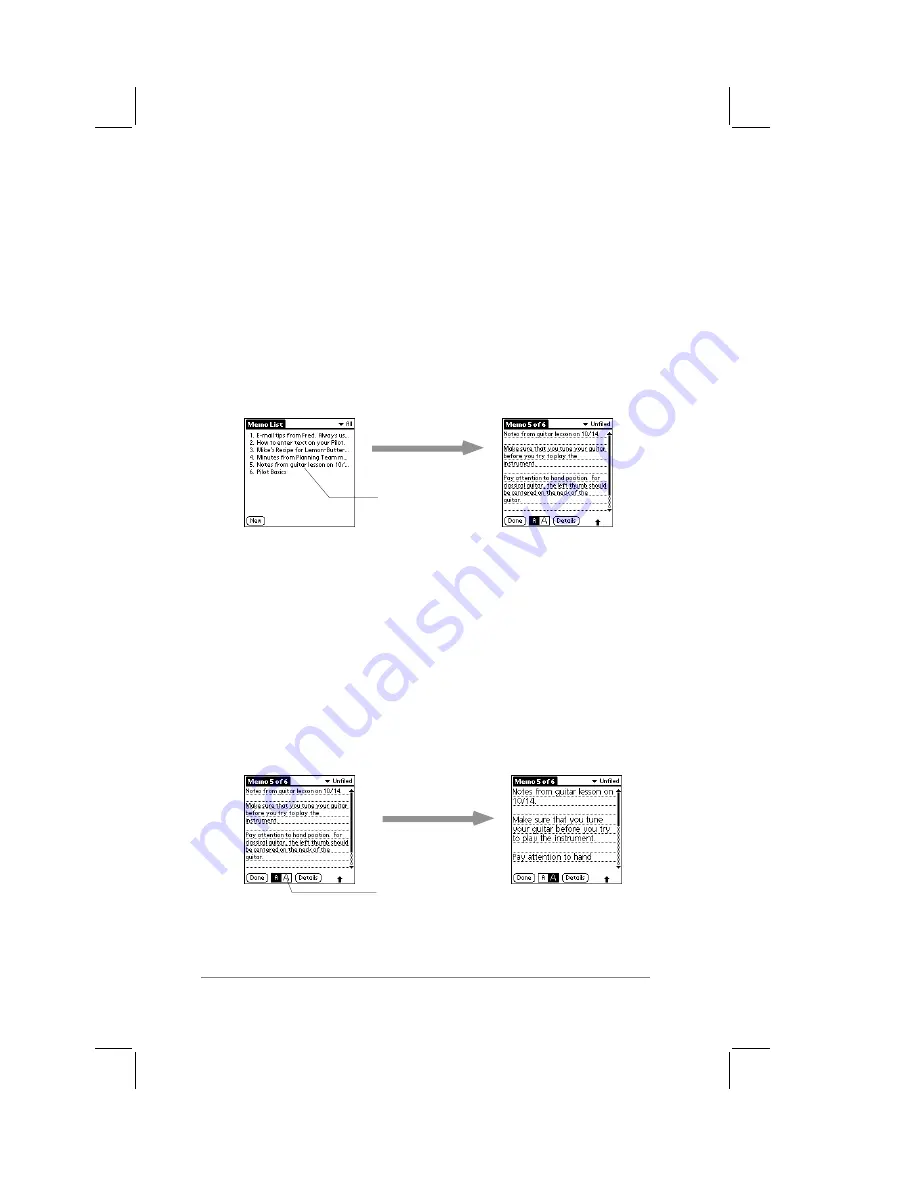
Tap the text of the memo that appears in the Memo List
screen.  The memo appears on the screen, as shown in the
following diagram:

Tap any memo to
review its contents

2.

You can now view or edit the text in the memo.  Tap the Done
button to save your changes to the memo, and return to the
Memo List screen.

Memo Font Size

When working with a memo, you have the option of changing the
screen display to show a larger font (text) size.

To change the memo font size:

With the memo displayed on the screen, tap the Font button,
as shown in the following diagram:

Tap the Font button
to change size

Summary of Contents for PalmPilot Professional

Page 1: ...PalmPilot Handbook...

Page 2: ...no responsibility for any damage or loss caused by deletion of data as a result of malfunction dead battery or repairs Be sure to make back up copies of all important data on other media to protect ag...

Page 3: ...t for the First Time 9 General Preferences 11 Format Preferences 14 Modem Preferences 16 Owner Preferences 17 Buttons Preferences 19 ShortCuts and Digitizer Preferences 22 PalmPilot Applications 22 Us...

Page 4: ...s 83 Deleting a To Do Item 85 Chapter 6 Memo Pad 87 Activating the Memo Pad 87 Working with Memos 88 Arranging Memos 90 Memo Pad Menu Commands 91 Deleting a Memo 93 Chapter 7 Expense 95 Activating Exp...

Page 5: ...ng the HotSync Feature 140 User Profile 142 Conducting a HotSync via Modem 144 Chapter 11 Installing Applications on your PalmPilot Connected Organizer 149 Using the PalmPilot Install Tool 149 Games 1...

Page 6: ...t come with it This chapter explains the physical buttons and controls of your PalmPilot how to install the batteries and safety and care tips Front Panel Buttons and Controls The following diagram sh...

Page 7: ...er scroll button is used to scroll up to view the earlier information above the screen In the Date Book these buttons are used to increment the day week or month views Power button The power button is...

Page 8: ...he lighting conditions or temperature of the environment where you use the PalmPilot you may need to adjust the setting of the contrast control PalmPilot Stylus The stylus is stored in a silo molded i...

Page 9: ...ctivated by pushing the end of an unfolded paper clip or similar blunt object into the hole Never press the reset button with a sharp object such as a pin Under normal use you should never have to use...

Page 10: ...ush on thumb recess 2 While pushing the thumb recess slide the battery door out and away from PalmPilot 3 Install the two 2 AAA alkaline batteries into the battery compartment These batteries are supp...

Page 11: ...ROM software is upgraded You must purchase a new PalmPilot Personal or Professional Edition to obtain the backlight feature To activate the backlight feature Press the green power button and hold it...

Page 12: ...rough the front panel buttons In general treat your PalmPilot as you would a pocket calculator or other small electronic instrument The touch sensitive screen of your PalmPilot contains a glass elemen...

Page 13: ...no screen display Never remove the batteries while the PalmPilot is turned on When replacing the batteries always use good quality batteries of the same type Use only alkaline batteries with your Palm...

Page 14: ...ilot Refer to the section entitled Resetting the PalmPilot Connected Organizer in Chapter 12 Reference for information about how to use the reset button After you reset the PalmPilot perform a HotSync...

Page 15: ...that appear on PalmPilot organizer s screen Starting PalmPilot for the First Time To turn on your PalmPilot 1 Press the green power button located on the front panel of your PalmPilot as shown in the...

Page 16: ...tapped each of the three digitizer alignment targets the General Preferences screen appears as shown in the following diagram Warning After you have completed the previous procedure you must install...

Page 17: ...Preferences screen is used to set the current time for your PalmPilot To set the current time 1 Tap the time The Set Time dialog appears as shown in the following diagram Tap here Set Time dialog 2 I...

Page 18: ...e dialog tap the arrows at the top to select the current year Tap arrows to select year Tap to select month Tap to select date 3 Below the year is a listing of months Tap to select the current month 4...

Page 19: ...rm and Game Sound settings enable you to turn PalmPilot s sounds on or off To set the system and alarm sounds 1 Tap the System Sound check box so it s checked to activate system sounds Tap the check b...

Page 20: ...pick list appears as shown in the following diagram Tap here Tap Formats 2 Tap Formats in the pick list The Formats Preferences screen appears as shown in the following diagram Country Default The co...

Page 21: ...nge these default settings for your own preferences as described in the following sections Time Date Week Start and Numbers Formats The Time setting defines the format for the time of day The time for...

Page 22: ...ected an example of the Numbers format appears in the Numbers selector Modem Preferences The Modem Preferences screen enables you to define the settings for a modem directly connected to the PalmPilot...

Page 23: ...ant for the modem 8 Tap the Flow Control Flow Ctl pick list Tap to choose Standard On Xon or Off Xoff flow control for the modem connection 9 The String setting is a text editable area that enables yo...

Page 24: ...ally activated on the right side of the screen as shown in the following diagram Scroll bar activated If you have used the Security application to turn off and lock the PalmPilot with a password infor...

Page 25: ...a different application such as the Expense application To activate the Buttons Preferences screen 1 Tap the text that appears in the upper right corner of the Preferences screen The Preferences pick...

Page 26: ...erences screen enables you to change the assignment of the full screen pen stroke By default the full screen pen stroke activates the on screen keyboard as shown in the following diagram drag to top o...

Page 27: ...ou must assign a password to lock the PalmPilot When locked you will need to enter that password the next time you use your PalmPilot HotSync Buttons Preferences The Buttons Preferences screen also en...

Page 28: ...t appears when you start your PalmPilot for the first time A complete description of how to use the digitizer calibration screen appears earlier in this chapter in the section entitled Starting PalmPi...

Page 29: ...rrent time and the condition of the batteries in your PalmPilot Starting Applications The Application picker displays icons for each application currently installed in your PalmPilot The order of the...

Page 30: ...tion The Memo Pad application is ideal for practicing with the character strokes of the Graffiti alphabet This section explains how to start the Memo Pad application so you can use and understand Graf...

Page 31: ...in this chapter like the shapes shown in the following diagram you will achieve 100 accuracy for entering text The heavy dot that appears on each shape shows where to begin the stroke Certain charact...

Page 32: ...xample the stroke shown below creates the letter n Start stroke at heavy dot Lift pen here As you ll see later you use these shapes to create both upper and lower case letters 3 Position the stylus in...

Page 33: ...ust begin the character strokes in the Graffiti writing area If you do not make Graffiti strokes in the Graffiti writing area they will not be recognized as text characters Graffiti Tips When writing...

Page 34: ...page 32 PalmPilot Handbook The Graffiti Alphabet Letter Strokes Letter Strokes A N B O C P D Q E R F S G T H U I V J W K X L Y M Z Space Back Space Carria ge Retur n Perio d tap twice...

Page 35: ...r a blank line To draw the first letter of a word as a capital letter Use the Caps Shift stroke Caps Shift When Caps Shift is activated an up arrow symbol appears in the bottom right corner of the Pal...

Page 36: ...can enter from a standard keyboard All punctuation marks begin with a single tap on the Graffiti writing area When you make this tap you activate punctuation shift and a dot appears to show it is acti...

Page 37: ...he same way as the basic Graffiti punctuation marks Begin with a single tap in the Graffiti writing area and the next stroke that you make will create the punctuation mark or symbol _ tab Writing Symb...

Page 38: ...aw the stroke normally used to create the letter followed by an accent stroke Graffiti then adds the accent to the letter For example the following diagram shows the strokes required to draw an accent...

Page 39: ...y Some stroke shapes are actually portions of letters as shown in the following diagram 5 A F K T 4 Using the On Screen Keyboard You may choose to activate the on screen keyboard any time text can be...

Page 40: ...ns of the on screen keyboard to generate text 5 When you are finished tap the Done button The on screen keyboard closes and the text appears in your PalmPilot application Activating the On Screen Keyb...

Page 41: ...erences that appears earlier in this chapter Numbers and International Characters The on screen keyboard also includes screens for numeric and international characters The following diagram shows the...

Page 42: ...in the chapters about each PalmPilot application To activate the menus 1 Start a PalmPilot application such as the Memo Pad as described earlier in this chapter 2 Tap the Menus button as shown in the...

Page 43: ...mands available in the Edit menu apply to text that you have selected in an application To select text in an application 1 Tap the beginning of the text that you want to select 2 Drag the stylus over...

Page 44: ...the on screen keyboard tap the Done button Graffiti The Graffiti command activates screens that show the Graffiti character strokes Use this command any time you forget a stroke for a particular char...

Page 45: ...ssigned to Date Book events When you first create a record it is listed as Unfiled which means it does not belong to any particular category You can leave a record as Unfiled or assign it to a categor...

Page 46: ...y you select does not affect the actual contents of the record Using Categories in Lists Once you have assigned categories to your records you can easily display lists of your record entries by catego...

Page 47: ...Your PalmPilot is supplied with two default categories Business and Personal In addition the Address Book contains the QuickList category designed as a quick reference of commonly used names addresses...

Page 48: ...the Edit Categories dialog appear in the Category pick list You may edit any of your records and file them in the new categories as appropriate Note You can merge two or more Categories by assigning...

Page 49: ...changes you have made in the Edit Categories dialog appear in the Category pick list You may edit any of your records and file them in the new categories as appropriate Note You can merge two or more...

Page 50: ...etails dialog 2 With the Details dialog on the screen tap the Note button The Note dialog appears 3 The name of the event appears at the top of the Note dialog Write Graffiti character strokes or use...

Page 51: ...PalmPilot applications have a Details button that enables you to define the characteristics of individual records Tap the Details button to display the Details dialog 2 With the Event Details dialog...

Page 52: ......

Page 53: ...overlaps or conflicts Use the Month View feature to quickly spot days where you have morning lunch or afternoon appointments Activate an alarm to sound an audible beep tone prior to the scheduled act...

Page 54: ...display the current time 1 In the Date Book application the title bar displays the date as shown in the following diagram Tap the date Current time displayed 2 Tap the date to display the current tim...

Page 55: ...p to 255 characters 3 Tap on a blank area of the screen to de select the event A vertical line appears to the left of the time indicating the duration of the event Note You can activate the Set Time d...

Page 56: ...3 Next tap to select the End Time box Tap the columns of times that appear on the right side of the Set Time dialog 4 Tap the OK button to confirm your selection and close the Set Time dialog Any chan...

Page 57: ...f the Date Book screen as shown in the following diagram No time lines selected New Untimed Event 5 Tap anywhere on the screen to de select the untimed event The new untimed event will appear as a dia...

Page 58: ...you start the Date Book application of your PalmPilot You can easily create events for any date that you want This section describes how to move to a specific date in the Date Book To move to a parti...

Page 59: ...nt panel to switch among the current day view week view and month view Use the on screen scroll arrows if you have more than one page of times and events When you use any of these methods to select a...

Page 60: ...urrent date Week View The Week view feature shows a chart of your events for an entire week This feature lets you quickly review your appointments and see the available time slots for a new event In a...

Page 61: ...in the following diagram Tap to show event details Event details If you want to re schedule any of the events that appear in the week view tap and drag the event to a different time or a different day...

Page 62: ...down button to move to the next week The Go to button appears in the Week view Tap the Go to button to activate the Go To Date dialog and select any week you want to display in the Date Book Event Con...

Page 63: ...s in the Month view screen to move directly to that day with the Day view screen Tap the arrows at the top to move forward or backward a month Tap the Go to button to display the Date Picker and choos...

Page 64: ...ttings that are available in the Event Details dialog Time The Time setting displays the current start and end times for an event For an untimed event the Time setting simply shows No Time To change t...

Page 65: ...d minutes hours or days before an event To set an Alarm for an event 1 With the Event Details dialog on the screen tap the Alarm check box A check mark appears to show that the Alarm is activated 2 Th...

Page 66: ...r is set for 5 minutes the alarm reminder will appear at 11 55 pm on the night of February 3rd The reminder will still be on screen the next time you turn on your PalmPilot Using the Repeat Function T...

Page 67: ...the OK button to close the Change Repeat dialog and activate your settings When you close the Change Repeat dialog a small repeat icon appears to the far right of the repeating event Considerations fo...

Page 68: ...rrence of a repeating event e g time that occurrence no longer shows the repeat icon Date Book Menu Commands The Date Book includes menu commands to perform common file and editing tasks This section...

Page 69: ...hed to the event If you tap the OK button the Note is deleted from the memory of your PalmPilot If you tap the Cancel button the alert dialog closes and you are returned to the Date Book Purge The Pur...

Page 70: ...ture changes the way times appear in the Day View When Compress Day View is off all time slots are displayed When it is on blank times slots toward the bottom of the screen are eliminated to minimize...

Page 71: ...of a repeating event all instances of that event are deleted If you use the Menu Command or the Event Details dialog you can delete one occurrence of the event as an exception or all occurrences of t...

Page 72: ...e mail addresses that are associated with each name Define which of the phone numbers will appear in the Address List view for each Address Book entry Attach a note to each Address Book entry where y...

Page 73: ...ing an Address Book Entry An Address Book entry is where you store name and address information about people or businesses Your PalmPilot makes it easy to sort Address Book entries based on an individ...

Page 74: ...e name 4 Use Graffiti software s Next Field stroke to move down to the First Name field of the Address Edit screen as shown in the following diagram Next Field Note You can also move to any field in t...

Page 75: ...entry you may at some point want to update or enter additional information To edit an Address Book Entry 1 In the Address List screen tap the Address Book entry that you want to change The Address Vie...

Page 76: ...Any changes you make to the types of phone numbers will apply only to the current Address Book entry They are not applied to new or existing Address Book entries Working with Address Book Entries Once...

Page 77: ...roke to view the selected entry Address Categories Categories are used to file individual Address Book entries into groups for easy review You can assign and edit categories by using the Categories pi...

Page 78: ...2 Tap to select the Preferences menu item The Address Book Preferences dialog appears as shown in the following diagram 3 Tap to select the setting that you want for the Address List view and then tap...

Page 79: ...Choosing the Phone Number for the List View Up to five phone numbers or e mail addresses can be associated with each Address entry As described in previous sections you may select that each of these...

Page 80: ...ed Organizer for information about menu commands that are common to all of your PalmPilot applications Record Menu When you select the Record menu its menu commands appear on screen as shown in the fo...

Page 81: ...ons menu its menu commands appear on screen as shown in the following diagram Preferences The Preferences command displays the Address Book Preferences dialog as shown in the following diagram Remembe...

Page 82: ...ok Entry There are two ways to delete an entry that you have created in the Address Book application use the Menu Commands described in the Record Menu section or use the Address Entry Details dialog...

Page 83: ...sign a due date for any or all of your To Do items Optionally assign a Category for any or all of your To Do items You can then view your To Do List based on Category Business Personal etc Sort your T...

Page 84: ...sort order of To Do items To create a To Do item 1 Tap the New button as shown in the following diagram tap New cursor of new To Do Item 2 A new To Do item appears on the screen When you create a new...

Page 85: ...iority level for a To Do item 1 Tap the Priority number that appears on the left side of the To Do item as shown in the following diagram tap here tap to select Priority 2 A pick list of Priority numb...

Page 86: ...ou completed the To Do item Refer to the section entitled To Do Show Options that appears later in this chapter To Do Item Details The To Do Item Details dialog enables you to make settings that relat...

Page 87: ...heir due date To set a Due Date for a To Do List Item 1 In the Details dialog tap the No Date text The Due Date pick list appears as shown in the following diagram Due Date pick list Tap here 2 Tap th...

Page 88: ...nge to show an exclamation mark after the date passes To Do Show Options Once you have assigned due dates to one or more To Do items you should activate the dates so they appear in the To Do List The...

Page 89: ...he item If you have not assigned a due date to an item the completion date is still recorded when you check the item Show Due Dates This setting causes the To Do application to display the due dates a...

Page 90: ...re you can create a note that will be attached to the currently selected To Do item Delete Note The Delete Note command displays an alert dialog prompting you to confirm that you really want to delete...

Page 91: ...about the To Do List Deleting a To Do Item There are three ways to delete a To Do item simply delete the text of the To Do item use the Menu Command as described in the previous section about the Reco...

Page 92: ...rd when you synchronize using PalmPilot Desktop software and HotSync technology Assign categories for memos This enables you to quickly view just your business related memos personal memos or any othe...

Page 93: ...memory available in your PalmPilot To create a new memo 1 With the Memo Pad application running on your PalmPilot tap the New button as shown in the following diagram tap New cursor of new Memo Note...

Page 94: ...n the Memo List screen The memo appears on the screen as shown in the following diagram Tap any memo to review its contents 2 You can now view or edit the text in the memo Tap the Done button to save...

Page 95: ...you to scroll up or down to review the entire contents of the memo as shown in the following diagram Scroll up Scroll down Scroll up one page Scroll down one page Note that the up and down scroll but...

Page 96: ...List view To rearrange the order of your memos In the Memo List view tap and drag the memo to a new location in the list When you lift the stylus from the PalmPilot organizer s screen the memo appears...

Page 97: ...bout menu commands that are common to all PalmPilot applications Record Menu When you select the Record menu its menu commands appear on screen as shown in the following diagram New Memo The New Memo...

Page 98: ...hich is described in Chapter 8 Additional Features About Memo Pad The About Memo Pad command shows version revision information about the Memo Pad Preferences Memo List view only The Preferences comma...

Page 99: ...Chapter 7 Expense page 97 3 Tap the Delete button The Delete Memo alert appears 4 Tap the OK button to confirm that you want to delete the currently selected memo...

Page 100: ...s such as business personal expenses associated with a trip or expenses associated with a range of dates Keep track of vendors companies and people involved with each particular expense Log miles trav...

Page 101: ...ker you will have to install the Expense application on your PalmPilot organizer To install the Expense application on your PalmPilot 1 Install the PalmPilot Desktop software on your PC as described i...

Page 102: ...icon 4 The PalmPilot Install Tool dialog appears as shown in the following diagram If necessary choose the name associated with your PalmPilot in the User Name area 5 Click the Install button The Read...

Page 103: ...or add other information that you want to associate with the item To create an expense item 1 With the Expense application running on your PalmPilot tap the New button as shown in the following diagr...

Page 104: ...expense item This technique takes advantage of the Expense application s Quickfill option For more information about Quickfill refer to the section entitled Options Menu that appears later in this cha...

Page 105: ...dy selected 2 Tap the Details button The Receipt Details dialog appears as shown in the following diagram The following sections describe the features and settings that are available in the Receipt De...

Page 106: ...supplied by your company you can choose that option from the list Choosing Prepaid will cause your expense to be recorded in the appropriate company paid cell of your final printed expense report spr...

Page 107: ...ection entitled Expense Menu Commands that appears in the next section Vendor and City The Vendor and City areas enable you to record the name of the vendor usually a company associated with the expen...

Page 108: ...Chapter 8 Additional Features Show Options The Expense application allows you to define the sort order and other settings that relate to your expense items To activate the Show Options dialog In the E...

Page 109: ...ds that are common to all of your PalmPilot applications Record Menu When you select the Record menu its menu command appears on screen as shown in the following diagram Delete Item The Delete Item co...

Page 110: ...ault currency symbol Use Quickfill The Quickfill feature enables you to select an expense type by writing Graffiti characters in the Graffiti writing area With Quickfill activated writing a letter aut...

Page 111: ...able in the Currency pick list of the Receipt Details dialog explained earlier in this chapter To define a custom currency symbol 1 Choose Custom Currencies from the Options menu The Custom Currencies...

Page 112: ...steps that appear in this section assume that you have installed the PalmPilot Desktop software installed the Expense application in your PalmPilot if necessary and have performed a HotSync operation...

Page 113: ...launching Expense from the Start menu instead of PalmPilot Desktop you must first choose the user name that corresponds to your PalmPilot 3 Click to select the expense category that you want to use Th...

Page 114: ...template Samples of the available expense templates appear in Appendix B Expense Templates Note If you want to create your own custom expense template and have it appear in the Templates menu refer to...

Page 115: ...eadsheet save the file in any directory and print the file in the normal manner Expense Templates Four different expense templates are provided with PalmPilot Desktop Choose the template that is most...

Page 116: ...tegories If you want to print the expenses associated with all of your Expense categories click the All button in the Categories area 2 If you want to define an end date for the expense report enter t...

Page 117: ...Chapter 7 Expense page 115 4 Click the Print button that appears in the Microsoft Excel window to print your expense report...

Page 118: ......

Page 119: ...arches all the data stored on your PalmPilot organizer and lists which applications contain the text For example suppose that you want to find a particular name but aren t sure where you stored it The...

Page 120: ...ears in the Find dialog The Find command is not case sensitive In other words searching for the name davidson will also find Davidson The Find command will also search the contents of notes Phone Look...

Page 121: ...tically scrolls to the first name that starts with that letter You can continue to add letters to narrow your Look Up search 5 Tap the Add button The Phone Number Lookup screen closes and the name and...

Page 122: ...o Do List or Memo Pad PalmPilot Calculator Tap the Calculator button on the PalmPilot screen The screen changes to show the Calculator screen Note When working with the Calculator you can immediately...

Page 123: ...l allow you to re enter the number without having to start the calculation over Clear The Clear C button clears the entire calculation and enables you to begin a fresh calculation Negative Positive Nu...

Page 124: ...Menu Commands The Calculator supports the Copy and Paste commands which enable you to copy a calculated value and paste it in another application on your PalmPilot When you choose the Copy command th...

Page 125: ...our PalmPilot and how the memory is currently being used To use the Memory application 1 Start the Application picker 2 Tap the Memory icon The Memory screen appears as shown in the following diagram...

Page 126: ...been deleted 5 When you are finished tap the Done button to return to the Memory application Note You cannot delete the Date Book Address Book To Do List Memo Pad or Calculator applications from your...

Page 127: ...pears 2 Tap the Security icon The Security screen appears Assigning a Password To assign a password 1 With the Security application running tap the password if no password is assigned tap the word Una...

Page 128: ...n The Hide Records dialog closes All records and entries marked as Private will not appear in any application on your PalmPilot Note that the records and entries are not deleted by the Hide button the...

Page 129: ...eleted To change or delete your password 1 With a password assigned tap the Assigned button The Password dialog appears as shown in the following diagram tap here 2 Enter the current password 3 Tap th...

Page 130: ...tton If you have a password assigned the Delete Password dialog appears 2 Tap the Yes button to delete the password as well as all records and entries marked Private PalmPilot Lock You can also use th...

Page 131: ...re you will need to enter the exact password to re activate the PalmPilot Should you forget the password you will have to use the PalmPilot organizer s reset button to resume using the unit Performing...

Page 132: ...stamp dts Dinner di Meeting me To use a ShortCut 1 Start any PalmPilot application and tap to define an insertion point 2 Draw the ShortCut stroke ShortC ut Graffiti responds with the ShortCut symbol...

Page 133: ...er appears 2 Tap the Prefs icon The Preferences screen appears 3 Tap the text that appears in the upper right corner of the Preferences screen The pick list appears 4 Tap ShortCuts The ShortCuts Prefe...

Page 134: ...g a ShortCut Once you have assigned a ShortCut you can modify it at any time To edit a ShortCut 1 In the ShortCuts Preferences screen tap to select the ShortCut you want to edit 2 Tap the Edit button...

Page 135: ...s shown in the following diagram Menu commands Command letters With the command stroke and the corresponding command letter you can immediately activate the menu command without having to access the m...

Page 136: ...ed when you write the command letter You do not have to tap the Menus button or access the menus when you use the Command stroke and command letters Graffiti Strokes In addition to text symbols Graffi...

Page 137: ...res and capabilities for the PalmPilot connected organizer that let you Work with your PalmPilot applications on your PC PalmPilot Desktop duplicates the Date Book Address Book To Do List and Memo Pad...

Page 138: ...r Windows NT 4 0 13 MB for Windows 3 1x VGA monitor or better the PalmPilot Tutorial requires a 256 color video system CD ROM drive 3 5 disks available upon request Refer to Appendix A Technical Suppo...

Page 139: ...nstallation If you are installing from floppy disks rather than the CD ROM make sure the original PalmPilot Desktop diskettes are write protected and then make backup copies of them When you finish us...

Page 140: ...he window and click the Next button 8 Follow the remainder of the installation instructions that appear on the screen Installation using PalmPilot Desktop 3 5 Diskettes To install PalmPilot Desktop fr...

Page 141: ...ling PalmPilot Desktop Software page 139 those programs and continue Read the warning message in the window and click the Next button 7 Follow the remainder of the installation instructions that appea...

Page 142: ......

Page 143: ...he process of automatically synchronizing data between the PalmPilot and PalmPilot Desktop Changes you make on the PalmPilot or PalmPilot Desktop will be reflected on both platforms after a HotSync Ho...

Page 144: ...ll be an electrical connection between the serial port of the PalmPilot and the PalmPilot Cradle To fit the PalmPilot into the PalmPilot Cradle 1 Position the PalmPilot Cradle on a convenient horizont...

Page 145: ...rresponds to the port number that is connected to the PalmPilot Cradle Note This port must not be shared with an internal modem or other device If you have trouble determining the correct serial port...

Page 146: ...e Local from the HotSync Manager in the System Tray Selecting Local tells the PalmPilot Desktop to use the Cradle for synchronization 3 Turn on the PalmPilot and place it into its Cradle HotSync butto...

Page 147: ...creen displays the HotSync progress on the PalmPilot When the HotSync is complete PalmPilot Desktop displays a final HotSync message Selecting HotSync Options As mentioned in the HotSync introduction...

Page 148: ...ustomize whether conduits are invoked and what the conduits do PalmPilot Desktop assumes that you want all files synchronized between the PalmPilot and the PalmPilot Desktop In general you should leav...

Page 149: ...s as shown below 4 Make selections to set in which direction you want HotSync to write data Within this dialog you can also opt not to transfer data for a particular application by clicking Do Nothing...

Page 150: ...ch as a company phone list before they are distributed to their actual users This feature is only available for PalmPilot Desktop v2 0 for Windows 95 or Windows NT 4 0 Important The User Profile featu...

Page 151: ...ta for the Profile e g company phone list etc To use a Profile for the first time HotSync 1 Install the new PalmPilot in the Cradle and press the HotSync button Because the PalmPilot is not associated...

Page 152: ...ected to your PalmPilot Special modem cable to connect the PalmPilot organizer s serial connector to the modem The Cradle is not used for a modem HotSync operation This special cable may be ordered by...

Page 153: ...place the call click the check box Enter the calling card number in the field 7 Tap OK This returns you to the HotSync dialog 8 Tap the Modem Setup button The Modem Preferences screen appears 9 Click...

Page 154: ...con The HotSync screen appears 3 Tap the Menu icon and choose Conduit Setup from the Options menu The Conduit Setup dialog appears as shown in the following diagram 4 Tap the check boxes to de select...

Page 155: ...o find and use the fastest transfer rate We suggest you initially try the As Fast as Possible rate and adjust downward if you experience problems Refer to the face plate or modem manual if you do not...

Page 156: ...if they appear to be similar On your PalmPilot 1 Turn on the PalmPilot 2 Tap Applications on the PalmPilot screen and then tap the HotSync application 3 Tap the Modem Sync button The HotSync screen ch...

Page 157: ...on is designed to make it quick and easy to install software on your PalmPilot during a HotSync operation Note Any game or application that you install on your PalmPilot resides in RAM memory and can...

Page 158: ...he Install Another File button to return to step 3 and install another application 6 Perform a local HotSync operation in the usual manner The application s that you specified in step 3 will be instal...

Page 159: ...bleshooting If you should encounter a problem with PalmPilot look to this section for the description that most closely matches the symptoms you observe and try the suggestions listed Installation Tro...

Page 160: ...box is not checked there will be no sound Refer to Chapter 2 Working with the PalmPilot Connected Organizer for information about how to use the settings in the Preferences application PalmPilot turns...

Page 161: ...es not activate the corresponding feature Recalibrate the digitizer In the Preferences application choose Digitizer from the pick list and follow the directions on the screen When I tap the Menus icon...

Page 162: ...our PalmPilot data 2 Use the Security application to remove the password tap the Forgotten Password button Private records will be deleted at this point 3 Use the PalmPilot Desktop software and the Pa...

Page 163: ...fined in the Memo Preferences setting In other words the settings for the order that you use with PalmPilot Desktop are not transferred to the PalmPilot Macintosh users only If you perform a HotSync o...

Page 164: ...u will never have to use the reset button However on rare occasions your PalmPilot may hang no longer respond to buttons or the screen In this case you need to perform a reset to get the PalmPilot run...

Page 165: ...hout a sharp tip to gently press the reset button 3 A message prompt appears on the PalmPilot organizer s screen warning that you are about to erase all the data stored on your PalmPilot Press the up...

Page 166: ...mation about the version of DOS Windows or Macintosh System you are using the actual error message or state you are experiencing and the steps you take to reproduce the problem Online Support Web Acce...

Page 167: ...Do not contact these sales offices for product technical support or other questions regarding the use of your PalmPilot Europe France Tour Kupka A 18 rue Hoche F 92980 Paris La D fense FRANCE 33 1 41...

Page 168: ...0 44 01189 696 666 FAX 0800 22 52 52 Infoline United States 1565 Charleston Rd Mountain View CA 94043 USA 415 237 6000 415 691 0927 FAX Spain c Gobelas 25 27 E 28023 Madrid SPAIN 34 9 1 509 69 00 34...

Page 169: ...ates This appendix provides illustrations of the four expense templates that are provided with PalmPilot Desktop software You may use or modify any of these templates when creating expense reports wit...

Page 170: ...page 168 PalmPilot Handbook Sample 2...

Page 171: ...Appendixes page 169 Sample 3...

Page 172: ...te your own custom expense report templates for use with the Expense application Note This section assumes that you are an experienced Microsoft Excel user or are experienced with a similar spreadshee...

Page 173: ...your PC the Expense data is stored on your PC in a file named expense txt When you activate the Expense application on Pilot Desktop an Excel Macro starts and populates an expense template with your d...

Page 174: ...3 1x this subdirectory will be named template Make a backup copy of the contents of this folder 2 Double click on the name of the sample template that you want to modify The sample template opens in M...

Page 175: ...le save the template file with its original file name e g Sample2 xlt If you will need to make changes to the Maptable xls file give your modified template a unique name Be sure to use the xlt file su...

Page 176: ...e columns for expense type In this case neither day date or expense type information would be fixed as a header Instead the date and expense type information would be filled into the cells of the spre...

Page 177: ...you must first analyze the characteristics of your report Perform the following before you begin a custom mapping table Print a copy of your custom expense report Activate the Row and Column Headings...

Page 178: ...crosoft Excel open a copy of the file named Maptable xls This file is located in the same folder subdirectory as the PalmPilot Desktop 2 0 application Make a backup copy of this file before you make y...

Page 179: ...ep 3 is pasted into the Maptable xls file 7 Name the table In the cell immediately to the right of the cell entitled Template Name enter the exact file name of your custom Expense Report template 8 De...

Page 180: ...le as shown in the following diagram Determine whether the Rows will contain expense or date information and place an x in the appropriate box When you do this you also define whether the label is Fix...

Page 181: ...he dates and intervals between dates appears in the light blue columns 14 17 as shown in the following diagram In the Date cell enter the row or column number where all the date information will be pl...

Page 182: ...ter the row or column numbers for the expense types that appear in the Section These settings appear in the aqua columns 20 48 partially shown in the following diagram For these settings simply enter...

Page 183: ...n on your template where this information will be mapped Because header data is not related to any particular Section you only have to fill in one row If the item does not appear on your template leav...

Page 184: ...wed by an end statement Currency Shows how many currencies were used for the Expense data and lists the countries that correspond to that currency Trip Shows the number of expenses by category and lis...

Page 185: ...to the Software The Software is licensed to be used on any personal computer and or any PalmPilot product provided that the Software is used only in connection with PalmPilot products With respect to...

Page 186: ...ure and developed solely at private expense The Software is delivered as Commercial Computer Software as defined in DFARS 252 227 7014 June 1995 or as a commercial item as defined in FAR 2 101 a and a...

Page 187: ...al or unenforceable the validity legality and enforceability of any of the remaining provisions shall not in any way be affected or impaired and a valid legal and enforceable provision of similar inte...

Page 188: ...cable 3Com catalog are not covered under this Limited Warranty except for the PalmPilot cradle the PalmPilot modem PalmPilot cables and memory upgrades 3Com shall not be responsible for Customer s sof...

Page 189: ...or parts are not shipped by Customer to arrive at 3Com within thirty 30 days from the date warranty service authorization is provided Customer will pay 3Com the price of such product or part at the th...

Page 190: ...OUT OF OR IN CONNECTION WITH THE SALE INSTALLATION MAINTENANCE USE PERFORMANCE FAILURE OR INTERRUPTION OF THIS PRODUCT EVEN IF 3COM OR ITS AUTHORIZED RESELLER HAS BEEN ADVISED OF THE POSSIBILITY OF S...

Page 191: ...t interference will not occur in a particular installation If this equipment does cause harmful to radio or television reception which can be determined by turning the equipment off and on the user is...

Page 192: ...Statement This Class B digital apparatus meets all requirements of the Canadian Interference Causing Equipment Regulations Cet appareil num rique de la classe B respecte toutes les exigences du R glem...

Page 193: ...ss book 65 buttons 2 calculator 116 date book 45 deleting from PalmPilot 119 expense 95 finding text 113 installing 149 memo pad 87 memory 118 menus 35 record categories 38 security 120 starting 23 to...

Page 194: ...ency 101 choosing default 105 defining custom 105 Cut command 37 D Date choosing in date book 50 setting 12 to do item 80 Date Book activating 45 alarm 57 choosing date 50 deleting events 63 event con...

Page 195: ...efault currency 105 details 100 item currency 101 item date 99 menu commands 104 payment method 101 printing reports 111 Quickfill 105 receipt details 100 show options 103 templates 160 type 101 vendo...

Page 196: ...ng area 2 writing characters 26 Graffiti Help pen stroke 21 H Hard Reset procedure 156 reset button 4 Help on line tips 38 HotSync communications port 137 conduit setup 146 customizing 141 HotSync Man...

Page 197: ...te book 61 104 purge to do list 84 Menus activating 35 address book specific 72 calculator specific 118 choosing 36 command equivalents 127 date book specific 60 edit menu 36 expense specific 104 memo...

Page 198: ...ntrast control 3 controls 1 forgotten password 123 HotSync cable 136 PalmPilot cont d HotSync via modem 144 install tool 149 installing applications 149 locking with password 123 memory door 4 menus 3...

Page 199: ...ronization 135 system requirements 132 Password assigning 120 changing 122 forgotten password 123 locking PalmPilot 123 troubleshooting 153 with owner preferences 18 Paste command 37 Payment expense i...

Page 200: ...egories 38 hiding private 120 private 44 Repeat Event 58 Reset Button 4 156 S Scroll Buttons 2 Search for text 113 phone lookup 114 Security 120 assigning password 120 changing password 122 forgotten...

Page 201: ...on screen keyboard 33 punctuation marks 30 symbols 31 with PalmPilot 24 writing tips 27 Time alarm setting 57 format 15 setting 11 setting event 47 56 Tips 38 To Do List activating 77 checking off ite...

Page 202: ...ot Handbook V Vendor 102 W Week date book view 52 Writing accent characters 32 capital letters 29 Graffiti ShortCuts 124 numbers 29 on screen keyboard 33 punctuation marks 30 symbols 31 text with Palm...

Reviews: