background image

66

© 2020

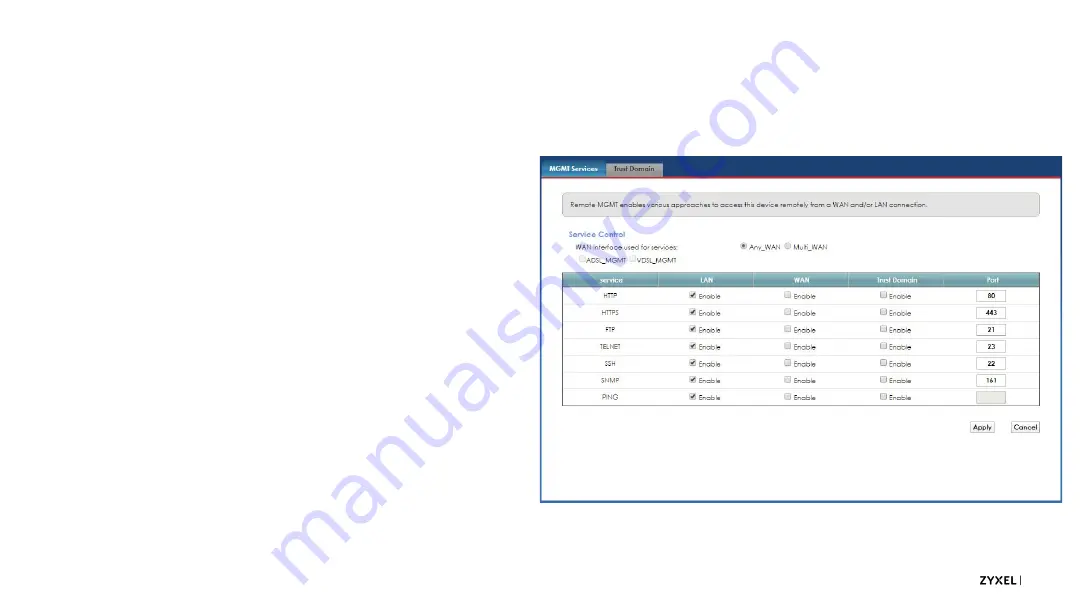
Remote Management

Traditional remote management 
settings can be found in the 
Maintenance > Remote Management 
menu, MGMT Services tab.

By default, no remote 
management settings are set to 
WAN to ensure device security.

If you want to open the service 
for any Internet source address, 
select the WAN option.

If you want to restrict the service 
to only certain source 
addresses, we strongly 
recommend using Trust 
Domain
(s), discussed next.

Содержание VMG4005-B50B

Страница 1: ...VMG4005 B50B VDSL2 Bonding Single Line Bridge Field Tech Overview Guide 22 April 2020 Illustrations info based on firmware V5 13 ABRL 2 C0...

Страница 2: ...Tired Account Access Connection Status Screen Menu System Configuration Bridged Setup Routed Setup IPv6 Routed Setup Advanced WAN Settings Using Multiple Services TR069 Remote Management Time Setting...

Страница 3: ...Introduction About the VMG4005...

Страница 4: ...4 2020 The VMG4005 VDSL2 Bonding Single Line Bridge Bonded VDSL2 Port Supports 17a and 35b Single Ethernet 1Gbps Port Modem or Single port Router...

Страница 5: ...2020 Online References Product Web Page General product info Quick Start Guide For info on accessing the web interface installation and mounting Users Guide Covers all aspects of the device s function...

Страница 6: ...Bonded DSL Introduction...

Страница 7: ...SL line alone Zyxel CPEs support 2 line bonding Two phone lines must be terminated between the CPE and the curbside DSLAM to use bonding Both the CPE and DSLAM must support IETF G Bond for bonding to...

Страница 8: ...bandwidth hungry applications like multiple Hi Def IPTV feeds for multiple Set Top Boxes Typically cheaper than Fiber to the Home FttH installations Disadvantages Requires multiple telephone lines per...

Страница 9: ...Curbside DSLAM with G Bond support G Bond Bonded DSL Pair CPE with G Bond support Ex using VDSL Profile 17a under excellent conditions Upstream Downstream 50Mbps 100Mbps x2 lines 100Mbps 200Mbps Diagr...

Страница 10: ...Introduction Setup and LEDs...

Страница 11: ...11 2020 Package Contents Installation Refer to the Quick Start Guide for package contents and installation instructions...

Страница 12: ...12 2020 LED Readout...

Страница 13: ...Logging In Multi Level Login...

Страница 14: ...evice on which the rubber feet are located is the device s bottom label This label displays the unit s admin username and password as well as its Serial Number and MAC Address This info is important f...

Страница 15: ...ngs Create a default configuration for your customers By default the supervisor password is admin password last 5 characters of the WAN MAC address found on the side and bottom labels respectively Sup...

Страница 16: ...Logging In Accessing the Web Interface...

Страница 17: ...default settings of the unit Summary of the default settings on the router WAN ADSL_MGMT ATM Routing Mode NAT Enabled IPoE 802 1p 0 802 1q 0 DHCP Client VDSL_MGMT PTM Routing Mode NAT Enabled IPoE 80...

Страница 18: ...name and password are supervisor supervisor password as previously described admin admin password as printed on side label The supervisor account is recommended for the NOC and creating the default co...

Страница 19: ...the administrative password Enter a New Password Verify the New Password and click Apply The new password must contain at least 6 characters 1 letter and 1 number You can also change the admin passwor...

Страница 20: ...e other Network Map screens in the next section User and Administrator accounts will see the Welcome to the Quick Start Wizard popup screen after they log in For the purposes of this guide we will ski...

Страница 21: ...Tiered Account Access Logging In...

Страница 22: ...account Only the supervisor account can control to which menus tiers have access For the purposes of this guide and in order to have access to every menu you should use the supervisor account Access p...

Страница 23: ...the Login Privileges link Select the Account Type you wish to alter from the drop down menu check or uncheck menu options to allow or deny access and click the Save button You can also use this menu t...

Страница 24: ...Connection Status Screen Menu System Logging In...

Страница 25: ...ion Status Screen is the first screen one will see when one logs into the router Clicking on the arrow on the right side of the screen will toggle between the Network Map and Status screens The Connec...

Страница 26: ...2020 This screen shows important device info such as the firmware version WAN IP address for any routed interfaces WAN encapsulation mode interface statuses up time CPU and memory usage etc Status Scr...

Страница 27: ...d to the router via LAN or WLAN If the device has a network name it will be displayed on the map for easy reference You can use the Info icon in the far right column for a connected device to find out...

Страница 28: ...ted Login Privileges available to the Supervisor account only controls to which menus Administrator and User accounts have access covered in the previous section and customize the Supervisor password...

Страница 29: ...29 2020 At the bottom of the web interface there is a menu system that allows easy navigation between the different menu pages of the router The Menu System...

Страница 30: ...of the unit such as WAN LAN DHCP settings Security Settings Controls advanced settings such as Firewall and admin controls System Monitor Allows viewing of system logs DLS status the ARP table etc Ma...

Страница 31: ...Configuration Bridged Setup...

Страница 32: ...with default broadband settings but you may need to replace these with the settings and credentials specific to your ISP Point your mouse over the Network Settings menu and then click the Broadband li...

Страница 33: ...f you want to bridge traffic through the device creating a bridged interface is fairly simple and straightforward Click the Add New WAN Interface button You can also use the Edit icon in the right col...

Страница 34: ...e Enable it and select the Mode as Bridged Give the interface an easy to identify Name For ADSL over ATM you ll also need to insert your VPI and VCI settings For multiple logical interfaces you may al...

Страница 35: ...need to edit one or both of the routed interfaces with VLAN settings Edit the interface Scroll down to the VLAN section and set the appropriate 902 1q tag For ADSL over ATM interfaces you may instead...

Страница 36: ...Configuration Routed Setup...

Страница 37: ...er adding or modifying a broadband interface you will see a screen like the examples on the right The next few slides will explain the basics of setting up a routed Broadband interface Adding a Broadb...

Страница 38: ...idging modes depending on the requirements for the interface We discussed bridged interfaces in the last section Select either IPoE or PPPoE encapsulations depending on the COE For more info on the IP...

Страница 39: ...p at all times Enabling the On Demand feature will display the Idle Timeout field the connection will automatically disconnect after the number of specified minutes elapse PPPoE Passthrough allows the...

Страница 40: ...e either Obtain an IP Address Automatically or assign a Static IP Address For the latter you ll need to assign an IP Address Subnet Mask and Gateway IP Address These fields won t be present unless you...

Страница 41: ...in order to properly operate Enter the appropriate VPI and VCI based on the COE port settings Also choose the proper Encapsulation Mode type If the service on the interface requires Quality of Service...

Страница 42: ...e Enable radio button select the proper 802 1p tag and enter the proper 802 1q VLAN tag appropriate for the service utilizing the interface data IPTV etc You can also change the MTU size if necessary...

Страница 43: ...ce but is less secure than the default Symmetric NAT used by interfaces If the interface is routed and being used for IPTV or other multicast traffic check IGMP Proxy Enable If the interface is being...

Страница 44: ...Obtain DNS Info Automatically However if the router isn t receiving a DHCP address be sure to manually enter the Primary and Secondary DNS Server addresses after selecting the Use the Following Static...

Страница 45: ...face you can choose to use its Factory Default MAC address or to Clone a LAN Host s MAC Address from a specific host IP address or to statically Set the WAN MAC Address This is mostly important for IS...

Страница 46: ...ptions 43 60 61 121 and or 125 These features are usually used to assign ACS URLs or static routes when the router obtains a DHCP address For the 6RD settings this will be discussed in the Broadband S...

Страница 47: ...Routed Setup for IPv6 Basic Triple Play Setup...

Страница 48: ...mes are supported Dual Stack the device performs IPv4 and IPv6 simultaneously Both IPv4 and IPv6 are supported on the LAN side of the device IPv4 ISP Network IPv6 ISP Network IPv4 IPv6 Network IPv4 In...

Страница 49: ...apid Deployment allows ISPs to deploy IPv6 utilizing IPv4 tunneling a 6RD gateway and DHCP Option 212 IPv4 ISP Network IPv6 Internet 6RD Gateway IPv4 Internet IPv6 Tunnel Supported IPv6 Schemes Cont d...

Страница 50: ...50 2020 IPv6 Only the device delivers a full IPv6 experience on the LAN and WAN side of the router IPv6 Internet IPv6 Network Supported IPv6 Schemes Cont d IPv6 Network...

Страница 51: ...l want to use If using 6RD keep the mode set to IPv4 Only Using the previous slides as a guide determine what IPv6 scheme the ISP is using and make the appropriate selection from the dropdown menu For...

Страница 52: ...le if the interface is to be used for IP video Apply as Default Gateway if the interface will be the primary data interface Decide if you need to Obtain IPv6 DNS Info Automatically or Use the Followin...

Страница 53: ...Automatically configured by DHCP or Manually Configured For the latter Specify the Service Provider IPv6 Prefix IPv4 Mask Length and Border Relay IPv4 Address for the 6RD Border Relay router When fini...

Страница 54: ...Advanced WAN Settings Other Important Settings...

Страница 55: ...55 2020 Advanced DSL Settings In the Broadband Advanced tab you can control the advanced DSL features for the device Enable the features you want to use and also supported by your COE and click Apply...

Страница 56: ...Configuration Using Multiple Services...

Страница 57: ...ll need to be translated into the ATM s Virtual Paths VPIs and Virtual Channels VCIs for proper packet handling to occur This next section will discuss how to do this through the VMG4005 even with its...

Страница 58: ...Interfaces Create broadband interfaces using the instructions in the previous section In our example we ve created these broadband interfaces and edited the default interfaces VPI 3 VCI 55 VPI 0 VCI 5...

Страница 59: ...s Go to the Network Setting VLAN Group menu then click on Add New Group to configure the VLAN Groups that match the correct VLAN IDs for your network Make a VLAN Group Name and assign a VLAN ID Check...

Страница 60: ...with VLANs Go to the Network Setting Interface Group menu then click on Add New Interface Group to configure an interface group per each VLAN Group that was created The next slide has more details on...

Страница 61: ...translation Instead of selecting LAN1 click the Add button in teh Automatically Add Clients With the following DHCP Vendor IDs section In the Add new criteria submenu select the VLAN Group radio butto...

Страница 62: ...rface Groups with VLANs Cont d Repeat the last two slides for any additional VLAN based Interface Groups you need in order to translate an services to ATM frames For our example we need two new VLAN b...

Страница 63: ...o send VLAN tags to devices on the LAN we can easily check that they re working by using a packet sniffer between the VMG4005 s Ethernet port and the connected switch or router to ensure those tags ar...

Страница 64: ...Configuration TR069 Remote Management Settings...

Страница 65: ...menu you can Enable Inform set the Inform Interval set the ACS URL ACS User Name and ACS Password for the CPE so it can perform TR069 configurations with an ACS If you need help with interop testing b...

Страница 66: ...enu MGMT Services tab By default no remote management settings are set to WAN to ensure device security If you want to open the service for any Internet source address select the WAN option If you wan...

Страница 67: ...ce Remote Management menu Trust Domains tab you can add trust domains to keep access to the device s remote management interfaces restricted to source IPs or subnets you specify This reduces the likel...

Страница 68: ...Time Settings Other Important Settings...

Страница 69: ...the correct time zone in mind be sure to use the Maintenance Time settings to ensure the device has the correct time zone time server and Daylight Saving Time settings US Daylight Saving Time is from...

Страница 70: ...Troubleshooting Using the LEDs...

Страница 71: ...71 2020 LED Readout Use the LEDs to quickly check the device s status...

Страница 72: ...power supply is plugged into the wall outlet and router and that the router s power switch is in the On position If that does not solve the problem try replacing the router s power supply Otherwise re...

Страница 73: ...g sure the device is using the correct power supply otherwise the router will need to be replaced Problem The POWER LED does not stop blinking Solution The unit only takes approximately 45 60 seconds...

Страница 74: ...wise replace the telephone cable to the router as it may be faulty Problem The DSL light does not stop blinking Solution The DSL light should blink after the unit boots up and synchronizes with the DS...

Страница 75: ...will flicker when data is being transmitted received Problem The Ethernet LED does not blink flicker or turn on at all Solution Ensure that the end device is connected to the unit with an Ethernet cab...

Страница 76: ...Troubleshooting Using the Web Interface...

Страница 77: ...f the device is terminating any WAN IPs it will display IP info in the WANx Information section of the Device Information screen For Bridged or routed interfaces you can easily view the Interface Stat...

Страница 78: ...received etc SNR margin may indicate poor line condition requiring line maintenance replacement Additional line testing may be required An ideal perfect SNR margin should be between 6 8dBm although o...

Страница 79: ...p DNS test to a local or remote address You can use this menu to test upper layer IP connectivity and routing Simply insert any URL or IP address to see if the router itself can reach the Internet If...

Страница 80: ...Troubleshooting Scenarios...

Страница 81: ...roubleshooting This section is designed to help troubleshoot the most common problems installers or customers may see when using the router router Use this section as a basic guide to aide in step by...

Страница 82: ...ver a lost password for security reasons If the device is connected via ACS passwords can be changed via ACS parameters If the password is lost you can also reset the unit by holding in the hardware r...

Страница 83: ...s are displaying normally refer to the LED Troubleshooting section of this guide Ensure the computer is obtaining an IP address from the router or that the computer is on the same network as the route...

Страница 84: ...es Try using a computer command prompt or app to ping the devices access IP address Try using an alternate form of administration such as Telnet default port 23 with a Telnet client like puTTY SSH def...

Страница 85: ...Troubleshooting WAN Frame Capture...

Страница 86: ...e ISP to troubleshoot issues Connecting a switch between the router and the ONT to add a monitor computer for frame capture can be bothersome especially for multiple VLANs To make capturing frames eas...

Страница 87: ...wish to mirror from your atm ADSL in ATM mode or ptm ADSL or VDSL in PTM mode interface LAN1 is the only Mirror Interface available on the VMG4005 Click the Apply Save button to start mirroring frames...

Страница 88: ...irmware contact your Zyxel Sales Representative Zyxel Communications Inc North America 1130 N Miller St Anaheim CA 92806 2001 Phone 714 632 0882 Fax 714 632 0858 Normal Business Hours 8am 5pm PST Mon...

Страница 89: ...of your Zyxel products for more information on settings features and warranty information Zyxel Communications Inc All rights reserved Reproduction of this material in any manner whatsoever without t...

Отзывы: