15
3.2 Mounting the RGS Series (Wall mount)
The Switch can be mounted on a wall. You may need screw anchors if mounting on a concrete or brick
wall.
2.3.1
Installation Requirements
•
Distance above the floor: At least 1.8 m (5.9 feet)
•
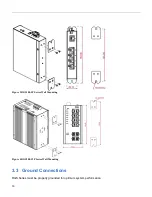
Distance between holes: 151 mm (5.945 inches) for RGS100-5P
172 mm (6.772 inches) for RGS200-12P
•
Two M4 screws and a #2 Philips screwdriver
•
Two screw anchors (optional)
Mounting step:
1.
Screw on the wall-mounting plate on with the plate and screws in the accessory kit.
Содержание RGS Series
Страница 7: ...7 Preface Scope Audience Safety Instructions Documentation Conventions ...
Страница 9: ...9 Overview Overview Faceplate Panel Introduction ...
Страница 13: ...13 Quick Installation Equipment Mounting Cable Connecting Equipment Configuration ...
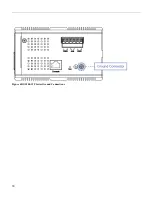
Страница 18: ...18 Figure 6 RGS200 12P Series Ground Connections ...
Страница 36: ...36 5 2 1 Configuration Menu ...
Страница 37: ...37 5 2 2 Monitor Menu ...
Страница 38: ...38 5 2 3 Diagnostics Menu 5 2 4 Maintenance Menu ...
Страница 54: ...54 5 3 12 Privilege Level This page provides an overview of the privilege levels ...
Страница 61: ...61 Buttons Click to apply changes Click to undo any changes made locally and revert to previously saved values ...
Страница 104: ...104 Buttons Click to apply changes Click to undo any changes made locally and revert to previously saved values ...
Страница 110: ...110 Buttons Click to apply changes Click to undo any changes made locally and revert to previously saved values ...
Страница 127: ...127 Buttons Click to apply changes Click to undo any changes made locally and revert to previously saved values ...
Страница 150: ...150 Buttons Click to apply changes Click to undo any changes made locally and revert to previously saved values ...
Страница 169: ...169 5 3 80 Port Config This page allows you to enable a port for GVRP Buttons Click to apply changes ...
Страница 238: ...238 Click to re start diagnostics with PING ...
Страница 252: ...252 台灣 警告使用者 ...


