background image


Confidential and Proprietary Information of ZTE NETVIEW 

71


A p p e n d i x  

A


Packing, Storage and 
Transportation 


This chapter introduces the package, transportation and 
storage of brick IP camera.   

Packaging 

The package of the brick IP camera contains a packing list and 
each  package has shockproof plastic foam and damp-proof 
plastic bags.


Transportation 

With proper package, the product should be covered with 
canvas against moisture and rain. It should be stacked on the 
vehicle orderly, compactly, properly, safely and reliably against 
damage caused by jolt. 

Be sure not to transport the product together with other 
flammable, explosive and corrosive materials and protect it 
from drench or any mechanical damage. Do not place the 
equipment in the outdoor warehouse in the transport. During 
the transportation, move and place the equipment slightly.   

Содержание NCN 2001-EPI/CE

Страница 1: ... ZTE Netview 4 F W1 A Bldg Gaoxin S 1th Ave Hi Tech Industrial Park Nanshan District Shenzhen P R China 518057 Tel 86 755 26525680 2503 400 8866755 Fax 86 755 26520574 URL http www ztenv com cn E mail wang guofu zte com cn 0049001000 zte com cn ...

Страница 2: ...ns are disclaimed including without limitation any implied warranty of merchantability fitness for a particular purpose title or non infringement ZTE NETVIEW and its licensors shall not be liable for damages resulting from the use of or reliance on the information contained herein ZTE NETVIEW or its licensors may have current or pending intellectual property rights or applications covering the sub...

Страница 3: ...ty of our product documentation and offer better services to our customers Please fill out the following questionnaire and fax to Please fax to 86 755 26520574 or mail to ZTE Netview 4 F W1 A Bldg Gaoxin S 1th Ave Hi Tech Industrial Park Nanshan District Shenzhen P R China 518057 Thank you for your cooperation ...

Страница 4: ...rove the overview introduction Make it more concise brief Improve the Contents Add more step by step procedures Improve the organization Add more troubleshooting information Include more figures Make it less technical Add more examples Add more better quick reference aids Add more detail Improve the index Other suggestions ____________________________________________________________________ ______...

Страница 5: ...iew 1 Introduction 1 Main Features 1 Basic 1 Audio Video Processing 2 Remote Transportation Access 2 Appearance and Dimensions 3 Networking Diagram 7 Chapter 2 9 Installation 9 Precautions 9 Power and Grounding Requirements 9 Tools Instruments and Documents 10 Installation Method 10 Wall Mounting 10 Ceiling Mounting 11 Preparation of Connecting Cables 12 ...

Страница 6: ...igital Quantity Collection Cable 19 Fiber Cable 20 Label Preparation 20 Chapter 3 23 Configuration and operation 23 Configuration Flow 23 Login steps 24 Handling if Unable to Login 26 Configuration 28 IP Address Setting 28 PPPOE Dial Setting 31 Login and Restart the Camera Device 32 Setting Manage Host 33 Setting Device ID 34 Setting Serial Parameter 35 Configuring I O 36 Operation 37 Viewing Vide...

Страница 7: ...g 53 Alarm Application 54 System Management 56 Self Diagnosis 57 Storage Medium Management 59 Time Synchronization 60 User Management 60 Log Query 63 Device Upgrade 64 Chapter 4 67 Routine Maintenance 67 Maintenance Test 67 Preventive Maintenance 67 Safety Protection 67 Troubleshooting 68 Appendix A 71 Packing Storage and Transportation 71 Packaging 71 Transportation 71 Storage 72 Appendix B 73 ...

Страница 8: ...Abbreviations 73 Appendix C 74 Connect into ZXVNMS Platform 74 Creating Encoder and Camera on Management Client 74 Write ZXVNMS Information into the Camera 82 Appendix D 87 Specification 87 ...

Страница 9: ...This page is intentionally blank ...

Страница 10: ...EP BE Please make sure the model is applicable before using this manual Typographical Conventions ZTE documents employ the following typographical conventions TABL E 1 TYP OGR AP HI C AL CONV EN TI ON S Typeface Meaning Italics References to other guides and documents parameter values Quotes Links on screens Bold Menus menu options input fields radio button names check boxes drop down lists dialog...

Страница 11: ...nfidential and Proprietary Information of ZTE NETVIEW Typeface Meaning Checkpoint Indicates that a particular step needs to be checked before proceeding further Tip Indicates a suggestion or hint to make things easier or more productive for the reader ...

Страница 12: ... Meaning Click Refers to clicking the primary mouse button usually the left mouse button once Double click Refers to quickly clicking the primary mouse button usually the left mouse button twice Right click Refers to clicking the secondary mouse button usually the right mouse button once Drag Refers to pressing and holding a mouse button and moving the mouse ...

Страница 13: ...hazardous situation which if not avoided could result in death or serious injury Caution Indicates a potentially hazardous situation which if not avoided could result in minor or moderate injury It may also be used to alert against unsafe practices Erosion Beware of erosion Electric shock There is a risk of electric shock Electrostatic The device may be sensitive to static electricity Microwave Be...

Страница 14: ...ompression decompressing TCP IP network technology and with code burned in FLASH makes it possible for more stable running of the system Brick IP camera can be connected with other network monitoring equipments to form a powerful video surveillance network It can be widely applied to banks telecommunications electric power judicial procedure transportation residence factory warehouse resources hyd...

Страница 15: ...ator have their own authority restriction high safety coefficient Built in WEB server support IE visiting Support local storage Realize T Flash card local storage Audio Video Processing Support 1 channel of PAL video signal and H 264 encoding so that dual stream can be achieved support variable frame rate up to 25 fps and code rate up to 2Mb s Support 4CIF DCIF 2CIF CIF and QCIF video formats Capt...

Страница 16: ...ng video viewing IP camera status realize alarm linkage Support remote downloading achieve user software upgrade Formatting T Flash card and resetting device Self diagnosis logs of alarm and exception events for retrieving Appearance and Dimensions The top and bottom view of NCN 2XXX EP B C brick IP camera is as shown in Figure 1 and front and side view of it is as shown in Figure 2 FIGU RE 1 TOP ...

Страница 17: ...No Function No Function 1 Mounting hole 2 U1 4 20UNC 3 CS C Lens mount 4 back focus length adjusting ring 5 MIC 6 Mount set 7 ALC lens mount The rear panel view of the following models of brick IP cameras is as shown in Figure 3 and the description of the rear panel is as listed in Table 5 NCN 2001 EPI CE NCN 2111E EPI BE NCN 2211E EPI BE NCN 2002 EPI CE NCN 2102 EPI CE NCN 2202 EPI BE NCN 2003 EP...

Страница 18: ... EL VIE W OF NCN 2XXX EP B C B RIC K IP C AM ER A The rear panel view of the following models of brick IP cameras is as shown in Figure 4 and the description of the rear panel is as listed in Table 5 NCN 2101 EPI CE and NCN 2201 EPI CE FIGU RE 4 RE AR PAN EL VIE W OF NCN 2XXX EP B C B RIC K IP C AM ER A ...

Страница 19: ...e 12 VOUT analog composed video output BNC connector 13 RS 422 DO DI terminals 14 AOUT audio output interface 15 Grounding screw 16 AIN audio input interface 17 Network interface RJ 45 connector 18 12V power interface 19 T Flash card socket 20 USIM card socket 21 RS 232 DI terminals 22 RS422 DO terminals The rear panel of NCN 2205 EP BE camera is as shown in Figure 5 and the description of the rea...

Страница 20: ... composite video output 11 Image brightness adjustment 12 12V power interface 13 Power indicator 14 AOUT audio output interface 15 AIN audio input interface 16 T Flash card slot 17 Data transceiver indicator of fiber module 2 18 Grounding screw 19 LC fiber interface 2 20 In position indicator of fiber module 2 21 Data transceiver indicator of fiber module 1 22 LC fiber interface 1 Networking Diagr...

Страница 21: ...y Information of ZTE NETVIEW FIGU RE 6 NE TW OR KI NG DI AGR AM OF NCN 2XXX EP B C BR IC K IP C AM ER A The typical networking diagram of NCN 2205 EP B fiber brick IP camera is as shown in Figure 7 FIGU RE 7 NE TW OR KI NG DI AGR AM OF NCN 2205 EP B BRIC K FIBE R IP CAM ER A ...

Страница 22: ...tion Please turn off the power of the device before you start installation Please check the supply voltage to avoid device being damaged due to unmatched voltage Do not use the device where it would be subject to extreme temperature or humidity Keep the device in a place with good ventilation and keep it away from liquid splashing or violent vibration If the device does not work normally please co...

Страница 23: ...ercussion drill tape measure marker pen etc Accessories indoor camera stand 1pc plastic metal expansion screw 3pcs tapping screw 3pcs Installation Method NCN 2XXX EP B C brick IP camera can be installed on wall or ceiling You can select a proper installation method according to actual condition Wall Mounting To install the device on wall please follow these steps 1 Unpack the camera and check if a...

Страница 24: ...x the camera Finally mount the lens onto the camera Please pay attention to the selection of C or CS lens mount FI G U R E 8 MO U N T O N W A L L Ceiling Mounting To install the device on ceiling please follow these steps 1 Unpack the camera and check if any appearance damage 2 Install the bracket i For cement wall surface expansion screws need to be installed first The location holes for expansio...

Страница 25: ...o proper place and then tighten the knob on the bracket to fix the camera Finally mount the lens onto the camera Please pay attention to the selection of C or CS lens mount FI G U R E 9 MO U N T O N CE I L I N G Preparation of Connecting Cables Preparation of Network Cable The method of preparing network cable is as below 1 Material and tool One twisted pair cable 8 pins the length can be defined ...

Страница 26: ...d with network hub or switch as shown in Figure 10 FIGU RE 10 THE CORR ES PO N DIN G RE L ATI O NS HIP O F THE STR AI GH T THRO UG H CAB LE 1 White orange 2 Orange 3 White green 4 Blue 5 White blue 6 Green 7 White brown 8 Brown White orange 1 Orange 2 White green 3 Blue 4 White blue 5 Green 6 White brown 7 Brown 8 ii Use the following method to make the crossover network cable when NCN 2XXX EP B C...

Страница 27: ... brown 7 Brown 8 Preparation of RS232 Connecting Cable RS 232 connecting cable is required to be used when connecting NCN 2XXX EP B C brick IP camera with DTE device with DB9 female connector such as computer alarm equipment access controller etc The cable is as shown in Figure 12 FIGU RE 12 RS 232 CO NN EC TIN G CAB LE The method of preparing RS 232 connecting cable is as below 1 Material and too...

Страница 28: ...ternal cables Cabling Requirements 1 The laid cables must be protected with sheaths such as PVC pipe PVC troughs metal tubes serpentine pipes or winding tubes 2 The AC cables and the DC cables must be laid separately but DC cables can be laid together with signal cables video cables and network cables 3 If there is the antistatic floor in the room the cables should be laid under the floor If there...

Страница 29: ...E C T I V E GR O U N D I N G C A B L E DI A G R A M A B TA B L E 8 WI R I N G LI S T O F PR O T E C T I V E GR O U N D I N G C A B L E Connecting End To Where Connect to Remark End A Brick IP Camera grounding screw Number of cables 1 Length as per configuration End B Grounding bar in the equipment room Grounding terminal Audio Output Cable Audio output cable is used to output audio signal It conne...

Страница 30: ... the wiring method of audio input cable FI G U R E 1 5 AU D I O IN P U T C A B L E DI A G R A M A B TA B L E 10 WI R I N G LI S T O F A U D I O I N P U T C A B L E Connecting End To Where Connect to Remark End A Microphone Audio output Number of cables 1 Length as per configuration End B Rear panel of NCN 2XXX EP B C brick IP camera AIN Video Cable Video cable is used to transmit video input outpu...

Страница 31: ...mark End A Monitor Video input interface Number cables 1 Length as per configuration End B Rear panel of NCN 2XXX EP B C brick IP camera VOUT Communication Cable Communication cable is used for signal connection between NCN 2XXX EP B C brick IP camera and PC communication equipment The communication cable is as shown in Figure 17 Table 12 lists the wiring method of communication cable FIGU RE 17 C...

Страница 32: ...422 Cable RS422 RS485 cable is as shown in Figure 18 The connecting method of end B can be determined according to the application at field FIGU RE 18 RS422 CAB LE DI AG R AM Digital Quantity Collection Cable DIO board is designed with 1 or 2 digital input interface s and 1 digital output interface Table 13 lists definition of interfaces The digital quantity collection cable is as shown in Figure ...

Страница 33: ...ut interface Fiber Cable The fiber cable is as shown in Figure 20 Table 14 lists the wiring method of communication cable FIGU RE 20 COM MU NI C ATI O N CAB LE DI AG R AM TABL E 14 WI R I N G LI S T O F CO M M U N I C A T I O N C A B L E Connecting End To Where Connect to Remark 1 LC PC optical fiber connector White sleeve of the blue case 2 Label Preparation Labels of all the cables shall uniform...

Страница 34: ...Chapter2 Installation Confidential and Proprietary Information of ZTE NETVIEW 21 FIGU RE 21 LAB E L Left Right ZTE 中兴 ...

Страница 35: ......

Страница 36: ...amera including configuration and access configuring IE and remote equipment upgrade Configuration Flow The configuration flow of connecting brick IP camera into video surveillance network management system is as shown in Figure 22 Among the steps the Set up manage host and set up device ID are two specific steps for connecting into ZTE video surveillance network management system ...

Страница 37: ...ost Set up device ID Viewing Video Querying video System upgrading and so on Settings are completed and operations can be performed Log in WEB Restart the Brick IP Camera Install Brick IP Camera Log in Login steps 1 As shown in Figure 23 type in http IP address of the NCN 2XXX EP B C brick IP camera Default IP address is 192 168 1 2 in the IE address field to go to the login interface Type in user...

Страница 38: ...ETVIEW 25 name and password are admin and 12345 respectively to access the camera FIGU RE 23 WEB LOGI N IN TE RF AC E 2 You will be prompted to install control upon initial login as shown in Figure 24 Click Install to install the control FIGU RE 24 CON TR OL INS T AL L ATI O N PR OM P T ...

Страница 39: ...if Unable to Login If unable to login normally please operate as per the following steps 1 Click Start Settings Control Panel double click Internet Options as shown in Figure 25 FIGU RE 25 IN TE RNE T OP TIO NS 2 On the Internet Properties dialog click Security tab as shown in Figure 26 Click Custom Level button ...

Страница 40: ...tial and Proprietary Information of ZTE NETVIEW 27 FIGU RE 26 IN TE RNE T PROP E R TI ES SEC UR I TY 3 Select Medium in the Reset to field set the items under ActiveX Control and Plug ins as Enable or Prompt as shown in Figure 27 Click OK to save ...

Страница 41: ...I NG SEC UR I TY LEV EL Configuration IP Address Setting There are two methods to set IP address and port number of the camera device in LAN Setting in WEB Way Login the camera device click Config Lineate Net Parameter IP Port to go to the IP Port Settings window Enter the correct IP address subnet mask DNS control port ...

Страница 42: ...IP address and port are set restarting the camera device is required to make the settings become effective FIGU RE 28 IP POR T SE TTI NG S Setting in Telnet Way To set IP information of the brick IP camera by using telnet perform the following steps 1 Click Start Run at the bottom left of your computer to open the Run window as shown in Figure 29 Enter cmd in the Open field and click OK to confirm...

Страница 43: ...E NETVIEW FIGU RE 29 RUN WINDOW 2 Enter telnet IP address of the camera as shown in Figure 30 FIGU RE 30 EN TER TE LN E T IP AD DRE SS 3 Login using debugger password is empty press Enter as shown in Figure 31 Enter to view the help information as shown in Figure 32 FIGU RE 31 NE TVI EW LOG IN ...

Страница 44: ...vice Using setCSG setGateway and setPUID you can also set server parameters gateway and encoder ID PPPOE Dial Setting Please make sure ADSL network is normal when setting PPPOE Click Config Lineate Net Parameter PPPOE Dial to go to PPPOE Dial setting window as shown in Figure 33 Tick the Start PPPOE check box enter ADSL user name and password click Save button to save the settings ...

Страница 45: ...re set it is required to restart the camera device and change the network in LAN to ADSL to make the settings become effective FIGU RE 33 PPPOE DI AL SE TTI NG Login and Restart the Camera Device Right click the camera device in the left Device List click Login to login the device click Reboot to restart the device as shown in Figure 34 ...

Страница 46: ...AG E O F THE CAM E R A Setting Manage Host Click Config Lineate Net Parameter Manage Host Address to go to Manage Host Address Setting window as shown in Figure 35 The IP address and port of manage host are those of access server Enter Registered Host and Registered Port other parameters are generated automatically ...

Страница 47: ... Information of ZTE NETVIEW FIGU RE 35 M AN AG E HO S T ADDR ES S SE TTI N G Setting Device ID Click Config Basic Parameter Basic Info to go to Basic Info Setting window as shown in Figure 36 Obtain the DevName and DevID from video surveillance NMS software and input them here ...

Страница 48: ...l parameters to make sure the normal serial communication Click Config Basic Parameter Serial Parameter to go to Serial Parameter Setting window Serial No 1 is for RS232 communication and serial No 2 is for RS485 PTZ control 1 Serial No 1 As shown in Figure 37 use default parameters for serial No 1 baud rate 115200 no flow control data bit 8 and stop bit 1 click Save to save ...

Страница 49: ...T ER SE TTIN G 1 2 Serial No 2 As shown in Figure 38 baud rate PTZ protocol and PTZ address for serial No 2 should be set as per the parameters of dome camera or PTZ other items use default value FIGU RE 38 SE RI AL P AR AM E T ER SE TTIN G 2 Configuring I O This is to query DI port state set DO output delay and test normal DO output ...

Страница 50: ...lect a time Test DO Output Control change the status of DO and click Test button to check the status of DO to determine if the DO output is normal Click Save to save the settings FIGU RE 39 I O CO NFI GU RE WINDOW Operation Please login the device before perform some common functions configuration Viewing Video Double click your desired camera to view the video Click the split screen buttons at th...

Страница 51: ...B C Brick IP Camera User Manual 38 Confidential and Proprietary Information of ZTE NETVIEW FIGU RE 40 VI EWI NG VID EO View picture control tool is as shown in Figure 41 FIGU RE 41 VI EW PI C TURE C O N TR OL TOOL ...

Страница 52: ... N TR OL TOOL Video Query This is to query the already recorded video files and play and download them Before querying video please make sure that there is video already recorded For storage strategy refer to Storage Task Setting To query video files perform the following steps 1 Click Playback to switch to the Video Playback window as shown in Figure 43 2 Select the time and file type to be searc...

Страница 53: ...rietary Information of ZTE NETVIEW FIGU RE 43 VI DEO PL AYB AC K WINDOW 3 Double click the file that you want to play in the list as shown in Figure 44 Click the quick launch buttons at the bottom of the window to play pause stop fast reverse fast forward the video file ...

Страница 54: ...on Confidential and Proprietary Information of ZTE NETVIEW 41 FIGU RE 44 PL AYI NG VID EO FILE 4 As shown in Figure 45 right click your desired video file in the right list and click File Download specify save path and start downloading ...

Страница 55: ...tting This is to set the positions that you concerned as the preset points With preset positions set you can turn the camera to these points quickly 1 Log onto the camera device click Preview double click the camera that you want to view to open the video playing screen as shown in Figure 46 turn the camera to the position that you want to set as preset position ...

Страница 56: ...RE 46 VI DEO PL AYB AC K 2 Click the at the bottom right corner of the window to add preset position Click Save button to save as shown in Figure 47 FIGU RE 47 AD D PRE SE T PO S I TI ON 3 The preset positions are listed in the Preset list at the bottom right corner of the window as shown in Figure 48 ...

Страница 57: ...O N Encoding Parameter Settings This is to set the encoding parameters of each video channel according to the network condition to get the best video effect Perform the following steps 1 Click Config Channel Parameter Encode Parameter to go to Encode Parameter Setting window as shown in Figure 49 2 Click Read to display the current parameters 3 Select video channel and set the stream information o...

Страница 58: ...ke the settings become effective FIGU RE 49 EN CO DE P AR AME TER SE TTI NG S OSD Setting You can select whether to display the channel name and time on the video screen In addition four OSD texts can be customized Perform the following steps 1 Click Config Channel Parameter OSD Parameter to go to OSD Parameter Setting window as shown in Figure 50 2 Click Read to display the current parameters ...

Страница 59: ...ntial and Proprietary Information of ZTE NETVIEW 3 Select video channel tick the items that you want to set and define the contents that their positions 4 Click Save the OSD you set is displayed as shown in Figure 51 FIGU RE 50 OSD PAR AM E TER SE TTIN GS ...

Страница 60: ...video surveillance screen Perform the following steps 1 Click Config Channel Parameter Hide Area to go to Hide Area Setting window 2 Hold down the left mouse button on the video screen and drag it to set the area that you want to hide as shown in Figure 52 Up to four areas can be set 3 After hide area is set it is as shown in Figure 53 4 Click Clear the already set hide area is cleared ...

Страница 61: ...NCN 2XXX EP B C Brick IP Camera User Manual 48 Confidential and Proprietary Information of ZTE NETVIEW FIGU RE 52 HID E AR E A SE TTI NGS FIGU RE 53 HID E AR E A SE TTI NGS Storage Task Setting ...

Страница 62: ...the following steps 1 Click Config Channel Parameter Storage Task to go to Storage Task Setting window 2 Click Read to display the current parameters 3 Clear Enable Record check box to turn off video recording Click Save as shown in Figure 54 FIGU RE 54 STOR AG E TAS K SE TTIN GS RE CO RD DI S AB L E D 4 With recording enabled tick the Recycle Record check box the earliest video data will be repla...

Страница 63: ...are three setting modes for storage by time segments as follows Time Record Select a Date select Time Record in the Record Type drop down list box and specify recording time Motion Detection Select a Date select Motion Detect in the Record Type drop down list box and specify recording time Alarm Touch Select a Date select Alarm Touch in the Record Type drop down list box and specify recording time...

Страница 64: ...and trigger DO alarm when video loss occurs Perform the following steps 1 Click Config Channel Parameter Video Lost to go to Video Lost window 2 Tick the Enable Detection check box If cleared video loss detection is not enabled 3 Select video channel set the DO to be linked drag your mouse to set the alarm time Grids in blue are the alarm time as shown in Figure 56 4 Click Save to save the setting...

Страница 65: ...m will be triggered Perform the following steps 1 Click Config Channel Parameter Hide Detect to go to Hide Detect window 2 Select video channel hold down the left mouse button on the video screen and drag it to set a hide detection area Click Clear to clear the already set area 3 Select a Sensitivity level 4 Check the DO to be linked 5 Drag your mouse to set alarm time Grids in blue are the alarm ...

Страница 66: ...orm the following steps 1 Click Config Channel Parameter Motion Detect to go to Motion Detect window as shown in Figure 58 2 Select video channel hold down the left mouse button on the video screen and drag it to set a motion detection area Drag your mouse upward to clear the already set motion detection area 3 Select a Sensitivity level 5 is the maximum sensitivity 4 Check the DO to be linked Tic...

Страница 67: ...lick Save to save the settings FIGU RE 58 MO TI ON DE TE C T Alarm Application Before login the camera device before configuring alarm parameters Alarm Parameter Alarm condition Tick the check boxes to select which error state s is detected will the system give alarm Alarm Record set the time length of alarm record Alarm Output Set whether DO output or not when alarm occurs ...

Страница 68: ...alarm giving When DI reaches this state the DO output and video recording d picture capturing are triggered Click Config Alarm Parameter Linkage Parameter to go to Alarm Linkage Parameter window as shown in Figure 60 Select a DI channel and click Read to display the current state Check Linkage Enable box and select an Alarm State the DO channel the recording and snapshot channel to be linked Then ...

Страница 69: ...E NETVIEW alarm time Select an item from the Copy To drop down list box to copy the settings of this channel to other channel Click Save to save the settings FIGU RE 60 AL AR M LIN K AG E PAR AM E TER System Management Before perform system configuration please log onto the camera device first ...

Страница 70: ...sis information to the factory for our issue tracking The system checks the communication link monitoring service control management and other information of the brick IP camera automatically Please log onto the camera device before running self diagnosis Perform the following steps 1 Click Config Sys Configure Device State to go to Device State window as shown in Figure 61 FIGU RE 61 DEV IC E ST ...

Страница 71: ... and Proprietary Information of ZTE NETVIEW 2 Click Start button to start self diagnosis If succeed a prompt box appears as shown in Figure 62 FIGU RE 62 SU CC ESS PR OMP T 3 Click Read button the system displays the self diagnosis results as shown in Figure 63 ...

Страница 72: ...S UL TS Storage Medium Management This is to check the storage medium information including medium type total capacity free space state and format state Check the Disk No click Formatting button to format the selected storage medium as shown in Figure 64 Some camera devices will restart automatically after formatting is finished ...

Страница 73: ...k IP camera Click Config Sys Configure Sync Time to go to Sync Time window as shown in Figure 65 Click Read to check the existing time of the brick IP camera To adjust it change the time and click Save to save the new time FIGU RE 65 SYNC TIM E User Management This is to add modify and or delete user and set authority for users If logging in from WEB browser user name and password are required ...

Страница 74: ...formation of ZTE NETVIEW 61 Click Config Sys Configure User Manager to go to User Manager window as shown in Figure 66 FIGU RE 66 USE R M AN AG E R 1 Adding user Click Add to open the User Info dialog as shown in Figure 67 Enter user information and click OK to confirm ...

Страница 75: ...E NETVIEW FIGU RE 67 USE R IN FO 2 Set user authority Select the user that you want to set authority for him her as shown in Figure 68 Check the boxes in the Permissible column to add the permissions Click Save to save the settings 3 Modify user password Select the user and click Modify button ...

Страница 76: ... 63 FIGU RE 68 USE R AU TH O RI TY M AN AG EME N T Log Query This is to query operation alarm error log information in specified time range Click Config Sys Configure Log Query to go to Log Query window as shown in Figure 69 Select the log type and the time click Search to display the results ...

Страница 77: ...69 LO G QUE R Y Device Upgrade 1 Select the camera device to be upgraded in the left Device List click Config Sys Configure Device Upgrade to go to Device Upgrade window as shown in Figure 70 2 Click Browse and find the file to be upgraded in the pop up dialog click Open button 3 Click Upgrade to start upgrading ...

Страница 78: ...NETVIEW 65 FIGU RE 70 DEV IC E UPG R AD E Note 1 Upgrading will not be done successfully unless the name of the downloaded file is exactly the same as the one specified in the dialog including case match 2 It takes about 3 minutes to upgrade a program file about 1M please wait patiently ...

Страница 79: ......

Страница 80: ...ssion and picture coding and decoding These can be verified by logging on from WEB browser Preventive Maintenance Check if the running environment meets requirements pay attention to the damp proof water proof and dust proof of the chassis Turn power off when the camera is turned off Safety Protection To ensure the stability of the system ESD wrist must be worn when testing terminal device or repl...

Страница 81: ...k normally i Check the model of T Flash card ii If the system has not identified the T FLASH card check if the T FLASH card is in good condition iii Check good condition of T FLASH card socket and if the T FLASH card is inserted to proper place iv After the above inspections are performed and the problem is still there please confirm if the T FLASH card is formatted 6 With fixed network bandwidth ...

Страница 82: ...ht Subjecting the camera under strong light for long time may damage CMOS CCD image sensor and cause them being burned out So the camera should be prevented from direct sun light or halogen lamp 9 How long can be network cable for connecting the brick IP camera extended to Generally UTP cable of LAN Cable can be extended to 100m It depends on the cabling environment and wires ...

Страница 83: ......

Страница 84: ...roof plastic bags Transportation With proper package the product should be covered with canvas against moisture and rain It should be stacked on the vehicle orderly compactly properly safely and reliably against damage caused by jolt Be sure not to transport the product together with other flammable explosive and corrosive materials and protect it from drench or any mechanical damage Do not place ...

Страница 85: ...IEW Storage Storage temperature 20 C to 70 C The product parts should be stored with the original preservative package The warehouse for storing the product should be moisture proof dust proof shock proof and corrosion proof and recommended to be equipped with air conditioner and illuminative devices ...

Страница 86: ...IEW 73 A p p e n d i x B Abbreviations Abbreviation Full Name DI Digital Signal Input DO Digital Signal Output IP Internet Protocol OSD On Screen Display PU Peripheral Unit PTZ Pan Tilt Zoom RTP Real time Transport Protocol TCP Transfer Control Protocol ...

Страница 87: ...s section introduces how to connect NCN 2XXX EP B C brick IP camera into the ZXVNMS platform Creating Encoder and Camera on Management Client 1 Log in the management client software right click on a blank in the device information area and select New EncoderDevice on the right click menu as shown in Figure 71 ...

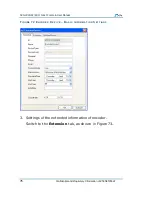
Страница 88: ...d Proprietary Information of ZTE NETVIEW 75 FIGU RE 71 CRE ATE EN CO DE R 2 The Encoder Device dialog box is displayed as shown in Figure 72 on which you can set the basic information of encoder including the name of the encoder ...

Страница 89: ...ser Manual 76 Confidential and Proprietary Information of ZTE NETVIEW FIGU RE 72 EN CO DER DEV IC E BAS IC IN FOR M ATI ON SE TT ING S 3 Settings of the extended information of encoder Switch to the Extension tab as shown in Figure 73 ...

Страница 90: ... NETVIEW 77 FIGU RE 73 EN CO DER EX TE NDE D INFO RM ATI O N SE TTI NG S Address IP address of the encoder InputPortNum The number of video input ports OutputPortNum The number of video output ports DINum The number of DI devices DONum The number of DO devices ...

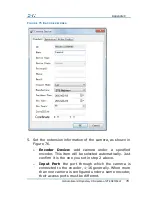
Страница 91: ...spatchServer Select the dispatch server to which the encoder will connect from the drop down list box HomePage Homepage in the format of http IP address of the encoder EncoderType 8000 device 4 Right click on a blank in the device information area and select New CameraDevice on the right click menu as shown in Figure 74 FIGU RE 74 CRE ATE CAM ER A 5 Set the name and model of camera as shown in Fig...

Страница 92: ... shown in Figure 76 Encoder Device add camera under a specified encoder This item will be selected automatically Just confirm it is the one you set in step 2 above Input Port the port through which the camera is connected to the encoder 1 16 generally When more than one camera is configured under a same encoder their access ports must be different ...

Страница 93: ... the protocol type from the drop down list box Control Select it to control Number of Presets set the number of presets to be used FIGU RE 76 CAM ER A EX TEN DED INF OR M ATI ON SE TTIN GS 6 Set video information of the camera as shown in Figure 77 Select Server Transmit if necessary dispatch server and storage server ...

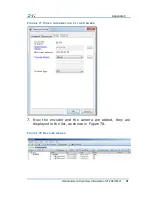
Страница 94: ... and Proprietary Information of ZTE NETVIEW 81 FIGU RE 77 VI DEO IN FO RM ATI ON OF TH E CAM E R A 7 Now the encoder and the camera are added they are displayed in the list as shown in Figure 78 FIGU RE 78 DEV IC ES AD D E D ...

Страница 95: ... Login the IE configuration interface of the NCN 2XXX EP B C brick IP camera click Config Network Parameter Access Server to go to the Access Server Settings window as shown in Figure 79 Enter the correct IP address port etc and click Save to save the settings Information of Heartbeat Host and Alarm Host are generated automatically FIGU RE 79 AC C ES S SE RV ER IP ...

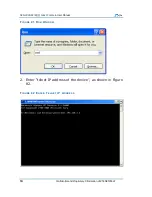
Страница 96: ... device in the DevName field DevID is the ID number shown in the section Creating Encoder and Camera on Management Client above Copy the ID number and paste it here then click Save to save the settings FIGU RE 80 BAS IC INF OR M ATI ON Setting in Telnet Way 1 Click Start Run at the bottom left of your computer to open the Run window as shown in Figure 81 Enter cmd in the Open field and click OK to...

Страница 97: ... C brick IP camera User Manual 84 Confidential and Proprietary Information of ZTE NETVIEW FIGU RE 81 RUN WINDOW 2 Enter telnet IP address of the device as shown in Figure 82 FIGU RE 82 EN TER TE LN E T IP AD DRE SS ...

Страница 98: ... Figure 84 FIGU RE 83 NE TVI EW LOG IN FIGU RE 84 HEL P IN FO RM ATI ON 4 Using setCSG and setPUID you can also set server parameters and encoder ID They are match case SetCSG IP address and port number of access server for example setCSG 192 168 0 2 8001 SetPUID device ID for example setPUID 200101111000002 The device ID is the one shown in the section Creating Encoder and Camera on Management Cl...

Страница 99: ......

Страница 100: ... 2001 EPI CE NCN 2002 EPI CE NCN 2102 EPI CE NCN 2202 EPI BE NCN 2003 EPI CE NCN 2103 EPI CE NCN 2203 EPI BE NCN 2205 EP BE Camera CCD type 1 3 SONY Super HAD CCD Horizontal resolution 420TVL 480TVL 540TVL 420TVL 480TVL 540TVL 540TVL Effective pixels 582 horizontal 500 vertical 782 horizontal 582 vertical 782 horizontal 582 vertical 782 horizontal 582 vertical Lens mount C CS ...

Страница 101: ...2 EPI BE NCN 2003 EPI CE NCN 2103 EPI CE NCN 2203 EPI BE NCN 2205 EP BE Lens optional or not Yes Signal system PAL Automatic IRIS control DC Optical filter switching Support Shutter 1 50 1 60 seconds to 1 100 000 seconds Min illumination 0 3Lux F1 2 0 3Lux F1 2 0 2Lux F1 2 0 3Lux F1 2 0 3Lux F1 2 0 2Lux F1 2 0 2Lux F1 2 Signal to noise ratio S N Greater than 48dB Audio Video Video Compression H 26...

Страница 102: ...002 EPI CE NCN 2102 EPI CE NCN 2202 EPI BE NCN 2003 EPI CE NCN 2103 EPI CE NCN 2203 EPI BE NCN 2205 EP BE Audio Compression AAC Speex Image size 704 576 528 384 704 288 352 288 and 176 144 Frame rate 25 fps PAL Function Heartbeat Support Dual stream Support Motion detection Support Lens blocking Support T Flash card local storage Support 16G max Password protection Support ...

Страница 103: ...face None Two 100M fiber LC interfaces Voice input 1 3 5mm audio interface Linear level 2 0 2 4Vp p impedance 1Kω or MIC Voice output 1 3 5mm audio interface Linear level impedance 600Ω Communication interface 1 RJ45 10M 100M self adaptive Ethernet port 1 RS 422 interface and 1 RS 232 interface 1 RJ45 10M 100M self adaptive Ethernet port 1 RS 422 interface and 1 RS 232 interface 1 RJ45 1 RS 422 an...

Страница 104: ... BE NCN 2205 EP BE Wireless system None NCN 2003 EPI CE NCN 2103 EPI CE and NCN 2203 EPI BE EV DO NCN 2002 EPI CE NCN 2102 EPI CE and NCN 2202 EPI BE WCDMA None Wireless online mode None Timing SMS trigger alarm linkage Automatic when power on None Wireless offline mode None Timing SMS trigger None Wireless module automatic identification None Support None General Operating temperature 10 60 Opera...

Страница 105: ...el Parameters NCN 2101 EPI CE NCN 2201 EPI CE NCN 2111E EPI BE NCN 2211E EPI BE NCN 2001 EPI CE NCN 2002 EPI CE NCN 2102 EPI CE NCN 2202 EPI BE NCN 2003 EPI CE NCN 2103 EPI CE NCN 2203 EPI BE NCN 2205 EP BE Power Consumption 4W 6W MAX 4W MAX Dimensions mm 167 8 L 69 71 W 70 26 H mm Weight g 500 10g ...

Отзывы: