background image

LifeVest 4000 Patient Manual 

Page 2-6 


Monitor touchscreen 

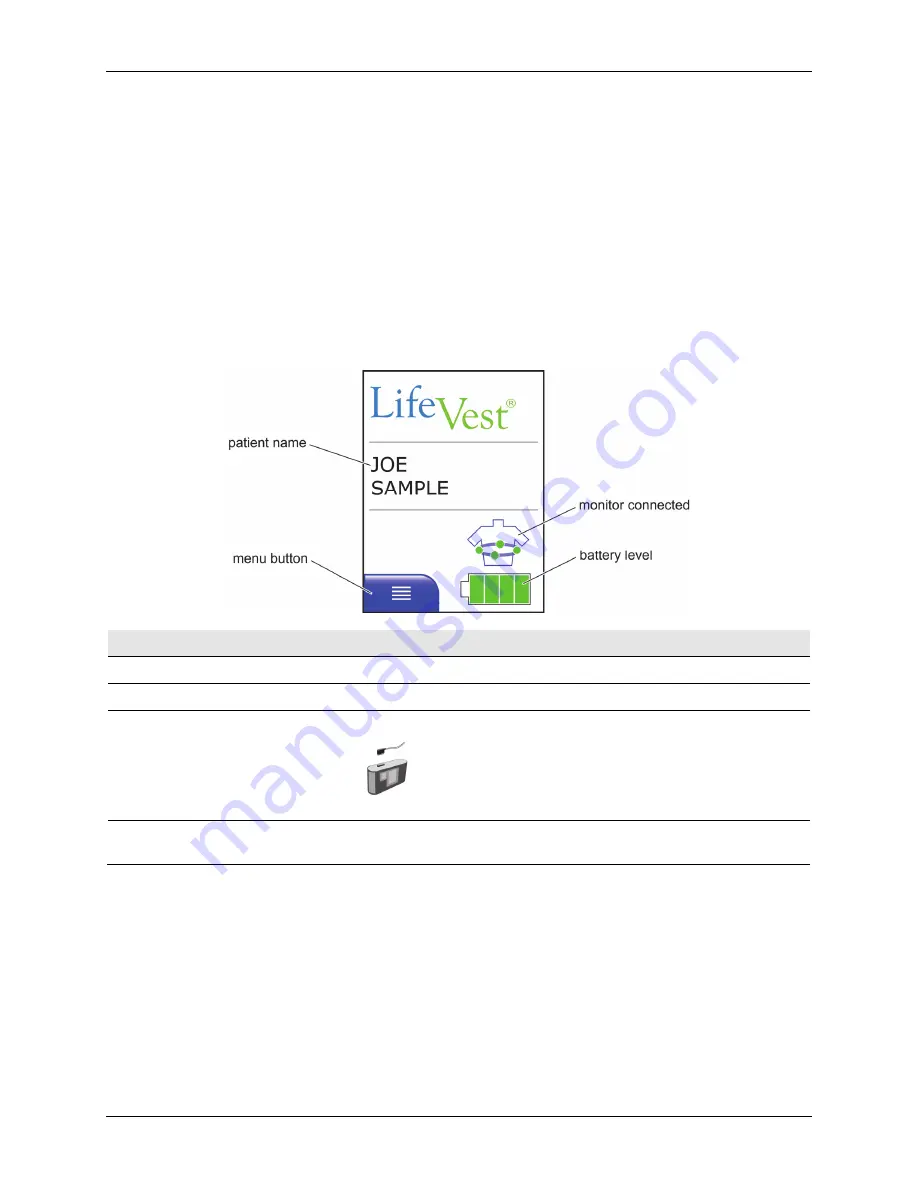
Shown below is an example of the monitor screen during normal monitoring. 

Not all of the symbols, controls, and indicators are shown in this example. Some 
symbols are shown only at certain times. 

As situations change, the screen will change to advise you and suggest an action 
to take. Screens that require you to take some action will have a help screen 
associated with them. For more on help screens, see page 2-8. 

For a complete description of how to use the touchscreen in the daily use of the 
LifeVest, see section 3. 


Item 

What it means and how to use it 

Patient name 

Displays your name so you know this device was programmed for you. 

Menu button 

Tap to display the patient menu, where you can select various options. See details in section 3.  

Monitor connected 

Shows that the monitor is connected to the patient and is in normal monitoring mode. 

If you see this symbol 

 instead of the monitor connected symbol, the electrode belt is not 

connected. See details in section 3. 

Battery level 

Shows amount of charge remaining in battery. Also shows when the battery is discharged or is 
defective. See details in section 3.  

Содержание LifeVest 4000

Страница 1: ...LifeVest Model 4000 Patient Manual PN 20B0047 EUK Rev M May 1 2021...

Страница 2: ...outine 3 1 Normal startup routine 3 3 Taking care of the batteries 3 5 Charger setup and use charger with touchscreen 3 8 Charger setup and use charger with indicator lights 3 13 Sending data manually...

Страница 3: ...eplace belt 5 20 Too much gel 5 21 6 Using the activities options 6 1 Introduction 6 1 Health survey option 6 2 How to know if you are to take the health survey 6 3 Answering the health survey questio...

Страница 4: ...are property of their respective owners Copyright notice 2021 ZOLL Medical Corporation All rights reserved Patents Patent www zoll com patents Software nonexclusive license The LifeVest device includ...

Страница 5: ...ical Ltd Silk Point Queens Avenue Macclesfield Cheshire SK10 2BB United Kingdom Phone Technical Support Email Web 01625 668811 01625 668811 info dot medical com www dot medical com In Spain contact ZO...

Страница 6: ...LifeVest 4000 Patient Manual Page vi This page intentionally left blank...

Страница 7: ...how they work Using the LifeVest device suggests a daily routine tells you how to use and care for the device and tells you what to tell your family members Assembling and putting on the garment goes...

Страница 8: ...al professional about all of your medical conditions and current treatments Always wear the LifeVest when instructed to do so by a medical professional Inappropriate use of the LifeVest may damage it...

Страница 9: ...se buttons lets the device know whether or not the patient is conscious and is critical in deciding when to give the patient a shock If anyone other than the patient holds the response buttons needed...

Страница 10: ...rdiac arrest possibly resulting in serious injury or death When performing the walk test do not continue walking if you experience symptoms such as shortness of breath chest pain or other pain or disc...

Страница 11: ...ate treatment If you encounter a loud high vibration environment while wearing the LifeVest you should be attentive to your device to ensure you respond to any alerts In the unlikely event that vibrat...

Страница 12: ...w Healthcare professionals prescribe the LifeVest for the patient The healthcare professional profile appears below Patient profile The device is appropriate for patients who are at risk for sudden ca...

Страница 13: ...sionals can perform advanced programming of the device Patient training It is essential that all patients receive training before wearing the LifeVest This training is given by ZOLL authorized represe...

Страница 14: ...by electronically sensing a special tag on a piece of merchandise when the tag passes through a detector gate In the USA these detector gates are commonly located near the doorways In Europe the detec...

Страница 15: ...least 27 centimeters 10 6 inches away from your body to prevent interference If you experience interference near the charger with touchscreen move away from the charger If you take the charger with to...

Страница 16: ...The charger with touchscreen may contain FCC ID POOWML C40 FCC ID AU792U05E06800 To comply with FCC RF exposure requirements a minimum separation distance of 27 centimeters 10 6 inches must be mainta...

Страница 17: ...s on page 2 2 2 Garment and electrode belt Fits around your body and connects to the monitor Different style garments may be provided See details on page 2 3 3 Charger with touchscreen Recharges the b...

Страница 18: ...he monitor upside down the display flips for reading by the patient who is wearing the device During normal monitoring most of the time the LifeVest displays a dark screen To see the display press and...

Страница 19: ...ld the heart sensors and therapy pads against your chest 2 Electrode belt Assembles to garment and contains heart sensors vibration box and therapy pads 3 Heart sensors Sense your heart s electrical s...

Страница 20: ...of charging the battery and transmitting data Charger with touchscreen Item Description 1 Touchscreen Displays messages about device operation and allows patient to interact with device For more on th...

Страница 21: ...2 Indicator lights Show the status of the charger For the details on charger operation see section 3 3 Battery Shown charging in the charger while the other battery is in the monitor 4 Power supply Pl...

Страница 22: ...description of how to use the touchscreen in the daily use of the LifeVest see section 3 Item What it means and how to use it Patient name Displays your name so you know this device was programmed fo...

Страница 23: ...number of bars indicates the signal strength LifeVest is set up for a wireless connection but there is no signal Try relocating the charger to improve the signal If you continue to see this symbol cal...

Страница 24: ...help message in the secondary language When you leave the screen the display returns to the primary language This button appears only if a secondary language has been programmed Touch to speak If the...

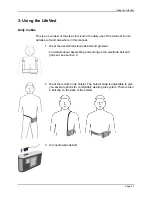
Страница 25: ...where in this manual 1 Wear the assembled electrode belt and garment For details about assembling and putting on the electrode belt and garment see section 4 2 Wear the monitor in its holster The hols...

Страница 26: ...rge the battery every 24 hours See page 3 6 or 6 Respond to any alarms See section 5 7 Completely remove the LifeVest when you shower or bathe See section 4 8 Change and wash the garment every 1 or 2...

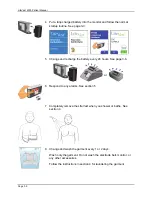
Страница 27: ...r until it clicks Make sure the battery is fully inserted and latched into the monitor 2 Startup screens appear 3 When you hear the gong and feel the vibration in your back press the response buttons...

Страница 28: ...your name and battery level Make sure your name appears on the monitor If your name does not appear contact ZOLL immediately During normal monitoring most of the time the LifeVest displays a dark scre...

Страница 29: ...ve the device to take a shower remove the battery first to ensure the device is not active when you are not wearing it In the event of a power outage If power is interrupted for any reason you need to...

Страница 30: ...r end flap then push the battery latches and slide the battery out of the monitor 2 Remove the fully charged battery from the charger and put it into the monitor Push the battery firmly into the monit...

Страница 31: ...battery charger Push the battery in firmly Read the battery status on the charger Battery should be charging testing or charged 4 If you ever need to unplug the charger unplug it from the wall outlet...

Страница 32: ...p on a nightstand or end table near a power outlet Place the charger so you can easily get to the top of the unit to insert and remove the battery The charger can be placed anywhere in the house but w...

Страница 33: ...ttery with its connector facing the rear of the charger Push the battery in firmly On the charger s screen read the battery status Battery should be charging charged or testing For details about readi...

Страница 34: ...is signal at power up until the charger finds a signal That is normal If you get this symbol all the time charger is not getting a signal Try relocating the charger to another part of the house in ord...

Страница 35: ...t run which can take up to 12 hours Test verifies battery function as part of normal routine After test battery will be charged which can take another 4 hours So the whole process can take up to 16 ho...

Страница 36: ...dark When the room gets dark the charger display gets dim To return the display to full brightness either turn on the light in the room or tap the screen If you want to press a button and the screen...

Страница 37: ...a nightstand or end table near a power outlet Place the charger so you can easily get to the top of the unit to insert and remove the battery The charger can be placed anywhere in the house but we re...

Страница 38: ...the charger Orient the battery with its connector facing the front of the charger Push the battery in firmly Read the battery status on the charger Battery should be charging testing or charged For d...

Страница 39: ...or use in monitor Leave the battery in the charger until you are ready to exchange the battery Green blinking Battery is charging Leave the battery in the charger Charging typically takes up to 4 hour...

Страница 40: ...message you need to send data manually Call ZOLL then follow along with this procedure 1 Go into the same room where the charger is located 2 On the monitor tap the menu button If the screen is dark p...

Страница 41: ...stronger signal try moving closer to the charger You may see this symbol while the device seeks a connection This is normal If this symbol does not go away after several minutes you cannot send data P...

Страница 42: ...18 8 The monitor shows when data transfer is complete Tap OK If the monitor is unable to send data you ll get this message Tap X and try again If you continue to have a problem sending data you will g...

Страница 43: ...spot then to the cell tower Symbols on the devices show the signal strength One symbol shows the strength of the monitor signal the other shows the strength of the cellular signal Depending on which t...

Страница 44: ...the number of green segments The more segments the better To get a stronger signal try moving the monitor closer to the charger If you have at least one green segment data can be sent The monitor is...

Страница 45: ...indow If you have at least one bar data can be sent The device is not connected to a cellular network You may see this signal until the device finds a signal That is normal If you get this symbol all...

Страница 46: ...hythm At times you may want to record your heart rhythm for your doctor to review Follow this procedure to record your heart rhythm 1 Hold the response buttons for 3 seconds 2 Release response buttons...

Страница 47: ...p screens You can also change the volume of these messages This does not affect the volume of the treatment prompts which are always delivered at full volume Screens speak in the language displayed Fo...

Страница 48: ...Volume level 3 5 Tap Mode until you see the speak mode you want LifeVest speaks when you tap the text area of the screen LifeVest speaks with every help screen You don t have to tap it LifeVest does n...

Страница 49: ...de 1 On the monitor tap the menu button If the screen is dark press and release the response buttons to activate the screen 2 Tap Settings 3 Tap Airplane mode When the airplane symbol appears on the b...

Страница 50: ...e airplane symbol in the upper right corner the LifeVest is in airplane mode When you see the airplane symbol no signals will be transmitted from LifeVest The monitor will go out of airplane mode the...

Страница 51: ...You may be instructed to go into the system information screens 1 On the monitor tap the menu button If the screen is dark press and release the response buttons to activate the screen 2 Tap Settings...

Страница 52: ...call and explain that your LifeVest needs to be updated You will be talked through a simple updating process You are to remain on the phone with ZOLL until this entire process has been completed You n...

Страница 53: ...Refer to these instructions to follow along as you remain in contact with ZOLL As you respond to each step tell ZOLL what you see on the screen 1 During normal monitoring the LifeVest screen should di...

Страница 54: ...LifeVest 4000 Patient Manual Page 3 30 4 Tap the next page button 5 Tap Support mode 6 Tap OK 7 You ll see the support mode screen for a few moments...

Страница 55: ...e either a support PIN or an update code Tell ZOLL which screen you see then read the number to ZOLL and wait for further instructions 9 When ZOLL tells you that the update has been completed tap OK t...

Страница 56: ...When you clean these items keep in mind Don t apply liquids directly to any of the non washable items as they contain electronic components that can be damaged Don t attempt to clean any electrical c...

Страница 57: ...ered Anyone touching the patient during a treatment may be shocked Do not remove the battery do not disconnect the electrode belt from the monitor and do not loosen the garment while the monitor is br...

Страница 58: ...he patient gets the alarm message shown below and the patient is unconscious call for help and then start CPR If the patient remains conscious check the belt to make sure all electrodes are pressing a...

Страница 59: ...ange to return the LifeVest system Battery recycling WARNING Do not dispose of or incinerate the batteries The batteries contain lithium ion and must be disposed of properly by ZOLL The lithium ion ba...

Страница 60: ...LifeVest 4000 Patient Manual Page 3 36 This page intentionally left blank...

Страница 61: ...lectrode belt and garment Connecting and disconnecting the electrode belt Removing the garment when you shower or bathe Disassembling and laundering the garment Assembling the electrode belt to garmen...

Страница 62: ...ckets The rear pockets are numbered 1 Insert the pads with silver to silver By that we mean to have the silver sides of the pads with the green stickers facing the silver fabric on the pockets Snap th...

Страница 63: ...secure the vibration box to the garment The vibration box goes in position numbered 2 Place the vibration box with the label side facing up Snap the flap over the vibration box to the blue tabs Make...

Страница 64: ...ront pocket is numbered 3 Insert the pad with silver to silver By that we mean to have the silver side of the pad with the green sticker facing the silver fabric on the pocket After the therapy pad is...

Страница 65: ...odes to the garment Match the colors on the backs of the electrodes to the colors of the Velcro on the garment 5 Make sure that you have properly assembled the electrode belt to the garment See next p...

Страница 66: ...k like the following figures Outside view This side faces away from your body when worn The foam sides of the electrodes face the back of the garment Inside view This side faces toward your body when...

Страница 67: ...othing including underwear must be worn OVER the device NOT under it 2 If desired apply unscented hand lotion or skin cream to the four ECG round electrodes 3 Put on the garment making sure The garmen...

Страница 68: ...LifeVest 4000 Patient Manual 4 Connect the garment ends together in the front Make sure that the clips are fully inserted past the slight bumps in the clips Page 4 8...

Страница 69: ...electrodes and therapy pads are pressing against bare skin The silver fabric pockets and silver side of the therapy pads with green stickers MUST TOUCH YOUR BODY for the device to work properly None...

Страница 70: ...To position the garment properly you may need to adjust the shoulder straps Move the sliders to position the garment properly and for a snug fit The garment should cross your body just below your brea...

Страница 71: ...n Forcing the connector may damage it and cause the system to malfunction 1 Line up the connector with the monitor The cable should face toward the center of the monitor 2 Gently push the connector st...

Страница 72: ...put the LifeVest device back on put the battery in last Completely remove the LifeVest device when you shower or bathe Don t put the monitor electrode belt or battery in or near water To remove the L...

Страница 73: ...ent Pull on the electrodes not on the wires 2 Remove the vibration box from the garment Do not use the vibration box as a handle to pull or lift the electrode belt Pulling on the vibration box can dam...

Страница 74: ...therapy pads with a soft cloth dampened with rubbing alcohol 5 Reassemble the garment and electrode belt as described on page 4 1 6 Put on the assembled garment and electrode belt as described on pag...

Страница 75: ...n Launder the garment every 1 or 2 days Before washing the garment Remove the electrode belt to protect it from damage Do not wash the electrode belt Attach the ends of the garment together Wash the g...

Страница 76: ...LifeVest 4000 Patient Manual This page intentionally left blank Page 4 16...

Страница 77: ...feVest Vibration alarm If you get a vibration in the back of the electrode belt you are being warned that you re about to get a siren alarm You will also get a short vibration alarm every time you cha...

Страница 78: ...h may result If you are conscious hold the response buttons to stop the treatment from occurring The siren stops and a voice prompt alarms bystanders that the treatment has been stopped NO ONE ELSE sh...

Страница 79: ...nue to wear the LifeVest system Leave the belt connected Do not remove the electrode belt or garment and do not disconnect the electrode belt from the monitor Leave the battery in the monitor Do not r...

Страница 80: ...ons to stop the message and siren alarm If the alarm continues even after you press the response buttons remove and replace the battery to reset the device If you continue to get this message call ZOL...

Страница 81: ...hnical alarm there is a problem that needs your attention Take the following action Read the message on the monitor s display Use this chart to see what the message means and what to do Message What i...

Страница 82: ...t provide needed treatment You should continue to use the device Note the code 102 on the screen Write down code 102 and call ZOLL immediately Continue using the device System has a more severe servic...

Страница 83: ...on the monitor s display For specific help with any message tap the help button if one is available on screen Use this chart to see what the message means and what to do Message What it means What to...

Страница 84: ...nditions Tap the help button for details Adjust your garment and electrode belt so that each ECG electrode is touching your skin Pay particular attention to the electrode icons that show yellow or red...

Страница 85: ...ormal operation For more details see page 5 16 You have received a treatment and the gel is drying out Add gel to the therapy pads or replace electrode belt Tap OK to return to normal operation See de...

Страница 86: ...he electrode belt connected change and recharge the battery as normal until you receive a replacement belt Follow instructions about what to do after receiving a treatment on page 5 3 Tap OK to return...

Страница 87: ...s If you are not holding the response buttons device may be defective Call ZOLL This message appears if the battery has been left in the monitor when not in use If you are not wearing the LifeVest rem...

Страница 88: ...2 Message What it means What to do Too much gel is on your skin Leave the gel that is under the therapy pads but wipe the gel from the skin that is not under the therapy pads Tap OK to return to norma...

Страница 89: ...ot making good contact with skin Poor signal Could be muscle noise electrical noise weak signal lost signal or interference Good signal Situation normal no action required If you get one or more of th...

Страница 90: ...lectrodes the round ones Follow this procedure to correct the problem 1 Check your electrode belt and garment Make sure All four ECG electrodes are touching your skin not flipped over or pulled away f...

Страница 91: ...ctrode belt from the monitor 2 Take off the garment and make sure that nothing is covering the metal surfaces of the ECG electrodes 3 Put a dab of unscented hand lotion skin cream or moisturizer on th...

Страница 92: ...erapy pad off skin Metal side is not making good contact with skin Check all three therapy pads front and back Therapy pad on skin Situation normal no action required If you get red symbols make sure...

Страница 93: ...not twisted or loose 2 Make sure that the metal mesh pockets and the therapy pads are pressing against your bare skin For details about putting on the garment and electrode belt see section 4 3 To hel...

Страница 94: ...or then remove the garment and electrode belt from your body 2 Make sure the therapy pads are inserted correctly their metal sides with green stickers facing the metal mesh which faces your body 3 Put...

Страница 95: ...ume normal monitoring To add gel 1 Remove the battery from the monitor then remove the electrode belt and garment from your body 2 Locate the packets of gel you got with the LifeVest system Add one ha...

Страница 96: ...elt While you re wearing the LifeVest tap the help button for reminders about what to do Tap OK to resume normal monitoring To replace the electrode belt 1 Remove the battery from the monitor 2 Discon...

Страница 97: ...ou re wearing the LifeVest tap the help button for reminders about what to do Tap OK to resume normal monitoring To remove excess gel 1 Remove the battery from the monitor 2 With the electrode belt an...

Страница 98: ...LifeVest 4000 Patient Manual Page 5 22 This page intentionally left blank...

Страница 99: ...on of the manual If your prescriber did not request the health survey or walk test you will not be able to access these options Your prescriber ordered the LifeVest to protect you because you are at r...

Страница 100: ...inutes The LifeVest stores your answers and during your next download will send the results to a secure website where your prescriber can choose to review the results Your prescriber may have you repe...

Страница 101: ...K 2 To take the health survey right now tap Now You will be taken to the screens for taking the health survey Continue with the steps on page 6 4 If you want to take the health survey later tap Later...

Страница 102: ...o answer The questions and answers shown in these instructions may not be the questions and answers you will see on your LifeVest 1 When you choose to take the health survey you will be presented with...

Страница 103: ...swers To hear an answer tap the screen in the answer area Select the answer that most closely describes your situation or the way you feel If you need to see the question again tap Back To choose an a...

Страница 104: ...LifeVest 4000 Patient Manual 7 When you get this message you have finished the health survey Tap OK Page 6 6...

Страница 105: ...lth survey Note that your menus might look slightly different than what is shown here The procedure and buttons that you are to tap are the same 1 During normal monitoring the LifeVest screen should l...

Страница 106: ...ies Note If your prescriber did not request that you take any of the activities you will not see the other activities option on your screen 5 Tap Health survey You re now ready to take the health surv...

Страница 107: ...it means What to do You are attempting to take the survey with the electrode belt disconnected The belt needs to be connected to take the health survey Wear the LifeVest and connect the electrode belt...

Страница 108: ...alk test information to a secure website From there your physician prescriber can review the results Your physician prescriber may have you repeat the walk test once a day or once a week The LifeVest...

Страница 109: ...s OK if you need to stop and rest at any time After resting continue walking when you are able to Why is it important that I do the walk test Your physician prescriber may use the information from the...

Страница 110: ...place yourself at risk for a cardiac arrest possibly resulting in serious injury or death When performing the walk test do not continue walking if you experience symptoms such as shortness of breath...

Страница 111: ...questions please contact your physician Tap OK 2 If you are prepared to take the walk test when you receive the message tap Now You will be taken to the screens for taking the walk test Continue with...

Страница 112: ...tions Your physician prescriber may review your answers and use this information to help evaluate your condition If you get a message while taking the walk test follow the instructions on the screen F...

Страница 113: ...tails about changing the speak settings see Speak options on page 3 23 4 When you are ready to answer the question tap Answer 5 Use the and buttons to scroll through the answers 6 Choose an answer To...

Страница 114: ...evere 7 Confirm your answer If the answer shown is correct tap OK To go back to the previous screen and change your answer tap Change 8 Repeat for the second question The LifeVest may tell you not to...

Страница 115: ...or if you need assistance while walking such as by using a cane walker or crutches please tell your prescriber as it may produce inaccurate results Be aware that the LifeVest will be giving you voice...

Страница 116: ...bar shows how far along you are in the walk test 4 If you need to cancel the walk test tap the Cancel button If you tap Cancel you will be asked to confirm that you really want to cancel If you do in...

Страница 117: ...e prompt telling you to stop walking When you hear the voice prompt telling you to stop walking the walk test has ended and you can stop walking Tap OK 6 Proceed to answer the two questions again Afte...

Страница 118: ...s you answered before the walking portion of the test Your answers should reflect how you feel now that you have completed the walk test Your answers do not need to match your previous answers Tap OK...

Страница 119: ...that most closely describes how you feel When your desired answer is shown tap OK If you need to see the question again tap Back Answer scale 0 Nothing at all 0 5 Very very slight 1 Very slight 2 Slig...

Страница 120: ...ivity Tap OK Follow any additional instructions your prescriber gives you regarding when and how to take the walk test After completing the walk test sit down and rest before resuming your normal acti...

Страница 121: ...complete the walk test Note that your screens might look slightly different than what s shown here The procedure is the same 1 During normal monitoring the LifeVest screen should look like the one at...

Страница 122: ...e If your physician prescriber did not request that you take any of the activities you will not see the other activities option on your screen 5 Tap Walk test You re now ready to take the walk test St...

Страница 123: ...nnected The belt needs to be connected to take the walk test Wear the LifeVest and connect the electrode belt to the monitor After connecting the electrode belt the message goes away Try again to take...

Страница 124: ...LifeVest 4000 Patient Manual This page intentionally left blank Page 6 26...

Страница 125: ...Quick charts Appendix A Quick charts Daily routine Assemble electrode belt and garment Put on LifeVest system Normal startup routine Recharge batteries daily Page A 1...

Страница 126: ...atient Manual Remove LifeVest system before bathing or showering Change garment as needed Disassemble electrode belt and garment Manually send data to your doctor If you get a treatment Change speak o...

Страница 127: ...Quick charts Airplane mode When you re finished with device If you get an alert Page A 3...

Страница 128: ...LifeVest 4000 Patient Manual Responding to a gong alert This is just a partial list For complete list and further details see section 5 Page A 4...

Страница 129: ...olds the electrode belt in place against the patient s skin ICD Implantable cardioverter defibrillator Is implanted in the chest and is used to treat abnormal heart rhythms Joules Units of measurement...

Страница 130: ...LifeVest 4000 Patient Manual This page intentionally left blank Page B 2...

Страница 131: ...battery charge Battery charging on charger Animated to show that battery is charging Battery empty on monitor Battery is discharged Battery will still operate for a while but should be changed Battery...

Страница 132: ...ges were made they are disregarded Translate button Tap to change the language on the screen to the secondary language Only shown when there is a secondary language Help button Tap to see help screen...

Страница 133: ...not monitoring Connect belt to monitor so that LifeVest can resume normal monitoring mode Recording LifeVest is recording your ECG signal manually activated Service required Device has a problem and...

Страница 134: ...static spray Laundering symbol No fabric softener Manufacturing date Manufacturing location May also show manufacturing date Expiration date Monitor connector Type BF defibrillator proof connector Mo...

Страница 135: ...l Warning Sign Indicates that the instruction manual must be read Indicates the need for the user to consult the instructions for use Symbol Automated external defibrillator Symbol Dangerous voltage S...

Страница 136: ...l device can be safely exposed Symbol for emits RF energy Symbol for magnetic resonance MR unsafe Symbol for Class II equipment Symbol for do not dispose of in unsorted trash Return to a collection si...

Страница 137: ...LICABLE LAW THE OPEN SOURCE COMPONENTS ARE PROVIDED AS IS WITHOUT WARRANTY OF ANY KIND EITHER EXPRESS OR IMPLIED INCLUDING BUT NOT LIMITED TO THE IMPLIED WARRANTIES OF MERCHANTABILITY AND FITNESS FOR...

Страница 138: ...LifeVest 4000 Patient Manual This page intentionally left blank Page D 2...

Страница 139: ...rged symbol C 1 battery charger 2 4 indicators 2 4 battery charger indicator lights 3 15 battery charger touchscreen indicators 3 11 battery charging symbol C 1 battery defective symbol C 2 battery em...

Страница 140: ...s 4 5 components 2 1 connect belt symbol C 3 connect electrode belt message 5 8 connecting electrode belt to monitor 4 11 connector connecting 4 11 disconnecting 4 11 electrode belt 2 2 2 3 connector...

Страница 141: ...gelled 5 3 glossary B 1 gong alarm 5 5 5 7 gong alert quick reference A 4 green ECG sensor symbol C 2 green sensor symbol 5 13 5 16 green stickers label symbol C 5 on therapy pads 5 18 green therapy...

Страница 142: ...removal 4 12 touchscreen 2 6 monitor menu 2 6 monitor touchscreen 2 2 monitor transmitting symbol C 3 monitor trying to connect symbol C 3 monitoring mode symbol C 3 myocardial infarction B 1 N next...

Страница 143: ...ng data 3 16 sensor symbols 5 13 C 2 sensors on belt 2 3 service code message 5 5 5 6 service symbol C 3 showering 3 2 shutdown device 3 35 signal strength symbols 3 19 signal strength antenna symbol...

Страница 144: ...us 5 2 underwear wearing 4 7 update screens 3 28 using LifeVest 3 1 V ventricular fibrillation defined B 1 ventricular tachycardia defined B 1 VF See ventricular fibrillation vibration 1 5 at startup...

Отзывы: