background image

34

Get more from your Zip NVR with our Free CCTV tips at 

ZipNVR.com

 How To - Add IP Cameras To Your NVR

3

4

2

1

Before adding an IP camera you will need to set its IP 

address (refer to the manual supplied with the cameras). 

The cameras need to be on the same network segment as 

the NVR. The 

default NVR address

 is 

192.168.1.254

. This 

means camera IP addresses all need to start with 

192.168.1

The last number has to be diff erent for each camera.

When using Zip cameras on a Zip PoE NVR simply set the 

switch to ‘Auto’ in network setup (pg24) and your cameras 

will automatically connect. For non PoE NVRs or if you’re using 

other makes of camera just follow these steps.

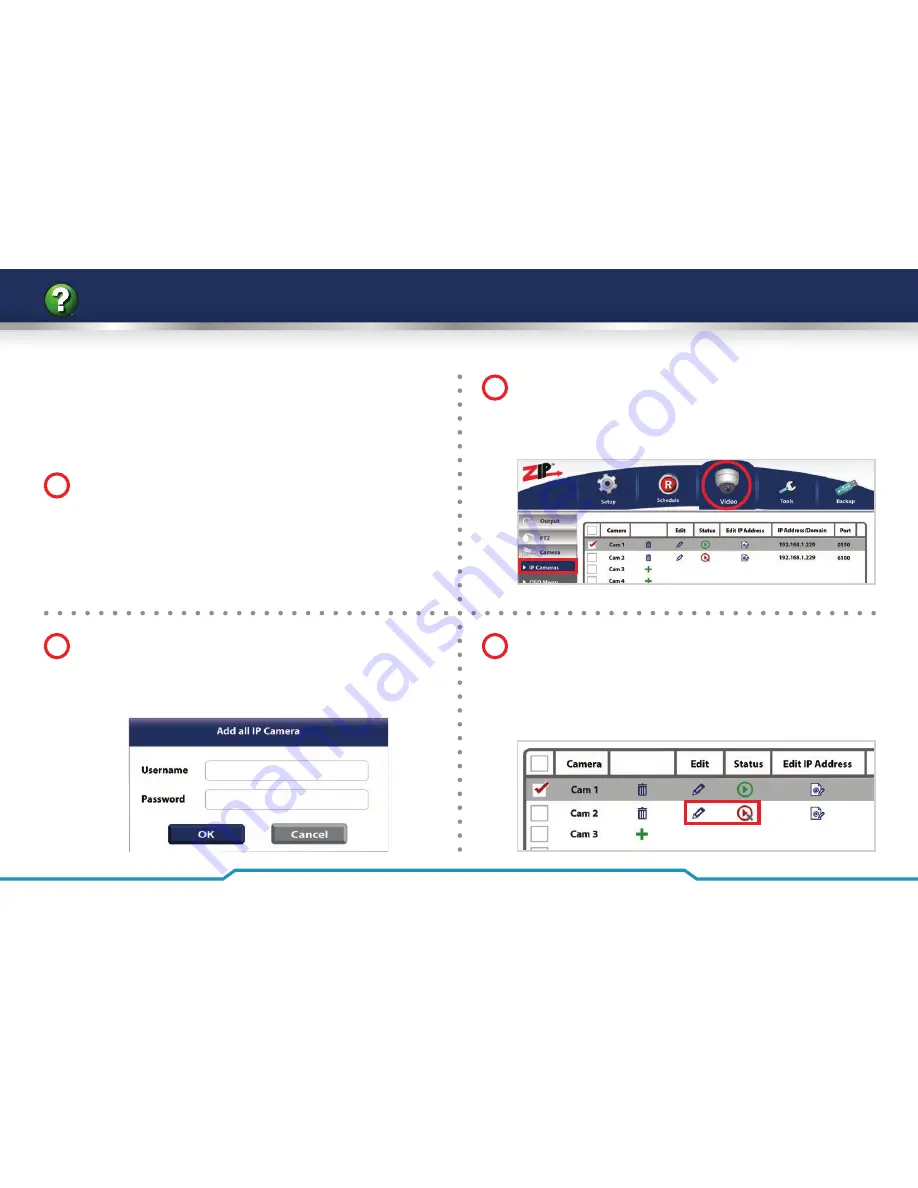
If all the cameras have the same user name and 

password like the Zip range then you can use ‘

Add All

’ 

and enter the 

Username and Password

. The NVR will 

search the network and add all of the cameras.

If any camera has diff erent log-on details they will be 

added but not viewable 

(the status indicator will be 

red not green)

 until they are edited and the correct 

sign details entered. This can be done by clicking on the 

edit icon

 next to the relevant camera, on this screen. 

To add multiple cameras, right click on the screen then 

choose ‘

Add IP Camera

’ or if you are in the menu select 

Video

’ on the top bar, click ‘

Camera

’ and then select the 

IP Cameras

’ tab down the left hand side. 

Содержание Zip104

Страница 1: ...1 Version 1 Q uick S t a r t G uide www ZipNVR com Add more to your CCTV zippy to fit zippy to learn Up To 8MP 4K Recording H 265 Compression PoE Quick Start Guide 4 8 16 32ch Zip NVR Models FREE UK...

Страница 2: ...over the Internet and even on your mobile The Zip NVR is really easy to set up thanks to its built in help menus getting you up and running as quickly as possible it even has an Autoport feature that...

Страница 3: ...y Step First Time Setup 11 Ways To Control Your Zip NVR By mouse 12 Ways To Control Your Zip NVR By IR Remote Control 13 Main Menu 14 Power Up Shutdown 15 Live View 16 Smart Setup 18 Schedule 25 Video...

Страница 4: ...using ZipVision software on your PC locally or remotely See how to backup to a USB drive on page 40 8 How long can I record for Recording times depend on the Hard Drive you have fitted and some of th...

Страница 5: ...R on page 31 13 How do I set up my router for port forwarding The Zip NVR has an Autoport feature which sets up port forwarding for you on compatible routers You can also set the port forwarding manua...

Страница 6: ...n On selected models DISPLAY MODE Cycle to next display mode with each press Single channel full screen 2x2 3x3 4x4 5x5 All channels Available display modes depends on NVR model CHANNEL SELECTION NUME...

Страница 7: ...l recoding on selected channel RECORD Start manual recording of selected channel MENU ESCAPE Display main menu Exit current menu screen SEARCH Display the video playback search screen MUTE UN MUTE Mut...

Страница 8: ...o input 4 AUDIO OUT RCA Phono connector for audio output 5 HDMI HDMI video and audio output 6 VGA DB15 connector for VGA output Display local video output and menu 7 USB Interface USB 3 0 and 2 0 port...

Страница 9: ...utput 6 VGA DB15 connector for VGA output Display local video output and menu 7 HDMI HDMI video and audio output 8 USB Interface USB 3 0 and 2 0 ports for connecting up to two USB mouse or USB flash m...

Страница 10: ...easily through the Zip NVR Control For timed relays use The KitVault keeps your Zip NVR locked cool and secure Heating ON 7am OFF 9am Power ON 6am OFF 5pm Sirens Lights Gates Up to 16 PoE IP Cameras...

Страница 11: ...a good time to set alarm triggers and schedules This is the most effective way to capture footage Setting different alarm types and recording schedules lets you choose when and what to record This is...

Страница 12: ...nd Motion Detection select target area Digital zoom in zoom in to target area Live view drag channel Right Click Single Click Live view show menu Menu exit current menu to upper level menu Scroll Whee...

Страница 13: ...reen 2x2 3x3 4x4 5x5 All channels Available display modes depends on NVR model 4 MENU ESCAPE Display Main Menu Exit current menu screen Exit current menu screen selection 5 NAVIGATION Directional keys...

Страница 14: ...ate and find all the features the Zip NVR has to offer This quick start guide gives you a brief overview of the Disc menu and each submenu For more in depth information about the Zip NVR s menu system...

Страница 15: ...of the NVR should show green indicating the device is getting power Shutdown To power down the NVR enter the Turn Off menu As an added security feature you will be asked to enter your username and pas...

Страница 16: ...nters Live View mode when powered up It is also at the very top of the menu hierarchy thus pressing the MENU Exit button a number of times depending on which menu you re on always brings you to the Li...

Страница 17: ...Switch to the single full screen by choosing a channel number from the drop down list Multi Screen Adjust the screen layout by choosing from the drop down list Add IP Camera Enter the Quick Add dialog...

Страница 18: ...rd you will be asked to set your own unique admin password for extra security If you don t do this during Smart Setup you will be asked to do change it the first time you log on Doing this during Smar...

Страница 19: ...gure key information such as time NTP is on by default date video format It is vitally important that the NVR is set to the correct time and date The wrong time and or date will cause schedules to sta...

Страница 20: ...ator can instantly assess the situation see page 38 You can also send email notifications when the NVR encounters an Exception such as video loss a hard drive error or a full hard drive see page 39 Yo...

Страница 21: ...age Using the calendar in the side bar just choose the year month and day you would like to review Recordings for that day are then displayed on the time line as coloured bars The colour of the bar gi...

Страница 22: ...16 normal speed 4 Play selected recording Resume playback 5 Pause playback 6 Stop playback No Icon Function 7 Fast forward 2x 4x 8x and 16x normal speed 8 Digital zoom Click and drag over the area of...

Страница 23: ...mal recording schedule 16 A recording coloured yellow shows that it was triggered by motion detection No Icon Function 17 A recording coloured blue shows that it was triggered by motion detection and...

Страница 24: ...nd choose what permissions users have both locally and remotely You can also edit and delete current users On initial setup there will only be the administrator account The User tab is where you go to...

Страница 25: ...le when creating a recording schedule Normal will record for as long as it is scheduled Motion records when motion is detected and Alarm records when an alarm is triggered The Email tab allows you to...

Страница 26: ...as or add new ones You can configure each camera s settings and OSD menu Privacy masking and motion detection are both setup here too The Playback tab gives you access to an advanced playback search s...

Страница 27: ...ation on recordings like state stream type frame rate bit rate and resolution You can also set the device ID so the NVR can be controlled independently with the IR remote control when multiple NVRs ar...

Страница 28: ...king up footage a quick backup and a precise backup A quick backup is ideal when archiving recordings as it exports all recorded footage to the selected USB device When doing precise backup you can se...

Страница 29: ...ages which cover Selecting A Network Address pg30 Setting A Network Address pg31 Configuring Port Forwarding pg32 Configuring Zip DDNS pg33 Adding IP Cameras pg34 Searching For An Event pg35 Adding Al...

Страница 30: ...he IPv4 Address which is the address of the PC that you are on The NVR s Default Gateway must be the same as the network s from step 2 The NVR s default IP address is 192 168 001 240 The first 3 numbe...

Страница 31: ...then click Save Enter the Setup menu of the NVR Select the Network tab on the left hand side Ensure you have Static selected Note Do not use a crossover cable for the connection to the router this is...

Страница 32: ...iest way to configure port forwarding is to use UPnP automatic port forwarding If this works then you do not need to access the router setup Manual Port Forwarding If UPnP did not work then we will ha...

Страница 33: ...t hand side Select the DDNS sub menu and enable DDNS To access your NVR remotely on your browser ZipVision or mobile app you can now use the serial number of the NVR followed by ippostcode com e g abc...

Страница 34: ...ally connect For non PoE NVRs or if you re using other makes of camera just follow these steps If all the cameras have the same user name and password like the Zip range then you can use Add All and e...

Страница 35: ...ck Play To view a specific camera and time of day choose the camera s enter the Start Time and End Time then click Play Select the Camera Event Type Month and Year then click Search Now choose a date...

Страница 36: ...is a simple way to extend the record time of your NVR as it will only record small clips rather than all day An alarm trigger could also be used to give a command to a PTZ or VoiceOff unit For example...

Страница 37: ...Warning and Post Recording time as required Select Schedule on the top bar click the Record tab on the left then click the Record Schedule tab Choose the camera you require and select Alarm Record Ch...

Страница 38: ...hannel s to record Click Trigger Alarm Out and select which Alarm Outputs if any to trigger Click OK then click Save Click the Setup button to enter the area selection screen Click and drag the mouse...

Страница 39: ...m For Hotmail Outlook the SMTP Port is 587 and the SMTP Server is smtp live com To schedule email alerts for example outside business hours only click the Email Schedule button Select the camera and t...

Страница 40: ...Camera and the Event Type Click Search then select the footage required and press Backup Note To select all footage highlight checkbox in the top title bar From the main menu of the device select Bac...

Страница 41: ...CB 1 Screw through the holes in the base of the NVR or hard drive shelf and into the four fixing holes in the bottom of the hard drive Screws supplied with hard drive 3 To record higher quality video...

Страница 42: ...nnect an RJ45 crossover cable between the LAN port on the rear of the NVR and the LAN port on the PC laptop Install the ZipVision software following the instructions given in the information pack supp...

Страница 43: ...ick Import to add the NVR to the devices list 6 The final step is to add the NVR to the UK group Highlight the NVR and click Import All The NVR will now be in the UK group Click Finish to exit the wiz...

Страница 44: ...p boasts remote viewing remote playback remote record PTZ control and relay control Click the to add a new device Enter the following details and tap the Save icon when done Device Name choose device...

Страница 45: ...eras Max number of cameras NVR can accept e g 4 8 16 or 32 4 Port forwarding and Zip DDNS must be setup in order for the Android tablet and iPad app to work The tablet app allows you to remotely monit...

Страница 46: ...ers turning on lights and sirens to operators being able to control heating systems and security gates When using an Zip NVR you have three options for controlling third party equipment alarm outputs...

Страница 47: ...Connection With an RS485 connection you can remotely control up to 31 Kontrol Kommand modules via ZipVision This means you can control up to 248 timed relays This also frees up the RS232 port for othe...

Страница 48: ...impressive 60m range A clever mechanical IR automatically inserts or removes an IR filter depending on light levels to provide optimum brightness and colour reproduction night and day The IP CAM930 a...

Страница 49: ...ve With a 3 6mm fixed lens and 10m IR range the IP CAM570 is great for internal surveillance Its crystal clear 4 Mega Pixel resolution makes the mini dome a high performance low cost IP solution The I...

Страница 50: ...nks 1000mbps Rack Mount Overload Protection Great Value Compact Size Supports 10 100Mbps 12V DC 1A Output Overload Protection Great Value Compact Size Supports 10 100Mbps 12V DC 1A Output Mini PoE Spl...

Страница 51: ...et cable allowing PoE cameras to be added to the run thereafter Typical cable runs of 100m into the device and 100m out of the device are easily achievable on a standard 100Mbps network Order Code POE...

Страница 52: ...cable run A single unit can also be used with a single PoE splitter models POE001 002 003 on page 32 to power non PoE cameras over longer network runs Order Code POE100 Supports 10 100Mbps 100m Max I...

Страница 53: ...8P8C 8 position 8 contact crimp on Order Code CON800 1pc Order Code CON801 100pcs A ratchet crimp tool for crimping RJ45 plugs onto network cable with built in wire cutters stripper Order Code TOO960...

Страница 54: ...gnal to RELAY 9 second K K module to close for 3 hours which overrides a central heating controller You might even open RELAY 3 for 9 minutes to trigger a siren because you have spotted intruders You...

Страница 55: ...sories Order Code VID501 1M Order Code VID502 2M Order Code VID503 3M Order Code VID505 5M Order Code VID510 10M HDMI Leads VoiceOff Voice Annunciator Trigger Up To 9999 Sounds 10 Alarm Inputs Trigger...

Страница 56: ...48V DC 1 2A 48V DC 2A 52V DC 2 5A Built in 52V DC 2 5A 12V DC 5A Built in Dimensions 300 x 217 x 53mm 378 x 330 x 50mm 378 x 325 8 x 70mm 378 x 325 8 x 50mm 378 x 325 8 x 70mm 440 x 450 x 98mm All sp...

Отзывы: