background image

801912UK - Commercial Boiling, chilled and sparkling user manual - Sept 2016- v2.04 

Page 13 of 28

  C.  Install

1.  Filter flush

Sub menu 

1. -   Filter flush

2. -   Filter reset.

3. -   Boiling calibration

4. -   Booster.

5. -   Purge CO

2

6. -   Lux sensor calibration.

LCD Screen operation - Section C

OPEN 

Position

CLOSED 

Position

ON

OFF

Once your Zip HydroTap

®

G4 unit has been installed, Go to the install menu to 

configure the system settings for your product. 

Have a bucket or similar container (not supplied) at the ready to hold a 

quantity of water that will be ejected while the filter flush mode is in operation. 

Open the filter access door on the front of the HydroTap

®

G4 and the filter 

cartridge will be exposed. Located to the rear right hand side of the cartridge 

is a flush line, approx 600mm long and the flush line stop cock. Place the 

free end of the flush line into the bucket or container (not supplied).    

• 

Press [MENU] button for main 

menu.

• 

Press the [Install] button. Turn the 

stop cock on. 

• 

Press the [Filter Flush] button.

• 

Press [START] button to start 

filter flush. Once the filter flush 

is finished, turn the stop cock off 

first (ensure the cock is properly 

closed) then press [STOP] to end 

filter flush mode.

• 

Press [<=] button for the previous 

menu or press [HOME] button to 

return to the home screen. 

• 

After initial installation,turning 

off the filter flush mode puts the 

HydroTap

®

G4 into calibration 

mode. With subsequent filter 

changes, the system reverts to 

the main menu.

Note:


Run at least 10 Litres 

of water through to flush the 

filter of any excess black carbon 

particles (this is normal). Once 

the filter flush has finished, 

press the [STOP] button to 

display the main menu

Содержание 801912UK

Страница 1: ...801912UK Commercial Boiling chilled and sparkling user manual Sept 2016 v2 04 Page 1 of 28 ZIP HydroTap G4 User Manual Affix model number label here 801912UK...

Страница 2: ...sure the touch surface is dry as moisture may interfere with the sensor touch control The safety lock can be controlled from either the tap or from the touch screen display See page 22 Filter light Bo...

Страница 3: ...Touching the red BOILING button allows the dispensing of boiling water To dispense boiling water with the safety lock on Place a finger on the safety lock then touch the red BOILING button keeping bot...

Страница 4: ...indicates that the boiling water is below the set dispense temperature Wait for the light to stop flashing before dispensing water The light will typically flash after switching on or coming out of sl...

Страница 5: ...e the tap safety lock see page 22 For hot isolation see page 22 To dispense boiling water with the safety lock off Press the red BOILING lever to dispense boiling water Pulling forward the red BOILING...

Страница 6: ...neutral position Safety sensor calibration Light intensity varies from site to site therefore it is recommended that a recalibration be performed at the time of the installation All direct sunlight m...

Страница 7: ...quickly warning light When the indicator light flashes quickly and continuously a system fault has occurred Check for details on the faults screen see page 12 If unable to rectify call a qualified se...

Страница 8: ...trol while the three red illuminated lights are flashing While dispensing boiling water all three red illuminated lights will continue to flash To dispense chilled water Rotate the control when the in...

Страница 9: ...d with a red dot and the cold direction with a blue dot for dispensing cold to warm water Moving the lever away from the tap will increase the flow rate and towards the tap will decrease the flow rate...

Страница 10: ...iling water or hot water is not available Refer to section G Energy modes Change Filter External Internal filter needs to be replaced Refer to section C Installation System Off System off in off mode...

Страница 11: ...llation Filter flush Filter reset Boiling calibration Booster CO2 Purge Lux sensor calibration Start Stop Internal External Calibration options Enable Disable C Service Password protected D Security E...

Страница 12: ...menu or press HOME button to return to the home screen Press Filter Log to check the filter resets Press button for the previous menu or press HOME button to return to the home screen Press the MENU...

Страница 13: ...e of the cartridge is a flush line approx 600mm long and the flush line stop cock Place the free end of the flush line into the bucket or container not supplied Press MENU button for main menu Press t...

Страница 14: ...he MENU button for main menu Press the Install button Press the Boost button In the next screen press button A to enable the booster dispense boiling water for 30 seconds and check the insulated outle...

Страница 15: ...o stop flowing through the unit Wait a further 10 seconds after the water has stopped running During this time you will hear the CO2 gas running through the tap The purge will stop automatically 6 Lux...

Страница 16: ...Zip on 0345 6 005 005 for assistance service spare parts or enquiries E Security The Zip HydroTap G4 allows the appliance coordinator to set up a password to protect against users changing the prefer...

Страница 17: ...nter your 4 digit password to access the WiFi set up Follow the set up instructions in the ZipAssist installation manual WiFi Setup Zip BC Sparkling 15 11 Tue 26 July 2016 Cloud server not registered...

Страница 18: ...or 24 HOUR mode by pressing the square button The selected mode will be displayed in dark grey colour with a tick box on the right Press NEXT button to set time Set Date Time Press the MENU button for...

Страница 19: ...maximum of 10000 litres Factory set at 6000 litres To edit the filter usage This function is to reset the filter change display after a filter has reached the end of its life see page 23 Filter maint...

Страница 20: ...Hours OFF N A 2 Hr OFF OFF OFF Lux Sensor 680 C Dark N A Sleep 680 C ON Lux Sensor OFF Dark N A OFF OFF OFF Lux Sensor or 2 Hr 680 C Dark 2 Hr Sleep 680 C ON Lux Sensor or 2 Hr OFF Dark 2 Hr OFF OFF O...

Страница 21: ...off at a specific time To activate On Off mode Press the MENU button for main menu Press the Settings button Enter your 4 digit password and press Enter Press the Energy Modes button Press the On Off...

Страница 22: ...s equipped with a safety mode that allows for additional safety protection if needed Hot isolation To allow safety changes select YES on the safety settings screen To activate press button to disable...

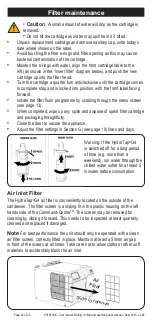
Страница 23: ...HydroTap G4 notifies when filter replacement is due If you notice one of the following you will need to change the filter The white change filter light will flash and remain so until reset The filter...

Страница 24: ...a quarter turn anticlockwise until the cartridge comes to complete stop and is locked into position with the front label facing forward Initiate the filter flush programme by scrolling through the me...

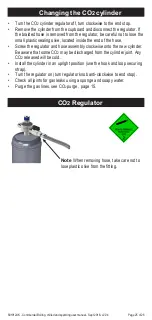
Страница 25: ...raided hose is removed from the regulator be careful not to lose the small plastic sealing olive located inside the end of the hose Screw the regulator and hose assembly clockwise onto the new cylinde...

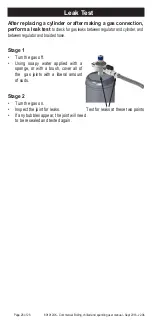
Страница 26: ...r all of the gas joints with a liberal amount of suds Stage 2 Turn the gas on Inspect the joint for leaks If any bubbles appear the joint will need to be resealed and tested again After replacing a cy...

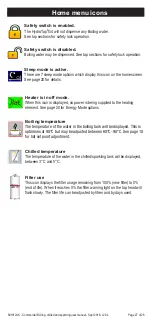
Страница 27: ...displayed no power is being supplied to the heating element See page 20 for Energy Mode options Filter use This icon displays the filter usage remaining from 100 new filter to 0 end of life When it r...

Страница 28: ...ticides near the Command CentreTM Contact details Website www zipwater com uk Email sales zipindustries co uk Facsimile 01362 692 448 Telephone 0345 6 005 005 Head Office Zip Water UK 14 Bertie Ward W...

Отзывы: