background image

38

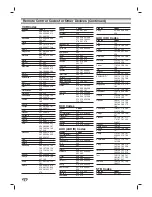
Remote Control Codes for Other Devices (Continued)

VCR Codes 

Brands

Codes

JVC

048 043 130 150
050 055 060 012
031 033 152

Kenwood

014 043 048 039
034 047

Lloyd

034

LXI

034 101 013 014
003 009 017 106 

Magin

040

Magnavox

067 031 034 041
033 068

Marantz

031 067 012 033
069

Marta

101

Matsui

027 030

MEI

031 033

Memorex

101 003 010 014
031 034 053 072
139 134 033 102

MGA

045 046 059

Minolta

013 020

Mitsubishi

059 061 151 046
013 020 045 049

MTC

034 040

Multi Tech

024 034

NEC

012 023 043 048
039

Nordmende

043

Optonica

053 054

Panasonic

066 070 083 145
133 140 074

Pentax

013 020 031 033
063

Philco

031 034 067

Philips

031 067 034 101
054 033 071

Pilot

101

Pioneer

021 048 013

Portland

108

Pulsar

072

Quartz

011 014

Quasar

033 066 075 145

RCA

013 020 033 041
034 062 063 107
109 140 144 145
147 040

Realistic

003 008 010 014
031 033 034 040
053 054 101

Rico

058

Runco

148

Salora

014

Samsung

032 040 102 104
105 107 109 112
113 115 120 122
125

Sansui

022 043 048 135

Sanyo

003 010 014 134
007 102

Scott

017 037 129 112
131

Sears

003 008 010 013
014 081 101 009
020 031 042 017
073

Brands

Codes

Sharp

149 031 054

Shintom

024

Sony

009 056 057 058
077 003 149 052
076 031 078

Soundesign

034

STS

013

Sylvania

031 059 033 034
067

Symphonic

034

Tandy

010 034

Teac

034 039 043

Technics

031 033 070

Teknika

031 019 033
034 101

Thomas

034

TMK

006

Toshiba

112 131 008 047
059 082 042 013

Totevision

040 101

Unitech

040

Video Research

012

Video Concepts

012 046 034 

Videonsonic

040

Wards

013 024 031 034
040 053 054 003
017 033 131

Yamaha

012 043 034 039

Zenith

001 072 080 056
048 034 101 058
012 013 020 106
114 123

DVD Codes 

Brands

Codes

JVC

012

LG (Goldstar)

001 010 016 025

Mitsubishi

002

Pioneer

004 026

Sony

007

Toshiba

019 008

Zenith 

010 016 025 001

AUX (AUDIO) Codes 

Brands

Codes

LG (Goldstar)

005

Luxman

017

NAD

014

Panasonic

003 015 036 046

RCA

004

Toshia

042

Hitachi

010

Marantz

002 021 028 030
032 035 

Victor

006 039

JVC

006 039 049 050

ONKYO

008 009 025 040
041

Sharp

013 029 043 045

KENWOOD

001 013 029 031
044

Optimus

011 013 022

Quasar

003 036 

Sherwood

012 019 

Brands

Codes

Sony

027 034 038 048
053

AUX (CD) Codes 

Brands

Codes

Adc 104
Aiwa

149 178 189 202
212

Akai

134 165 200

Denon

101 190 221 222
223

Emerson

133 136 152 166
175

Marantz

129 135 141 159
224 225 226

Fisher

113 122 138 140
168

GE

209

Hitachi

133 166

JVC

117 196 227 228

KENWOOD

105 110 113 118
144 154 155 198
200 216 217 

Luxman

108 123 153 173

Magnavox 

127 135 172 179
180

Mcs

111 147 156 169 

Mitsubishi

120 179 229 230
231

Onkyo

125 126 130 131
213 215 232

Optimus

100 107 110 124
139 140 145 146
162 164 165 170
163

Panasonic

106 151 176 184
203 219 233

Philips

127 135 195 199
237

Pioneer

107 124 167 171
179 187 191 205
206 207

Quasar

106 176

Radio shack

186 188

Sanyo

121 140 158 168

Sears

147

Sharp

110 141 150 181
200 204 210 150
217

Sherwood

102 115 116 128
141 193

Sony

100 142 168 174
182 183 192 208
234 235 236

Technics

106 148 151 176
184 203 214 218

Teac

103 112 132 141
160 161 177 185
161 197 201

Yamaha

109 119 137 143
194 211

STB Codes 

Brands

Codes

Zenith

001, 002

Содержание HDR230

Страница 1: ...Copyright 2003 Zenith Electronics Corporation Installation and Operating Guide Warranty Model Number HDR230 High Definition Television Receiver...

Страница 2: ...ion which can be determined by turning the product off and on the user is encouraged to try to correct the interference by one or more of the following measures Reorient or relocate the receiving ante...

Страница 3: ...grounding type plug has two blades and a third grounding prong The wide blade or the third prong are pro vided for your safety If the provided plug does not fit into your outlet consult an electricia...

Страница 4: ...ock System 24 Set Password 24 Block Ch Channel 25 Movie Rating 25 TV Rating Children 26 TV Rating General 27 PVR Menu Options 28 30 Program Guide 28 Reservation 29 Reservation Settings General Operati...

Страница 5: ...ected MENU item If the SELECT button is pressed while you are in normal viewing the information banner will be displayed Arrow Buttons 3 3 4 4 1 1 2 2 Allow you to navigate on screen menus and to adju...

Страница 6: ...OFF RATIO Changes the picture aspect ratio SURF Tunes to your 10 surf channels INFO Shows the current station and program information on the screen SELECT Completes the channel number input and promp...

Страница 7: ...OPTICAL Digital audio out jack Connect to digital optical audio equipment COAXIAL Digital audio out jack Connect to digital coaxial audio equipment VIDEO OUT Connect to a TV with video inputs YPbPr O...

Страница 8: ...rovides an RF connection between the HDTV Receiver and the TV and provides the signal of ANT IN jack to TV Attenuator During initial installation and setup of your Zenith HDTV Receiver you may need to...

Страница 9: ...eption area where an undesired signal strength is too high One of the possible symptoms would be that after your program channel search your HDTV receiver does not find all the local digital terrestri...

Страница 10: ...e Antenna to the ANT IN jack on the HDTV Receiver using a coaxial RF cable ote There might be some areas where the signal strength could be too high If so you may need to connect the antenna to the at...

Страница 11: ...TV Receiver to the Antenna In jack on your TV using a coaxial RF cable 3 3 Connect the COMPONENT OUT jacks on the HDTV Receiver to the COMPONENT IN jacks of your TV using RCA type cables The OUTPUT SE...

Страница 12: ...e HDTV Receiver to the Antenna In jack on your TV using a coaxial RF cable 3 3 Connect the RGB OUT jack on the HDTV Receiver to the RGB IN jack of your TV using VGA type connector The OUTPUT SELECTION...

Страница 13: ...k on the HDTV Receiver to the A V in jacks on your VCR using RCA type cables If your VCR is equipped with an S Video jack use the S Video jack ote These connections are only available when 480i displa...

Страница 14: ...i channel decoder Dolby Digital Connect one of the HDTV Receiver s DIGITAL AUDIO OUT jacks OPTICAL or COAXIAL to the corresponding input jack on your amplifier Use an optional digital optical or coaxi...

Страница 15: ...e menu label to help you go to the next level To bring up and exit the Menu Press the MENU button on the remote control to bring up the menu A sec ond press of the MENU button or a press of the EXIT b...

Страница 16: ...on the TV screen Ch Edit Channel Edit This feature allows you to add or erase channels from memory manually and creates your own surf list with up to 10 favorite channels Press SURF on the remote con...

Страница 17: ...so able to add the logo of a channel to the Surf channel list by pressing the SELECT button on the remote A dialog box will ask what you want to do with the highlighted logo area you can replace the h...

Страница 18: ...not work properly There is a bad sector on the HDD Settings status S W version Function Use 3 3 4 4 to select desired option Automatically finds all channels digital available through the antenna inp...

Страница 19: ...us screen or press EXIT on the remote control to return to TV viewing Audio Language The audio language choices are English French or Spanish in the language menu If the selected language is not avail...

Страница 20: ...time and date the Auto Clock Feature or manually Auto Clock Set 1 1 Press MENU to display the on screen menu 2 2 Select the OPTION menu using 3 3 4 4 then press SELECT or 2 2 3 3 Use 3 3 4 4 to selec...

Страница 21: ...level 5 5 Use 3 3 4 4 to select an option then press SELECT to confirm your selection 6 6 Press MENU to return to the previous screen or press EXIT on the remote control to return to TV viewing ip Yo...

Страница 22: ...use Live TV Playback Timeshift record icon or progress Bar display appears on the TV screen Press EXIT to disappear the icon or progress Bar display Caption Settings General Operation 1 1 Press MENU T...

Страница 23: ...t is translucent Transparent The text is transparent In this case whatever the color is the color does not affect the caption display BG Background Color Selects the background color for Closed Captio...

Страница 24: ...personal 4 digit security password When you have already entered a password Enter a 4 digit password using the numbered buttons to confirm the per sonal 4 digit security password then press SELECT 3 3...

Страница 25: ...with the ratings above a specified level Keep in mind that the movie ratings apply only to movies shown on TV not TV programs such as soap operas 1 1 Follow Steps 1 2 as shown for the Lock System on p...

Страница 26: ...ELECT to move to the third level 4 4 Use 3 3 4 4 to select the Age or Fantasy Violence option then press 2 2 or SELECT Age Selection applies regardless of content category of rating Fantasy Violence S...

Страница 27: ...ograms have rating for Violence 5 5 Use 3 3 4 4 to select a rating then press SELECT to confirm your selection All Block All programs with rating are blocked TV Y All Children This program is designed...

Страница 28: ...idden from the screen using the arrow buttons 1 1 2 2 3 3 4 4 Move horizontally to reach other time slots and move vertically to reach other channels 5 5 Use 1 1 2 2 3 3 4 4 to select a program then p...

Страница 29: ...hannel Selects the channel to record Date Selects recording date Time Selects recording start time Duration Selects recording duration Repeat Selects recording repeat option ONCE The receiver is to re...

Страница 30: ...to confirm your selection the pop up dialogue box will be displayed as shown to the left Play1 Begin Plays back the selected program from the start position Play2 Cont Plays back the selected program...

Страница 31: ...button on the remote control while viewing a program 1 1 Press INFO while watching a program Program Information appears on the TV screen You can change the audio signal with 3 4 if available 2 2 Pre...

Страница 32: ...an check if the program is added in the Program List by pressing Program List 4 4 Press GUIDE or EXIT to remove the Program Guide screen ote If the disk space available is insufficient while recording...

Страница 33: ...he speed increases as indicated above Still Picture and Frame by Frame Advance 1 Press PAUSE during playback The receiver will go into PAUSE mode 2 You can advance the picture frame by frame by pressi...

Страница 34: ...sufficient during a Pause Live TV Playback Timeshift operation the oldest Pause Live TV Playback Timeshift section will be deleted To save disk space a program that has no signal can t be stored A blo...

Страница 35: ...iting press the STOP button If you press POWER to stop Clip editing the program may not be recorded Clip edits cannot be made for sections lasting less than 10 seconds Clip Record You can edit during...

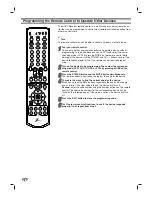
Страница 36: ...quires program ming 2 2 Turn on the device to be programmed Then select the correspon ding mode VCR AUX TV DVD or STB by pressing MODE on the remote control 3 3 Press the POWER button and the MUTE but...

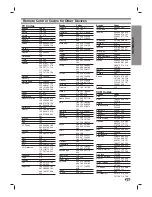
Страница 37: ...n 116 131 143 058 171 004 173 Quasar 034 092 056 Radio Shack 019 043 047 116 127 143 RCA 160 161 165 065 156 144 006 004 023 024 056 074 152 Realistic 007 019 043 047 Runco 168 169 Sampo 058 116 004 0...

Страница 38: ...12 Video Concepts 012 046 034 Videonsonic 040 Wards 013 024 031 034 040 053 054 003 017 033 131 Yamaha 012 043 034 039 Zenith 001 072 080 056 048 034 101 058 012 013 020 106 114 123 DVD Codes Brands C...

Страница 39: ...If HDTV Receiver is connected to your monitor or TV via the RGB port on the back panel the OUTPUT SELECTION switch must be set to the RGB position Otherwise you may not be able to see a picture Selec...

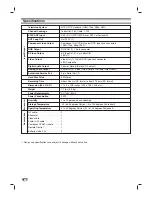
Страница 40: ...t Audio Out 2 Fixed Output Level or Variable Output Level Authorized Service Port 9 pin Serial Port 1 Hard Disk Drive 80G Bytes Recording Time About 9 hours HD format about 27 hours SD format Dimensio...

Страница 41: ...Notes 41...

Страница 42: ...Notes 42...

Страница 43: ...Notes 43...

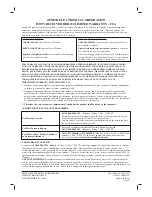
Страница 44: ...R NUMBERS FOR WARRANTY SERVICE You must call 1 800 984 9349 Monday Friday 7 AM to 7 PM CT and select appropriate option from the menu to confirm the product is defective and to obtain Return Authoriza...

Отзывы: