background image

 20

The accessories for steam cooking (available for
purchase in a separate kit) offer the opportunity to
expand the field of steam cooking, allowing you, for
example, to experiment with specific ways of cooking
vegetables, fish, etc.
The accessories include:
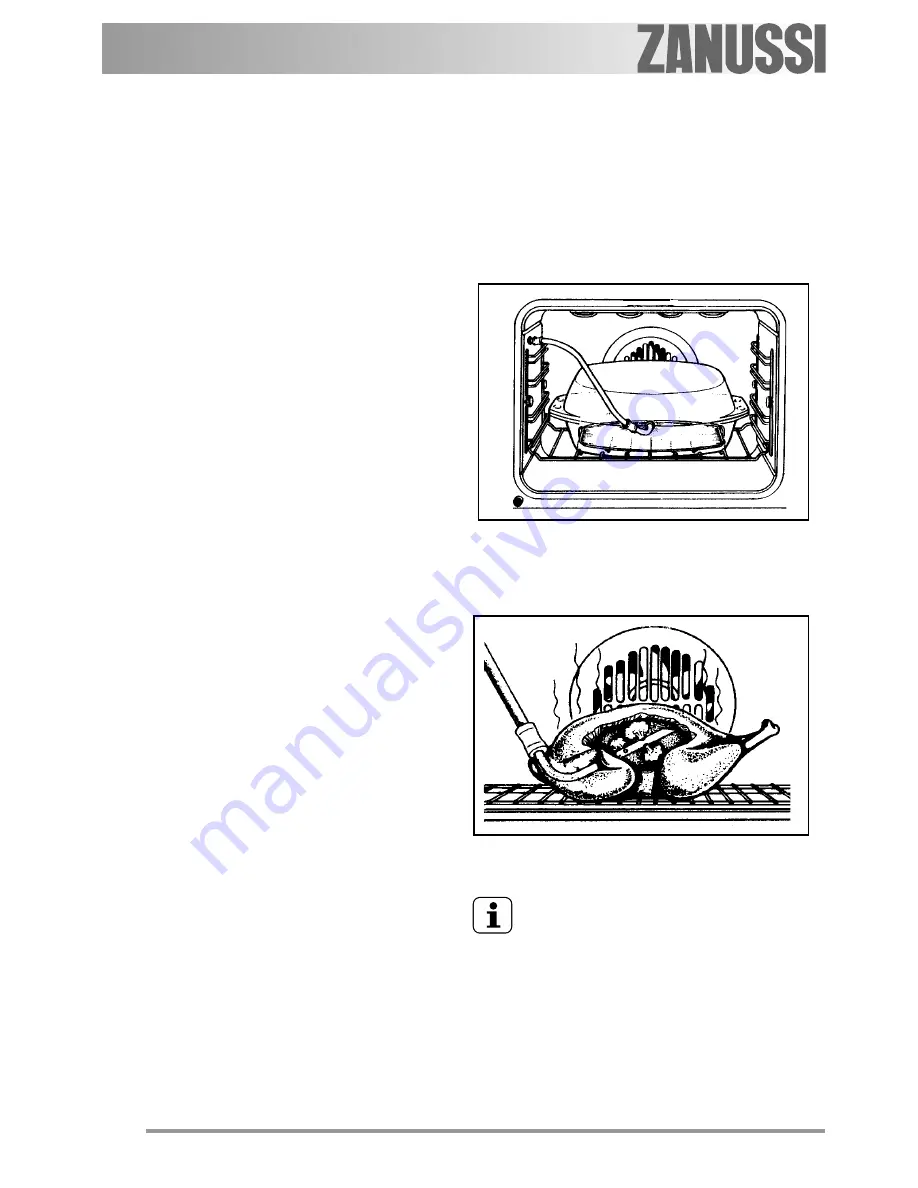
- a dietary baking-pan consisting of two half-shells

made out of special glass with a recess for the
passage of a steam injector (Fig.29);

- a small grill to place inside the dietary baking pan

to keep the food raised;

- 2 injectors for steam cooking;
- a special steam cooking probe with two different

injectors to be used as shown in figures 29 and
30, by inserting them in the probe.

Fig. 29

Accessories for steam cooking

Steam cooking in the dietary baking dish is
particularly suited for vegetables: it heightens the
flavours without watering them down and maintains
the nutrient properties of the foods intact.
Direct vapour cooking (Fig. 30) which uses the
perforated injector is ideal for chickens and turkeys.
The flesh is cooked on the inside thanks to the
vapour while on the outside it browns through
traditional cooking, and ends up being delicate, soft
and very tasty. The holes in the injector must not
be blocked; this is why the injector must always be
placed inside the empty part of the chicken and
turkey, as shown in Fig. 30.

Fig. 30

Fit the end of the probe with the metal
element into the steam outlet. Insert the
two injectors into the other end of the
probe.

Содержание ZCB 990

Страница 1: ...ZCB 990 Operating instructions Steam oven ...

Страница 2: ...t Guide to using the instructions Contents For your safety 3 Description of oven 5 Electronicprogrammer 6 Usingtheapplianceforthefirsttime 7 Thecookingfunctions 10 Programming the oven 11 Specialfunctions 13 Steamcooking 17 Howtousesteamcooking 19 Advice on using the oven 21 Shelfsupports 27 Cookingtables 28 Cleaningandmaintenance 34 Whattodoifsomething does not work 41 Technicalspecifications 43 ...

Страница 3: ...s or lack of experience and knowledge prevent them from using the appliance safely without instruction or supervision of a responsible person The exposed parts of this appliance become hot during cooking and remain hot for some time even after the appliance is turned off Keep children away until it has cooled During use This product is designed for non professional use to cook edible foodstuffs on...

Страница 4: ...lways demand the use of original spare parts Advice for safeguarding the environment Packing All the materials used are environmentally friendly and recyclable Please make your contributiontosafeguardingtheenvironment by using the special differentiated waste collectionchannels Appliances in disuse Discarded or unusable appliances are not worthlesswaste Throughecologicaldisposal variousmaterialsus...

Страница 5: ...Description of oven 1 2 3 4 5 6 7 9 10 8 1 Control Panel 2 Oven Light 3 Grill 4 Fan 5 Ovendataplate 6 Steamcookingwarninglights 7 Water loading drawer 8 Steamintake 9 Wateroutletvalve 10 Wateroutletprobe ...

Страница 6: ...G FUNCTIONS DISPLAY 1 2 3 4 5 6 CAUTION If the electrical supply should fail the programmer retains all the settings in its memoryforapproximately3minutes Once this time has elapsed the data is wiped clean and all the settings will have to introduced once more when the power returns The cooking functions are controlled by an electronic programmer You can select any combination of cooking function ...

Страница 7: ...asttimeyousetthecorrect time Fig 2 b if the symbol does not flash any longer lightlypressthe buttontwice Then proceed as described at point a Fig 3 How to turn the oven on and off The oven must be on to select the cooking function program Every time you press the button the oven symbol appears on the display and the oven light turns on The oven may be turned off at any time To turn the oven off pr...

Страница 8: ... allow the oven to operate EMPTY for about 45minutes Ifyouprefer programtheovento operatefor45minutes ensure the room is well ventilated during the entireoperation It is advisable to repeat the above procedure selecting the function Fan Cooking and the function Large Grill for about 5 10 minutes After 45 minutes allow the oven to cool then clean the interior with warm water and delicate detergent ...

Страница 9: ...perature by five degree intervals Thethermometersymbol showsthatthe temperature inside the oven is increasing When the oven temperature reaches the chosen heat the programmer emits a short acousticsignalandthethermometersymbol stopsflashing How to adjust the temparture Press the button the display will show thetemperature Using the and buttons adjust the preset temperature while the symbol is flas...

Страница 10: ...he combined action of the heat coming from below and the air distributedbytheventilatorallowsa uniform cooking of pizzas and savoury pastries The preset temperatureis175 C Largegrill Theovenemitsintense heat only from above The preset temperatureis250 C You can adjust the temperature between 200 C and 250 C Bottom heat The oven emits a moderateheatonlyfrombelow The presettemperatureis250 C Topheat...

Страница 11: ...ticsignal pressanybutton It will go off automatically after one minute Fig 9 IMPORTANT The counter function does NOT turn the oven off automatically if it is on It is impossible to set the Counter function when the oven is in stand by mode To access or modify the counter setting Pressthe buttonrepeatedly untilthe and symbols appear on the display At this point you can change the counter settingsby...

Страница 12: ...cousticsignalsounds The digits 0 00 and the symbol flash on thedisplay Pressthe buttontoswitchofftheacoustic signal To cancel the cooking time Pressthe buttonuntilthe symbolstarts to flash on the display Press the button until the digits 0 00 appear on the display Fig 13 How to program your oven to switch on and off Set the Cooking time as described on the previous page Pressthe buttonandselectthe...

Страница 13: ...ual heat utilization If you program your oven to switch off automatically itwillactuallyswitchoffafewminutes earlier Inthiswaytheresidualheatinsidetheoven will complete the cooking allowing you to save energy The indications on the display will in any case remain on right up to the end of the cooking timeset Thisspecialfunctionisnotactiveifthecooking timesetislowerthan15minutes Child safety look T...

Страница 14: ...w rooms without any energywaste withtheexceptionoftheovenlight and the fan To activate this function the device must be in its first use mode meaning when the oven is connected for the first time to the mains power or when power is restored after a power cut To select the demo mode wait until 12 00 appears and the symbol flashes on the display Then proceed as follows 1 Press the button for about 2...

Страница 15: ...tton 2 Selectthecookingfunctionasdescribedinthe previous pages 3 Set the temperature using the and buttons The temperature flashes on the display 4 Press the button The lettering FHU appears on the display Fig 20 5 Whentheoventemperaturereachesthelevel set the programmer emits a short acoustic signal and the indication of the temperature level set appears on the display Thisfunctioncanbeusedhaving...

Страница 16: ...he parameters are not correct such as for example if the oven is used incorrectly the control unit terminates all functions currently in use and the display shows the corresponding error code letter F followed by a number Fig 21 Forfurtherdetails seethesection Whattodo if something does not work Fig 21 ...

Страница 17: ...hown in Fig 22 3 Continue to extract it as far as it will come Fig 23 4 Fillthetankwithwateruntilthe Tankfullwarning light comeson Thenstarttoclosethetankby pressing on the centre of the lid Fig 24 5 Toclosethetank pressitdownuntilitreturnsto itsoriginalposition Fig 22 Fig 23 Fig 24 Steam cooking ...

Страница 18: ...n Rememberthatthetank can contain just over one litre of water Thenreplacethecapandclosethedrawer Atthis point the oven is ready for steam cooking If you pour too much water into the tank a safety outlet will pour it back into the bottom of the oven Dry this excess water with a sponge or cloth Fig 26 Fig 25 Fig 26 Tank full light Indicatesthattheovenisreadyforsteamcooking Tank empty light Indicate...

Страница 19: ...e tank as shown on page 17 One litre of water is sufficientforabout60minutesofcookingtime 2 Then prepare the food in pots suitable to be used in the oven position them on the grill Fig 27 at the height suggested in the cooking tables The 2 level from the bottom usually gives the best results 3 Selectthe steam function 4 Select a temperature between 130 C and 230 C Remember that above 230 C steam c...

Страница 20: ...be Fig 29 Accessories for steam cooking Steam cooking in the dietary baking dish is particularlysuitedforvegetables itheightensthe flavourswithoutwateringthemdownandmaintains thenutrientpropertiesofthefoodsintact Direct vapour cooking Fig 30 which uses the perforatedinjectorisidealforchickensandturkeys The flesh is cooked on the inside thanks to the vapour while on the outside it browns through tr...

Страница 21: ...ng systemthatgeneratesnaturalaircirculation andcontinuouslyrecoverscookingsteam Thisallowsforcookinginaconstantlyhumid environment keepingfoodsoftontheinside andcrispontheoutside Moreover thecooking timeandenergyconsumptionarereducedto aminimum Duringcooking steammaybegeneratedand released from an opening on the oven door Thisisquitenormal Bewareofthehotaircomingfromthe oven when opening the door ...

Страница 22: ...thermostat To prevent dangerous overheating through incorrect use of the appliance or defective components the oven is fitted with a safety thermostat whichinterruptsthepowersupply The ovenswitchesbackonagainautomatically when thetemperaturedrops Shouldthesafetythermostattriggerduetoincorrect use of the appliance it is enough to remedy the erroraftertheovenhascooleddown ifontheother hand thethermo...

Страница 23: ...ture between 150 C and 200 C Before baking a cake it is advisable to heat the ovenforabout10minutes andavoidopeningthe oven door during baking Advice for grilling To grill meat or fish baste it with a little oil and place on the grill When grilling the heat only comes from above therefore the grill must be inserted on the upper orlowerguidesdependingonthethicknessofthe meatorfish Inwhichcase ALWAY...

Страница 24: ... on 2 Press the Oven Function Control button and select the Fan Cooking function 3 Ifnecessaryadjusttemperaturesettingusing the or buttons Conventional Cooking The middle shelf position allows for the best heat distribution To increase base browning simply lower the shelf position To increase top browning raise the shelf position The material and finish of the baking trays and dishes used will aff...

Страница 25: ...reheatthegrillonafullsetting fora fewminutesbefore sealingsteaksortoasting Adjusttheheatsettingand theshelfasnecessary duringcooking During cooking the cooling fan and the thermostat controllightwilloperateinthesamewayasdescribed forthefanovenfunction How to use the Inner Grill The inner grill provides quick direct heat to the centralareaofthegrillpan Byusingtheinnergrill elementforcookingsmallqua...

Страница 26: ... the oven ON 2 Select the Pizza Oven Function by pressing theOvenFunctioncontrolbutton untilthe symbol appears on the display 3 If necessary press or buttons to adjust the temperature setting Defrosting Theovenfanoperateswithoutheatandcirculates theair atroomtemperature insidetheoven This increases the speed of defrosting However pleasenotethatthetemperatureofthekitchenwill influence the speed of ...

Страница 27: ...Pull the right and left hand telescopic shelf supportscompletelyout asshowninthepicture Placetheshelforthegrillpanonthetelescopic shelfsupports thengentlypushthemallinside the oven see the picture Donotattempttoclosetheovendoor if the telescopic shelf supports are not completely inside the oven This could damage the door enamel and glass Telescopic shelf supports and other accessories get very hot...

Страница 28: ...tin 1 170 1 160 50 60 in baking tin Smallcakes withwhiskedmixture 2 175 2 1and3 160 25 35 Biscuits shortbread 2 160 2 1and3 150 20 30 Meringues 2 100 2 1and3 100 90 120 Focaccia 2 190 2 1and3 180 12 20 Creampuffs 2 200 2 1and3 190 15 25 BREAD and PIZZA 1000 Whitebread 1 190 2 180 40 60 1 or 2 loafs 500 Rye bread 1 190 1 180 30 45 sandwich loaf 500 Sandwich 2 200 2 1and3 175 20 35 6or8sandwiches 25...

Страница 29: ...dongrill medium 2 210 2 200 60 70 well done 2 210 2 200 70 80 2000 Shoulderofpork 2 180 2 170 120 150 Withcrackling 1200 Lamb 2 190 2 175 110 130 Leg 1000 Chicken 2 190 2 175 60 80 Whole 4000 Turkey 2 180 2 160 210 240 Whole 1500 Duck 2 175 2 160 120 150 Whole 3000 Goose 2 175 2 160 150 200 Whole 1200 Rabbit 2 190 2 175 60 80 Inpieces 1200 Knuckleofpork 2 180 2 160 100 120 2knuckles 1500 Rabbit 2 ...

Страница 30: ...oking with ventilated grill Beeffiletstakes 4 800 3 250 12 15 12 14 Porkstakes 4 600 3 250 10 12 6 8 Half a chicken 2 1000 3 250 30 35 25 30 Chicken breast 4 400 3 250 12 15 12 14 Pork chop 4 600 3 250 12 16 12 14 Hamburger 6 600 3 250 10 15 8 10 Sausages 8 3 250 12 15 10 12 Kebabs 4 3 250 10 15 10 12 Fish filets soles 4 400 3 250 12 14 10 12 Toast with filling 4 6 3 250 5 7 White bread for toasti...

Страница 31: ... drip tray 500 Smallpizzas 1 200 10 20 in moulds or grilled 500 Focaccia 1 200 15 25 inmould Cooking with pizza function Cooking times do not include pre heating time it s necessary to pre heat the oven for 10 minutes before cooking tempe rature C Cookingtime in minutes 4 3 2 1 ...

Страница 32: ...rioches 3 180 20 30 on baking tray BREADANDPIZZA Whitebread 1000 g 2 190 50 60 1 2 French loaf 500 g Rolls 500 g 2 190 20 30 6 8 rolls on baking tray Pizza 1 200 20 30 on baking tray FLANS Vegetablefilled 1 175 30 40 in pyrex container Quiches 2 200 35 45 inmould Lasagne 2 190 45 60 in pyrex container Steamedpotatoes 1 180 60 70 in pyrex container PatatoesGratin 1 185 50 60 in pyrex container Cook...

Страница 33: ...on grill Lamb 1000 g 2 175 120 150 Leg Chicken 1000 g 2 200 50 60 Whole Turkey 4000 g 1 175 150 180 Whole Duck 1 175 150 180 Whole Goose 3000 g 1 160 120 150 Whole Rabbit 2 180 90 120 In pieces FISH Trout 1500 g 2 180 30 45 3 4 fish Tuna 1200 g 2 180 35 60 4 6fillets Hake 2 210 20 30 Function Steam NOTES FOOD TYPES Level tempe rature C Cookingtime in minutes WEIGHT IN g 4 3 2 1 Cooking with the St...

Страница 34: ...andasoftsponge DONOTusescouring pads steelwooloracids e g descalingproducts astheycoulddamagetheenamel Aftercleaning rinsethoroughlyanddrywithasoft clothorshammyleather In case of stubborn stains do not use abrasive detergents e g powders Usenormaldetergents oraclothmoistenedwithhotvinegar leavingiton thestainforawhile Fruitcontainsacidswhich becominghot during cooking can form stains that are ver...

Страница 35: ...lam shut if you try to remove the inner glass panes when the oven door is still mounted on its hinges Removeasfollows 1 Openthedoorfully 2 Locatethetwodoorhinges 3 Liftandturntheleversonthetwohinges 4 Hold the door by the two outside edges and close the door by about 45 5 Pullthedoorforward removingitfromitsseat 6 Liethedooronafirmsurfaceandprotectthe surfaceofthehandlewithasoftcloth 7 Usethebolts...

Страница 36: ...embledsothattheetchingwork facestheoutsideoftheoven Theglasspane isproperlypositionedifwhenpassingafinger over the visible surface no roughness is perceived over the etched area The inner panel must be inserted in positionas showninthediagram Oncetheglasspaneshave beenreassembledintheovendoor fastenthem asdescribedatpoint 8 Do not clean the oven door when it isstillhot astheglasscouldshatter If yo...

Страница 37: ...he reverse order Be sure to tighten the fastening screws properly when you replace the guides It is possible to remove the telescopic runners only unlocking the elements as shown on page 27 Thetelescopicrunnersmustnotbecleaned inthedishwasher Do not attempt to remove the telescopicrunnersuntiltheovenhas cooled down Donotpulloutthetelescopicrunners to remove them from the side rails Sharp edges cou...

Страница 38: ...s upto 300 degrees 2 power supply 230 V 50 Hz 3 power 15 25 W 4 connectiontypeE14 Toreplacethelamp proceedasfollows Fig 32 1 unscrewtheglasslampcover 2 unscrewtheoldlamp 3 fitthenewlamp 4 refittheglasscover 5 switchthepowerbackon When cleaning the shelf supports take care not to remove the lubricating grease behind the telescopic runners This is meant to ensure their good operation ...

Страница 39: ...the probe into a container of any sort 3 Open the oven door Fig 34 and insert the connector A in the outlet valve C located nearthelowerleftcorneroftheovendoor as shown in Fig 35a To fit the connector A on the valve C and allow the water to flow out presslightlyinthedirectionshowninthefigure 4 When the water stops flowing remove the connector from the valve Fig 35b Fig 33 Fig 34 A B C Fig 35a C Fi...

Страница 40: ...or steam cookinganumberoftimes thelimedepositsinside thetankandmaycauseareductionofthesteam itself Afterabout6monthsofoperationitislikelythat acertainquantityoflimewillhavedeposited Itis therefore advisable to proceed with a thorough cleaningofthepartsoftheoventhatgeneratethe steam In which case proceed as follows Empty the tank as described on page 38 Duringthisoperation theovenandthesurrounding ...

Страница 41: ...lt this handbook at the paragraph Advice on oven use Do not leave food in the oven for more than 15 20 minutes after cooking Please takenoteoftheerrorcodeandpasstoour nearestCustomerServiceoffice SYMPTOM THE OVEN DOES NOT WORK THEOVENLIGHTDOESNOTSWITCHON THE OVEN TAKES TOO LONG TO COOK OR COOKSTOO FAST MOISTURE FORMS ON THE FOODAND INSIDE THE OVEN THE ERROR CODE F FOLLOWED BY DIGITSAPPEARS IN THE ...

Страница 42: ...ed by a qualified service engineer Fillthetank Ifafterhavingpouredalitreofwater the warning light remains on the problem can only be resolvedbyaqualifiedserviceengineer Ensure that the steam function is selected Close the oven door securely Fill the water tank Clean the tank out with water as described in the paragraph concerned The steam inlet hole may be obstructed Remove the lime that obstructs...

Страница 43: ... usefulvolume 53 l Heating element power Topandbottomheatingelement 1800W Topheatingelement 800W Bottomheatingelement 1000W SimpleGrillheatingelement 1650W Doublegrillheatingelement 2450W Fancooking 2080W Ventilatedgrill 1650W Pizzafunction 2025W Steamfunction 2825W Ovenlight 25W Ovenfan 25W Coolingfan 25W Totalmaximumpower 2825 W Power supply 50 Hz 230 V Technical specifications ...

Страница 44: ...lectricalpartsand partsonlyprotectedwithfunctionalinsulationmust beguaranteedbycorrectfittingoftheequipment Allthepartsensuringprotection andalsoapossible coveringpanel e g iftheapplianceisplacedatthe endorbeginningofmodularunits mustbefixed sothattheycannotberemovedwithoutusingatool Itisadvisabletoinstalltheapplianceatacertain distancefromrefrigeratorsandfreezers because theheatgivenoffcouldaffec...

Страница 45: ...ectionincompliancewithapplicable standardsandregulations 3 thesocketoromnipolarswitchusedareeasily accessiblewiththeapplianceinstalled Thisapplianceissuppliedwithaconnectioncable incorporatingastandardplug suitableforthetotal electricloadshownontheratingplate Theplugis to be inserted into a suitable wall socket If you require a direct connection to the electric network mains it will be necessary t...

Страница 46: ...VV F H05 V2V2 F T90 H05 BB F section 3 x 1 5 mm2 suitable for the load and the working temperature Also the yellow green earth wire must be approx 2 cm longer than the phase and neutral wires Terminal block The oven is equipped with an easily accessed specialterminalblock arrangedforoperationwith a 230 V single phase power supply Fig 37 The Manufacturer declines any liability in the event of failu...

Страница 47: ...model Mod the product number Prod no and serial number Ser no which are displayed on the oven dataplate Thedataplateislocatedontheoutsideoftheoven and is visible opening the door in the place shown in Fig 38 Original spare parts certified by the product manufacturer andidentifiedbythismark areonly available at our Technical Assistance Centres and Authorised Spare Parts Shops Fig 38 Technical assis...

Страница 48: ...48 35907 0701 R A 08 08 ...

Отзывы: