background image


Z3-DME-20 User Instructions


DOC-USR-0180-05


___________________________________________________________________________________________


Z3 Technology, LLC 

 100 N 8

th

 ST, STE 250 

 Lincoln, NE 68508-1369 USA 

 +1.402.323.0702


17


6.5


View the UDP Stream in VLC


(1)


Run the VLC media player on your PC (version used in testing at Z3: 2.1.5).


(2)


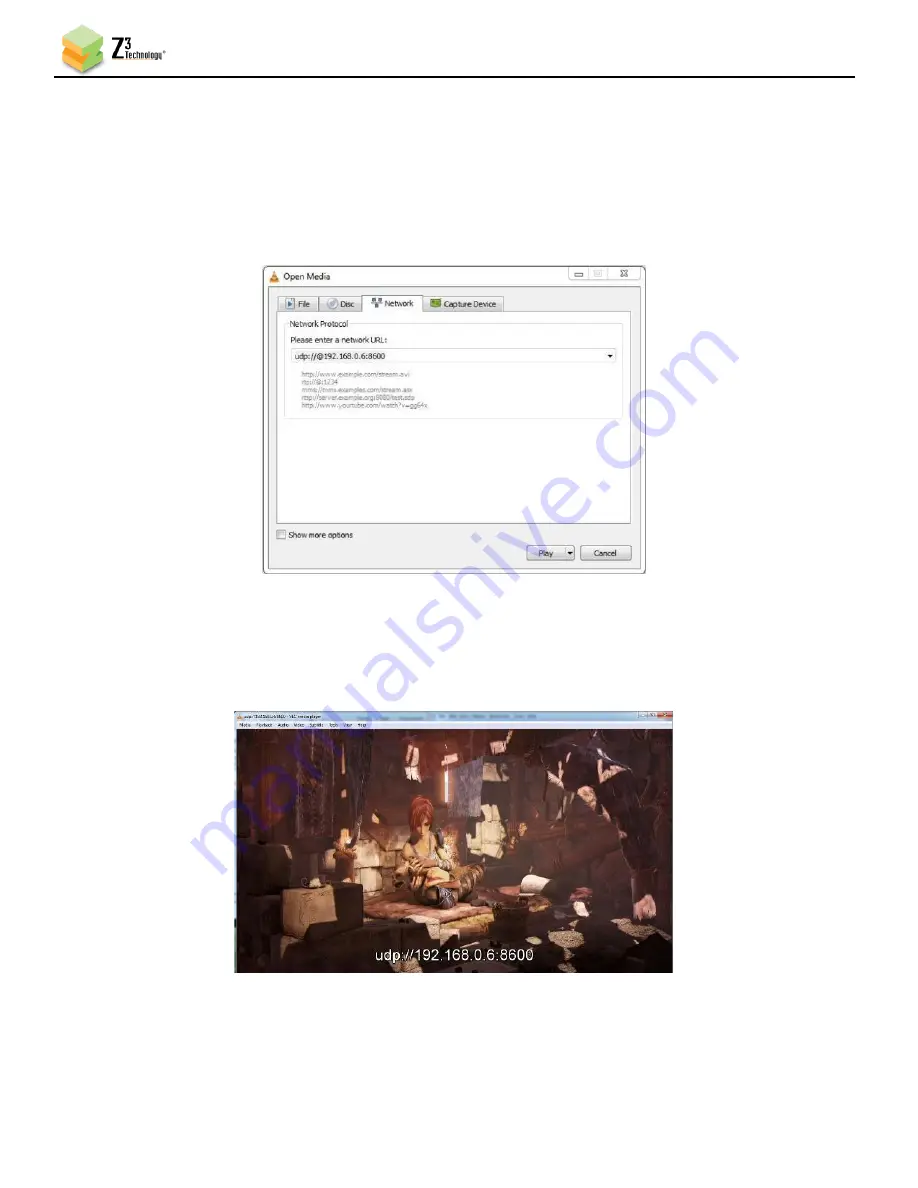
Select Media – Open Network Stream.  In the box, type “udp://@192.168.0.6:8600”, where 

“192.168.0.6” matches the values of the computer IP address or multicast address entered for 
“Dest Address” previously and “8600” is the value of “Dest Port” noted previously. 


Figure 8 VLC Open Network Screen for UDP


(3)


Press “Enter.”


(4)


You will now see video streaming to VLC.


Figure 9 Example of Encoded Video Streaming to VLC (UDP)


Содержание Z3-DME-20

Страница 1: ...cument may not be used reproduced disclosed or disseminated to anyone without the prior written approval of an authorized representative of Z3 Z3 reserves the right to change this product at any time and without notice All product names trademarks trade names service marks or service names mentioned in this document are the property of their respective owners Z3 Technology LLC incorporates HDMI te...

Страница 2: ...T STE 250 Lincoln NE 68508 1369 USA 1 402 323 0702 2 REVISION HISTORY Version Date Change Note Author 1 0 10 16 2018 Original Document SI 1 1 04 30 2019 Update for latest SW JW 1 2 05 08 2019 Minor edits JW 1 3 05 16 2019 Updated features list updated supported input resolutions SI 1 4 09 13 2019 Added Section 7 1 Setting up NTP and Section 7 2 Overlay Timestamp SI ...

Страница 3: ...inder 14 6 4 Configure Encoder for Streaming UDP 16 6 5 View the UDP Stream in VLC 17 6 6 Configure Encoder for Streaming RTP 18 6 7 View the RTP Stream in VLC 18 6 8 Configure Encoder for Streaming RTSP 20 6 9 View the RTSP Stream in VLC 21 6 10 Configure Encoder for Streaming RTMP 22 6 11 View RTMP Streaming 23 6 12 Encoding One SDI Video 25 6 13 Encoding Two SDI Videos 26 6 14 Tuning for Latenc...

Страница 4: ... 1 Setting NTP 40 7 7 Overlay Timestamp Error Bookmark not defined 7 8 Making a Firmware Update 43 7 9 HTTPS Support 44 8 0 SUMMARY OF OPTIONS 46 8 1 The System Setup Tab 46 8 2 The User Presets Tab 47 8 3 The Status Tab 48 8 4 The CH1 Tab 49 8 5 The CH2 CH3 Tabs Channels 2 3 56 8 6 The CH4 Tab Channel 4 57 8 7 Values Appearing at the Bottom of All Tabs 57 APPENDIX A Configuring the Wowza Server f...

Страница 5: ...rk Stream Screen for RTSP 21 Figure 14 Example of Encoded Video Streaming to VLC RTSP 21 Figure 15 Example Settings for RTMP Encode 22 Figure 16 Getting to the Wowza Test Player 23 Figure 17 Viewing Content on Wowza 24 Figure 18 SDI Encode Connections 25 Figure 19 Channel 1 Tab SDI 25 Figure 20 System Setup tab Dual SDI mode 26 Figure 21 CH2 tab Select SDI Input 2 27 Figure 22 Create Additional Ou...

Страница 6: ...igure 36 User Interface Using New IP Address 39 Figure 37 Accessing Advanced Settings 41 Figure 38 Default UDP Settings Left and Advanced UDP Settings Right 42 Figure 39 Updating the Device Firmware from the Web Interface 43 Figure 40 Updater Screen 43 Figure 41 Insert SD Card for Firmware Update 44 Figure 42 System Setup tab configuration 45 Figure 43 Wowza Performance Settings 59 Figure 44 Wowza...

Страница 7: ...isplay Port It allows users to quickly take video from any of those three sources and stream them to the web or internal clients PCs via UDP RTP or RTSP This system is also enabled with Zixi FeederTM This solution is ideal for applications such as low cost broadcast encoders low bandwidth satellite uplink remote monitoring and industrial applications The Z3 DME 20 provides immediate access to H 26...

Страница 8: ...ion describes how to quickly generate a UDP RTP or RTSP stream to VLC how to stream RTMP how to tune for latency how to stream in multiple resolutions recording to USB SD storage devices and how to utilize Zixi FeederTM and Pro MPEG Forward Error Correction Encoding from HDMI and SDI is described 2 2 If You Already Have a System from Z3 and Need to Update the Firmware You can update the firmware v...

Страница 9: ...____________________________________________________________ Z3 Technology LLC 100 N 8th ST STE 250 Lincoln NE 68508 1369 USA 1 402 323 0702 9 3 0 PACKAGE CONTENTS Z3 DME 20 12V Power Supply HDMI Cable MCX to BNC Cable Figure 2 Package Contents Serial Cable Null Modem Adaptor ...

Страница 10: ...ut RS 485 2x GPIO or UART Outputs RTP RTSP MPEG 2 TS over UDP RTMP RTMPS TSRTP MPTS and TS File MP4 Recording Picture in Picture support 4SDI stereo pairs supported Additional Resolution support Support Simultaneous HDMI capture Support for Dual HD SDI mode or SDI and a HDMI input Audio Resampling support Live Video Preview in the web browser Optional PTZ control for external RS 485 ROI encode Sup...

Страница 11: ...680x1050 60fps 1600x1200 60fps 1600x900 60fps 1440x900 60fps 1400x1050 60fps 1280x1024 60fps 1280x1024 75fps 1280x1024 85fps 1280x960 60fps 1280x800 60fps 1280x768 60fps 1280x768 75fps 1280x768 85fps 1280x720 75fps 1280x720 85fps 1280x600 60fps 1152x864 60fps 1024x768 60fps 1024x768 70fps 1024x768 75fps 1024x768 85fps 960x600 60fps 848x480 60fps 800x600 60fps 800x600 72fps 800x600 75fps 800x600 85...

Страница 12: ... 68508 1369 USA 1 402 323 0702 12 5 0 OPERATING CONTROLS 1 Power Switch 2 Status LED 3 GPIO RS 485 4 Reset Pinhole 5 USB 2 0 6 Micro SD Card 7 RS 232 8 Audio In 9 Gigabit Ethernet 10 3G SDI Input 1 11 3G SDI Output 1 12 3G SDI Input 2 13 3G SDI Output 2 14 HDMI Output 15 Display Port In 16 HDMI In 17 12V 1A Power Figure 3 Front and Rear Panels 1 17 16 15 14 13 12 11 10 9 8 7 6 5 4 3 2 ...

Страница 13: ...Actual version numbers for your Z3 product may differ from those pictured in this document 6 1 Set up the UHD Source 1 Select an HD source with HDMI output Power on the UHD Source Connect HDMI to a monitor Set the UHD Source to 2160p output If your source is a media player select the content you would like to stream If you see playback on the monitor you ve confirmed the source works 6 2 Connect a...

Страница 14: ...The ZFinder window appears ZFinder completes a scan of the network and lists the location of all Z3 systems connected to the network In this case the Z3 DME 20 appears 3 Click on the Z3 DME 20 entry in the window to select it This will cause the Edit Device Open Device and Flash LEDs boxes to activate Figure 5 ZFinder with Z3 DME 20 Selected Note Selecting Edit Device allows for manual changes to ...

Страница 15: ...________________ Z3 Technology LLC 100 N 8th ST STE 250 Lincoln NE 68508 1369 USA 1 402 323 0702 15 Click on Open Device An Internet browser window is opened for best results Firefox or Chrome are recommended and the HTTP based graphical user interface GUI appears at the CH1 tab Figure 6 Z3 DME 20 User Interface CH1 Tab ...

Страница 16: ...lution to 3840x2160 or Follow Input 4 Select the codec you would like to use for your encoding Both H 265 HEVC and H 264 AVC are supported In the pictured example verify Video Codec is set to H265 HEVC 5 Set Output Format to UDP 6 You can set the Dest Address to a the IP address of your PC that will be running the VLC media player in the pictured example 192 168 0 6 b or to a multicast address An ...

Страница 17: ... VLC media player on your PC version used in testing at Z3 2 1 5 2 Select Media Open Network Stream In the box type udp 192 168 0 6 8600 where 192 168 0 6 matches the values of the computer IP address or multicast address entered for Dest Address previously and 8600 is the value of Dest Port noted previously Figure 8 VLC Open Network Screen for UDP 3 Press Enter 4 You will now see video streaming ...

Страница 18: ...e dropdown menu 4 Verify Output Resolution to 3840x2160 or Follow Input 5 Select the codec you would like to use for your encoding Both H 265 HEVC and H 264 AVC are supported In the pictured example Video Codec is set to H265 HEVC in the dropdown menu 6 Verify the codec under Audio Info is set to the codec you would like to use for your encoding Both AACHE and AACHEv2 are supported In the pictured...

Страница 19: ...Media Open File 3 In the file type dropdown menu select All Files 4 Find and select the SDP file corresponding to the video and audio codec you selected previously a H265 HEVC video AACHE audio use the SDP file entitled z3 netra_h265_aache sdp b H265 HEVC video AACHEv2 audio use the SDP file entitled z3 netra_h265_aachev2 sdp c H264 AVC no audio use the SDP file entitled z3 netra_h264 sdp 5 Click ...

Страница 20: ...ht corner of any screen to stop any current encoding 3 At the CH1 tab verify the Video Source is set to HDMI using the dropdown menu 4 Verify Video Resolution to 3840x2160 or follow input 5 Select the codec you would like to use for your encoding Both H 265 HEVC and H 264 AVC are supported In the pictured example Video Codec is set to H265 HEVC in the dropdown menu 6 Set Output Format to RTSP 7 Ma...

Страница 21: ...ddress z3 ch m mp4 where IP Address is the IP address of the Z3 DME 20 noted previously ch is 1 for CH1 and m is added if a multicast address is being streamed For example if the IP address of the Z3 DME 20 is 192 168 0 120 encode is being done from CH1 and unicast streaming is being done the user would type in rtsp 192 168 0 120 z3 1 mp4 Note VLC version 2 1 5 or later is needed for RTSP support ...

Страница 22: ... the screen of any tab 3 At the CH1 Tab set Output Format to RTMP 4 The Dest Address textbox should be formatted as IP_address port application stream_name where the IP address is the address of the PC with the Wowza server installed port refers to the port used on this PC application will need to match the application used in Wowza and the stream name is of your choosing For the pictured example ...

Страница 23: ...6 11 2 Run the Wowza Streaming Engine to View RTMP Stream 2 Go to a PC that is on the same network as the Wowza server and open a web browser in this example Firefox is used Type in the URL of the Wowza server with the port 1935 in this example 192 168 0 4 1935 This will bring up the Wowza home page Log in with your user name and password 3 At the top you will see four options Home Server Applicat...

Страница 24: ...69 USA 1 402 323 0702 24 4 You should see the Test Players popup screen Select the Adobe RTMP tab change the Stream name to 1080 should match the directory you are streaming to in the Z3 DME 20 and click Start You will then see the content streamed from your Z3 product 1 Select Adobe RTMP tab 2 Type stream name 3 Click Start 4 Audio and Video start to appear Figure 17 Viewing Content on Wowza ...

Страница 25: ... Input 1 on the rear panel of the encoder Figure 18 SDI Encode Connections 2 Return to the user interface 3 Click the red Stop button at the bottom of any screen to stop any current encoding 4 At the CH1 tab change the Video Source to SDI Input 1 using the dropdown menu 5 Verify your remaining settings are as desired See Section 8 0 for a detailed list of all options 6 Click the green Start button...

Страница 26: ...rent sources SDI Input 1 and SDI Input 2 Each channel supports up to 3G SDI video 1 In System Setup tab go to the Device Management box Navigate to the Set Operating Mode and click Go to show the Operating Mode settings see Figure 20 2 In the operating mode dropdown box select Dual_SDI 3 Click the change button When asked to reboot click the OK button 4 In the CH2 tab change input to SDI Input 2 s...

Страница 27: ...ion but it severely effects image image quality The Low Latency position will be best for most low latency applications If streaming to the VLC media player latency can be reduced on the decode side by adjusting the network caching value By default this is set to 1000ms You can lower this to as low as 200ms To do this go to the following VLC Tools Preferences Show Settings ALL Input Codecs Network...

Страница 28: ...dropdown menu select your storage device location 6 In the File Prefix textbox enter the desired prefix for your ts file name a When saved a number will be automatically generated and added to the end of the file prefix starting with zero If subsequent recordings are made to the same storage device existing files with the same prefix will be detected and the new recordings will auto increment to t...

Страница 29: ... or TSRTP the TS stream can be simultaneously saved to a file on a USB SD storage device 1 Connect to the encoder and go to the System Setup tab Check the Advanced Settings checkbox see 7 3 2 and switch to the Channel tab 2 Configure the encoder Output Format to output UDP or TSRTP and set TS Lowlat Mode to False 3 When UDP or TSRTP is selected the Aux TS File Enable option appears Select True usi...

Страница 30: ...ab or the Stop All button in the lower right corner of any screen to stop any current encoding 2 Set Output Format to ZIXI 3 Set the Dest Address to address port streamid where a address is the IP address of the decoder b port is the port of the decoder c streamid is any stream ID or name you select for example 192 168 0 6 2088 z3 4 The Zixi percent overhead can be adjusted by entering a number be...

Страница 31: ...t to TSRTP It must be TSRTP in order to use Pro MPEG FEC 4 After setting the Output Format the FEC Enable dropdown will become visible Change the value for FEC Enable to True 5 This will allow for setting the number of FEC columns and rows The default setting is 5x1 This is a medium level of coverage that will work in many situations The number of columns multiplied by the number of rows must be l...

Страница 32: ...op down 3 Select UDP from the Output Format drop down 4 Select TRUE from the KLV Enable drop down This will reveal the KLV Pid KLV Bitrate KLV Mode and KLV source settings 5 Set the desired PID value Most applications will dynamically find any PID with KLV The default KLV bitrate of 1000 mbps is usually sufficient If a higher data rate is expected set the bitrate higher 6 Set the KLV Mode to SDI T...

Страница 33: ... set KLV Enable to True Set KLV Mode to SERIAL and the KLV Serial Baud Rate to the rate of the device feeding the KLV metadata Our example assumes 9600 baud To use the RS232 port set int KLV Source to dev ttyAMA0 KLV has two multiplex modes and the DME 20 supports both Synchronous mode includes a timestamp in each TS packet while Asynchronous does not Choose based on the expectation of your decode...

Страница 34: ...508 1369 USA 1 402 323 0702 34 Figure 27 Settings for Multiplex Modes 2 When using the SERIAL RS232 port it is important to disable the serial console Click on the Term tab Change the Serial 0 row settings for Function to Off Click the Save Serial Ports button A reboot will be required Figure 28 Term Tab serial console setting DME 20 2 Set Function to Off 1 Click Save Serial Ports button ...

Страница 35: ... is now enabled and your system clock will be adjusted Note The encoder will need to be on a network with a route to the specified NTP server and port 123 open on the router If the system time is not as expected check the network settings of the encoder Figure 29 Setting up NTP 7 2 Overlay Timestamp The DME 20 supports the overlay of a system timestamp on the video stream This is done via the Text...

Страница 36: ...is powered off and back on it automatically uses those settings 1 In the preset dropdown menu located at the bottom of any screen select new preset Figure 31 Creating a New User Preset Configuration 2 A text will appear Enter your desired preset name In the pictured example z3_config1 is used 3 Click ok Figure 32 Entering a User Preset Name 4 Select your newly created configuration from the preset...

Страница 37: ...namic Host Configuration Protocol This is enabled by default allowing the encoder to dynamically receive an IP address at startup The IP address that is assigned can be seen through using ZFinder If you prefer you can set your encoder to a static IP address If you would like to have your PC set to a static IP address you will need to set your encoder to a static IP address as well To set your unit...

Страница 38: ...d then Ok to the Are you sure window after that to start rebooting Figure 35 Save Complete Message Note The very first time settings are saved it may take up to 30 seconds This is due to some flash initialization which occurs on the very first configuration save 7 4 1 Open the User Interface Using ZFinder 1 Run the ZFinder PC Utility on your Windows PC The ZFinder window appears ZFinder completes ...

Страница 39: ... the encoder and changes may be required before you can access the user interface 3 A web browser will then open at the IP address of the Z3 DME 20 and you will see the user interface 4 You can return to the use of DHCP by checking the Use DHCP checkbox in the System Setup tab and saving that to the preset 7 4 2 Open the User Interface Manually You can also access the user interface by manually ty...

Страница 40: ...tton next to Set NTP 7 Select TRUE from the Enable NTP dropdown 8 Select the desired time zone for the unit form the Time Zone dropdown 9 Enter an NTP server address The default is 128 138 141 172 NIST 10 Click the change button NTP is now enabled and your system clock will be adjusted Note The encoder will need to be on a network with a route to the specified NTP server and port 123 open on the r...

Страница 41: ...le for timestamp format of YYYY MM HH MM SS use ts Y m H M S Figure 30 CH1 Tab Overlay Timestamp 1 Saving Current Settings 2 Return to the System Setup tab 3 Select your newly created configuration from the preset dropdown menu at the bottom of the screen 4 As soon as you select your preset the screen will reload 7 7 2 Accessing Advanced Settings 5 Under Device Setup check the Advanced Settings bo...

Страница 42: ...02 323 0702 42 7 A pop up window appears with a message that the settings were saved successfully 8 Return to your channel tab to set additional encoding configuration parameters for your stream Figure 38 Default UDP Settings Left and Advanced UDP Settings Right 9 You can return to the use of limited settings by un checking the Advanced Settings box in the System Setup tab and saving that to the p...

Страница 43: ...ded on your encoder on the USB drive provided with your system 1 In the user interface System Setup tab click the Update device firmware button Figure 39 Updating the Device Firmware from the Web Interface 2 This brings you to the update image screen In this screen click on the Choose File button Figure 40 Updater Screen 3 This brings you to the File Selection Screen Navigate to the img file to up...

Страница 44: ...t the SD card from your PC 3 Verify the Z3 DME 20 is currently powered off and has an Ethernet cable connected to a DHCP network plugged into the back panel 4 Insert the SD card with your update img file in the slot on the front panel 5 Power on the system and wait a few minutes for the new software to be detected and the system to update 6 While the unit is updating the status LED s on the front ...

Страница 45: ...ck on Go for Set HTTP HTTPS 2 Click on Choose File for Select SSL certificate and choose the crt file that was created 3 Click on Choose File for Select SSL Key and choose the key file that was just created 4 Check the Enable HTTPS checkbox 5 Click on change Test by using https x x x x in your web browser If using a Self Signed Certificate you may have to tell your browser to trust your certificat...

Страница 46: ...68 a b 192 168 0 1 Sets the network gateway to use for the unit Note that a save of these settings and a reboot is needed for changes to this value to take effect DNS Server IP 1 a b c d 8 8 8 8 Used to specify the DNS server for hostname lookup when in static IP mode DNS Server IP 2 e f g h 8 8 4 4 Used to specify the secondary DNS server for hostname lookup when in static IP mode Use DHCP Checke...

Страница 47: ...ed inputs are not supported in this mode When HDMI is 2160p30 SDI Input 1 encode only supports up to 1080p30 If HDMI is 1080p60 or less SDI Input 1 encode supports up to 1080p60 Dual_SDI SDI Input 1 max 1080p60 SDI Input 2 max 1080p60 HD_Interlaced HDMI or DisplayPort max 1080p60 SDI Input 1 Max 1080p60 1080i is supported Update device firmware Button Access the Software Updater to update the firm...

Страница 48: ...r FPS Current target frames per second of encoder Actual FPS Actual frames per second being encoded Key frame FPS Number of key frames per second for example a value of 0 5 means a key frame is inserted every two seconds Width Width of encoded picture Height Height of encoded picture A small i will appear if interlaced is being encoded Audio Status Channel The channel number 1 3 Subchannel Always ...

Страница 49: ...urce HD SDI HDMI Display Port The video source selected for encode Selection of HD SDI will also support 3G SDI resolutions Output Resolution 3840x2160 320x180 Follow Input The encode resolution If this resolution is different from the capture resolution resizing will occur Follow Input generates the resolution based on the capture resolution Note 1 Video Codec H265 HEVC H264 AVC MJPEG Selects the...

Страница 50: ...tely for an HEVC stream The decoder will need to support field separated mode The HE265 DEC from Z3 supports field separated mode Gradual Data Refresh True False Select True to enable refresh of the frame data gradually Video Bitrate RTP RTSP and RTMP Only 2K 40M 4M Textbox for entering video bitrate For example 1M 1 000 000 bits per second 1000k 1 000 000 bits per second 2 5M Not a Valid Format F...

Страница 51: ...ine In MIC Selects audio input source Digitial Stereo Pair 1 2 3 4 5 6 7 8 1 2 3 4 1 2 3 4 5 6 1 2 3 4 5 6 7 8 Select stereo pair s from digital audio input 1 2 indicates one stereo pair consisting of left channel 1 and right channel 2 It is recommended to only run up to 5 stereo pairs for example HDMI input 1 2 1 pair AND SDI Input 1 1 2 3 4 5 6 7 8 4 pairs Only transport stream muxers UDP ZIXI T...

Страница 52: ...he value of TS Rate to make sure it is in line with expectation RTP requires an SDP file for the receiver that corresponds with the video codec used RTSP requires the use of the RTSP URL TSRTP causes streaming of TS over RTP This format is required for encoding with Pro MPEG Forward Error Correction FEC ZIXI causes streaming via Zixi FeederTM to a Zixi ReceiverTM compatible device Decoder URL RTSP...

Страница 53: ...the TS stream in milliseconds PMT PID UDP TSRTP TSFILE Only 0 8191 31 PID assigned to PMT in the TS stream Video Max Delay UDP TSRTP TSFILE Only 300 Sets encoder maximum video delay in milliseconds TS RATE UDP TSRTP TSFILE Only 125K 20000K 5000K The overall bitrate of the transport stream Normally this value should be set to 1 25 video bitrate audio bitrate This can be set to higher values to allo...

Страница 54: ...KLV Pid 0 8191 35 PID assigned to the KLV stream in the TS stream KLV Bitrate 100 1M Expected bit rate of the KLV stream KLV Mode SDI FILE SERIAL Sets the source type for the KLV stream The other positions are FILE and SERIAL FILE will take a binary file of capture KLV data as its source and SERIAL configures the unit to capture KLV via serial port KLV Source dev gv7601 0 Location of KLV source th...

Страница 55: ...D indicates that the unit is not currently encoding Must be in this mode to make any configuration changes POLLING indicates start was pressed and the encoder is waiting for valid input data to be detected RUNNING indicates the unit is currently encoding Error statuses will be preceded by an exclamation point and include a description of the error Note 1 Encode Resolutions Supported WQVGA 320x180 ...

Страница 56: ...s 8 5 The CH2 CH3 Tabs Channels 2 3 The Z3 DME 20 supports simultaneous encode into multiple different resolutions and bitrates Each output stream can be set using a separate Channel tab See the CH1 Tab section for detailed descriptions of available settings on the CH2 and CH3 tab If these tabs are not present you can create a them by clicking on the tab CH2 Default Parameter Options default in bo...

Страница 57: ...ailed descriptions of available settings on the CH4 tab If this tab is not present you can create a them by clicking on the tab CH4 Default Parameter Options default in bold Description Encoder Setup Output Resolution Follow Input On CH4 the output resolution is not configurable The encoded resolution will always match the input resolution Video Bitrate 2K 40M 1M Textbox for entering video bitrate...

Страница 58: ...ncoln NE 68508 1369 USA 1 402 323 0702 58 system status OK encoder status IDLE STOPPED RUNNING Current status of the encoder IDLE indicates no valid input data is present STOPPED indicates the previous encoding session has ended RUNNING indicates the unit is currently encoding video Error statuses will be preceded by an exclamation point and include a description of the error ...

Страница 59: ...P streaming from your encoder the following steps are needed 1 Log in to the Wowza Streaming Engine Manager Home page by typing http localhost 8088 where localhost is the IP address of the server in this User s Guide 192 168 0 4 2 Click on Server in the top band of options On the left column click on Performance Tuning and then Java Settings Click Edit and then change Java Heap Size to Production ...

Страница 60: ...e RTMP Publishing and RTSP Publishing are both set to Open and Client Restrictions is set to No client restrictions Then click Save The Wowza server is now configured to work with your Z3 encoder Note You can also specify Require password authentication for RTMP Publishing In this case Authentication on the channel tab needs to be enabled and a valid Wowza user name and password needs to be entere...

Страница 61: ...Do not see video in VLC UDP Does the IP address set in Dest Address equal the IP address of the PC running VLC Does the port number in Dest Port equal the value entered in the URL for VLC Was included in the UDP address for VLC Is the PC fast enough for 2160p decode on VLC Does the PC have enough DDR to handle 21600p decode on VLC Is VLC version 1 1x or later Problem Do not see video in VLC RTP On...

Страница 62: ...ditional support please click the download device logs button in the GUI at the time the problem occurs and send the resulting gz file along with screenshots of the CH1 CH2 Status tabs to Z3 Technology Z3 Technology s Express Limited Warranty will be void if the label on the hardware bearing the Serial Number is removed tampered with or defaced You can view Z3 Technology s full hardware warranty a...

Отзывы: