


- 8 -
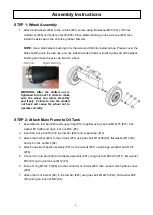
STEP 1: Wheel Assembly
1. Attach both wheels (#48) to the oil tank (#51) secure using flat washer Ø20 (#47), thin hex
slotted nut (#46) and cotter pin 4x36 (#45). Place plastic bushing on the axle cap (#44) then
install the axle cap on the end using rubber hammer.
NOTE:
Use a black plastic bushing to fix the axle cap (#44) like below picture. Please cover the
black bushing onto the axle cap, and use rubber/wooden hammer knocking the end of the plastic
bushing and make the axle cap fixed on wheel.
STEP 2: Attach Main Frame to Oil Tank
1. Assemble the tow bar (#23) and support leg (#14) together using hex bolt M10x75 (#15), flat
washer Ø10 (#8) and nylon lock nut M10 (#5).
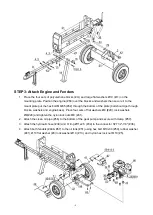
2. Insert the lock pin (#16) into the tow bar (#23) and support leg (#14).
3. Attach the tow bar (#23) to the oil tank (#51) using hex bolt M12x80 (#2), flat washer Ø12 (#3)
and nylon lock nut M12 (#4).
4. Attach one side of beam assembly (#21) to the oil tank (#51) using hinge pin (#42) and R Pin
(#76).
5. Connect the tow bar (#23) to the beam assembly (#21) using hex bolt M12x35 (#11), flat washer
Ø12 (#3) and nylon lock nut M12 (#4).
6. Put an O ring Ø11x2.5 (#34) into the connector of oil tank (#51) then connect with hydraulic hose
(#38).
7. Attach the front tow bar (#9) to the tow bar (#23) using hex bolt M12x75 (#43), flat washer Ø12
(#3) and nylon lock nut M12 (#4).
Assembly Instructions
WARNING: After the slotted nut is
tightened, turn back 1/4 circle to make
sure the wheel can rotate smoothly
and freely. Failure to turn the slotted
nut back will cause the wheel not to
operate correctly.
Содержание 23316
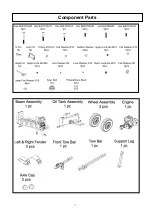
Страница 7: ...7 Component Parts...
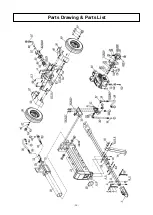
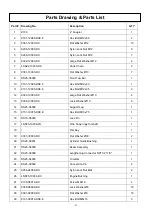
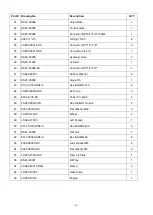
Страница 20: ...20 Parts Drawing Parts List...