background image

Advanced  Phone  Features 

161 

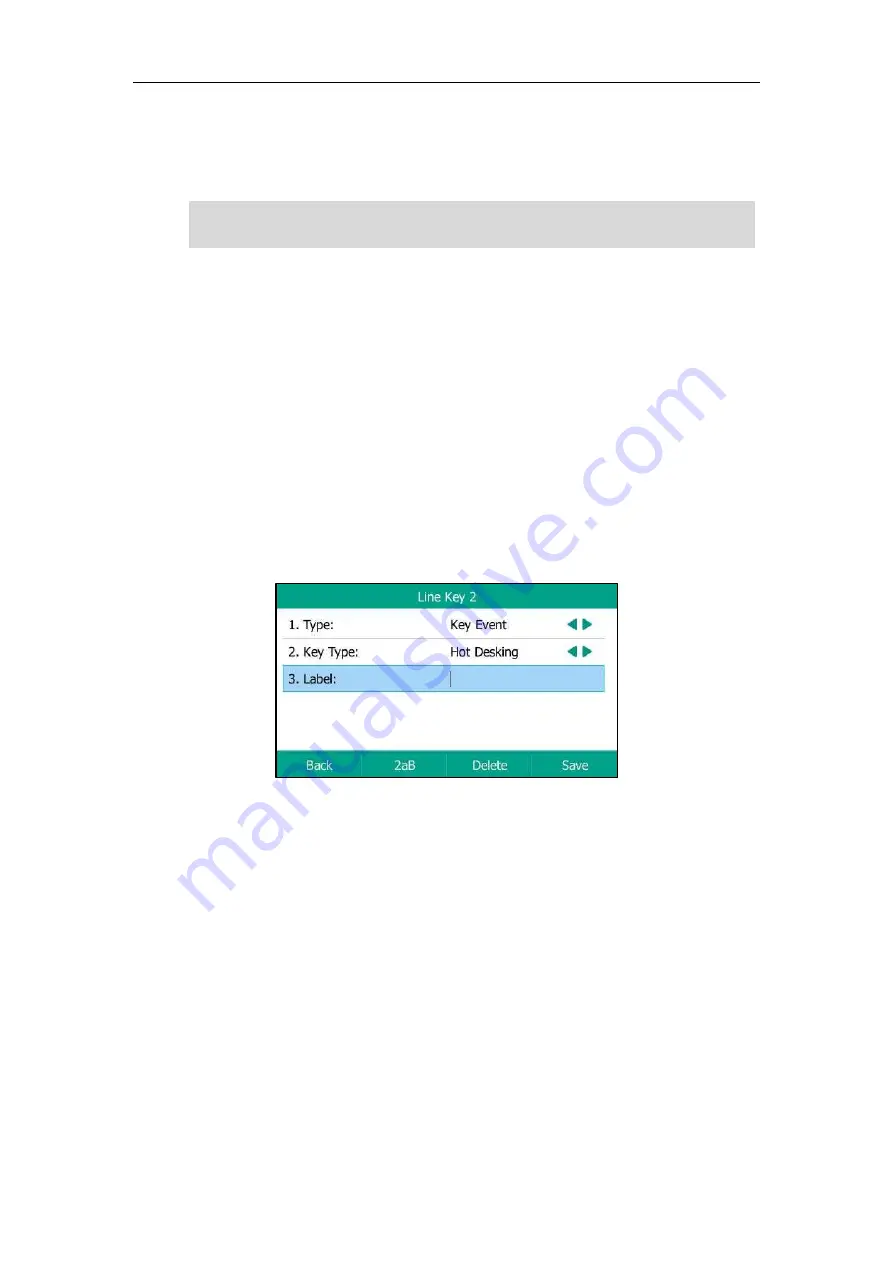
You can use hot desking to log out from the current account and then log into a new account. 
As a result, many users can share one same phone resource at different times. To use this 
feature, you need to configure a hot desking key in advance. 

Note


Configuring a Hot Desking Key 

Procedure:


1.


Navigate to 

Menu

->

Features

->

DSS


Keys

2.


Select a desired line key. 

3.


Select 

Key Event

 from the 

Type 

field. 

4.


Select 

Hot Desking

 from the 

Key Type

 field. 

5.


(Optional.) Enter the string that will display on the LCD screen in the 

Label

 field. 

6.


(Optional.) For the SIP-T52S IP phone, enter the string that will appear on the LCD screen in 
the 

Short Label

 field. 


7.


Press 

Save

Hot desking key is configurable via web user interface at the path

 Dsskey

->

Line Key

Using a Hot Desking Key 

Procedure:


1.


Press the


hot desking key when the phone is idle. 


Hot desking is not available on all servers. Contact your system administrator for more 
information. 


Содержание T5 Series

Страница 1: ......

Страница 2: ...Without Yealink s express written permission recipient shall not reproduce or transmit any portion hereof in any form or by any means with any purpose other than personal use Warranty 1 Warranty THE...

Страница 3: ...into this agreement and to abide by all its terms and conditions just as if you had signed it The EULA for this product is available on the Yealink Support page for the product Patent Information Chin...

Страница 4: ...k uses software under the specific terms of the GPL Please refer to the GPL for the exact terms and conditions of the license The original GPL license source code of components licensed under GPL and...

Страница 5: ...r phone Additionally the examples and graphics in this guide may not directly reflect what is displayed or is available on your phone screen This user guide contains information for the following Yeal...

Страница 6: ...he SIP T54S IP phone as an example Chapters in this guide include Chapter 1 Overview Chapter 2 Getting Started Chapter 3 Customizing Your Phone Chapter 4 Basic Call Features Chapter 5 Advanced Phone F...

Страница 7: ...LED 11 User Interfaces 13 Phone User Interface 13 Web User Interface 20 Features Configurable via Phone Web User Interface 21 Getting Started 27 Phone Initialization 27 Phone Status 27 Viewing the Ph...

Страница 8: ...ent 74 Viewing History Records 74 Placing a Call from History Records 74 Adding a Contact to the Local Directory Blacklist 75 Deleting History Records 75 Disabling History Record 76 DSS Keys 77 Line K...

Страница 9: ...iting 111 Ending Calls 111 Auto Redial 112 Enabling the Auto Redial 112 Redialing a Call Automatically 113 Call Completion 113 Enabling Call Completion 113 Using Call Completion 114 Call Mute 115 Muti...

Страница 10: ...an Incoming Call of the Monitored User 149 Parking a Call Retrieving a Parked Call to the Monitored User 150 BLF List 150 Configuring BLF List Settings 151 Call Recording 153 Recording Using a USB Fla...

Страница 11: ...the Wireless Network 200 Using an Expansion Module 206 Maintaining Your Phone 209 Diagnosing the Network 209 Checking the Network Using Ping Method 209 Checking the Network Using Trace Route Method 21...

Страница 12: ......

Страница 13: ...of your phone and how to navigate the phone web user interfaces Topics include Hardware Icons and Status Indicators Instructions LED Instructions User Interfaces Contact your system administrator for...

Страница 14: ...special characters as well as select menu items which are with index numbers HEADSET Key Toggles the headset mode on or off The LED indicator glows green when headset mode is activated MUTE Key Mutes...

Страница 15: ...P Phones Hookswitch Lifts the handset from the handset cradle then the hookswitch bounces and the phone connects to the line Rests the handset on the handset cradle then the phone disconnects from the...

Страница 16: ...Mode Bluetooth headset paired and connected Bluetooth Enabled mobile phone paired and connected Wi Fi connection successful Wi Fi connection failed USB flash drive connected Line Key Icons Icons for l...

Страница 17: ...rd URL Record Recording in process Record URL Record Multicast Paging Group Listening Paging List Hot Desking Zero Touch URL Phone Lock Directory Speed Dial Icon indicators associated with mobile acco...

Страница 18: ...ing Register failed DND is enabled on this line Call forward is enabled on this line Icon indicators associated with call park retrieve park Icons Description Park successfully Idle state Park failed...

Страница 19: ...xtension registers failed Icon indicators associated with ACD Icon Description Log in Available Wrap up Unavailable Log out Icon indicators associated with a shared line The Local SCA Phone is involve...

Страница 20: ...ine is placed on private hold The call on shared line is barged in by the other shared line party In a multi party call all the participants place the call on hold Icon indicators associated with a br...

Страница 21: ...work signal strength weak to strong Connected Unsecure wireless network signal strength weak to strong Not connected Secure wireless network signal strength weak to strong Not connected Icon indicator...

Страница 22: ...escription The default contact photo LED Instructions Power LED Indicator Power LED Indicator LED Status Description Solid red The phone is initializing Fast flashing red 300ms The phone is ringing Sl...

Страница 23: ...t key LED Status Description Solid green The monitored user is idle Fast flashing red 200ms The monitored user receives an incoming call Solid red The monitored user is busy The monitored user s conve...

Страница 24: ...le Fast flashing green The shared line receives an incoming call Solid green Local SCA Phone Solid red Monitoring SCA Phone The shared line is busy or is in a call The shared line is dialing The share...

Страница 25: ...to configure your IP phone via both phone user interface and web user interface While in some particular cases only via phone user interface or via web user interface is available for you to operate o...

Страница 26: ...P T52S IP phone the page icons appear only when you assign functionality to line key located in line key 7 15 refer to DSS Keys for more information The Idle screen on SIP T52S IP phone is shown as be...

Страница 27: ...Menu screen on SIP T54S IP phone is shown as below History Screen When the phone is idle you can press the History soft key or navigate to Menu History to access the History screen History screen for...

Страница 28: ...T54S IP phone is shown as below Dialing Pre dialing Screen When the phone is idle you can pick up the handset press a line key or Speakerphone key to access the Dialing screen Or you can enter a numb...

Страница 29: ...efer to Linekey Length in Short for more information The Dialing screen on the SIP T52S IP phone is shown as below SIP T52S Calls Screen All of your active and held calls display on the Calls screen Y...

Страница 30: ...enter data and edit fields using the dialpad keys on the phone console The IP phones provide 5 different input methods including 2aB abc Abc ABC and 123 and different input methods provide different...

Страница 31: ...imes depending on what input mode you re in to enter the characters that is displayed on the keypad key You can press the abc ABC 123 2Ab Abc abc soft key one or more times to switch among uppercase A...

Страница 32: ...e it will provide the following special characters Delete text you entered Press or to position the cursor to the right of the text you want to delete and then press the Delete soft key to delete one...

Страница 33: ...an example that navigates to Settings Preference Features Configurable via Phone Web User Interface The main features you can customize for the IP phone via phone user interface and or via web user in...

Страница 34: ...ailable for the SIP T52S IP phone Time Date SNTP Settings Manually Settings Time Date Format Administrator Password Key As Send Phone Lock Phone Lock Settings Unlock PIN Emergency Number X Audio Setti...

Страница 35: ...tiple Line Key per Account Auto Linekeys X Number of Line key X Label Length X Not available for the SIP T52S IP phone Page Tips X Linekey Length in Short X Not available for the SIP T54S IP phone Pro...

Страница 36: ...nsfer Mode X Call Pickup Directed Call Pickup X Group Call Pickup X Anonymous Call Anonymous Call Rejection Advanced Phone Features Busy Lamp Field BLF BLF Pickup X BLF List BLF Key BLF List Settings...

Страница 37: ...e Hold Key Call Pull X Bridged Line Appearance BLA BLA Account Settings X Messages Short Message Service SMS Voice Mail Settings Optional Accessories Headset Headset Prior X Dual Headset X Wireless Ne...

Страница 38: ...User Guide for T5 Series IP Phones 26...

Страница 39: ...the initialization by loading the saved configuration A message Welcome Initializing Please wait is displayed on the LCD screen during the initialization DHCP Dynamic Host Configuration Protocol The p...

Страница 40: ...Phone Status You can view phone status via phone user interface by pressing the OK key or navigating to Menu Status You can also view the phone status via web user interface Procedure 1 Open a web br...

Страница 41: ...The IP phone can support either or both IPv4 and IPv6 addresses Note Configuring the DHCP You can configure DHCP for IPv4 or IPv6 The following takes IPv4 as an example Procedure 1 Navigate to Menu Ad...

Страница 42: ...ocedure 1 Navigate to Menu Advanced default password admin Network WAN Port 2 Select IPv4 or IPv4 IPv6 from the IP Mode field 3 Enter IPv4 and then select Static IP from the Type field 4 Enter the des...

Страница 43: ...e account has been registered already But if the account is not registered you should register it manually You can register one or multiple accounts on the IP phone You can configure one or multiple l...

Страница 44: ...ess Save You can repeat steps 2 to 6 to register more accounts Account registration is configurable via web user interface at the path Account Register The following figures demonstrate single or mult...

Страница 45: ...ne will use the default account to dial out by default From the Idle screen you can press the left or right navigation key to select the desired account as the default account for all IP phones You ca...

Страница 46: ...User Guide for T5 Series IP Phones 34...

Страница 47: ...ustomize your phone Topics include General Settings Audio Settings Contact Management Call History Management DSS Keys Dial Plan Contact your system administrator for assistance or more information Ge...

Страница 48: ...Procedure 1 Click Settings Preference 2 In the Upload Wallpaper 480 272 field click Browse to choose a desired picture from your local system 3 Click Upload The custom picture you uploaded just now ap...

Страница 49: ...ia web user interface at the path Settings Preference Changing Wallpaper from Phone You can change the wallpaper to display on the Idle screen from your phone directly Procedure 1 Navigate to Menu Bas...

Страница 50: ...d as the wallpaper refer to Wallpaper it may affect your experience of the Idle screen display You can choose an appropriate transparency for DSS key labels and status bar on the Idle screen as requir...

Страница 51: ...gain for a specified period of time the screen saver will start again The time date and certain feature status icons for example auto answer DND a new text message will also display on the screen save...

Страница 52: ...saver Type field 3 In the Upload Screensaver field click Browse to choose a custom picture from your local system and then click Upload This field appears only if Screensaver Type is set to Custom The...

Страница 53: ...Press Set as and then select Set as screensaver 4 Press OK Note Configuring the XML Browser URL Procedure 1 Click Settings Preference 2 Select Server XML from the Screensaver Type field Before adding...

Страница 54: ...k field It is not available when you select Server XML from the Screensaver Type field 4 Select the desired screen saver type from the Screensaver Type field If you select System The IP phone will aut...

Страница 55: ...idle for a certain period of time The power LED glows red for 500ms and goes out for 3000ms alternately Note The IP phone will exit power saving mode if one of the following phone events occurs Press...

Страница 56: ...ving field 3 Click Confirm Configuring the Office Hour Office Hour enables you to specify when you start and end work in the office each day Procedure 1 Click Settings Power Saving 2 Enter the startin...

Страница 57: ...TimeOut and Off Hours Idle TimeOut so that when you re actively using the phone power saving mode doesn t initiate as often By default the Office Hours Idle Timeout is much longer than the Off Hours I...

Страница 58: ...on the backlight Always On Backlight is always on 15s 30s 1min 2min 5min 10min or 30min Backlight intensity changes when the phone is inactive after a period of time Procedure 1 Navigate to Menu Basic...

Страница 59: ...age from the pull down list at the top right corner of web user interface Text displayed on the web user interface will change to the selected language Idle Clock Display The time and date are display...

Страница 60: ...me or IP address of SNTP server in the NTP Server1 and NTP Server2 field respectively 4 Select the desired value from the Daylight Saving field 5 Select the desired time zone name from the Location fi...

Страница 61: ...e and date are configurable via web user interface at the path Settings Time Date Configuring the Time and Date Format Procedure 1 Navigate to Menu Basic Time Date Time Date Format 2 Select the desire...

Страница 62: ...he default administrator password is admin For security reasons you should change the default administrator password as soon as possible Procedure 1 Navigate to Menu Advanced default password admin Ch...

Страница 63: ...key HEADSET key and Speakerphone key You are only allowed to dial emergency numbers reject incoming calls by pressing the Cancel key or the Reject soft key answer incoming calls by lifting the handset...

Страница 64: ...00 seconds of automatic phone lock in the Auto Lock field If it is set to 0 the phone will not be automatically locked You need to long press key to lock it when the phone is idle If it is set to othe...

Страница 65: ...the LCD screen prompts you to enter an unlock PIN 2 Enter the desired PIN in the Unlock PIN field 3 Press OK The lock icon disappears from the LCD screen You can long press the key or wait for a peri...

Страница 66: ...Number You can specify the emergency telephone numbers on the IP phone for contacting the emergency services for assistance in case of emergency You can dial these numbers even when the phone is lock...

Страница 67: ...is in use Procedure 1 Press the Volume key to adjust the ringer and audio volume If ringer volume is adjusted to minimum the minimum volume icon will appear on LCD screen Note Ring Tones Ring tones ar...

Страница 68: ...s Preference Ring Type Selecting a Ring Tone for an Account Procedure 1 Navigate to Menu Basic Sound Ring Tones 2 Select a desired account 3 Select a desired ring tone If Common is selected this accou...

Страница 69: ...st be wav from your local system 3 Click Upload The custom ring tone you uploaded appears in the Ring Type field You can only delete the custom ring tone by clicking Del when selecting the desired cus...

Страница 70: ...s for the Directory Soft Key Local Directory Blacklist Remote Phone Book Configuring List s for the Directory Soft Key Directory provides an easy access to the contacts lists The lists may contain Loc...

Страница 71: ...Click Confirm Procedure via phone user interface 1 Press Directory when the phone is idle The LCD screen displays the enabled list s in the directory If there is only one list in the directory press...

Страница 72: ...up will use the ring tone according to the priority Contact ring tone refer to Adding Contacts Account ring tone refer to Ring Tones Phone ring tone refer to Ring Tones If a specific ring tone is sele...

Страница 73: ...1 Press Directory or Menu Directory Local Directory to enter the local directory 2 Highlight a desired group 3 Press Option and then select Delete A message is displayed on the LCD screen 4 Press OK...

Страница 74: ...d this contact will use the ring tone according to the priority Group ring tone refer to Adding Groups Account ring tone refer to Ring Tones Phone ring tone refer to Ring Tones 7 Highlight the Photo f...

Страница 75: ...path Directory Local Directory Deleting Contacts You can delete a contact or all contacts from the local directory Delete a Contact Procedure 1 Press Directory or navigate to Menu Directory Local Dire...

Страница 76: ...ter the desired contact group 3 Press Option and then select Delete All A message is displayed on the LCD screen 4 Press OK to delete Deleting contacts is configurable via web user interface at the pa...

Страница 77: ...Enter the desired contact group If the contact is not in any group enter the All Contacts 3 Highlight a desired contact and then press Send If only one number for the contact is stored in the local di...

Страница 78: ...er matches the entered characters will display in the result list You can dial from the result list directory Importing Exporting Contact Lists You can manage your phone s local directory via phone us...

Страница 79: ...the file format must be csv from your local system 3 Optional Check the Show Title checkbox It will prevent importing the title of the contact information which is located in the first line of the CSV...

Страница 80: ...lacklist You can store up to 30 contacts add edit delete or search for a contact in the blacklist and even call a contact from the blacklist Incoming calls from the blacklist contacts will be rejected...

Страница 81: ...ble via web user interface at the path Directory Local Directory Adding a Contact from the Local Directory Procedure 1 Press Directory or navigate to Menu Directory Local Directory to enter the local...

Страница 82: ...porarily synchronize mobile phone contacts The mobile phone contacts will be imported to your IP phone under Mobile Contacts directory You can add mobile contacts to the local directory or blacklist b...

Страница 83: ...successfully saved to the blacklist directory For how to place calls to and or search for contacts in the mobile contacts directory refer to Placing Calls to Contacts and or Searching for Contacts No...

Страница 84: ...our IP phone to access up to 5 remote phone books For how to place calls to and or search for contacts in the remote phone book refer to Placing Calls to Contacts and or Searching for Contacts Configu...

Страница 85: ...on the phone Procedure 1 Navigate to Menu Directory Remote Phone Book 2 Select the desired remote phone book The phone then connects to the remote phone book and proceeds to load it The contacts in th...

Страница 86: ...history lists of Missed Calls Placed Calls Received Calls and Forwarded Calls Viewing History Records In the Call History list you can view a list of up to 100 missed placed received and forwarded cal...

Страница 87: ...call records 2 Select a desired list 3 Highlight a desired entry and then press Option 4 Select Add to Contact or Add to Blacklist 5 Edit the corresponding fields 6 Press Save For more information on...

Страница 88: ...Disabling History Record History record feature is enabled by default if you don t want to save the call history you can disable the feature Procedure 1 Navigate to Menu Features Others General 2 Sel...

Страница 89: ...ne keys allow you to quickly access features such as recall and voice call and monitor a specific line when the line keys are assigned with particular features such as BLF The default line key type is...

Страница 90: ...er interface at the path Dsskey Line Key You can configure line key to quickly access the features for more convenience The following subchapters explain the configuration for some line keys Configuri...

Страница 91: ...that will appear on the LCD screen in the Short Label field 7 Press Save Note Configuring a Transfer Key You can perform a Blind Semi Attended or Attended Transfer by pressing the transfer key during...

Страница 92: ...l field 8 Press Save Note Configuring a Park Retrieve Key You can retrieve a parked call directly by pressing the park retrieve key when the phone is idle Procedure 1 Navigate to Menu Features DSS Key...

Страница 93: ...ave Note Configuring a Group Pickup Key When any number in the group receives an incoming call you can press the group pickup key to pick up the incoming call Procedure 1 Navigate to Menu Features DSS...

Страница 94: ...ld 6 Optional Enter voice mail code in the Value field 7 Optional For the SIP T52S IP phone enter the string that will appear on the LCD screen in the Short Label field 8 Press Save Configuring Multip...

Страница 95: ...uring the Number of Line Key If Auto LineKeys is enabled you can automatically assign multiple DSS keys with Line type for a registered line on the phone Procedure 1 Navigate to Account Advanced 2 Ent...

Страница 96: ...some key features which will be displayed on the Idle screen If the length of the label exceeds the maximum display length the phone will only display the first few characters You can configure the p...

Страница 97: ...nge The following figure shows an example of label display when the label length feature is set to Default Procedure 1 Click Dsskey Line Key 2 Select the desired value from the Label Length field 3 Cl...

Страница 98: ...s 3 Click Confirm to accept the change Linekey Length in Short For the SIP T52S IP phone you can specify labels for some key features which is displayed on the idle LCD screen The length of the label...

Страница 99: ...ays two characters from left to right for example L1 else it displays the first two characters of the label for example su If both left blank the default label is used The display rule is the same as...

Страница 100: ...Customizing the Programable Keys Procedure 1 Click Dsskey Programable Key 2 Customize specific features for these keys 3 Optional Enter the string that will display on the LCD screen in the Label fie...

Страница 101: ...ay your IP phone processes the inputs received from your phone dialpad Yealink IP phones support the following dial plan features Configuring the Replace Rule Configuring the Dial Now Configuring the...

Страница 102: ...a pattern s with wildcards refer to the expression syntax in the table above so that any string that matches the pattern s will be replaced For example a replace rule is configured as prefix 1 and rep...

Страница 103: ...gs Dial Plan Replace Rule 2 Select the desired replace rule by checking the checkbox 3 Edit the values in the Prefix and Replace fields 4 Enter the desired line ID in the Account field or leave it bla...

Страница 104: ...e will apply to account 1 and account 2 If you leave the Account field blank or enter 0 the replace rule will apply to all accounts For more information on available accounts of each phone refer to Re...

Страница 105: ...t belong to your plan area For example an area code is configured as Code 0592 Min Length 1 Max Length 15 When you dial out the number 56789 the length of the number should be between 1 and 15 the pho...

Страница 106: ...s from being dialed out from your phone The dialing attempts of these 10 numbers will fail and the LCD screen will prompt Forbidden Number Procedure 1 Click Settings Dial Plan Block Out 2 Enter the de...

Страница 107: ...e contacts to the IP phone and use your IP phone as a hands free device for Bluetooth Enabled mobile phone You can also view and edit the Bluetooth device information disconnect and delete your Blueto...

Страница 108: ...tooth headset and then press Connect The Bluetooth icon appears on the LCD screen on all IP phones With the Bluetooth headset paired and connected you can use the Bluetooth headset to place and answer...

Страница 109: ...e contacts sync feature and the IP phone will sync the mobile contacts temporarily or press Cancel to disable mobile contacts sync feature and the IP phone will not sync the mobile contacts If you pre...

Страница 110: ...and connect the Bluetooth Enabled mobile phone to the IP phone refer to Pairing and Connecting the Bluetooth Enabled Mobile Phone you need to enable the mobile contacts sync feature manually when you...

Страница 111: ...e or IP phone on your mobile phone For example if you choose Bluetooth the audio will go through the IP phone if you choose Handset earpiece or Speaker the audio will go through the mobile phone Proce...

Страница 112: ...address of the Bluetooth device Mobile Contacts Sync mobile contacts synchronization when Bluetooth enabled mobile phone is connected Editing Bluetooth Device Information Procedure 1 Navigate to Menu...

Страница 113: ...ss OK to delete Disconnecting the Bluetooth Device You can disconnect the Bluetooth device from your phone After you disconnect the Bluetooth device it will still remain paired So you can easily conne...

Страница 114: ...t be connected anymore but it will still be paired When you activate the Bluetooth mode again the paired Bluetooth device will appear in the Paired Bluetooth Device list Bluetooth deactivation is con...

Страница 115: ...Ending Calls Auto Redial Call Completion Call Mute Call Hold Resume Do Not Disturb DND Call Forward Call Transfer Conference Call Park Retrieve Call Pickup Anonymous Call Anonymous Call Rejection Con...

Страница 116: ...dialing numbers You can also dial an entry contact from local directory remote phone book or call history For more information refer to Contact Management and Call History Management Placing a Call Pr...

Страница 117: ...ed call and then press Resume to retrieve it Note Placing a Call Using a Speed Dial Key You can configure a speed dial key to quickly dial a number which is used frequently or hard to remember Procedu...

Страница 118: ...or search source list which has calls that were recently placed answered or missed on your phone Note Procedure 1 Pick up the handset press Speakerphone key or the line key The LCD screen displays th...

Страница 119: ...el field 6 Optional For the SIP T52S IP phone enter the string that will appear on the LCD screen in the Short Label field 7 Press Save Recall key is configurable via web user interface at the path Ds...

Страница 120: ...contacts Procedure 1 Press the REDIAL key when the phone is idle 2 Select the desired entry from the placed calls list to dial out Answering Calls When you receive an incoming call on your phone you...

Страница 121: ...or a different line the incoming call information is displayed on the LCD screen Procedure 1 Press Answer The incoming call is answered and the original call is placed on hold If the phone just plays...

Страница 122: ...from the Auto Answer field 4 Press Save The auto answer icon appears on the LCD screen only when the auto answer feature is enabled for the default account Auto answer is configurable via web user in...

Страница 123: ...the Play Tone field 4 Optional Enter the call waiting on code or off code respectively in the On Code or Off Code field If on code or off code is configured the IP phone will send the corresponding c...

Страница 124: ...l attempts Redial Interval Enabling the Auto Redial Procedure 1 Navigate to Menu Features Others Auto Redial 2 Select Enabled from the Auto Redial field 3 Enter the desired time between 1 and 300 seco...

Страница 125: ...een 2 Wait for the designated period of time or press OK to redial the phone number The phone will retry as many times as configured until the called party answers the call Call Completion You can ena...

Страница 126: ...web user interface at the path Features General Information Using Call Completion Procedure When the called party is busy a message will display on the LCD screen 1 Press OK the phone will then retur...

Страница 127: ...Keep mute feature enables you to make the mute state of your phone persist across calls When keep mute is enabled and you press the MUTE key the phone stays in the mute state until you unmute the mic...

Страница 128: ...hold Only one active call can be in progress at any time Other calls can be made and received while placing the original call on hold The phone will play beep of a specified frequency softly to remin...

Страница 129: ...dicates the number of missed calls for example 1 New Missed Call s will appear on the LCD screen and callers will receive a busy message All calls you receive while DND is activated are logged to your...

Страница 130: ...Configuring the DND Modes There are two DND modes Phone default DND is effective for the phone system You can apply DND to all line registrations on the phone Custom DND can be configured for each or...

Страница 131: ...ick Confirm Phone Mode Activating DND in Phone Mode Procedure 1 Press DND The DND icon appears on the status bar Note When DND and busy forward are activated in phone mode calls will be forwarded to t...

Страница 132: ...f accounts registered on the phone 2 Select a desired account 3 Select Enabled from the DND Status field 4 Optional Enter the DND on code or off code respectively in the On Code or Off Code field If t...

Страница 133: ...iguring DND Emergency and Authorized Numbers You can receive incoming calls from authorized numbers when DND is activated Procedure 1 Click Features Forward DND 2 Select Enabled from the DND Emergency...

Страница 134: ...All incoming calls are immediately forwarded Busy Forward Incoming calls are immediately forwarded if the phone is busy No Answer Forward Incoming calls are forwarded if not answered after a period of...

Страница 135: ...e field 3 Click Confirm Phone Mode Activating Call Forward in Phone Mode Procedure 1 Navigate to Menu Features Call Forward and then select a desired forwarding type 2 Select Enabled from the Always F...

Страница 136: ...cedure 1 Navigate to Menu Features Call Forward and then select a desired forwarding type 2 Select Disabled from the Always Forward Busy Forward No Answer Forward field 3 Press Save You can also press...

Страница 137: ...es to and the icon appears on the status bar When you activate call forward for the non default account only the associated line icon will change to When you activate call forward for all accounts all...

Страница 138: ...umbers in the Forward Authorized Numbers field For multiple authorized numbers enter a comma between every two numbers 4 Click Confirm Dynamic Forwarding You can manually forward the call to another n...

Страница 139: ...n there is a call either active or hold held on the IP phone you can transfer the call differently using a Transfer key BLF BLF List key or Speed Dial key The phone behavior depends on the configurati...

Страница 140: ...peed Dial Key to perform blind transfer to the pre defined number directly Before performing a blind transfer using these keys make sure that the transfer mode via Dsskey is configured as Blind Transf...

Страница 141: ...ettings or Speed Dial key refer to Placing a Call Using a Speed Dial Key to perform semi attended attended transfer to the pre defined number directly Before performing a semi attended attended transf...

Страница 142: ...d 4 When the second party answers the call press Conference Conf again to join all parties in the conference Joining Two Calls in a Conference You can select a hold call to join into a conference call...

Страница 143: ...the conference on hold When the conference is placed on hold you can press New Call to place a new call 2 Press the HOLD key again or Resume to resume the held conference call Muting and Unmuting a Co...

Страница 144: ...turn to the previous screen Ending a Conference Call By default the other two parties drop the call when you end the conference call However your system administrator can set up your phone so that the...

Страница 145: ...arty and then press the OK key key or Send 4 When the second party answers the call press Conference Conf to add the second party to the conference 5 Press Conference Conf to place a new call The conf...

Страница 146: ...e supports call park feature under the following modes FAC mode park the call to the local extension or a desired extension through dialing the park code Transfer mode park the call to shared parking...

Страница 147: ...he Park soft key The phone will dial the configured call park code shown as below 2 Do one of the following a If you want to park the call against the local extension press the key If the call is park...

Страница 148: ...soft key on the pre dialing screen The phone will dial the configured park retrieve code and the Retrieve screen is shown as below 2 Follow the voice prompt do one of the following Press the key on t...

Страница 149: ...rk soft key This call park code will also apply to the call park key 5 Enter the park retrieve code in the Park Retrieve Code field It is configured for the Retrieve soft key This park retrieve code w...

Страница 150: ...you to pick up incoming calls to another phone while group call pickup allows you to pick up incoming calls to any phones within a predefined group of phones To use call pickup you need to configure...

Страница 151: ...ckup Code field 4 Click Confirm You can also configure the directed call pickup code on a per line basis Procedure 1 Click Account Advanced 2 Select the desired account from the Account field 3 Enter...

Страница 152: ...he target phone receives an incoming call 3 Enter the phone number which is receiving an incoming call 4 Press DPickup again The call is answered on your phone You can also use a Directed Pickup key r...

Страница 153: ...Pickup Code field 4 Click Confirm You can also configure the group call pickup code on a per line basis Procedure 1 Click Account Advanced 2 Select the desired account from the Account field 3 Enter t...

Страница 154: ...thout revealing your identification by blocking your name or phone number from being displayed on the called party s phone screen You can also configure the phone to send anonymous call on off code to...

Страница 155: ...6 Press Save Anonymous call is configurable via web user interface at the path Account Basic Placing an Anonymous Call Procedure 1 Using the specific line which has been configured with anonymous cal...

Страница 156: ...onal Enter the anonymous call rejection on code and off code respectively in the On Code and Off Code field The phone will send the configured on code or off code depending on your selection when you...

Страница 157: ...he BLF key LED glows red when the friend s line is in use You can also enable visual and audio alert features for BLF pickup on the phone You can use the BLF key to do the following Placing a call to...

Страница 158: ...the call directly 8 Press Save BLF key is configurable via web user interface at the path Dsskey Line key Note Configuring Visual and Audio Alert for BLF Pickup The visual alert feature for BLF picku...

Страница 159: ...s Pick up Park 2 Select Enabled from the pull down list of Visual Alert for BLF Pickup 3 Select Enabled from the pull down list of Audio Alert for BLF Pickup 4 Click Confirm Configuring the BLF Ring T...

Страница 160: ...g a Call to the Monitored User When there is already an active call on the IP phone you can transfer the active call to the monitored user by pressing the BLF key The phone handles the active call dif...

Страница 161: ...e phone will dial the number of the monitored user 2 Press the BLF key of the monitored user again or Transfer to complete the transfer after the monitored user answers the call Performing a New Call...

Страница 162: ...LFList example com with user1 and user2 in the list on the server After configuration the BLF List keys on the IP phone can present the status of user1 and user2 and the respective key LEDs or icons w...

Страница 163: ...hese features refer to Busy Lamp Field BLF Configuring BLF List Settings Procedure 1 Click Account Advanced 2 Select the desired account from the pull down list of Account 3 Enter the BLF List URI in...

Страница 164: ...seized the IP phone will skip to configure the next DSS key Note For more information on BLF List URI BLF List Pickup Code BLF List Barge In Code BLF List Retrieve Call Parked Code contact your system...

Страница 165: ...ng and a message will display on the screen If you insert a USB flash drive to the IP phone during a call a message will pop up to tell you how much time is available for recording For more informatio...

Страница 166: ...soft key is not available when You place a new call No free space of USB flash drive Receiving an incoming call Recording a Call You can record active calls or conferences Procedure 1 Press More and t...

Страница 167: ...LCD screen and the duration stops counting Both you and the callee are not recorded Press Resume to resume the call the recording is continued Press the MUTE key while recording the muted party is not...

Страница 168: ...n you end a call during recording the recording will be stopped and saved as wav file on the USB flash drive automatically Procedure Press More and then press StopREC The recording icon and recording...

Страница 169: ...a desired file to play During the recording playback you can do the following Press the Speakerphone key the HEADSET key or pick up the handset to alternate among Speakerphone Headset and Handset mode...

Страница 170: ...ntil you press Play again Deleting the Recorded File Procedure 1 Navigate to Menu USB Browse Audio 2 Highlight a desired recording and then press Delete A message is displayed on the LCD screen 3 Pres...

Страница 171: ...During a conference call The Record and URL Record keys are not available when There are no connected calls on your phone You are placing a new call Configuring a Record Key Procedure 1 Navigate to M...

Страница 172: ...r URL record key again to stop recording The recording icon disappears from the LCD screen You can listen to the recordings stored on your server system For example you can dial an access code to list...

Страница 173: ...ine key 3 Select Key Event from the Type field 4 Select Hot Desking from the Key Type field 5 Optional Enter the string that will display on the LCD screen in the Label field 6 Optional For the SIP T5...

Страница 174: ...Intercom Intercom is a useful feature in an office environment to quickly connect with the operator or the secretary You can press the intercom key to place a call to a contact that is answered automa...

Страница 175: ...ter the string that will appear on the LCD screen in the Short Label field 9 Press Save Intercom key is configurable via web user interface at the path Dsskey Line Key Note Configuring the Intercom By...

Страница 176: ...to automatically answer an incoming intercom call while an active call is in progress The active call will be placed on hold If you disable this feature the IP phone will handle an incoming intercom c...

Страница 177: ...ones If you configure the directed call pickup code in advance refer to Configuring the Directed Call Pickup you can pick up the target extension s incoming call by pressing the intercom key The direc...

Страница 178: ...to 30 We recommend that you specify these channels when broadcasting with Yealink IP phones running firmware version 81 or later The IP phone can only send and receives broadcasts to from the listened...

Страница 179: ...tures DSS Keys 2 Select a desired line key 3 Select Key Event from the Type field 4 Select Paging List from the Key Type field 5 Optional Enter the string that will display on the LCD screen in the La...

Страница 180: ...10008 in the Address field The valid multicast IP addresses range from 224 0 0 0 to 239 255 255 255 5 Enter the string that will display on the LCD screen in the Label field 6 Enter the desired chann...

Страница 181: ...ve an RTP stream when there is a voice call a normal phone call rather than a multicast paging call in progress If it is disabled all incoming multicast paging calls will be automatically ignored If i...

Страница 182: ...ty Active feature decides how the phone handles incoming multicast paging calls when there is already a multicast paging call on the phone If enabled the phone will ignore incoming multicast paging ca...

Страница 183: ...dle The phone sends RTP to a preconfigured multicast address IP Port Both the sender s and receiver s phones play a warning tone and the multicast RTP session will be automatically answered on the rec...

Страница 184: ...n press Resume The multicast RTP session is re established Press End Call to end the multicast RTP session Automatic Call Distribution ACD ACD is often used in offices for customer service such as cal...

Страница 185: ...ld 5 Press Save ACD key is configurable via web user interface at the path Dsskey Line Key Logging into the ACD System Procedure 1 Press the ACD key when the phone is idle The LCD screen prompts you t...

Страница 186: ...rance SCA You can use SCA feature to share an extension which can be registered on more than one IP phones at the same time The shared line is indicated by a different line icon In the following figur...

Страница 187: ...03_1 register name is 4603 user name is 4603_1 and assigns line key 1 and line key 2 for the account 4603_1 third party phone registers the account 4604 For more information on how to register an acco...

Страница 188: ...o retrieve the held call For example you can retrieve the held call on either boss phone or secretary phone when you place a call on public hold but you can retrieve the held call only on boss phone w...

Страница 189: ...ey 3 Select Key Event from the Type field 4 Select Private Hold from the Key Type field 5 Optional Enter the string that will display on the LCD screen in the Label field 6 Press Save Private hold key...

Страница 190: ...m The phone will dial out 11 automatically when you press the Call Pull CallPull soft key Using SCA Feature on the IP Phone This section provides you with detailed information on using the IP phone in...

Страница 191: ...cted line key Placing Multiple Calls on the Shared Line Procedure You can have more than one call on the shared line To place a new call when there is an active call on the line key 1 do one of the fo...

Страница 192: ...u can do Status Boss Press the line key 1 the Speakerphone key OK key or Answer on the phone The LED indicator of the line key 1 glows red Secretary Answering Multiple Calls on the Shared Line An inco...

Страница 193: ...e key 2 Press the Answer soft key Press the down navigation key to access the new call Press the OK key or the Answer soft key Secretary Press the line key 2 Boss phone stops ringing The LED indicator...

Страница 194: ...dure Role You can do Status Boss Press the HOLD key or the Hold soft key The LED indicators of line key 1 on boss phone slowly flashes green and secretary phone slowly flashes red Secretary The LED in...

Страница 195: ...he public held call on either boss phone or secretary phone when there is a call between boss and other party Procedure Role You can do Status Boss Press the line key the HOLD key or the Resume soft k...

Страница 196: ...e line key the HOLD key or the Resume soft key The conversation between boss and the third party is retrieved Secretary Call is private held by secretary Press the line key the HOLD key or the Resume...

Страница 197: ...call is ended If there is only one active call on the shared line do the following Procedure Role You can do Status Boss Long press the line key The Cancel Call Pull New Call and Barge In soft keys ap...

Страница 198: ...s set up with the boss and the third party in the active call Call Pull Call pull feature allows users to retrieve an existing call from another shared phone that is in active or hold status For examp...

Страница 199: ...l on the shared line do the following Procedure Role You can do Status Boss Long press the line key The Cancel Call Pull New Call and Retrieve soft keys appear on the LCD screen Press the Call Pull so...

Страница 200: ...receive calls on the bridged line An incoming call to the BLA number can be presented to multiple phones in the group simultaneously but only one IP phone within the group can answer this call Config...

Страница 201: ...Phone This section provides you with detailed information on using the IP phone in a BLA scenario In a BLA scenario the status of the line key icon which associates with a bridged line will change Fo...

Страница 202: ...idged line To place a new call when there is an active call on phone A do one of the following on the phone A Press the HOLD key or Hold The original call is placed on hold Press New Call to enter the...

Страница 203: ...en In the meanwhile the LED indicator of the line key on the phone A glows red indicating that there is an active call on the phone B Placing a Call on Hold Procedure Role You can do Status Phone A Pr...

Страница 204: ...he power indicator LED will slowly flash red A message of n New Text Message s n indicates the number of unread text messages and a message icon are displayed on the phone Note Text messages can be st...

Страница 205: ...e Text Message New Message 2 Compose the new text message 3 Press Send 4 Select the desired account from the From field 5 Enter the number you want to send the message to in the To field 6 Press Send...

Страница 206: ...dure 1 Navigate to Menu Message Text Message Inbox Sentbox Outbox or Draftbox 2 Highlight the desired message 3 Press Option select Delete A message is displayed on the LCD screen 4 Press OK to delete...

Страница 207: ...nt that has unread voice mail s Note Configuring the Voice Mail Code Procedure 1 Navigate to Menu Message Voice Mail Set Voice Mail Code You can also press the MESSAGE key when the voice mail code is...

Страница 208: ...and old voice mails When the LCD screen prompts that the phone receives a new voice mail you can press the MESSAGE key or Connect to dial out the voice mail access code 2 Highlight an account and then...

Страница 209: ...e analog headset you require an optional headset YHS32 YHS33 For more information on how to use your USB headset see your USB headset documentation from the manufacturer You can also pair and connect...

Страница 210: ...ly For more information on using the headset to answer a call refer to Answering Calls With the handset on hook enter the desired number and press Send the phone will then place a call using the heads...

Страница 211: ...lly connect one headset to the headset jack and the other one to the handset jack respectively Once the phone connects to a call the headset connected to the headset jack will have full duplex capabil...

Страница 212: ...se Wi Fi USB dongle WF40 to wirelessly connect SIP T29G T27G IP phone to available wireless networks Wi Fi mode is configurable via web user interface at the path Network Wi Fi Connecting the Wi Fi US...

Страница 213: ...e Wi Fi mode directly and scan Wi Fi devices automatically If you press Cancel you can activate Wi Fi mode manually when you want to use the Wi Fi feature Procedure 1 Navigate to Menu Basic Wi Fi 2 Se...

Страница 214: ...to connect and disconnect to the wireless network and how to view and manage the wireless network Connecting to the Wireless Network Three ways to connect IP phone to the wireless network Manually co...

Страница 215: ...ess WPS key on both the IP phone and gateway router to connect Personal Identification Number PIN The user has to enter a PIN generated randomly by the IP phone on the gateway router to connect Push B...

Страница 216: ...k s and then press Add 4 Use the WLAN settings obtained from your gateway router to configure this WLAN Profile on the IP phone Do the following a If you select None or WEP from the Security Mode fiel...

Страница 217: ...ully this wireless network profile will be saved in Known Network s list The next time you activate Wi Fi feature the IP phone will be automatically connected to the wireless network which has the hig...

Страница 218: ...n expansion module EXP50 It features a large graphic color LCD screen and provides 20 physical keys with dual color LEDs and three display pages supporting a total of 60 keys When you change the backl...

Страница 219: ...module EXP50 is connected to the IP phone successfully Format Resolution Single File Size Screen Size jpg png bmp jpeg 4 2 megapixels 5MB 4 3 inches Resolution 272x480 Note Wallpaper for color screen...

Страница 220: ...the EXP Wallpaper from USB Flash Drive Procedure 1 Press Menu USB Browse Photo 2 Select a desired picture and then press Preview 3 Press Set as and then select Set as EXP wallpaper 4 Press OK The phon...

Страница 221: ...All Diagnostic Files Diagnosing the Network The wrong network settings may result in inaccessibility of your phone and poor network performance In this case your system administrator may ask you to u...

Страница 222: ...he network status information 4 Press Back to back to the preview screen Rebooting Your Phone The improper operation may cause malfunction When your phone is malfunctioning your system administrator m...

Страница 223: ...nalized settings are kept before resetting your phone to factory settings Procedure 1 Navigate to Menu Advanced default password admin Reset Config 2 Highlight the Reset to factory settings and then p...

Страница 224: ...n information in the corresponding field 3 Press Save A message is displayed on the LCD screen 4 Press OK Updating the phone configuration is operable via web user interface at the path Settings Auto...

Страница 225: ...Click Stop in the Export All Diagnostic Files field to stop the capture The system log level will be reset to 3 5 Click Export to open file download window and then save the diagnostic file to your lo...

Страница 226: ...User Guide for T5 Series IP Phones 214...

Страница 227: ...n Chile Santiago Paraguay Asuncion United Kingdom Bermuda Bermuda United Kingdom Falkland Islands Trinidad Tobago 3 30 Canada New Foundland St Johns 3 Argentina Buenos Aires Brazil DST Brazil no DST D...

Страница 228: ...tana Almaty Russia Novosibirsk Omsk 6 30 Myanmar Naypyitaw 7 Russia Krasnoyarsk Thailand Bangkok 8 Australia Perth China Beijing Russia Irkutsk Ulan Ude Singapore Singapore 8 45 Eucla 9 Japan Tokyo Ko...

Страница 229: ...Appendix 217 Appendix B Menu Structure...

Отзывы: