background image

2

3

GB

GB

Installation

Installation Guide

This chapter explains how to install the Robotic Mower. Please read this completely before you 
start the installation.
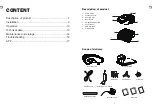
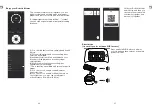
Introduction

We recommend creating a draft of your lawn, including all obstacles and how these should be 
protected. This makes it easier to find a good position for the docking station and how to correctly 
place the boundary wire around your garden perimeter protecting bushes, flower beds etc. You 
will also need some tools, like a hammer and wire cutters, pliers or scissors.
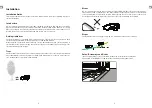
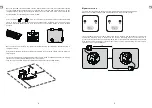
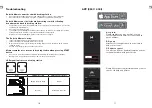
Cutting limitations

The Robotic Mower is equipped with collision sensors. These will detect any rigid and fixed 
obstacles higher than 100 mm, such as walls, fences and garden furniture.
When triggered, the Robotic Mower will stop, reverse backwards and then continue mowing in 
a different direction. Still, protecting the obstacles running the boundary wire accordingly is the 
recommended long-term solution.

Trees

The Robotic Mower treats trees as common obstacles, but if the roots of the tree are exposed and 
lower than 100mm, this area should be excluded using boundary wire in order to protect the tree 
root, cutting blades or rear wheels from damage.

Stones

We recommend clearing the lawn of small (less than 100 mm high) rocks and stones and any 
stones with a round or sloped edge. The Robotic Mower might try and climb such rocks instead 
of recognising them as a barrier. A Robotic Mower getting stuck on such a stone requires user 
intervention to restart mowing. Contact with stones can result in damage to the blades.
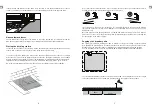
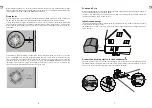
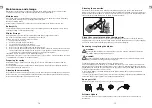
Slopes

The Robotic Mower can navigate slopes up to a maximum of 30% incline or decline.

<

30%

>

30%

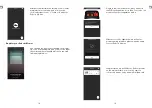
Paths, Driveways and Roads

If an elevated driveway crosses your lawn, better keep it outside the boundary wire.
Please allow a safety distance of 40 cm between driveway and boundary wire.

40cm

Содержание AMIRO 350

Страница 1: ...myRobotcenter The expert for robots in your home With one click to the online shop myRobotcenter eu myRobotcenter co uk ...

Страница 2: ...cm 10 cm AMIRO 350 350i 400 400i ROBOTIC MOWER Installation Guide MÄHROBOTER Installationsanleitung ROBOT TONDEUSE Guide d installation ROBOTMAAIER Gebruiksaanwijzing ROBOSEKAČKA Průvodce instalací ROBOT KOSZĄCY Instrukcja instalacji GB DE FR NL CZ PL ...

Страница 3: ...t 1 STOP button 2 Ultrasonic sensor 3 Charging port 4 Rear wheel 5 Height adjustment dial 6 Control panel 7 USB interface 8 On Off switch Scope of delivery Original instrcution Warranty Installation guide Robotic Mower Wire pegs Manuals Spare blades Extension cord Docking station Connectors Measurement ruler Boundary wire Switching Power Supply 2 1 3 4 5 6 7 8 ...

Страница 4: ...ent direction Still protecting the obstacles running the boundary wire accordingly is the recommended long term solution Trees The Robotic Mower treats trees as common obstacles but if the roots of the tree are exposed and lower than 100mm this area should be excluded using boundary wire in order to protect the tree root cutting blades or rear wheels from damage Stones We recommend clearing the la...

Страница 5: ...e a robot port or garage Do not place the docking station too close to a slope such as at the top of a hill or the bottom of a furrow Avoid left and right inclination in excess of 5 degrees 5 5 If your lawn has a soft or uneven surface we recommend fortifying the area around the docking station with a grass protection mesh Otherwise the repeated stress of the rear wheels can damage the turf Once t...

Страница 6: ...placing an obstacle on the boundary wire around the flowerbed Place the obstacle e g a large rock or pole near position A indicated on the below illustration The obstacle must be surrounded by a flat area of about 1 m x 1 m without any slopes This obstacle will allow the machine to exit the circle 5 mm Ponds and Pools While the Robotic Mower is protected against rain and spray water being submerge...

Страница 7: ...n the Robotic Mower will remain in the docking station until the battery is fully charged Successful docking and charging indicates that you have found a suitable position for the docking station You should now drive fixing pegs into ground fully Take care not to damage or kink the surplus wire stored under the docking station Signal selection There are two singals which can be selected S1 blue in...

Страница 8: ...l flash quickly when successfully connected to Wifi Physical button Start mowing Press and hold unlock button then press Start button Unlock button interlock with STOP button press this button will unlock the stop model Rain sensor indicator Robotic Mower will return to docking station when it rains Start button Press and hold unlock button then press the Start button Robotic Mower will stat to wo...

Страница 9: ...botic Mower Emergency Stop Technical Data Model 350 350i 400 400i Wifi Max cutting area 350 m2 400 m2 Battery pack 20V 2000mAh Switch power supply Input 100 240V AC 50 60Hz 42W Output 24VDC CC1 5A Mowing time on one charge 60 min 60 min Rated voltage 20 V 20 V Rated power 42 W 42 W No load speed 3500 min 3500 min Cutting width 16 cm 16 cm Cutting height Approx 20 55 mm Approx 20 55 mm Charging tim...

Страница 10: ...e when cleaning Remove rough dirt with a soft brush Use a manual water spray with mild household detergent for intensive cleaning Wipe off any residue after cleaning with a moist rag Cleaning the underside Ensure the main power switch is in OFF position Wearing protective gloves turn the Robotic Mower onto its side to expose its underside Clean the blade disc and frame using a soft brush or damp c...

Страница 11: ...if necessary Inspect the blades for damage replace if necessary Grass may be too high Try increasing the cutting height or mow the lawn with an ordinary lawnmower first Cutting motor failure please call after sales service Mower remains at or returns to docking station when pressing START button Check if the mower has already completed the programmed working time for that day Battery is low let gi...

Страница 12: ... you also can input the series number manually which you can find from nameplate also Please follow the instructions press and hold the WIFI setting button more than 5 seconds the mower will enter configuration mode After successful configuration we will enter mower naming interface please make an name for your Robotic Mower Congratulation we will find your Robotic Mower on the main interface now ...

Страница 13: ...er boundary cutting distance boundary singal select buttons 4 Multi zone cutting function setting four seperated area is available This is function is available only for some special model 5 You can choose enable or disable water sensor function 6 You can choose enable or disable ultrasonic sensor function you also can set ultrasonic action distance from 30cm to 60cm Click your Robotic Mower and l...

Страница 14: ...22 23 GB GB Open the MOWAP program on your mobile phone and choose Direct mode Input the PIN code the initial PIN code of Robotic Mower is 0000 ...

Отзывы: