24
VF2400
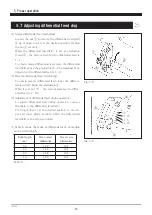
6.1 Needle thread tension
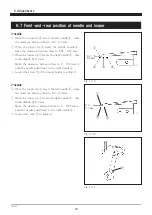
Fig. 6-1
Fig. 6-3
Fig. 6-2
①
② ②
a
T
L
52 ㎜
As standard, make the distance between the needle thread
take-up ① and the center of the left screw ② to 52 mm,
and set the part “a” horizontally when the needle bar is at
the highest point.
Adjusting:
(1) Loosen the screws ② .
(2) Move the needle thread take-up ① to adjust it.
(3) Tighten the screws ② securely.
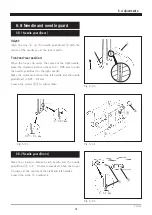
If not enough for adjusting above, move the needle thread
eyelet ③ to adjust it.
Make the distance between the top of the needle thread
eyelet and the center of the screw ④ to 8 mm as standard.
Adjusting:
(1) Loosen the screw ④ .
(2) Move the needle thread eyelet ③ to adjust it.
(3) Tighten the screw ④ securely.
● To tighten the needle thread tension, move the
needle thread take-up ① in the direction “T” .
● To loosen the needle thread tension, move the
needle thread take-up ① in the direction “L” .
● To tighten the needle thread tension, move the
needle thread eyelet ③ in the direction “T” .
● To loosen the needle thread tension, move the nee
-
dle thread eyelet ③ in the direction “L” .
③
④
T
L
8 ㎜
6
. Adjustments
Before adjusting, ALWAYS turn the power switch OFF and check that the machine has already stopped.
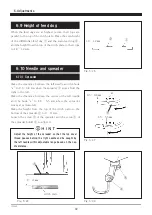
☆ As the the needle thread loop is difficult to be formed
depending on the thread used, the looper cannot catch
the needle thread. It can cause skip stitch.
Then thread the needle thread through the needle
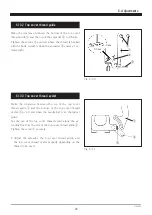
thread retainer dice ⑤ . (Fig. 6-3)
With UT device, do not use the needle thread retainer
dice ⑤ becasue it cannot form seams at the beginning of
sewing.
ADVICE
⑤

