background image

 Playback 

21

Special Features II: Ribbon Controller

The SU10’s ribbon controller is probably its most distinctive feature. You can use
the ribbon to control pitch, filter, or crossfade during replay of samples and songs.
You can also use it to play a special “scratchpad” during sample play. Finally, you
use the ribbon as an effect controller for the SU10’s special “external” modes. (For
information about external modes, see pages 29 to 30.)

Pitch Play

1.

Be sure that the SU10 is in PLAY mode.

2.

Press 

[SHIFT]

+

[PITCH]

.

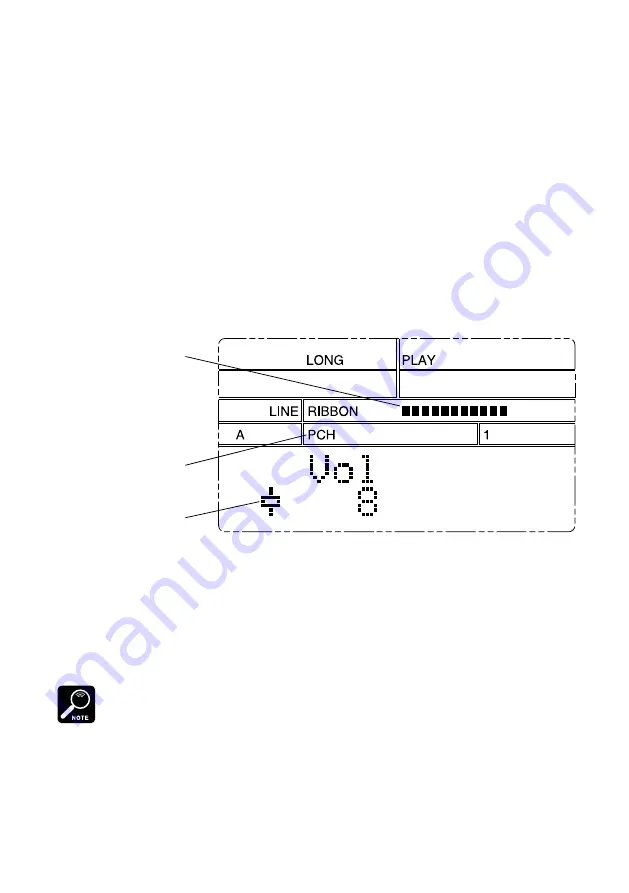
The LCD changes as shown to indicate that you have selected the pitch fea-
ture.

Current ribbon value

PITCH-play indicator

PITCH symbol

3.

You can now change the pitch dynamically by touching or rubbing your fin-
ger over the ribbon: pitch decreases as you move to the left, and increases as
you move to the right. Try this now while playing some samples or a song.
Notice that the LCD displays the ribbon value in real time.

4.

To return to normal PLAY mode, press 

[EXIT]

. The pitch automatically returns

to its original value.

Ribbon operation changes the value of the 

Pitch

 parameter — a system-wide pitch offset

parameter that determines how much pitch varies from normal. You can access this setting di-
rectly from RECORDING or UTILITY mode; the allowable range is -20% to +10%. (See page
56.)

Содержание SU-10

Страница 1: ...Owner s Manual M D G EMI Division Yamaha Corporation 1995 VU37290 601CRIT15 2 02B0 Printed in Japan ...

Страница 2: ...ccording to the instructions found in the user s manual may cause interference harmful to the operation of other electronic devices Compliance with FCC regulations does not guarantee that interference will not occur in all installations If this product is found to be the source of interference which can be determined by turning the unit OFF and ON please try to eliminate the problem by using one o...

Страница 3: ...nction or effect works when the unit is operating as designed are not covered by the manufacturer s warranty and are therefore the owners respon sibility Please study this manual carefully and consult your dealer before requesting service ENVIRONMENTAL ISSUES Yamaha strives to produce products that are both user safe and environmentally friendly We sincerely believe that our products and the produ...

Страница 4: ... record at a maximum sampling rate of 44 1kHz the same rate used by audio CDs Reverse play reproduces samples in reverse Scale play sets up a single sample at 12 different pitches along the pad console Unique ribbon controller allows you to apply a dramatic filter or scratch effect to your samples or to crossfade your samples with realtime sound from an external source Impressive editing features ...

Страница 5: ...fect to feed through line input MIDI support Drive your SU10 from a remote sequencer keyboard or computer or use your SU10 to drive a remote device Load selected samples to a synthesizer or other remote device using the MIDI sample dump standard Back up all SU10 data to an external storage device then reload at any time ...

Страница 6: ... 21 Pitch Play 21 Filter Play 22 Scratchpad 24 Crossfade 25 Playing a Song 27 External Performance Modes 29 External Scratch 29 External Filter 30 7 Recording Samples and Creating Songs 31 Sample Recording Overview 31 Connecting the Input Source 31 Entering REC Mode and Selecting the Pad 31 Setting the Recording Parameters 32 Starting Stopping the Recording 35 Creating Songs 35 Procedure 36 8 Edit...

Страница 7: ... Clear Note Table NoteTbClr 58 Bulk Dump Bulk 58 Receiving Dump Rcv 59 Sending Dump Send 60 Interval Intrvl 60 Sample Dump 62 Song Deletion Song 63 Lock Lock 64 Initialize Init 64 Deleting data only Init Data 65 Deleting data and resetting the system Init All 65 0 Troubleshooting 67 A Error and Warning Messages 71 Warning messages 71 MIDI Errors 72 Memory Related Errors 73 B Specifications 74 MIDI...

Страница 8: ... The upper function is indicated by an expression such as SHIFT SONG 2 which means hold down the SHIFT key while pressing the SONG2 button In general a sign between two button names means that you must hold down the first button while pressing the second For example REV PAD 1 SHIFT EDIT SU10 editing and utility operations are semi interactive with the lower left area of the LCD displaying the nece...

Страница 9: ...d To prevent potential damage from battery leakage remove the batteries if you plan to leave the SU10 unused for an extended period 4 Use the correct cables Handle cables with care When disconnecting a cable grip firmly at the connector area and pull straight out Use only high quality MIDI cables for your MIDI connections Cable perfor mance degrades as length increases avoid cables that are longer...

Страница 10: ...atch or filter effect to a realtime signal as it passes through the SU10 The SU10 always starts from PLAY mode when power is switched on You can always return to PLAY mode from any other mode by pressing EXIT once or in some cases twice For full information about PLAY mode see Chapter 6 REC This is the mode you use to record samples and create songs You enter this mode from PLAY mode by pressing R...

Страница 11: ...k the start and end points and so on The following conceptual diagram shows how a sample exists within a typical sampler LpMode SdMode AltGrp MIDI NOTE StPnt LpPnt EdPnt How a Sample is Made A sample is created by taking digital readings of an acoustic analog signal at a very rapid rate The resulting binary values indicate the state of the acoustic wave at each point of reading The sample can be r...

Страница 12: ...sample can be extended to an arbitrary length by setting up a loop so that the sample repeats indefinitely The term sample is also used in a technical sense its original sense to refer to each reading of the acoustic signal as described above Within this manual however the term always refers to the entire recorded waveform together with its related parameters Banks and Pads You play the SU10 sampl...

Страница 13: ...that records and reproduces pad and button sequences You use this feature to create up to four songs each consist ing of a series of pad operations that you have registered into memory Sample Time Sample Sample Sample Sample Sample MIDI The SU10 provides both MIDI IN and MIDI OUT capability You can use these features to back up or reload your data to download selected samples to synthe sizers comp...

Страница 14: ...ibbon to apply a dramatic scratch or filter effect or to vary the pitch or line pad crossfade During exter nal scratch and external filter play you use the ribbon to apply realtime scratch ing or filtering to a straight audio signal as it feeds through the SU10 Finally you can use the ribbon during EDIT operation to change pad volume and start loop and end point settings Use light pressure when ru...

Страница 15: ...rns song to start position SCRATCH play SCRATCH TOP returns scratch section to top of sample EDIT mode Jumps to START POINT edit function 6 BWD Normal play Moves song back to previous event SCRATCH play SCRATCH BWD shifts the scratch section back EDIT mode Jumps to LOOP POINT edit function 7 STOP PLAY mode Stops playback of song REC mode Stops recording of sample or song 8 PLAY PLAY mode Starts pl...

Страница 16: ...RATCH and press the pad for the sample you want to scratch E BANK The SU10 provides four pad banks Banks A to D each capable of storing up to 12 samples Press the BANK button to change the bank setting A B C D A The LCD always indicates the currently selected bank F ENTER Press to respond Yes to a prompt and execute the corresponding operation or to select one of the utilities within UTILITY mode ...

Страница 17: ...an external device such as a CD player 3 MIDI IN OUT Standard MIDI connectors You use these connectors to link your SU10 to other MIDI devices 4 MIC INPUT miniphone jack Accepts input from a dynamic or powered condenser type microphone 5 DC IN power input Receives power input from a PA 3B or PA 1B DC power adaptor CAUTION Use only a PA 3B or PA 1B adaptor Use of a different adaptor type may result...

Страница 18: ...LUME slider Adjusts the output volume to the PHONES and LINE OUTPUT connectors 2 Headphone jack Stereo miniphone jack connects to stereo headphones Screen Display The LCD consists of various compartments each displaying a different type of information 1 3 0 A B 2 4 5 6 7 8 9 ...

Страница 19: ...ratch 9 Currently selected song and song REPEAT arrow Arrow appears only if song is playing in REPEAT mode 0 Message parameter display area During editing the upper line displays the parameter name and the bottom line displays the value At other times this area displays input prompts status information and error messages A Indicators MIDI ON when MIDI message is coming in TIME ON during recording ...

Страница 20: ...er end of the cable into an AC power socket When you have finished using the SU10 Switch off the power and then discon nect the plug from the wall socket Batteries The SU10 accepts six 1 5V AA batteries R6P or SUM 3 Yamaha recommends the use of alkaline batteries Inserting Batteries 1 Check that the POWER switch on the rear panel is OFF 2 Turn the unit upside down you will see the battery cover on...

Страница 21: ...r during normal playback You still have about five minutes of PLAY mode operation left the message will repeat intermittently until batteries are exhausted The message then changes to Battry End and the SU10 shuts down until you replace the batteries or connect an AC adapter Do not reuse batteries that you have removed following a Battry Low message Do not switch off power or remove batteries whil...

Страница 22: ... SU10 playback from an external keyboard Powered speakers LINE OUT MIDI IN MIDI OUT MIDI keyboard CBX K1 etc SU10 SAMPLING UNIT To back up all SU10 data to an external data filer bulk dump MIDI IN MIDI OUT SU10 MIDI Data Filer MDF2 etc SAMPLING UNIT ...

Страница 23: ...ve already deleted the demos however then you will need to record some new samples so that you will have something to play refer to Chapter 7 for details Preparation 1 Connect an amplifier or powered speakers to the LINE OUT jack or connect headphones to the headphone jack See illustration page 14 If you are going to try ribbon crossfade page 25 or either of the realtime features pages 29 to 30 yo...

Страница 24: ...alues during FILTER or EXTERNAL FILTER playback If you notice dis torted sound during playback press 1 to lower the digital volume Note that reduc ing the level with the volume slider or on your external speakers will not eliminate clipping Basic Sample Playback Your SU10 stores up to 48 samples four banks of 12 samples each The following procedure shows how to replay these samples 1 Select the ba...

Страница 25: ...um of four monaural samples at once although the number drops if you select HI sampling grade or use the scale scratch filter or crossfade features If you try playing too many samples at once certain samples drop out For more information about po lyphony see page 26 below Special Play Features I Now let s try some of the SU10 s special playback features HOLD Use the HOLD feature when you want to f...

Страница 26: ...mples 4 To shut off the held pad press the pad again or else press HOLD again REVERSE Hold down REV and press a pad The sample will play out backwards producing a sound similar to that of a cassette tape or vinyl disc playing in reverse SCALE For this effect you first select a single sample for scale play You can then play the sample at any of 12 different pitches with pitch increasing in semitone...

Страница 27: ...iefly displays the Change Grd message then resumes normal PLAY mode For information about sampling grades and how to change them see page 55 When using this feature you can only produce sound from one pad at a time Reverse playback is not possible during SCALE play The REV button does not function If the selected sample has a reverse loop mode setting the setting automatically converts to its forw...

Страница 28: ...e that you have selected the pitch fea ture Current ribbon value PITCH play indicator PITCH symbol 3 You can now change the pitch dynamically by touching or rubbing your fin ger over the ribbon pitch decreases as you move to the left and increases as you move to the right Try this now while playing some samples or a song Notice that the LCD displays the ribbon value in real time 4 To return to nor...

Страница 29: ... FILTER The LCD indicates the current filter type and resonance The lower left of the LCD shows a graphic image of the resulting filter effect Filter type Resonance l LPF f Flat b BPF w Weak h HPF s Strong Current ribbon value Effect play indicator Filter type b Band pass filter Filter image Weak resonance 2 You can now use the ribbon to control the filter Try playing some samples or songs and run...

Страница 30: ...d Strng strong See FILTER SETTINGS box 4 Try playing some samples and working the ribbon to see how your new set tings sound When you are satisfied with the settings press EXIT once to terminate filter setup and return to the regular filter play level Or else press EXIT twice to return to normal PLAY mode FILTER play is available only when the sampling grade is set to LONG or EXLG If you try to se...

Страница 31: ... cut off characteristics of a low pass filter Volume Frequency Cutoff flat weak strong Volume Frequency Cutoff Volume Frequency Cutoff Scratchpad You use this mode when you want to simulate the action of a DJ manually ma nipulating a turntable to produce a scratch effect You begin by selecting the source sample that contains the sound section that you want to use for this effect The ribbon will th...

Страница 32: ...e allows you to mix your sample and song output with a realtime acous tic signal received at the LINE INPUT or MIC INPUT jack The SU10 outputs the mixing result over LINE OUTPUT Once you have selected crossfade play you can control the mix ratio dynamically by touching or rubbing the ribbon Please connect a playback device such as a CD player to the LINE INPUT jack or a microphone to the MIC INPUT...

Страница 33: ...elect HI sampling grade or if you use the scale scratch filter or crossfade effect The following table shows the polyphonies for each combination of grade and play type A entry denotes an impossible combination if you attempt to set such a combination the LCD will return the Change Grd message to indi cate that you should reduce the sampling grade Grade PLAY HI STD LONG EXLG Normal 2 4 4 4 Scale 2...

Страница 34: ... Song 1 For information about how to create songs refer to Chapter 7 page 35 For general advice about song replay refer to ABOUT SONG PLAY on page 28 1 Select the song Hold down SHIFT and press the appropriate song pad In this case please select SONG 1 The selected song number appears on the display You can omit this step if the song you want to play is already selected 2 Press PLAY to begin playb...

Страница 35: ...sample is being sounded from within a song since this will cause the song sample to shut off Song playback is available with FILTER CROSSFADE and PITCH play These effects apply to song samples just as they do to pad played samples Avoid using HOLD while a song is sounding as the HOLD action will apply to the sounding samples Since HOLD acts as a toggle switch it may cause some samples to stay on t...

Страница 36: ...playing disc and begins moving it back and forth While the ribbon is untouched the SU10 feeds the incoming audio signal through without change while at the same time holding the most recent portion of the signal in an internal scratch buffer When you touch the ribbon the SU10 switches off the feed through you can then move your finger across the ribbon to produce scratch play of the buffered data ...

Страница 37: ...rresponding to the filter and resonance you want to use The LCD indicators change to reflect the new selections For information about filter types and resonance see FILTER SETTINGS box on page 24 Filter Type Resonance PAD 1 LPF l PAD 7 Flat f PAD 2 BPF b PAD 8 Weak w PAD 3 HPF h PAD 9 Strong s PAD 4 Bypass 3 Now feed some sound through the SU10 and listen to the filter effect Poke your finger at v...

Страница 38: ...urn Connecting the Input Source Connect a line input to the LINE IN jack or a microphone to the MIC INPUT Entering REC Mode and Selecting the Pad 1 Check that the SU10 is in PLAY mode then press REC to enter RECORDING mode The LCD displays the REC indicator and prompts you to select the pad to be recorded The LCD s meter area indicates the available recording time Remaining recording time Availabl...

Страница 39: ...available recording time will increase accordingly Setting the Recording Parameters The LCD now displays the Gain setting the first of seven recording parameters Set each parameter to the appropriate value before beginning to record To move from one parameter to another press or To change the setting of a param eter press 1 or 1 The following diagram illustrates the structure The RECORD ING PARAME...

Страница 40: ...andard Long and Extra Long Hi Std Long Exlg The tradeoff is between quality and recordable length High gives the best quality but is very memory intensive and limits the avail able recording time Extra Long provides much longer recording time at a significant cost in quality A sample recorded at a given sampling grade will change its pitch if played at a different grade You may therefore find it b...

Страница 41: ...eplay lengths tempos Format Selects whether to record in stereo or mono St or Mono If you select mono the SU10 records the left input only Note that a stereo sample counts as two sounds in the polyphony calculation you can never play more than two stereo samples at once Input Selects whether the SU10 takes its input from the LINE IN jack or the MIC INPUT jack Line or Mic You cannot use both inputs...

Страница 42: ...ns to PLAY mode Do not switch off the power while the Finished or Memory Full message is on the LCD as this may in some cases cause destruction of all internal data Creating Songs To record a song you 1 enter RECORDING mode and select the destination song 2 press PLAY to begin the recording 3 press the pad sequence you want to record as a song 4 press STOP to end the recording The procedure is de ...

Страница 43: ...If the song is unlocked but already contains a recorded sequence the LCD will first ask whether you want to delete overwrite it If you wish to proceed press ENTER and continue to the next step If you wish to cancel press EXIT to return to the screen shown at Step 1 above 4 Press PLAY to begin recording But note that the SU10 will not start actual recording until the moment you press a pad to begin...

Страница 44: ...ime A good strategy is to record the song from one bank then play along from an other bank Or record using pads 1 to 6 and play along using pads 7 to 12 If you plan to use SCRATCH or FILTER with your song Remember that polyphony is significantly reduced during SCRATCH and FIL TER play see page 26 A song that sounds fine during normal play may lose important sounds when used with these features Des...

Страница 45: ...ions appears below The first eight functions set parameter values the remaining five functions execute an operation Keep in mind that the parameter setting functions and the COPY and MOVE operations do not affect the sound data content of the sample in any way so that you can try out various changes without fear of destroying your recorded phrase The SPLIT COMPACT and DELETE operations however wil...

Страница 46: ...a different pad or 1 1 When you are satisfied with your selection press ENTER If you press an empty pad the LCD displays the Pad Empty message and waits for a different selection If you select a pad that is in a locked bank the LCD briefly displays the Locked Bank message 3 Move to the appropriate edit function The SU10 begins from the first edit parameter the loop mode setting If loop mode is cur...

Страница 47: ...r 1 1 as necessary Then press ENTER to execute COMPACT DELETE Check the pad selection then press ENTER Then press ENTER once again to confirm or EXIT to cancel 5 Repeat steps 3 and 4 as necessary to edit the selected sample 6 If you wish to edit a different sample press BANK and or the appropriate pad This will return you to Step 2 above 7 When you have finished editing press EXIT to return to PLA...

Страница 48: ...ss 1 1 Explanation OShot One Shot The sample plays once through from Start Point to End Point then stops Actual wave start Actual wave end Start point End point WLoop Whole Loop Play begins from the Start Point advances to the End Point then jumps back to the Start Point and repeats in a continuous loop Actual wave start Actual wave end Start point End point ...

Страница 49: ...tart point End point Loop point Note that it is possible to set the Loop Point to an earlier position than the Start Point Actual wave start Actual wave end Start point End point Loop point RShot Reverse Shot The sample plays backwards once through from End Point to Start Point RLoop Reverse Loop The sample plays backwards in a loop Play starts from the End Point moves to the Start Point then jump...

Страница 50: ...at is set to a reverse loop mode the sample will play out in its original forward direction SOUNDING MODE SdMode Purpose Sets the pad s ON OFF action Values Note Toggl Trggr To set Press 1 1 Explanation Note Note driven The sample plays only while the pad is held down Play stops as soon as you release the pad unless you extend the play by pressing HOLD Pad Press Pad Release Toggl Toggle Play start...

Страница 51: ...tive to that of other samples If you find that the sample A3 is too loud when played together with sample A4 for example you can adjust by lowering the volume for A3 and or increasing the volume for A4 If you play the sample while changing the value you will be able to hear the level going up or down ALTERNATE GROUP AltGrp Purpose Selects the sample s alternate group Values Off 1 2 3 To set Press ...

Страница 52: ...ing a MIDI NOTE ON message from an external MIDI device The setting will automatically change to match the message s note number Under default conditions note numbers are assigned sequentially starting from pad A1 note C1 and ending with pad D12 note B4 If you select a note number that is already in use on another pad the setting on the other pad automatically switches to Off The assignments made ...

Страница 53: ...About TEMPO box for information About TEMPO When you edit the start point or end point of a loop the lower right of the LCD displays the word TEMPO and the meter area indicates a tempo value The value is an estimation of the tempo of the looping segment in beats per minute and can be used as a reference for matching the timing of loops on different samples The value always falls between 80 00 and ...

Страница 54: ...TEMPO indicator and current tempo at the bottom right of the LCD The tempo value will change as you adjust the setting Refer to the About TEMPO box on page 46 for details END POINT EdPnt Purpose Sets the playback end point Values Start loop point 127 wave end To set Touch the ribbon or press or hold 1 1 Explanation This function sets the sample s end point The selected point determines where sampl...

Страница 55: ...ination pads will hold identical wave con tent and parameter settings except that the MIDI Note Number for the destination pad will remain unchanged Pad Copy Execute Source Sample Pad Destination Pad Sample Pad Sample Procedure 1 When you enter this function the LCD displays a message such as the follow ing CopyTo x x Change the destination selection as necessary To change the bank press BANK To c...

Страница 56: ...he destination pad You can now a press ENTER to start editing of the destination pad b select a different pad for editing or c press EXIT to return to PLAY mode MOVE MoveTo Purpose Use this function to move a sample wave content and all parameter settings other than MIDI Note Number from one pad to another The destination pad must be empty Following the operation the source pad will be empty and t...

Страница 57: ...r another selection 4 When execution is completed the LCD displays the Complete message then asks whether to begin editing of the destination pad You can now a press ENTER to start editing of the destination pad b select a different pad for editing or c press EXIT to return to PLAY mode SPLIT SpltTo Purpose You use this function to split the sample you are editing into two parts The split is execu...

Страница 58: ...splitting is possible the SU10 begins execution and displays the Keep PwrOn message Do not switch off power while this message is on the screen If your destination pad is in a locked bank the LCD briefly displays the Locked Bank message then waits for another destination selection If the destination pad is already occupied or if the pad s End Point is within 128 units of the wave end the LCD will ...

Страница 59: ...entifies the currently selected pad Compct x x You are free to change the selection To change the bank press BANK To change to a different sample within the same bank press the corresponding pad or 1 or 1 If you do not wish to compact press or to change to a different edit function or else press EXIT to return to PLAY mode 2 Press ENTER to execute The LCD displays a confirmation query Cpt xx Sure ...

Страница 60: ... pad becomes free to accept new data Execute Pad Sample Pad Procedure 1 When you enter this function the LCD displays the following message where xx identifies the currently selected pad Delete x x 2 Press ENTER The LCD displays a confirmation query Del xx Sure 3 To execute press ENTER again If you do not want to execute deletion press EXIT instead The SU10 returns to Step 1 above 4 The SU10 begin...

Страница 61: ...tion Page Rec Set recording parameters 55 MIDI Set MIDI parameters 56 Bulk Send receive bulk dump 58 MSDS Execute a sample dump 62 Song Delete a selected song 63 Lock Lock unlock a bank or song 64 Init Delete all data and initialize system 64 General Procedure 1 Enter the UTILITY menu From PLAY mode press SHIFT UTIL The LCD changes as follows The word Utilty indicates that you are at the menu leve...

Страница 62: ...gs for pur poses of playback The following diagram shows the utility structure Grade Pitch Format Input RecTrg Defalt All of these parameters are accessible under RECORDING mode for detailed in formation refer to pages 32 to 34 The three parameters that apply also to play back are described briefly below Grade Selects the sampling grade at which the sample is replayed You have four choices High St...

Страница 63: ...ion Selects the channel for both incoming and outgoing MIDI channel messages The SU10 attaches the specified channel number to outgoing channel messages Note On Note Off and Control Change messages It responds only to those incoming channel messages Note On Note Off and Channel Volume messages that carry the specified channel number If the setting is Off the SU10 does not send or receive channel m...

Страница 64: ...ber Values Off P Bnd 0 120 Explanation This setting assigns a controller number to the ribbon so that you can use the ribbon to drive an external controller Off The SU10 does not output Control Change messages P Bnd When you change the ribbon value the SU10 outputs a Pitch Bend message indicating the new value 0 120 When you change the ribbon value the SU10 outputs a MIDI Control Change message in...

Страница 65: ...ess ENTER to execute The LCD returns the Clear Sure confirmation prompt Press ENTER again to confirm or press EXIT to cancel and return to the UTILITY menu level Explanation This operation deletes all note number assignments for all pads Immediately fol lowing execution you will not be able to use pads to drive an external device nor use an external device to drive SU10 playback You can restore no...

Страница 66: ...the dump 2 The SU10 stands by for the start of data flow The Waiting message appears to indicate that data reception has not yet started During this time you can cancel the dump at any time by pressing EXIT 3 When data reception begins the SU10 disables the EXIT button and displays the Receiving message The meter indicates the percentage of data received Do not switch power off while reception is ...

Страница 67: ...y displays the Complete message then automatically returns you to the UTILITY menu The SU10 breaks the transmission into four segments to allow for transfers to machines with limited memory or reception capacity Some receiving devices will be able to record all four segments to a single file With other devices you will have to set each segment into a separate file You can press EXIT at any time to...

Страница 68: ... You can then remove the disk To dump to a QY300 or QS300 1 If dumping to a QY300 set the SU10 s Intrvl value to Short If dump ing to a QS300 set the value to Mid 2 Begin song recording at the QY300 QS300 3 At the SU10 move to the Dump Send screen and press ENTER twice to begin sending 4 Each time the SU10 displays the message Next OK proceed as follows You will have to repeat this process three t...

Страница 69: ...e until all four files have been sent Sample Dump Use this utility to dump one or more selected samples in MIDI Sample Dump Standard format a standard format recognized by a wide variety of synthesizers samplers and MIDI software packages This utility makes it possible to send indi vidual samples to a remote device for replay or editing When you enter this utility the SU10 displays a message such ...

Страница 70: ...ng the pad number for the left sample s ID and 50 plus the pad number for the right sample s ID If you dump stereo sample A3 for example the left sample gets ID 3 while the right sample gets ID 53 The SU10 always transmits the sample in forward direction from start of wave to end of wave regardless of the sample s loop mode setting Not all receiving devices will be able to reproduce the sample exa...

Страница 71: ...s utility the LCD displays the lock setting for Bank A If the lock is Off for example the display will look like this Bank A Off Proceed as follows 1 To move to the setting for a different bank or song press or The se quence is Bank A Bank B Bank C Bank D Song 1 Song 2 Song 3 Song 4 2 To change the lock setting to On press 1 To change the setting to Off press 1 3 To return to the UTILITY menu pres...

Страница 72: ...ution is finished the LCD displays the Complete message then returns the UTILITY menu Deleting data and resetting the system Init All Purpose Deletes all samples and all songs and returns all system settings to their defaults see below Procedure 1 Move to the Init All query and press ENTER The LCD returns the All Sure confirmation prompt Press ENTER to proceed If you do not want to proceed press E...

Страница 73: ... Long Pitch 0 Format Stereo Input Source Line Recording Trigger Manual Default Loop Mode Whole Loop MIDI Channel 1 Device Number 1 Local Control On Ribbon No Off MIDI Note Table Pad A1 MIDI C1 Pad A2 MIDI C 1 PAD D12 MIDI B4 Bulk Interval Short Locks All off Volume 8 ...

Страница 74: ...nternally set volume EDIT mode see page 44 b Check the digital volume Try pressing 1 to increase the level c Try adjusting the volume slider d Check the volume setting on your speakers or amp Are batteries or adaptor correctly connected You must use six AA batteries or a PA 3B or PA 1B adaptor Are batteries fresh Try again with new batteries alkaline batteries recommended or check opera tion using...

Страница 75: ... Remember also that a stereo sample counts as two sounds page 26 Check samples alternate group settings Samples in the same group cannot play together page 44 Certain play features are not available while sam pling grade is set to HI or STD You can correct the problem by going to the Rec utility and changing the Grade setting accordingly page 26 SONGS A song is a recorded sequence of pad play Edit...

Страница 76: ...l setting on the SU10 and the external device match page 56 Check the MIDI Note Number settings a If you have cleared the Note Table all note num ber settings have been deleted You must reas sign note numbers to enable pads to drive and be driven pages 45 57 b Check that note number assignments corre spond to notes assignments on the external de vice c Remember that note numbers are different dur ...

Страница 77: ...70 Troubleshooting Problem Possible Cause Check sounding mode SdMode settings for each sample page 43 Check the MIDI Note Number settings MIDI input does not drive SU10 sound as ex pected ...

Страница 78: ...attempted to select a PLAY feature that is not available at the currently selected sampling grade Response Go to the Recording Setup utility and reduce the Grade setting Memory Full Cause Song sample memory became full during recording of a sample or song All data recorded prior to the appearance of this message remains registered in memory Response If you need to record a longer sample try deleti...

Страница 79: ...SU10 DevNum Off Cause Attempted to receive bulk dump with SU10 s DevNum parameter set to Off Response To enable bulk dump reception set the SU10 s device number DevNum parameter in the MIDI utility either to All or else to match the device number of the sending device Wrong Data Cause The SU10 received an unrecognizable MIDI System Exclusive message Response Check the machine type and data at the ...

Страница 80: ... detected a problem with internal data at time of power on This problem can occur if you switch the power off while a memory write is in progress Response The SU10 does its best to repair the problem but it is possible that you will lose some songs or samples If you find that the data loss is considerable you should clear all remaining data and reinitialize the system go to the INIT utility and ex...

Страница 81: ...ealtime Filter Special effects Low pass band pass and high pass filters all with resonance crossfade pitch Songs Records up to 4 songs Each song is a recorded sequence of pad and button operations Interfaces MIDI IN MIDI OUT Connects to MIDI se quencer MIDI keyboard etc Can dump individual sample s in MSDS MIDI Sample Dump Standard format to supporting RAM equipped devices synthesizer sampler comp...

Страница 82: ...put volume Power switch 5 Connectors MIDI IN MIDI OUT HEADPHONES stereo mini jack LINE OUT L R stereo mini jack LINE IN L R stereo mini jack MIC IN L R stereo mini jack DC IN 6 Output level Full scale level LINE OUT 3 8dbm typ 10kΩ PHONES 4 0dbm typ 33Ω 7 Input level LINE 15 0dbm typ MIC 31 8dbm typ 8 Power AC adaptor PA 1B or PA 3B Batteries six 1 5V AA R6P or SUM 3 ...

Страница 83: ...168 104 32 2 mm 6 61 4 09 1 27 inches 10 Weight 0 4kg 0 88lb 11 Included accessories Owner s manual this manual Two sample CDs Demo music features samples from Time Space sample CDs See the enclosed Yamaha Soundshow CD for more information ...

Страница 84: ...nH v 127 o v 1 127 Note OFF x 9nH v 0 x After Key s x x Touch Ch s x x Pitch Bender o 1 x 7 bit resolution 7 x o Volume 0 120 o Assignable 1 x Control Change Prog x o 0 1 Change True System Exclusive o o System Song Pos x x Song Sel x x Common Tune x x System Clock x x Real Time Commands x x Aux Local ON OFF x x All Notes OFF x x Mes Active Sense x x sages Reset x x Notes 1 transmit if switch is o...

Страница 85: ...te 53 Demo Song 27 Dump Rcv 59 Dump Send 60 E EDIT 39 EDIT mode 39 EdPnt 47 ENTER 9 EXIT 9 EXLG 33 EXTERNAL FILTER 30 EXTERNAL SCRATCH 29 F FILTER 22 Filter type 22 Flat 24 Format 34 FWD key 8 G Gain 33 Grade 33 H Headphones 11 HI 33 HPF 24 HOLD 18 HOLD key 8 I Init 64 Input 34 Intrvl 60 L LCD 7 Line 34 LINE INPUT 10 LINE OUTPUT 10 Local Control 57 Lock 64 LONG 33 Loop 41 Loop Mode 41 LPF 24 LpPnt...

Страница 86: ...hony 26 POWER 13 POWER switch 10 R REC key 8 Recording 32 RecTrg 34 Resnce 23 REV key 9 Reverse 19 Ribbon controller 7 Ribbon Number 57 Rloop 42 Rshot 42 S Sample 4 Sample Dump 62 Sample Playback 17 SCALE 19 SCRATCH 9 SHIFT 9 Song 6 Song Creating 35 Song Deletion 63 Song Play 27 Sounding Mode 43 Split 50 STD 33 Stereo 34 STOP 8 StPnt 46 Strng 24 T Tempo 46 Toggl 43 TOP 8 Trggr 43 U UTILITY mode 54...

Страница 87: ...no Italy Tel 02 935 771 SPAIN Yamaha Hazen Electronica Musical S A Jorge Juan 30 28001 Madrid Spain Tel 91 577 7270 PORTUGAL Valentim de Carvalho CI SA Estrada de Porto Salvo Paço de Arcos 2780 Oeiras Portugal Tel 01 443 3398 4030 1823 GREECE Philippe Nakas S A Navarinou Street 13 P Code 10680 Athens Greece Tel 01 364 7111 SWEDEN Yamaha Scandinavia AB J A Wettergrens Gata 1 Box 30053 S 400 43 Göte...

Страница 88: ... 215 3443 THE PEOPLE S REPUBLIC OF CHINA AND OTHER ASIAN COUNTRIES Yamaha Corporation International Marketing Division Nakazawa cho 10 1 Hamamatsu Japan 430 Tel 053 460 2317 OCEANIA AUSTRALIA Yamaha Music Australia Pty Ltd 17 33 Market Street South Melbourne Vic 3205 Australia Tel 3 699 2388 NEW ZEALAND Music Houses of N Z Ltd 146 148 Captain Springs Road Te Papapa Auckland New Zealand Tel 9 634 0...

Страница 89: ...Owner s Manual M D G EMI Division Yamaha Corporation 1995 VU37290 601CRIT15 2 02B0 Printed in Japan ...

Отзывы: