background image

68

Voice Mode

within the current Voice Memory, [------] is displayed in the
LCD and you will not be able to use Knob [2]. 
Press the [ENTER] key to start searching in the next
Memory.

Using the Quick Access

Using Quick Access, you can quickly select any of 12
types of Preset Voices and 4 types of Internal Voices (at
their factory default settings) in each Bank according to
their Categories.  The procedure is as follows. 

Details about the Voices that can be selected using Quick
Access are given in the separate Data List.

1

Press the [QUICK ACCESS] key in Voice Mode.  Its
LED will light and Quick Access will be enabled. 

Press the key again or switch to another Mode to
disable Quick Access.

When you enable Quick Access, the Voice you
previously selected using Quick Access is selected again. 

If you enable Quick Access while editing a Voice, the
Voice is not changed until you select another Voice via
Quick Access.

You cannot use the MEMORY keys while Quick Access
is enabled.

2

Use BANK keys [A] to [H] to select the Category.
There are eight Categories, as listed below.  The
Category names are printed below the respective
BANK keys.

3

Use PROGRAM keys [1] to [16] to select the Voice
within the specified Category.  The name of the
Voice is displayed.

For each BANK [A] to [H], Preset Voices are accessed
using PROGRAM keys [1] to [12].  The remaining four
keys (PROGRAM keys [13] to [16]) are used to access
each of four internal Voices.  Details about Voices are
given in the separate Data List.  By selectively assigning
your own selected Voices to the PROGRAM keys [13] to
[16] in each BANK, you can make use of the Quick
Access feature to quickly switch between them.

1

2

3

4

5

6

7

8

9

10

11

12

13

14

15

16

QUICK

ACCESS

A

B

A. PIANO

E. PIANO

ORGAN

GTR/BASS

STRINGS

BRASS

SYNTH

OTHER

C

D

E

F

G

H

 VCE Quick)  INT:017(H01)[Pf:GrandPiano]
 EQLow-G EQMid-G  EQHi-G FLT-Frq ChoSend

Voice Edit

There are three kinds of Voices: Normal Voices, Drum
Voices and Plug-in Voices (if a Plug-in board has been
installed).  The following is an explanation of the
parameters used to edit each kind of Voice. 

Details about Voices are given on Page 36. 

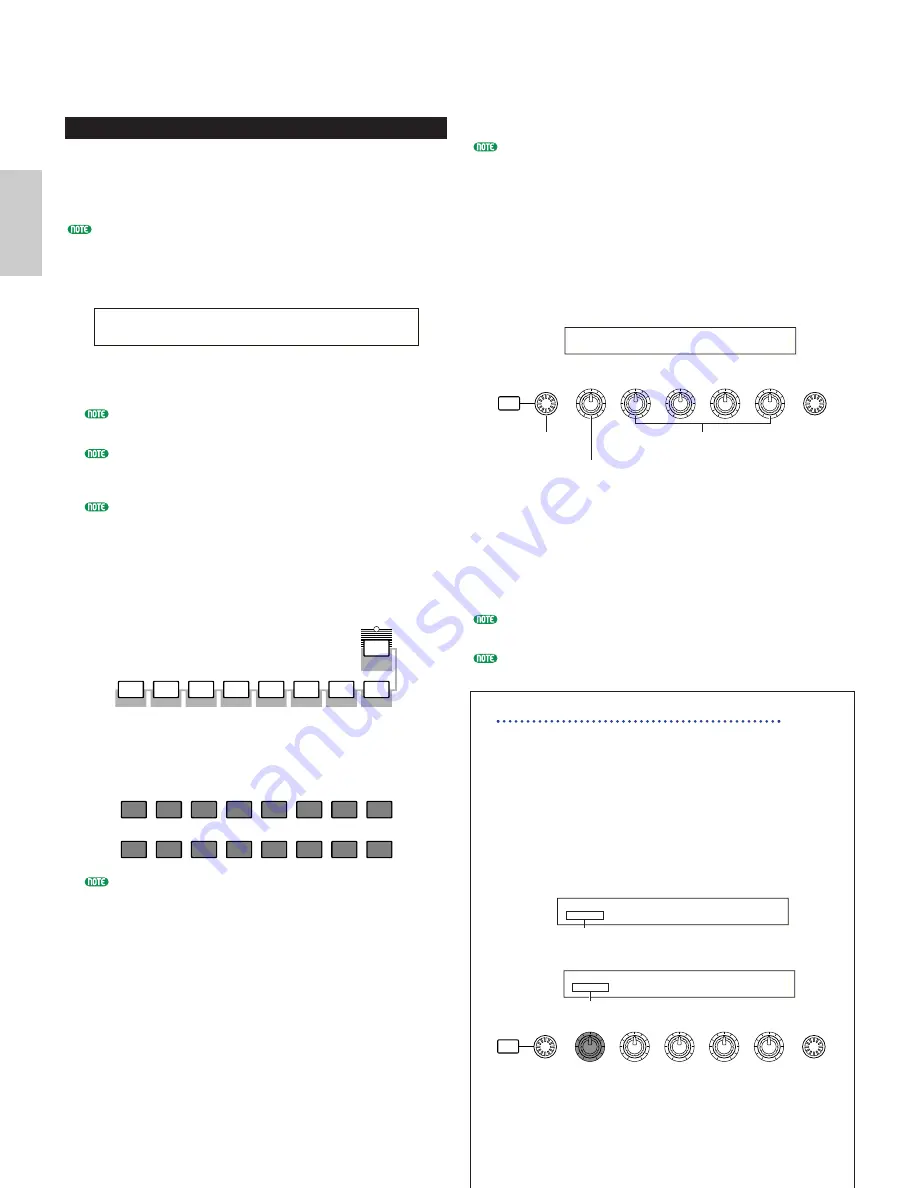
The following is displayed when you enter Voice Edit
Mode.  The displayed screens will vary according to the
type of Voice being edited, but basically the [PAGE]
knob is used to switch between screens and the
parameters on each screen are altered using Knobs [A],
[B], [C], [1] and [2].  The [DATA] knob and the
[INC/YES] and [DEC/NO] keys can be used to alter
parameters in small increments. 

While holding down the [SHIFT] key, you can use
Knobs [A], [B], [C], [1] or [2] to move the cursor to the
respective parameter without changing it’s value.  You
can also move the cursor using the [DATA] knob or the
[INC/YES] and [DEC/NO] keys while holding down the
[SHIFT] key.

You need to select the Voice before entering Voice Edit Mode
(Page 65).  All parameters can be set and stored per Voice. 

See page 21 on how to enter Voice Edit mode.

Common Edit and editing each Element

Voices can consist of up to four Elements (Page 37).  Use
Common Edit to edit the settings common to all four
Elements.  Voice Edit Mode can be divided into screens
for Common Edit and those for editing each Element. 

In Voice Edit Mode, Knob [A] is used to switch
between the Common Edit screens and the screens
for editing each Element. 

Common Edit screens

Element 1~4 Edit Screens

SHIFT

PAGE

PART/ELEMENT

DATA

A

B

C

1

2

 OSC Wave)        Number  Ctgry         
 EL1234          001[Pf:Grand 1 ]        

Elements 1~4 Indicator

 GEN Other) Mode  Assign   MicroTuning  
 C 1234     poly  single   31:Indian    

Common Indicator

SHIFT

PAGE

PART/ELEMENT

DATA

A

B

C

1

2

 GEN Name) Ctgry     a-Z     0-?  Cursor
 C 1234                  [Pf:Init Voice]

Choose Common or 

Elements 1 to 4

Change pages

Set the value

Содержание S-80

Страница 1: ...I Division Yamaha Corporation 1999 Yamaha Corporation V419010 909MWCP25 2 01A0 Printed in Japan This document is printed on chlorine free ECF Paper OWNER S MANUAL OWNER S MANUAL OWNER S MANUAL MUSIC SYNTHESIZER ...

Страница 2: ... the production methods used to pro duce them meet these goals In keeping with both the letter and the spirit of the law we want you to be aware of the following CAUTION TO REDUCE THE RISK OF ELECTRIC SHOCK DO NOT REMOVE COVER OR BACK NO USER SERVICEABLE PARTS INSIDE REFER SERVICING TO QUALIFIED SERVICE PERSONNEL CAUTION RISK OF ELECTRIC SHOCK DO NOT OPEN Battery Notice This product MAY contain a ...

Страница 3: ... as correct for the instrument The required voltage is printed on the name plate of the instrument Alwaysconnectthethree pinattachmentplugtoaproperlygroundedpowersource For more information about the main power supply see page 12 Before cleaning the instrument always remove the electric plug from the outlet Never insert or remove an electric plug with wet hands Check the electric plug periodically...

Страница 4: ...e place for future reference About This Manual This manual is basically divided into two sections Basics Section Page 6 Explains how to get started with the synthesizer its overall structure and how to use its main features and functions Reference Section Page 64 Explains the parameters in the synthesizer s various Modes Package Contents Owner s Manual this book Data List Performance List AC Power...

Страница 5: ...1 Arpeggiator 41 2 Using Controllers 43 Voice Edit 50 Effects 55 Using as a Master Keyboard Performance Mode 57 Using as a Multitimbral Tone Generator Performance Mode 62 Reference Section Voice Mode 64 Voice Play 64 Voice Edit 68 Voice Job Mode 105 Voice Store 106 Performance Mode 107 Performance Play 107 Performance Edit 111 Performance Job Mode 130 Performance Store 131 Sequence Play Mode 132 U...

Страница 6: ...wheel Page 43 Controls the modulation effect You can also assign other parameters functions to this controller VOLUME Slider Page 20 Adjusts the master volume Move the slider upwards to raise the output level from the OUTPUT L R jacks and the PHONES jack Control Sliders Page 61 In Master Keyboard Mode the sliders can be used to control various functions assigned to them as Control Change messages ...

Страница 7: ... system control functions Pages 46 136 Knobs 1 and 2 can be assigned control functions that affect Voices Pages 47 74 DATA knob Page 25 Use this to increase or decrease the value of the parameter at which the cursor is positioned SHIFT key Page 23 In Voice or Performance Play Mode a screen for viewing or setting the Octave parameter and the MIDI Transmit channel Page 23 is shown when you press the...

Страница 8: ...pass Press the key its LED will light to bypass the effects used with the current Voice or Performance The bypassed effects Reverb Chorus or Insertion are specified in Utility Mode Page 135 MASTER KEYBOARD key pages 57 111 The S80 keyboard can work as MIDI master keyboard in Performance mode When the key is pressed and switched on the LED will light the keyboard can play and control multiple MIDI ...

Страница 9: ...ces In Voice Edit Mode each of the BANK A to D keys selects a Voice s Element ELEMENT SELECT while each of the BANK E to H keys turns the associated Voice s Element on or off ELEMENT ON OFF Page 51 When you activate Master Keyboard Mode by pressing the MASTER KEYBOARD key these key A to D can respectively select Zones 1 to 4 if the Master Keyboard Mode setting is 4 zone in Performance Edit Mode PR...

Страница 10: ... separated from that at the OUTPUT L MONO and R jacks In Performance Mode you can specify which Parts can be output from these separate outputs AC INLET terminal Page 12 Plug the female end of the supplied AC power cord in here before plugging it into an AC wall outlet CARD slot Page 142 Insert a Memory Card here to transfer various data to from the instrument Read carefully the precautions on use...

Страница 11: ...utput via these phone jacks For monophonic output use just the L MONO jack GAIN knob Pages 63 Use this to adjust the input gain of the audio signals at the A D INPUT jack You may need to adjust this depending on the type of device microphone other instrument output etc connected when using a A D Input Part A D INPUT jack Page 14 External audio signals can be input via this phone jack When an A D I...

Страница 12: ...e used as listed on the rear panel Connecting the unit to the wrong AC supply can cause serious damage to the internal circuitry and may even pose a shock hazard Use only the AC power cord supplied with the S80 If the supplied cord is lost or damaged and needs to be replaced contact your Yamaha dealer The use of an inappropriate replacement can pose a fire and shock hazard The type of AC power cor...

Страница 13: ...ument s rich sounds with their own pan and effect settings Connect your powered speakers to the OUTPUT L MONO and R jacks on the rear panel When using just one powered speaker connect it to the OUTPUT L MONO jack on the rear panel Connecting to a Mixer There are extra audio outputs in addition to the OUTPUT L MONO and R jacks These four outputs can connect to a mixer for separately controlling the...

Страница 14: ...of the audio source using the GAIN knob Details about A D Input including how to adjust the input gain are given on Pages 63 119 If you choose the wrong type of input source Pages 119 120 you may possibly damage your hearing and or any connected audio equipment Make sure you set this parameter correctly Before connecting a device to the A D INPUT jack always turn the GAIN knob all the way down You...

Страница 15: ... switch on the rear panel should be set to MIDI Otherwise MIDI information will not be transmitted from the synthesizer s MIDI OUT connector Controlling from an External MIDI Keyboard Controlling an External MIDI Keyboard Recording and Playback using an External MIDI Sequencer MIDI IN MIDI OUT MIDI IN MIDI OUT External MIDI sequencer S80 HOST SELECT PC 2 PC 1 MIDI Mac MIDI OUT MIDI IN External MID...

Страница 16: ...With the included Voice Editor program for instance you can edit the synthesizer s Voices Using another program Card Filer you can transfer files between the computer and the Memory Card inserted in the synthesizer s CARD slot There are two ways to connect your synthesizer to a computer 1 Serial connection the computer s serial port to the synthesizer s TO HOST terminal 2 MIDI connection the compu...

Страница 17: ...need to an appropriate MIDI application sequencer editor etc for your computer platform MIDI Interface MIDI OUT MIDI IN MIDI IN MIDI OUT HOST SELECT PC 2 PC 1 MIDI Mac Computer S80 Computer with MIDI interface Serial cable HOST SELECT PC 2 PC 1 MIDI Mac MIDI OUT MIDI OUT MIDI IN MIDI IN IBM PersonalSystem V PS V PersonalSystem V S80 ...

Страница 18: ...FC4 or FC5 Foot Controller the FC7 and Breath Controller BC3 etc to control tone volume pitch and other parameters Details about how to these controllers are given on Page 44 FOOT SWITCH FC4 or FC5 FC4 or FC5 FC7 FC7 BC3 FOOT CONTROLLER FOOT VOLUME BREATH SUSTAIN MIDI OUT THRU IN HOST SELECT TO HOST BREATH SUSTAIN FOOT SWITCH FOOT CONTROLLER FOOT VOLUME Mac PC 1 PC 2 MIDI INDIVIDUAL OUTPUT OUTPUT ...

Страница 19: ... audio When powering down the setup first turn down the volume for each audio devices then switch off each device in the reverse order first audio devices then MIDI When the S80 as MIDI receiver Switching the S80 On Before you switch your synthesizer on or off first turn down the volume of any audio equipment connected to it 1Press the POWER switch 2A splash screen is displayed briefly 3The Voice ...

Страница 20: ...r s VOLUME slider to set an appropriate volume level About Memory Cards You can save various kinds of data Voice Performance Plug in Sequence Chain and so on onto Memory Card The built in CARD slot can accept 3 3 volt Memory Cards SmartMedia Before using a Memory Card read through precautions on how to handle it Page 142 Formatting a Memory Card You cannot use a new Memory Card to save files immed...

Страница 21: ...Utility Mode the CARD key for Card Mode and the SEQ PLAY key for Sequence Mode STORE VOICE MODE UTILITY EDIT JOB PLAY STOP CARD SEQ PLAY PERFORM COMPARE 6 4 3 8 2 7 5 1 Play Modes 1 Voice Play Mode Page 64 Press the VOICE key its LED will light to enter Voice Play Mode To exit to another Mode simply press the respective key for that Mode 2 Performance Play Mode Page 107 Press the PERFORM key its L...

Страница 22: ...ss the UTILITY key its LED will light to enter Utility Mode To exit to another Mode simply press the respective key for that Mode 6 Card Mode Page 142 Press the CARD key its LED will light to enter Card Mode To exit to another Mode simply press the respective key for that Mode 7 Sequence Play Mode Page 132 Press the SEQ PLAY key its LED will light to enter Sequence Play Mode To exit to another Mod...

Страница 23: ...revious screen Some Modes have more screens In this case you can use the PAGE knob while holding down the SHIFT key to switch to a specific screen For example if you use the PAGE knob while hoilding down the SHIFT key in Voice Edit Mode the following screen is shown Select a specific item using the cursor then release the SHIFT key to switch to the parameter screen for that item The SHIFT key also...

Страница 24: ...clockwise to decrease it SHIFT PAGE PART ELEMENT DATA A B C 1 2 OSCíOut Level Delay InsEF EL1234 96 0 ins2 EFFíEF1 Ctgry Type ENTER C 1234 MOD Tremolo to Edit DEC NO INC YES EXIT ENTER EF BYPASS MASTER KEYBOARD Moving the Cursor By using a knob A B C 1 or 2 while holding down the SHIFT key you can move the cursor to the respective parameter on the screen without affecting its value INC YES and DEC...

Страница 25: ...ic characters With others you can choose from a number of available settings Furthermore some types of parameters are absolute whereas others are relative For example the absolute parameter in the following illustration can be set to either Mono or Poly For other absolute parameters such as Volume the setting can be any value between zero and 127 The Volume setting has a linear on to one relations...

Страница 26: ...screen There are two screens in Sequence Play Mode Use the PAGE knob to switch to the screen shown above 2Press the INC YES key to enter the SEQ Demo screen To cancel demo playback press the DEC NO key 3Press the PLAY STOP key to start playback of the song 4Press the PLAY STOP key again to stop playback At the end of the song playback is automatically looped back to the beginning You can change th...

Страница 27: ...O ORGAN GTR BASS STRINGS BRASS SYNTH OTHER C D E F G H 1 2 3 4 5 6 7 8 9 10 11 12 13 14 15 16 1 Press the VOICE key The VOICE key LED will light showing that you are now in Voice Play Mode The following appears in the display At this point you can play the Voice named on the screen via keyboard VCE Play PRE1 001 A01 Pf StereoGrnd EQLow G EQMid G EQHi G ChoSend RevSend STORE VOICE MODE UTILITY EDIT...

Страница 28: ...16 in each BANK you can make use of the Quick Access feature to quickly switch between them 1 2 3 4 5 6 7 8 9 10 11 12 13 14 15 16 QUICK ACCESS A B A PIANO E PIANO ORGAN GTR BASS STRINGS BRASS SYNTH OTHER C D E F G H VCE Quick INT 017 H01 Pf GrandPiano EQLow G EQMid G EQHi G FLT Frq ChoSend 28 Basics Section The Drum Voices are held in separate areas of each Memory and are accessed as follows To a...

Страница 29: ...KNOB DEC NO INC YES ENTER EDIT JOB PLAY STOP CARD SEQ PLAY PERFORM COMPARE E PIANO ORGAN GTR BASS STRINGS BRASS SYNTH OTHER C D E F G H 1 2 3 4 5 6 7 8 9 10 11 12 13 14 15 16 3 DEC NO and INC YES keys 3 DATA knob 1 Press the PERFORM key The PERFORM key LED will light showing that you are now in Performance Play Mode The following appears in the display At this point you can play the Performance na...

Страница 30: ...out selecting Performances using the DATA knob or the DEC NO and INC YES keys are given on Page 66 You can also select Performances using a combination of BANK and PROGRAM PART keys or using the Category Search feature Details about selecting Performances are given on Page 109 On selection a Performance may take a few seconds to become ready since the settings for multiple Parts are applied With s...

Страница 31: ...ation from the keyboard and controllers can be transmitted to other external MIDI devices through the MIDI OUT connector Sequencer Section This section can be used to play back Standard MIDI Files held on Memory Card The contents of Tracks 1 to 16 correspond to MIDI channels and Parts in a Performance as shown in the following illustration The sequencer can play back songs with a different Voice a...

Страница 32: ...in Voices just like ordinary internal Voices and use them as Parts in a Performance Page 98 This synthesizer is compatible with the Modular Synthesis Plug in System see next page There are three types of Modular Synthesis Plug in System compatible Plug in Boards Single Part Multi Part and Effect Plug in Board Using these you can build your own system based on the sounds you require Single Part Plu...

Страница 33: ...se the synthesizer like a vocoder by connecting and using a microphone while playing the keyboard Multi Part Plug in Board XG Plug in Board PLG100 XG This Plug in Board is a 16 part XG sound generator You can play back XG GM song files using the rich variety of sounds and effects on this board More Plug in Boards will be available in future About MODULAR SYNTHESIS PLUG IN SYSTEM The Yamaha Modular...

Страница 34: ...Voice So basically the Insertion Effects can be set on a per Element basis After being passed through the Insertion Effects the signals from all individual Elements are mixed and sent to the Reverb and Chorus Units These Reverb and Chorus Units apply effects to the sound as a whole before it is sent to the outputs and are therefore known as System Effects In Performance Mode the Insertion Effects ...

Страница 35: ...nitialize Voices and perform other such operations Jobs on them Performance Mode Page 107 Performance Play Mode This Mode is used when playing Performances You can layer multiple Voices Parts to create rich sonic textures You can also create multitimbral setups by assigning Parts to different MIDI channels You can layer A D Input and Plug in Parts as well as AWM2 based Voices Performance Edit Mode...

Страница 36: ...1 16 Voice 1 16 Voice Preset1 128 Preset Voices Banks A H Preset2 128 Preset Voices Banks A H Internal 128 User Voice Banks A H External 128 User Voice Banks A H 2 User Drum Voices 2 User Drum Voices 256 Normal 8 Drum Voice Preset Controllers Controllers Sequencer Song play Tone Generator Voice Tone Generator Performance Playing a Voice Playing a Performance Plug in1 64 Plug in Voice Bank A D 1 16...

Страница 37: ...or you to choose from These Voices are known as Plug in Voices and will vary depending on the Plug in Board you have installed Page 32 The Note Limit settings Page 80 will also affect the allocation of sounds But basically Normal Voices of up to four Elements are playable across the whole keyboard range whereas with Drum Voices any of 73 different Waves can be assigned to each Drum Key on the keyb...

Страница 38: ...a Voice 553 high quality preset Waves are available As shown in the following illustration when creating a Voice you can select the Wave to be used as an Element and then set its level pitch tone and other parameters wave 1 553 Element1 Element2 Element3 Element4 C 2 G8 Voice ...

Страница 39: ...igned to different areas of the keyboard If you assign a different MIDI channel number to each Part each track of a sequencer can play back a different Part In Performance Mode several different Voices Parts can be layered to create rich textures However this can cause note response to become slower under some circumstances Multiple Layered Voices Sequencer Song MIDI CH 1 16 Part 1 16 A D INPUT Pa...

Страница 40: ...ecify the sound and the note range within which the arpeggiator is active then use your left hand to hold down the notes being arpeggiated while using your right hand to play a melody line 2 Using the Controllers Page 43 The Pitch Bend Wheel Modulation Wheel and Control Sliders can be freely assigned to control various sound parameters in real time By connecting an optional Foot Controller or Foot...

Страница 41: ...ti clockwise until Common is displayed on the bottom line Voice Edit Mode consists of two different Edit screens Common Edit for parameters common to all Drum keys Elements and Drum key Element Edit The Arpeggiator parameters are found in the Common Edit screens that you have now selected 3Use the PAGE knob to switch to the ARP Type Arpeggio Type screen If you use the PAGE knob while holding down ...

Страница 42: ...ch Hold C_ 1234 BigBeat2 Ct 127 on off SHIFT PAGE PART ELEMENT DATA A B C 1 2 ARPíType Type Tempo Switch Hold Common BigBeat2 Dr 92 on off 1The Note Limit parameters can be set in the ARP Limit screen which follows immediately after the ARP Type screen mentioned in step 3 earlier Use the PAGE knob to switch to the screen 2Use Knob 2 to jump to the parameter for the highest note in the range and to...

Страница 43: ...g the sliders ARPíType Type Tempo Switch Hold Common BigBeat2 Dr 127 on on 2 Using Controllers The S80 is equipped with Pitch Bend and Modulation Wheels Either of the S80 is equipped with front panel Knobs A B C 1 and 2 with which you can control many different parameters Pitch Bend Wheel This wheel s prime function is to control pitch Roll the wheel upward downward to bend the pitch upward downwa...

Страница 44: ...or to operate other controllers This is very convenient if you are playing live Foot Controller parameters can be set for each Voice Foot Switch An optional Yamaha FC4 or FC5 Foot Switch connected to the rear panel FOOT SWITCH jack Page 18 can be assigned to a range of parameters It is suited for a switch type on off controls such as Portamento Switch increment decrement of a Voice or Performance ...

Страница 45: ...tion Wheel Src Sw MW Modulation Wheel Moving the Modulation Wheel changes the amount of Pitch Modulation plus the pan position Aftertouch Aftertouch lets you for example add vibrato to a sound by applying further pressure to a note on the keyboard while it is being held down This allows real time expression and control Aftertouch can be used to control a wide variety of parameters Page 74 Control ...

Страница 46: ...RL Assign2 screen of Utility Mode you could assign Control Change Number 1 Modulation to the same knob Now when you turn the knob resonance will be applied to the sound of the internal tone generator but at the same time modulation information will be sent to the external MIDI device connected to the MIDI Out This aspect of the synthesizer makes it ideal for use as a master controller for controll...

Страница 47: ...Basics Section Assigning Parameters to Knobs 1 and 2 The following procedure explains how you can assign a desired parameter to Knob 1 or 2 You can assign controllers to each Voice or Part in a Performance Control Settings can be assigned as a Control Set and a each Controller can be used to control multiple parameters although this varies according to the type of Voice Here we introduce an exampl...

Страница 48: ...to the Modulation Wheel If the current Voice has a Control Set with a source Src assigned to Modulation Wheel MW and receives a Control Change message of Modulation Wheel a destination Dest parameter for the source MW will be affected with that message The above procedure explains how to set up the Foot Control to control Modulation in Voice Mode To create such a setup for Performance Mode the app...

Страница 49: ...e Mode the Foot Switch can now be used to switch between programs Alternatively you can assign other functions such as Arpeggio Switch On Off Sequencer Play Stop and so on Page 136 SHIFT PAGE PART ELEMENT DATA A B C 1 2 CTRL Other FS Sys 099 PC Inc SHIFT PAGE PART ELEMENT DATA A B C 1 2 CTRL Other FS Sys 088 STORE VOICE MODE UTILITY EDIT JOB PLAY STOP CARD SEQ PLAY PERFORM COMPARE 49 Basics Sectio...

Страница 50: ...from scratch You can then store up to 128 of these new edited Normal Voices and up to 2 new edited Drum Voices to internal user memory or external Memory Card The following procedure gives a basic idea about how to go about creating editing Voices Of course this is just one example you are free to set any parameters in any way you like Details about each parameter are given in the Reference sectio...

Страница 51: ...nt3 Element4 51 Basics Section Switching Between Screens and Entering Settings After selecting a Common Edit screen or a edit screen for an Element 1 to 4 use the PAGE knob to switch to other screens There are many parameters available within a screen To make editing easier the knobs below the LCD are assigned to each of the parameters in the screen Menu Screen If you use the PAGE knob while holdi...

Страница 52: ...igher note velocities Mixer Elements Level Pan Stereo 1 2 3 4 OSCíPan Pan Alter Random Scale EL1234 C L64 63 63 OSCíOut Level Delay InsEF EL1234 96 0 ins2 OSCíWave Number Ctgry EL1234 001 Pf Grand 1 52 Basics Section QED Common Quick Edit These parameters mostly control the volume and tone of the Voice and you can easily change the overall sound ARP Common Arpeggio By setting these parameters you ...

Страница 53: ...s basic idea is similar As illustrated below the filter is used to pass overtones at specific frequencies and cut off does not pass others to alter the harmonic factor of an original waveform You can determine such frequencies by specifying a pointing or center frequency cutoff frequency With some filters you can adjust signal levels at several frequency bands You can also set the Filter Envelope ...

Страница 54: ... Time Release Time Decay1 Level Sustain Level Key off Time Level AEGíTime Attack Decay1 Decay2 EL1234 127 127 127 Effect AMP FILT PICTH OSC Element 1 4 PEG FEG LFO AEG 8 LFO Low Frequency Oscillator Screens As its name suggests the LFO creates waveforms of a low frequency These waveforms can be used to vary the pitch filter or amplitude of each Element to create effects such as vibrato wah and tre...

Страница 55: ...ug in Voices will also be available Details about each Effect Type are given in the Effect Type List in the separate Data List Effects in Voice Mode In Voice Mode you can set up the effect type and its value for each Effect Unit Reverb Chorus and Insertion Effects and store them with each Voice Furthermore you can determine that each Element connects or bypasses the Insertion Effect Units When you...

Страница 56: ... Mode Page 135 You can also specify more than one effect When you press the EF BYPASS key its LED will light and all Effects assigned to the currently selected Voice Performance will be bypassed The Effect Bypass will also apply to Effects on Plug in Boards other than the PLG100 series DEC NO INC YES EXIT ENTER EF BYPASS MASTER KEYBOARD Part 1 16 Mixer Chorus Reverb System Effects Insertion Effect...

Страница 57: ... Lower Upper Point Common split ch01 ch02 C 3 As previously explained your Synthesizer provides several convenient features that you can make use of in a live show or the like Here we introduce some examples to combine those features to meet your specific purposes The S80 has special settings in Performance Mode so that you can use the instrument as MIDI master keyboard You can activate the functi...

Страница 58: ...ther associated settings so that you can control multiple Parts at the same time A Split setting can divides the entire keyboard into two absolute sections key ranges In a 4 zone setting however each section can overlap to one another You can even set a section to cover or include other sections ARPíType Type Tempo Switch Hold Common UpOct1 Sq 120 on off In the following example Zone 1 is set up f...

Страница 59: ...e Note Limit Zone01 1 11 C 2 G 8 MKBíTransmit TrnsCh TG MIDI Zone01 Ch01 on on 9Use again the Knob A to switch to the MKB Note screen for Zone03 As in the same manner in step 7 select C3 for the lowest note and G8 for the highest Use the Knob one more time A to switch to the MKB Note page for Zone04 As in the same manner in step 7 select C3 for the lowest note and G8 for the highest Note that this...

Страница 60: ...g in Voices are available only when you attach an optional Plug in Board page 98 Layer Upper Layer Lower Part 1 Voice Plug in 1 Part Plug in Voice 1Press the PERFORM key followed by the EDIT key each LED will light to enter Performance Edit Mode Then press the MASTER KEYBOARD key to activate Master Keyboard Mode its LED will light 2Select Common using the Knob A then open the General Master Keyboa...

Страница 61: ...en set to L R If you ve checked the above but still can t resolve the problem initialize the Performance Page 130 and apply the settings again About Note Limit Key Range Note Limit setups are provided for setting Master Keyboard Mode Part and Voice They are associated to one another as follows While using in Master Keyboard Mode you can control the internal tone generator or an external MIDI devic...

Страница 62: ...n off 2 Performance Mode lets you use your synthesizer as a multitimbral tone generator for use with computer based music software or external sequencers If each track in a song file uses a different MIDI channel then the Parts in a Performance can be each assigned to those MIDI channels correspondingly Therefore you can play back a song file on an external sequencer and have different Voices play...

Страница 63: ...garding settings the important points are as follows Switch to the PartAD A D Input Part parameters and set the external input source and template at the MIX Template screen There are 13 templates available already with a variety of gain and effects settings for you to select from according to the input source Here we will be using the A D Input Part for vocals so let s set the Src Source paramete...

Страница 64: ...ice Program Numbers within each memory fall in the range 001 to 128 Drum Voices are DR1 to DR8 Details about Voice Memories are given on Page 36 Bank Program Number Voice Program Numbers 001 to 128 correspond with Banks A to H and Program Numbers 01 to 16 Therefore you can cycle through Voice Program Numbers 001 to 128 sequentially or you can select them randomly using a combination of BANK and PR...

Страница 65: ...7 SHIFT PAGE PART ELEMENT DATA A B C 1 2 Oct 3 PRE1 128 H16 Pf GrandPiano Tch 1 Octave MIDI Transmit Channel SHIFT PAGE PART ELEMENT DATA A B C 1 2 VCE Play PRE1 128 H16 Pf GrandPiano 63 EQ Mid EQ Hi Cutoff RevTime Voice Program Selection There are four ways in which you can choose a Voice Using the BANK PROGRAM keys Using the DEC NO and INC YES keys Using the DATA knob Using the Category Search U...

Страница 66: ...RE DR1 Preset Drum 1 to DR8 Preset Drum 8 DATA C 1 2 Decrement Number Increment Number DEC NO INC YES Previous Number Next Number Press the MEMORY PRE2 key while holding down the MEMORY PRE1 key or vice versa to select the Preset PRE Memory of the Drum Voice Then use the INC YES or DEC NO keys to select the Drum Voice Press the MEMORY PRE2 key while holding down the MEMORY PRE1 key or vice versa t...

Страница 67: ...k The different Voice Categories are listed on Page 70 3Use Knob 2 the INC YES and DEC NO keys the DATA knob and Knob C to search for a Voice The selected voices are called up using each knob and key The functions of knobs and keys are given below Knob 2 Use this to switch between Voices in the selected Category Turn the knob clockwise to increment the voice number and anti clockwise to decrement ...

Страница 68: ...BASS STRINGS BRASS SYNTH OTHER C D E F G H VCE Quick INT 017 H01 Pf GrandPiano EQLow G EQMid G EQHi G FLT Frq ChoSend Voice Edit There are three kinds of Voices Normal Voices Drum Voices and Plug in Voices if a Plug in board has been installed The following is an explanation of the parameters used to edit each kind of Voice Details about Voices are given on Page 36 The following is displayed when ...

Страница 69: ...nt data you should always use Voice Store to store your edited Voice Details about the Voice Store procedure are given on Page 106 When creating a new Voice from scratch it can be useful prior to editing to clear the settings for the current Voice using the Initialize Voice function in Voice Job Mode Page 105 Normal Voice When editing Normal Voices there are 12 settings consisting of six Common Ed...

Страница 70: ...AGE PART ELEMENT DATA A B C 1 2 GENíName Ctgry a Z 0 Cursor C 1234 Pf Init Voice Choose numeric characters and symbols Choose alphabetic characters Move the cursor position Choose a Category Category Name Voice Name 70 Voice Mode Menu Display You will see the following if you use the PAGE knob while holding down the SHIFT key Use the PAGE knob to move the cursor to the parameter you wish to edit t...

Страница 71: ...nique character Francescantonio Vallotti and Thomas Young both mid 1700s divised this adjustment to the Pythagorean tuning in which the first six fifths are lower by the same amount Johan Philipp Kirnberber was also concerned with tempering the scale to allow performances in any key 13 24 This tuning is designed so that most of the intervals especially the major third and perfect fifth in the majo...

Страница 72: ...íFilter Cutoff Reso C 1234 63 63 Sustain Set the level of the Voice maintained while the note on the keyboard is being held down Settings 64 0 63 Release Set the transition time from the point at which the note on the keyboard is released to the point at which the level of the Voice reaches zero Settings 64 0 63 Common Arpeggio The following four parameters control the behavior of the Arpeggiator ...

Страница 73: ...nce data they will be applied and reproduced whenever the Arpeggio plays back ARPíMode Key Mode Vel Mode C 1234 sort thru ARPíLimit Note Limit C 1234 C 2 G 8 If the Arpeggio Category is set to Ct you will not hear any sounds unless you select direct here With the sort and thru settings the order in which notes are played back will depend on the Arpeggio sequence data Vel Mode Velocity Mode Set the...

Страница 74: ... semitones by which the Voice pitch changes when the Pitch Bend Wheel is moved downwards For example a value of 12 means that the pitch of the Voice drops by up to an octave when the Pitch Bend Wheel is moved downwards Settings 48 0 24 Upper Set the amount in semitones by which the Voice pitch changes when the Pitch Bend Wheel is moved upwards For example a value of 12 means that the pitch of the ...

Страница 75: ...ol Set Assignments are given in the Basics Section of this manual Page 45 SET1 KN1 Assignable Knob 1 Src PAN Dest SET2 KN2 Assignable Knob 2 Src PAN Dest Use either Assignable Knob 1 or 2 to change the pan parameter SET1 Src PAN Dest SET2 Src LFO Speed Dest MW Modulation Wheel MW Modulation Wheel Use the Modulation Wheel to change both the Pan and LFO speed parameters simultaneously Common LFO Low...

Страница 76: ...gs are available Settings off each on 1st on off The LFO is self running no synchronization and starts a waveform at any phase when you play on the keyboard each on The LFO resets with each note you play and starts a waveform at the phase specified by the Phase parameter see below 1st on The LFO resets with every note you play and starts the waveform at the phase specified by the Phase parameter S...

Страница 77: ...et the length of time during which the LFO is held at its maximum level A higher value means a longer Hold time Settings 0 127 FadeOut Fade Out Set the time taken for the LFO effect to be faded out after the Hold time has elapsed A higher value means a slower fade out Settings 0 127 Low FadeOut value Faster fade out High FadeOut value Slower fade out LFO Dest1 LFO Destination 1 LFO Dest2 LFO Desti...

Страница 78: ... 123 DLY DelayLCR D W63 to Edit Effect Type selection screen Parameter settings screen EFFíEF2 Ctgry Type Dry Wet ENTER C 123 DLY DelayLCR D W63 to Edit Dest Destination Set the parameters which will be controlled modulated by the LFO Wave Settings AMD PMD FMD RESO Resonance PAN ELFOSpd Element LFO Speed ElemSw Element Switch Select whether to allow variations in the LFO Wave for each Element Move...

Страница 79: ...creens are available for each OSC Wave Oscillator Wave OSC Out Oscillator Out OSC Pan Oscillator Pan OSC Limit Oscillator Limit OSC Wave Oscillator Wave You can use Knob A to select each Element and Knob C to assign a Wave to it Number Wave Number Select the Wave Number The Category and Wave Name are displayed to the right of the selected Wave Number You can assign a different Wave Number to each ...

Страница 80: ... for notes played within its specified range Settings C 2 G8 for the lowest and highest notes If you specify the highest note first and the lowest note second for example C5 to C4 then the note range covered will be C 2 to C4 and C5 to G8 You can set the lowest and highest notes in the range by pressing notes on the keyboard while holding down the SHIFT key Vel Limit Velocity Limit Set the minimum...

Страница 81: ...234 127 128 127 0 Coarse Adjust the pitch of each Element in semitones Settings 48 0 48 Fine Fine tune the pitch of each Element Settings 64 0 63 Random Set the amount by which the pitch of each Element is varied at random for each note you press A setting of zero means the original pitch is not changed Settings 0 127 PEG VelSens PEG Velocity Sensitivity You can determine how the Pitch Envelope Ge...

Страница 82: ... the Release Level Settings 128 0 127 4800 cents 0 4800 cents Pitch Envelope Generator Settings There are five Time settings controlling the speed of changes to the sound and five Level settings controlling the pitch The pitch of a note is held at the Hold Level for the length of time defined by the Hold Time After the Hold Time has elapsed the pitch changes in accordance with the Attack Time Leve...

Страница 83: ...r an LPF Low Pass Filter an HPF High Pass Filter a BPF Band Pass Filter and a BEF Band Elimination Filter Each available filter has a different frequency response There are also combinations of LPF and HPF LPF Low Pass Filter This only passes signals below the Cutoff frequency You can then use the Reso Resonance parameter to add further character to the sound Six types of LPF are available Frequen...

Страница 84: ...lter 6dB oct The combination of a 6dB oct HPF and LPF BPF12D Band Pass Filter 12dB oct Digital The combination of a 12dB oct HPF and LPF BPFW Band Pass Filter Wide Also the combination of a 12dB oct HPF and LPF but can have a wider frequency band than the BPF12D filter BEF Band Elimination Filter This attenuates a band of signals around the Cutoff frequency but passes everything else BEF6 Band Eli...

Страница 85: ... Settings 200 0 200 FLT Sens Filter Sensitivity You can set Filter Sensitivity parameters for each Element FLTíSens EGDepth VelCutoff VelReso EL1234 63 7 7 FLTíHPF Cutoff KeyFlw EL1234 255 200 EGDepth Set the sensitivity of the Filter to note velocity A positive setting will produce large filter changes for notes played harder and a setting of zero will produce no filter changes at all With a nega...

Страница 86: ...en FLTíKeyFlw Cutoff Center EGTime Center EL1234 200 C 3 63 C 3 0 Release Level Attack Level Hold Level Attack Time Hold Time Decay1 Time Decay2 Time Release Time Decay1 Level Sustain Level Key off Time Level FEGíRelease Time Level EL1234 127 127 FEG Time You can set various Time parameters for the Filter Envelope Generator FEG Combined with the FEG Level and FEG Release settings these can be used...

Страница 87: ...es of 0 and 127 respectively cannot be exceeded A note set below the BP1 will become the BP1 Level A note set above BP4 will become the BP4 Level FLTíScale BP1 BP2 BP3 BP4 EL1234 E 1 B 2 G 4 A 5 FLTíScale Ofst1 Ofst2 Ofst3 Ofst4 EL1234 4 10 17 4 FLTíScale Ofst1 Ofst2 Ofst3 Ofst4 EL1234 0 127 128 0 FLTíScale BP1 BP2 BP3 BP4 EL1234 C 2 C 3 C 5 G 8 Cutoff Set the Filter Key Follow ratio the amount by...

Страница 88: ...ameters to affect the output level of each Element The following seven screens are available AEG VelSens AEG Velocity Sensitivity AEG Time AEG Level AEG Release AMP KeyFlw AMP Key Follow AMP Scale AMP Scale Break Point AMP Scale AMP Scale Offset AEG VelSens AEG Velocity Sensitivity You can set the sensitivity of the Amplitude Envelope Generator AEG to note velocity Level Set the sensitivity of the...

Страница 89: ...ffect Settings 200 0 200 AMPíKeyFlw Level Center EGTime Center EL1234 200 C 3 63 C 3 0 Release Level Attack Level Init Level Attack Time Decay1 Time Decay2 Time Release Time Decay1 Level Sustain Level Key off Time Level Center Center Key This shows that the basic Level is at note C3 At this note the output level remains unchanged For other notes the output levels vary according to the Level settin...

Страница 90: ...nd 4 at BP4 set to A5 That is the amplitudes at each Break Point are 76 90 97 and 84 respectively For other notes the amplitudes will be on the straight line connecting the two adjacent Break Points The Break Points are automatically arranged in ascending order across the keyboard For example BP2 cannot be set to a lower note than that of BP1 AMPíScale BP1 BP2 BP3 BP4 EL1234 E 1 B 2 G 4 A 5 AMPíSc...

Страница 91: ...nd Low Frequency Band to adjust the signal Level If you select this Filter the EQ Parameter screen will be available with the following parameters Frequency 0 Low Freq High Freq EQíParam LoFreq LoGain HiFreq HiGain EL1 3 257 OHz 32 6 25kHz 32 EQíType Type EL1 3 EQ L H Speed Set the speed of the LFO waveform A larger setting means a faster speed Settings 0 63 Speed Fast Speed Slow KeySync Switch Ke...

Страница 92: ...u select this the equalizers are bypassed and the entire signal is unaffected Drum Voices With Drum Voices different drum and percussion Waves or Normal Voices are assigned to notes across the keyboard from C0 to C6 forming an entire drum kit For editing Drum Voices there are five Common Edit screens affecting all the Drum Voices together and the five Drum Key screens When you select a Drum Voice ...

Страница 93: ... Tune Pitch Tune 96 Drum Key Filter 96 FLT Cutoff Filter Cutoff 96 Drum Key Amplitude 96 AMP AEG Amplitude Envelope Generator 97 AMP VelSens Amplitude Velocity Sensitivity 97 Drum Key EQ Equalizer 91 EQ Type EQ Type 91 EQ Param EQ Parameter 91 Drum Common General For Drum Voices there is only the one type of Common General shown below The parameters and settings are the same as for Normal Voices D...

Страница 94: ...v Reverb EFF Cho Chorus Drum Key OSC Oscillator You can change your Drum Voice waveform settings Each Drum Voice can consist of up to 73 Drum Keys Page 37 assigned to notes spread across the keyboard C0 to C6 You can assign waveforms to Drum Keys and set their parameters The following four screens are available OSC Wave Oscillator Wave OSC Out Oscillator Out OSC Pan Oscillator Pan OSC Other Oscill...

Страница 95: ...hoSend Key C 3 127 thru 64 127 Pan Set the Pan position for each sound in a Drum Voice Drum Kit This will also be used as the basic Pan position for the Alternate and Random settings Settings L63 Left C Center R63 Right Alter Alternate Set the amount by which the sound is panned alternately left and right for each note you press The Pan setting is used as the basic Pan position Settings L64 Left 0...

Страница 96: ...ttings 64 0 63 This parameter is only available if the Type parameter in the OSC Wave screen is set to wave PCHíTune Coarse Fine VelSens Key C 3 0 0 63 Drum Key Filter You can apply filter settings to the Drum Voice A Low Pass Filter and High Pass Filter can be applied per Wave to change its tonal characteristics This parameter is only available if the Type parameter in the OSC Wave screen is set ...

Страница 97: ...ay the keyboard and conversely negative values will cause it to fall Settings 64 0 63 AMPíVelSens Level Key C 3 63 AMPíAEG Attack Decay1 Level Decay2 Key C 3 127 127 127 126 Amplitude Envelope Generator Settings The Amplitude Envelope Generator has three Time parameters and one Level parameter These govern the transitions between output levels for the duration of a note The Attack Time is the time...

Страница 98: ...Limit Arpeggio Note Limit 73 ARP Mode Arpeggio Mode 73 ARP PlayEF Arpeggio Play Effect 73 Plug in Common Controller 100 CTL Pitch Pitch Bend 100 CTL Set1 Control Set 1 100 CTL Set2 Control Set 2 100 CTL MW Control MW Control Depth 100 CTL MW Modulation MW Modulation Depth 100 CTL AT Control AT Control Depth 100 CTL AT Modulation AT Modulation Depth 101 CTL AC Control AC Control Depth 101 Plug in C...

Страница 99: ...ces Details are given on Page 71 QED EffectCtrl Quick Edit Effect The parameters and settings are the same as for Normal Voices Details are given on Page 71 GENíOther Mode Assign Common poly single QED Filter Quick Edit Filter The parameters and settings are the same as for Normal Voices Details are given on Page 72 QED EG Quick Edit Envelope Generator The EG Envelope Generator can be used to cont...

Страница 100: ...ailable for Normal Voices CTLíPitch Pitch Bend Portamento Time Common 24 on 127 CTL MW Control MW Control Depth Here you can set the depth of control the Modulation Wheel has over the filter Filter Set the depth of control of the Modulation Wheel over the filter cutoff frequency Settings 64 0 63 CTL MW Modulation MW Modulation Depth Here you can set the depth of control the Modulation Wheel has ov...

Страница 101: ...the Control Change messages Assignable Control have over the pitch filter and amplitude of the Plug in Voice CTLíAC Modulation PMod FMod AMod Common 127 127 127 CTLíAC Control Source Filter Common 04 FootCtrl 64 CTLíAT Modulation PMod FMod AMod Common 127 127 127 PMod Pitch Modulation Depth Set the depth of control the Control Change messages selected in the Source parameter have over the pitch mo...

Страница 102: ...rs for the Board Voice The Pitch Envelope Generator controls the change in pitch from the moment a note is pressed on the keyboard to the moment it is released OSCíVelocity Depth Offset NoteSft Elem 127 0 24 OSCíAssign Bank Number Elem NORM 001 128 GndPiano Delay Set the delay time between the moment you press a note on the keyboard and the moment the LFO comes into effect As shown in the illustra...

Страница 103: ...eter LoFreq Low Frequency Set the shelving point for the low frequencies The levels of signals below this frequency will be boosted attenuated by the amount set in the LoGain parameter Settings 32Hz 2 0kHz LoGain Low Gain Set the amount by which signals below the LoFreq frequency will be boosted attenuated Settings 64 0 63 HiFreq High Frequency Set the shelving point for the high frequencies The l...

Страница 104: ...with your Plug in Board Once you have transmitted the edited Board Voice data to the synthesizer and saved it to Memory Card as a plugin file type you can load the file without having to connect the computer Computer Editor Bulk Dump Edit Save IBM PS V Board Voice Plug in Voice Custom Bank Plug in Board S80 Plug in Memory PLG 1 2 If a Board Voice in the Custom Bank has been edited in Voice Edit Mo...

Страница 105: ...ndPiano Current Job PRE1 128 H16 EL1 EL1 1 2 3 4 VCE Edit Recall Job VCE Initialize Job Current Voice Voice Job Mode You can perform various operations Jobs in Voice Job Mode For example you can Initialize Voices including those currently being edited or Recall previous edits When you enter Voice Job Mode you will first see the Initialize screen The following four screens are available for each Vo...

Страница 106: ... settings for the current Voice to your computer or some other external MIDI device using Bulk Dump You must set the correct MIDI Device Number in order to perform a Bulk Dump Details are given on Page 137 VCE Bulk Dump Job Current Voice Voice Store You can store save the parameter settings for up to 128 Voices to each of your synthesizer s Memories INT Internal or to its Memory Card EXT External ...

Страница 107: ...ow EQ Mid EQ Hi 1 0 1 2 3 4 Performance Play In Performance Play Mode multiple Voices up to four Parts can be layered to create thick sounds which you can play in real time or using a sequencer In Performance Mode up to 19 Parts can be combined in a single Performance including Voices for the 16 Parts plus A D Input and Plug in 1 2 Parts Depending on the Performance Edit settings Page 111 you can ...

Страница 108: ...4 126 H 14 063 D 15 127 H 15 064 D 16 128 H 16 4 Knob Parameter Display This shows the function Parameter value assigned to each knob A to C and 1 2 Setting Viewing Knob Parameters In Performance Play Mode you can use Knobs A to C and Knob 1 2 to adjust parameters assigned to them When you use each knob the value of its assigned parameter is displayed briefly knob A to C Details about assigning pa...

Страница 109: ... to 16 to select a Program Number Performances can be selected by setting the Memory Bank and Program Number as explained in the three steps given above The display also shows the selected Performance Multi Edit Volume Pan Reverb Chorus Send Note Shift You can set the output level volume stereo pan and other parameters for each Part using the graphic editors on screens 3 to 7 You can for example a...

Страница 110: ...available If you select Part17 to Part32 the bar graph shows the settings for those Parts PFM Mlt Volume L Part01 127 PFM Mlt Volume Part17 127 Part17 Part32 PFM Mlt NoteSft L Part01 0 __ _ _______________ PFM Mlt ChoSend L Part01 127 __ _ _______________ PFM Mlt RevSend L Part01 127 __ _ _______________ PFM Mlt Pan L Part01 L63 __ _ _______________ PFM Mlt Volume L Part01 127____ ___________ 2 3 ...

Страница 111: ... Input Part or a Plug in Part 1 2 Page 39 The parameters common to all Parts are known as a Common Edit The Performance Edit Mode screens can be divided into the Common Edit screen and screens for editing each Part individually SHIFT PAGE PART ELEMENT DATA A B C 1 2 MIX Level Com GEN QED ARP CTL MEQ EFF Part01 Part MIX TON LYR RCV MKB Cursor SHIFT PAGE PART ELEMENT DATA A B C 1 2 Select Common Par...

Страница 112: ...e to the î indicator and the EDIT COMPARE key LED will blink The Performance settings prior to editing will temporarily be reinstated for comparison purposes Editing will not be possible while the Compare function is enabled 2Press the EDIT key again to disable the Compare function and restore the settings for your edited Performance Performance Store The edited settings for the current Performanc...

Страница 113: ...ilable If the MASTER KEYBOARD key LED on the front panel is off these Modes are not available and brackets are shown in the display Settings split 4zone layer split Splits the keyboard into a left hand lower section and a right hand upper section assigning a different MIDI channel and Part to each section 4zone Splits the keyboard into a maximum of four zones assigning a different MIDI channel and...

Страница 114: ...f off 0 0 C 2 G8 on on on on on on on on on on on on off off 100 40 0 0 0 7 Zone4 ch off off 0 0 C 2 G8 on on on on on on on on on on on on off off 100 40 0 0 0 7 Zone1 ch on on 0 0 C 2 G8 on on on on on on on on on on on on off off 100 40 0 0 0 7 Zone2 ch 1 on on 0 0 C 2 G8 on on on on on on on on on on on on off off 100 40 0 0 0 7 Zone3 ch off off 0 0 C 2 G8 on on on on on on on on on on on on o...

Страница 115: ...s peak to the point at which it levels off Settings 64 0 63 Sustain Set the output level of the Layer Part maintained while the key on the keyboard is being held down Settings 64 0 63 Release Set the transition time from the point at which the key on the keyboard is released to the point at which the output level of the Layer Part reaches zero Settings 64 0 63 Common Arpeggio The following four sc...

Страница 116: ...o the Ribbon Controller Settings Details are given in the separate Control List SHIFT PAGE PART ELEMENT DATA A B C 1 2 CTLíAssign2 FC RB Common FootCtrl 04 22 Control Change Name Control Change Number SHIFT PAGE PART ELEMENT DATA A B C 1 2 CTLíAssign1 BC Knob1 Knob2 Common FootCtrl 02 16 17 Control Change Name Control Change Numbers Common EQ Equalizer You can assign any of five different Equalize...

Страница 117: ...0Hz 10 0kHz Q Frequency Characteristic This varies the signal level at the Frequency setting to create various frequency curve characteristics Settings 0 1 12 0 EQ High This Equalizer covers high frequencies You can adjust the signal level at the specified frequency You can also select different Equalizer types Shapes Shape Select either a Shelving or Peaking equalizer The Peaking type attenuates ...

Страница 118: ... EFFíRev Type Return ENTER Common Basement 127 to Edit Type Chorus Effect Type Set the Chorus Effect Type Settings Details are given in the Effect Types list of the separate Data List toRev To Reverb Set the Send level of the signal sent from the Chorus Effect to the Reverb Effect Settings 0 127 Return Set the Return level of the Chorus Effect Settings 0 127 If an Insertion Effect Plug in Board ha...

Страница 119: ...nd use Knob C to select the Program Number Bank Settings PartP1 P2 Plug in 1 2 PLG1 2 INT Plug in 1 2 Internal MSB LSB Plug in Bank For details about Plug in Banks Bank Select MSB LSB refer to the Owner s Manual that came with your Plug in Board Number Program Number Settings PLG1 2 INT Plug in 1 2 Internal 1 64 MSB LSB Plug in Bank 1 128 There may be a delay when changing programs for Plug in Par...

Страница 120: ...line TouchWah1 Audio line 8 Echo mic Echo CleanGtr mic Celeste3 RotaryOrg line RotarySp Audio line 9 Vocal mic Stage1 FuncGtr mic TouchWah2 SynthStr line Symphonic Audio line 10 Studio mic Exciter Tremolo mic Tremolo SynthPad line Flanger2 Audio line 11 OctUp mic PitChange1 Phaser mic Phaser1 SynthLead line DelayLCR Audio line 12 OctDown mic PitChange1 5thGuitar mic PitChange1 SFX line PitChange1 ...

Страница 121: ... note on the keyboard is released to the point at which the output level of the Part reaches zero A positive value will lengthen the transition time and a negative value will shorten it This parameter is not available for Drum Voice Parts Settings 64 0 63 TONíEG Attack Decay Part10 0 0 TONíEG Attack Decay Release PartP1 0 0 0 TONíEG Attack Decay Sustain Release Part01 0 0 0 0 TON Portamento Tone P...

Страница 122: ...hanges to velocity curve according to VelDepth with offset set to 64 Offset 64 Received Velocity Velocity at tone generator Depth 64 Offset 64 Depth 32 Offset 64 Depth 0 Offset 64 Depth 127 Offset 64 TONíOther Pitch Bend VelDepth Offset PartP1 12 127 64 TONíOther Pitch Bend VelDepth Offset Part01 12 12 127 64 offset Velocity Offset As illustrated below the velocity will be increased by the specifi...

Страница 123: ...t and the lowest note second for example C5 to C4 then the note range covered will be C 2 to C4 and C5 to G8 You can set the lowest and highest notes in the range by pressing notes on the keyboard while holding down the SHIFT key LYRíLimit Note Limit Vel Limit Part01 C 2 G 8 1 127 Vel Limit Set the minimum and maximum values of the velocity range within which each Part will respond Each Part will ...

Страница 124: ...h Voice in each Part will receive messages from Knob 1 2 plus Breath Controller Foot Controller and Control Change messages This screen is only available for Parts 1 to 16 including Drum Voice Parts RCVíSw1 PB MW AT PartP1 on off off RCVíSw1 PB MW RB AT Part01 on off on off Parts 1 to 16 Drum Voice Part Settings Knob1 Knob 1 off on Knob2 Knob 2 off on BC Breath Controller off on FC Foot Controller...

Страница 125: ...tch Bend Wheel MW Modulation Wheel AT Aftertouch FC Foot Controller FS Foot Switch RB Ribbon Controller BC Breath Controller KN1 2 Knob 1 2 RevSend Dest ChoSend Dest SET 1 A D Input SET 2 Src MW Modulation Wheel Src KN1 Knob 1 CTLíSet1 Src Dest Depth PartAD FC 04 off 63 Dest Destination Set the parameter to be controlled by the Controller specified in Src Settings see the separate Control List Dep...

Страница 126: ...Modulation PMod FMod AMod Part17 127 127 127 CTLíAT Control Pitch Filter Amp Part17 24 63 63 FMod Filter Modulation Depth Set the amount by which the filter Cutoff frequency changes when aftertouch is used Settings 0 127 AMod Amplitude Modulation Depth Set the amount by which the amplitude modulation changes when aftertouch is used Settings 0 127 CTL AC Control AC Control Depth Multi Plug in Parts...

Страница 127: ...nit and the dry signal which has not been passed through the Effects Unit This may be unavailable depending on the selected Effect Type Settings D63 W D W D W63 EFFíEF1 Ctgry Type Dry Wet ENTER PartAD DLY DelayLCR D W63 to Edit Effect Parameter Settings These parameters are available when you press the ENTER key for certain Effect Types Use the PAGE knob to switch between screens and use the other...

Страница 128: ...on on MKB TxSw1 Master Keyboard Transmit Switch 1 For each zone you can enable disable the transmission of messages for the Pitch Bend Wheel Modulation Wheel Knobs A to C and Knob 1 2 Settings PB Pitch Bend Wheel off on MW Modulation Wheel off on KnobA C Knobs A to C off on Knob1 2 Knob 1 2 off on MKB TxSw2 Master Keyboard Transmit Switch 2 For each zone you can enable disable the transmission of ...

Страница 129: ... 127 Bank Select is a type of MIDI message transmitted when changing Voice Bank Control Change MSB and LSB messages are combined to form Bank Select messages which are used to specify the Voice Bank These message values will vary according to synthesizer For more details refer to the documentation that came with your synthesizer This setting is not transmitted if the Bank Bank Select parameter at ...

Страница 130: ...to exit Performance Job Mode and return to Performance Play Mode PFM Bulk Dump Are you sure YES NO PFM Initialize Job Current Perform PFM Initialize You can reset initialize all parameters of a Performance to their default settings You can also selectively initialize certain parameters such as Common settings settings for each Part and so on Note that this is not the same as editing an existing Pe...

Страница 131: ...e current Performance to your computer or some other external MIDI device using Bulk Dump You must set the correct MIDI Device Number in order to execute a Bulk Dump Details are given on Page 137 PFM Bulk Dump Job Current Perform Performance Store You can store the parameter settings for up to 128 Performances to each of your synthesizer s Memories INT Internal or up to 64 Performances to Memory C...

Страница 132: ...ain Step Number 1 100 Song File Performance 1 1 2 3 16 Sequence Track 1 2 3 16 Plug in Part 1 Plug in Part 2 A D Input Part Part MIDI CH 2 3 16 1 MIDI CH 2 16 5 3 4 6 In this Mode you can play back the built in demo songs and Song files stored on Memory Card Up to 100 Song files can be played back end to end by using the Chain Step feature This Chain Step data can also be saved to Memory Card A Me...

Страница 133: ... contained within a Song file is displayed as the Bank Number when the Song File is selected In this case the Song file will use the Program set in the currently selected Mode Voice Mode Performance Mode Performances can be changed while Songs are playing or have been stopped However it does not change in real time during playback if you specify a Chain Step other than the current one In stead it ...

Страница 134: ...wrapped over MSTR Kbd Oct Trnspose Vel Sys 3 11 fixed 127 MSTR TG Vol NoteShift Tune Sys 127 24 102 3c The parameters in Utility Mode are explained here Utility Mode can roughly be divided into a screen for settings common to the entire system a screen for Voice Mode settings and a screen for Plug in Board settings You will first see the following screen when you enter Utility Mode Each of the thr...

Страница 135: ...ed to the EF BYPASS key on the front panel Insert Insertion Reverb Chorus When the EF BYPASS key is pressed its LED is lit various effects can be bypassed Settings off on for Insert Insertion Reverb and Chorus effects Plug in Board Variations Variation Effects will be bypassed according to the Insert setting MSTR Other Other Setup Set other parameters common throughout the system PowerOnMode Selec...

Страница 136: ...gnable Knobs A to C Settings 000 095 see the separate Data List for details Dest Control Destination Set the function to be controlled by Assignable Knobs A to C Settings see the separate Data List for details The positions of Knobs A B C can be memorized for each Voice Performance If a Master Equalizer parameter is selected as the destination the M EQ settings of vce in Utility Mode are increased...

Страница 137: ...er used to control the ARPEGGIO ON OFF key Settings 000 095 000 032 off Hold Select the Control Change Number used to control the ARPEGGIO HOLD key Settings 000 095 000 032 off Out Vce Enable disable the output or Arpeggiator data to external MIDI devices through the MIDI Out Settings off disabled on enabled Ch Vce Arpeggio Transmit Channel Select the MIDI channel through which Arpeggio data will ...

Страница 138: ...PgmChng Program Change Set to enable or disable reception of a Program Change message coming in With this parameter set to on the instrument can receive a Program Change massage coming in and it can also send a Program Change out to an external MIDI device when you select a Voice or Performance using a PROGRAM PART key etc on its front panel Settings off disable on enable Control Set the MIDI tran...

Страница 139: ...d the Frequency setting Settings 12dB 0dB 12dB Freq Frequency Set the center frequency Frequencies around this point are attenuated boosted by the Gain setting Settings 100Hz 10kHz Q Frequency Characteristic This varies the signal level at the Frequency setting to create various frequency curve characteristics Settings 0 1 12 0 M EQ High Master EQ High This Equalizer covers high frequencies You ca...

Страница 140: ...ge Name CTRL Assign1 BC Knob1 Knob2 Vce FootCtrl 02 16 17 Control Change Number Control Change Name RB Ribbon Controller Assign a Control Change Number to the Ribbon Controller Settings 00 95 see the separate Data List for details Details about Controller Assign settings in Performance Mode are given on Page 116 PLG Plug in if a Plug in Board has been installed If you have a Plug in Board installe...

Страница 141: ...n 4Use the PAGE knob to select the name of the Plug in Board as shown at the bottom left of the screen Then enter the Plug in native part parameter screen 5Use the PAGE knob to select the Plug in native part parameter for the tempo Then use the appropriate knob to select MIDI midi PLG2 System Vel Curve Mrph CtrlNo norm off Now the tempo of the Plug in Board is synchronized with the MIDI clock sign...

Страница 142: ...in 142 Card Mode In Card Mode you can use Memory Card a SmartMedia card available at a consumer electronics shop etc to save or load data from to the instrument or perform other data exchange operations between memories on the instrument and the Card Using the included Card Filer software you can use a computer to manage data on Memory Card You can also use it to exchange data between the computer...

Страница 143: ...ic loading of files hold down the EXIT key when powering up the synthesizer Release the key when the Now checking plug in board message is displayed All all data Name the file AUTOLOAD S2A to automatically load all data Plugin Plug in data Name the file AUTOLD1 S2B to automatically load Plug in 1 Board data or AUTOLD2 S2B for Plug in 2 Board data You will see the 1st screen Status when you enter C...

Страница 144: ... the data may be damaged The steps in the procedure may vary slightly depending on the operation being performed Refer to the explanation of each operation for details Load Type File VOICEDIR SUBDIR 1 Are you sure YES NO SHIFT PAGE PART ELEMENT DATA A B C 1 2 Save Type File A Cursor Card all NEWFILE S2A Status You can view the amount of free and used on the Memory Card There are no settings Used S...

Страница 145: ... Type 1Use Knob B to select the File Type of the data to be loaded 2Use Knob C to select the File Number 3When you press the ENTER key the following will be displayed depending on the selected File Type If you have selected a File Type other than perf or voice A confirmation message is displayed before loading The synthesizer will automatically select an appropriate location in its internal memory...

Страница 146: ...o which file will be loaded target Voice Memory of file to be loaded source Voice Memory to which file will be loaded target Type File Type Settings all all data all voice chain Sequence Chain plugin other Details about File Types are given on Page 143 1Use Knob B to select the File Type and Knob C to select the File Number If you press the SHIFT key the directory for the currently selected file i...

Страница 147: ...rectory The message Completed will be displayed after it has been created and you will be returned to the previous screen Directories are denoted by Dir next to the directory name To open a subdirectory use Knob C to move the cursor to it and press the ENTER key All the files in the subdirectory are displayed If you select File Number 000 up dir will be displayed By pressing the ENTER key you will...

Страница 148: ...t into consideration before installation n Although the PLG100 VL and PLG100 DX can also be installed some of the functions are not available Precautions When Installing the Optional Boards Remember the following precautions and install the Plug in boards properly by following the steps as written Handle the Plug in boards with care Dropping or subjecting the Plug in board to any kind of shock may...

Страница 149: ...tration 6 2 Press down the other side until it is securely settled on the hooks 2 Hooks 2 Hooks 2 Hooks 1 Hooks 1 tape 6 3 Carefully plug the cable connector into the Plug in board connector until the two notches on the cable connector lock into the sockets on the board Removing the Plug in board from the keyboard 1 Pull out the cable connector from the Plug in board connector 2 Press down the hoo...

Страница 150: ...150 Appendix 7 Insert the plate into the keyboard 8 Replace the Plug in board cover by fastening the three SILVER screws you removed in the step 2 above ...

Страница 151: ... Slot 2 is not working properly Sound requires a different Plug in Board to that inserted in Slot 1 Sound requires a different Plug in Board to that inserted in Slot 2 When used with a PLG100 series Plug in Board a data file of which File Type is plugin cannot be stored on a Memory Card Operation is being executed Memory Card operation is being executed File is being loaded from Memory Card File i...

Страница 152: ... using the internal sequencer or an external MIDI device have the volume and expression parameters been set appropriately When playing performances using the internal sequencer or an external MIDI device have the transmit channels for each sequencer track and the receive channels for each Part in the Performance been set correctly Page 123 For Performances is the volume of each Part sufficiently h...

Страница 153: ...rt Page 122 No effects are applied Has the EF BYPASS key been set to OFF Page 56 Has the Insertion Effect Element Switch parameter in the EFF screen of Voice Edit been set to ON Also in this Mode has the effect type been set to something other than thru or off Page 78 For Performances have the Insertion Effect Parts been specified Page 117 For Reverb and Chorus have the effect types in the Common ...

Страница 154: ...Recall function in the Job mode to restore the last edited data Pages 105 130 The Quick Access function doesn t work When a program change message is received from a connected MIDI device such as a computer or MIDI keyboard the Quick Access function is automatically disabled When using the Quick Access function set Program Change PgmChng to off in the MIDI Receive Switch MIDI Sw parameter in the U...

Страница 155: ... Volume Individual Output 1 2 Output L Mono R Phones A D Input AC Inlet 2 Connectors for Plug in Boards 40 x 2 Backlit Owner s Manual Data List CD ROM AC Power Cord PLG150 Plug in Boards Series PLG100 Plug in Boards Series FC4 5 Footswitch FC7 Foot Controller BC3 Breath Controller 16W Output 18 1 2dbm 10k ohms Phones 17 2 2dbm 33 ohms 1329 W x 371 D x 157 H mm 24 3 kg KEYBOARD Number of Keys Touch...

Страница 156: ...onnections 13 Control Sets 45 Control Sets and External MIDI Control 46 Controller Section 31 43 Controlling Parameters by Foot Controller 48 CONTROL SLIDER 6 44 61 CTL AC Control AC Control Depth 101 CTL AC Control AC Control Depth Multi Plug in Parts only 126 CTL AC Modulation 101 CTL AC Modulation AC Modulation Depth Multi Plug in Parts only 126 CTL Assign1 Controller Assign 1 116 CTL Assign2 C...

Страница 157: ...ram LFO Parameter 101 LFO Wave 75 90 Load 145 LYR Limit Layer Limit 123 LYR Mode Layer Mode 122 LYR Out Layer Out 123 LYR Tune Layer Tune 123 M M EQ Voice Master Equalizer 138 M EQ High Master EQ High 139 M EQ HighMid Master EQ High Middle Range 139 M EQ Low Master EQ Low 139 M EQ LowMid Master EQ Low Middle Range 139 M EQ Mid Master EQ Middle Range 139 Master keyboard 57 128 134 Master Keyboard T...

Страница 158: ...n Element EQ Equalizer 103 Plug in Element Native 103 Plug in Element OSC Oscillator 102 Plug in Element Pitch 102 Plug in Voices 98 Power Supply 12 POWER switch 10 Powering Up 19 PROGRAM PART 1 to 16 keys 9 23 Q Quick Access key 9 QED EF Quick Edit Effect 114 QED EffectCtrl Quick Edit Effect 71 93 99 QED EG Quick Edit Envelope Generator 72 93 99 115 QED Filter Quick Edit Filter 72 93 99 115 QED L...

Страница 159: ...itialize 105 Voice Category 65 Voice Edit 21 50 68 Voice Job Mode 22 105 Voice Memory Number Bank Number Display 64 Voice Mode 35 64 Voice Name 65 Voice Play Mode Display 21 64 Voice Program Selection 65 Voice Store 69 106 Voices 27 36 VOLUME Slider 6 W Waves 38 Z Zones 127 ...

Страница 160: ...Scandinavia AB J A Wettergrens Gata 1 Box 30053 S 400 43 Göteborg Sweden Tel 031 89 34 00 DENMARK YS Copenhagen Liaison Office Generatorvej 8B DK 2730 Herlev Denmark Tel 44 92 49 00 FINLAND F Musiikki Oy Kluuvikatu 6 P O Box 260 SF 00101 Helsinki Finland Tel 09 618511 NORWAY Norsk filial av Yamaha Scandinavia AB Grini Næringspark 1 N 1345 Østerås Norway Tel 67 16 77 70 ICELAND Skifan HF Skeifan 17...

Страница 161: ...tions are not provided it must be assumed that unobstructed ventila tion is required 7 Temperature considerations Electronic products should be installed in locations that do not seriously contribute to their operating temperature Placement of this product close to heat sources such as radiators heat registers etc should be avoided 8 This product was NOT designed for use in wet damp loca tions and...

Страница 162: ...r its subsidiaries class B This applies only to products distributed by YAMAHA CORPORATION OF AMERICA IMPORTANT NOTICE FOR THE UNITED KINGDOM Connecting the Plug and Cord WARNING THIS APPARATUS MUST BE EARTHED IMPORTANT The wires in this mains lead are coloured in accordance with the following code GREEN AND YELLOW EARTH BLUE NEUTRAL BROWN LIVE As the colours of the wires in the mains lead of this...

Страница 163: ...t and playing chords on the keyboard Harmony interval changes can be recorded in a sequencer track for automated playback a dream tool for performing vocalists or for singer songwriters who want to compose and record songs at home Advanced DX TX Plug in Board PLG150 DX Add the classic sounds of Yamaha s world famous DX 7 synthesizer to the S80 The PLG150 DX features the same 6 operator 16 note pol...

Страница 164: ...M D G Pro Audio Digital Musical Instrument Division Yamaha Corporation 1999 Yamaha Corporation V419010 012MWCP2 3 04D0 Printed in Japan This document is printed on chlorine free ECF Paper OWNER S MANUAL ...

Отзывы: