background image

Erasing Pattern Changes

The 

[F6] 

function key (“Clear”) can be used to clear the style number, section,

or end-of-song marker at which the cursor is located. If you clear a time
signature change, the default time signature value for the current pattern will
be automatically re-selected.

“Chd” 

— 

Step Record Chord Changes

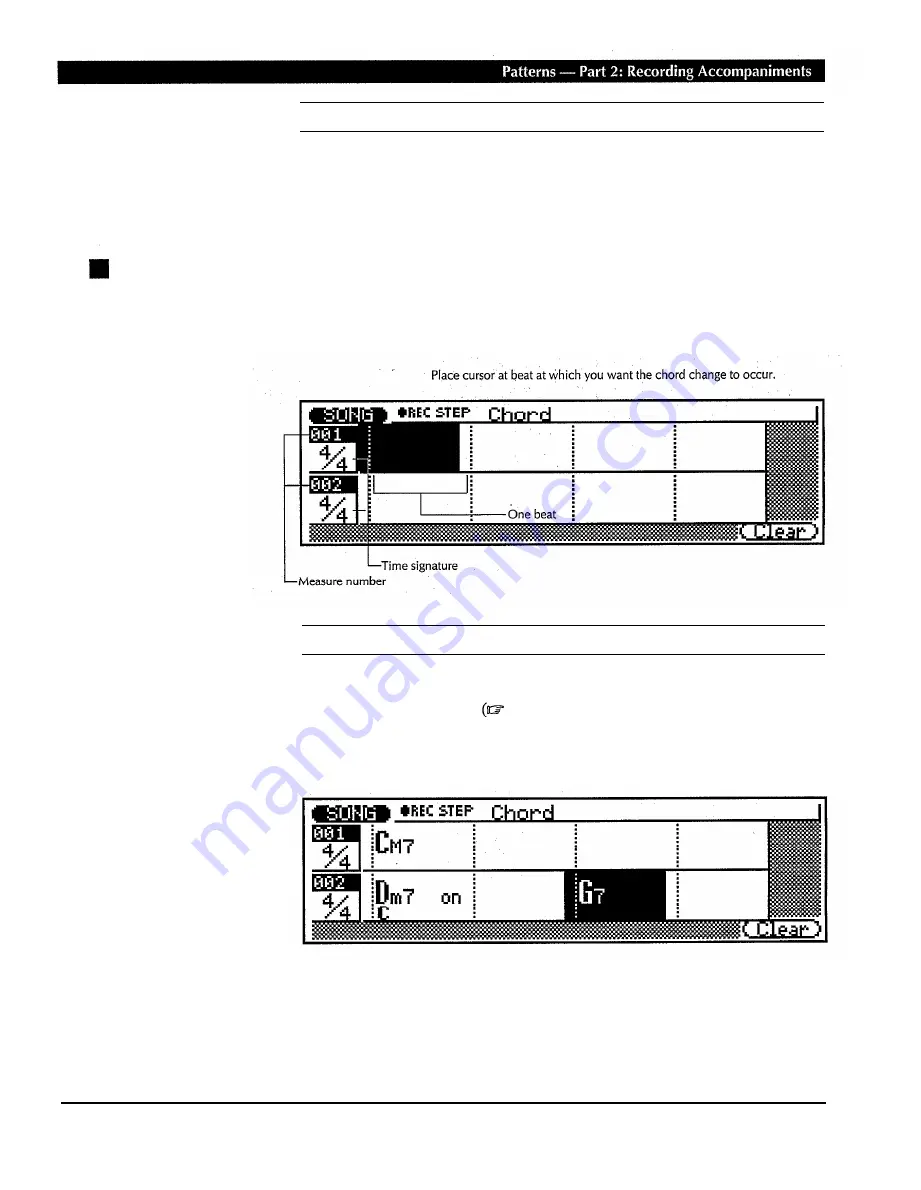
Here’s how the STEP record chord display will look if you’ve selected an
empty- song (the appropriate chord data will appear if the selected song con-
tains data).

Chords

One chord can be entered per quarter note. Place the cursor at the required
quarter-note division on the display and enter the chord via the micro-key-
board in the normal way

page 59). In the example display below, a C

major chord is entered on the first beat of the first measure, a D minor seventh
on the first beat of the second measure, and a G seventh on the third beat of the

second measure.

71

Содержание QY 300

Страница 1: ......

Страница 2: ...iance with FCC regulations does not guarantee that interference will not occur in all installations If this product is found to be the source of interference which can be determined by turning the unit OFF and ON please try to eliminate the problem by using one of the following measures Relocate either this product or the device that is being affected by the interference Utilize power outlets that...

Страница 3: ...elating to how a function or effect works when the unit is operating as designed are not covered by the manufacturer s warranty and are therefore the owners responsibility Please study this manual carefully and consult your dealer before re questing service ENVIRONMENTAL ISSUES Yamaha strives to produce products that are both user safe and environmentally friendly We sincerely believe that our pro...

Страница 4: ...he Faders 15 Reverb 15 Coarse Fine Tuning 16 Pitch Bend Range 17 Channel Assignments 18 Playback Effects 18 Quantization 18 Swing 20 Transpose Clock Shift 21 Gate Time Velocity Modify 22 The Per Track Display 22 Song Mode Part 2 Basic Recording 23 Realtime Recording 23 Punch in Recording 26 Multi channel Recording 28 Step Recording 28 Drum Assignment Used Memory Displays 33 The Song Jobs 34 00 Und...

Страница 5: ...ty 95 03 Modify Gate Time 95 04 Crescendo 96 05 Transpose 97 06 Shift Note 98 07 Shift Clock 98 08 Copy Phrase 99 09 Append Phrase 100 10 Split Phrase 100 11 Get Phrase 101 12 Put Phrase 102 13 Clear Phrase 102 14 Phrase Name 103 Editing Songs Phrases 104 Engaging the Edit Mode Moving Around 104 n Moving Around 105 Change Mode Editing 106 Deleting Events 107 Changing Tracks 107 Assigning a Track N...

Страница 6: ...ecting or discon necting audio and MIDI cables MIDI Connections When connecting the QY300 to MIDI equip ment be sure to use high quality cables made especially for MIDI data transmission Avoid MIDI cables longer than about 15 meters Longer cables can pick up electrical noise that can causes data errors HandIing and Transport Never apply excessive force to the controls con nectors or other parts of...

Страница 7: ...ures e g direct sunlight a car interior etc Do not expose the disk to magnetic fields Mag netic fields can partially or totally erase data on the disk rendering the disk unreadable To eject a floppy disk press the eject button slowly as far as it will go then when the disk is fully ejected remove it by hand The disk may not be ejected properly if the eject button is pressed too quickly or it is no...

Страница 8: ...may occur due to improper operation or set up This icon marks information that you must read i e important procedures that are essential for proper efficient or easy operation steps or The magnifying glass icon indicates information that may not be essential for general operation but is a more detailed explanation of a feature a description of the principle involved etc You can skip this informati...

Страница 9: ...acks recorded in real time The QY300 pro vides an extensive range of advanced editing functions that make modifying and refining your recorded data an easy efficient process Accompaniment Sequencing One feature that truly sets the QY300 apart from other sequencers is its ad vanced accompaniment sequencing capability Accompaniments are produced by specifying a sequence of patterns to be played rath...

Страница 10: ...on instruments assigned to different notes You can assign any of these voices to the sequencer tracks and phrases or play them directly from an external keyboard or other MIDI controller via the MIDI interface The QY300 also features a high quality internal DSP Digital Signal Processor system which provides a range of reverb and delay effects so you can produce a warm polished sound with out the n...

Страница 11: ... into the cable clip on the QY300 rear panel to minimize the possibility of accidentally unplugging the cable during operation Do not attempt to use an AC adaptor other than the sup plied unit or an appropriate re placement provided by your Yamaha dealer to power the QY300 The use of an incom patible adaptor may cause ir reparable damage to the QY300 and might pose a seri ous shock hazard Be sure ...

Страница 12: ...s from the QY300 sequencer L MONO R OUTPUT Jacks These are the main stereo outputs from the QY300 s internal tone generator system see Audio Connections below Both are standard 1 4 mono phone plugs When a plug is inserted into only the L MONO output the left and right channels signals are mixed and delivered via that output to allow direct connection to mono sound systems The output level is adjus...

Страница 13: ... phone plug ca bles use the L MONO output when connecting to a mono sound system Make sure that both the QY300 and your sound system are turned OFF when making connections MIDI Connections Although the QY300 can be played and programmed from the built in micro keyboard an external MIDI keyboard connected to the MIDI IN connector provides the added advantages of standard keyboard size and key veloc...

Страница 14: ... even combine the internal voices with those produced by exter nal equipment Connect the QY300 MIDI OUT connector to the MIDI IN connector of a single external device or the first in a chain of devices you want to control The MIDI THRU connector of the first device in the chain should then be connected to the MIDI IN connector of the second device and so on It s a good idea not to chain more than ...

Страница 15: ...POWER Switch LCD Display CONTRAST Control Press in to turn the QY300 on and press again to turn it This large multi function liquid crystal display panel off When the power is on one of the mode key indica shows all parameters and prompts you need to operate tors will light and the SONG mode display will appear the QY300 with optimum ease and efficiency on the LCD Liquid Crystal Display Use the CO...

Страница 16: ...TTERN PHRASE and CHAIN modes the DISK mode provides access to a full range of important disk and data management functions Cursor and 1 NO and 1 YES Keys This block of six keys includes four cursor keys the ones labeled with the triangular arrow heads and two data decrement increment keys The cursor keys move the cursor around the dis play screen highlighting the various parameters that are availa...

Страница 17: ... much more Sequencer Keys The sequencer keys control recording and playback in the SONG PATTERN and PHRASE modes REC Activates the record ready mode in the QY300 SONG and PHRASE modes The red REC key indicator will light then recording will begin as soon as the PLAY key is pressed The REC key can be pressed again to cancel the record ready mode before recording is actually started by pressing the ...

Страница 18: ...n song Song number 01 to hear an example of can be re loaded from the sup what the QY300 can do and use the demonstration song data to try out the plied QY300 data disk Follow playback features and parameters described in this chapter the instructions on page 56 of this manual to load the all data type file DEMO NOTE Actual file names on the data disk supplied with the QY300 may be different from ...

Страница 19: ...it finishes or you can press the key to stop playback at any time Loop Playback For continuous loop playback i e playback of the song will repeat until stopped by pressing the key hold the SHIFT key while pressing the key The loop playback symbol will appear to the right of the song name 9 ...

Страница 20: ...Re member to press ENTER after entering a measure number via the numeric keypad The beat number will always be reset to 1 when you locate a measure The Shuttle Dial The outer ring of the QY300 data dial is a shuttle dial that lets you move forward or backward through the current song at varying speed both during playback and when playback is stopped The more you rotate the shuttle dial in the cloc...

Страница 21: ... press ENTER This records the current measure beat location in the specified Mark Jump number and returns you to the SONG mode Jumping to a Marked Location To jump to a marked location press the F6 key Mark from any other location move the cursor to the appropriate Mark Jump number or enter the Mark Jump number via the numeric keypad and press ENTER You will immediately be returned to the SONG mod...

Страница 22: ...ependently placed at the ones or tenths section of the tempo parameter to set as required Transposition The pitch of song playback can be transposed up or down by as much as an octave in semitone increments Please note that the transpose parameter does not affect the re corded sequence data only the pitch of playback To transpose playback pitch place the cursor at the transpose parameter Trs on th...

Страница 23: ...y located at the track 4 mute button The mute buttons are a handy way to simply turn tracks that you don t want to hear off When re cording they also make it easy to mute a busy track or several tracks that might make it difficult to hear an important track Simultaneous Track Mute Un mute This function can be very handy when you want to solo monitor a track first mute all tracks then turn on only ...

Страница 24: ...isplay Press the F6 function key Exit from any of the voice mode displays to return to the normal SONG mode display The master M fader also af fects the pattern tracks page 65 Try Out the Voices In any QY300 mode the micro keyboard plays the voice assigned to the currently selected track A MIDI key board connected to the MIDI IN con nector however will only play the voice assigned to the track tha...

Страница 25: ... of the display Left 7 is full left and Right 7 is full right see DETAIL below Hold the SHIFT key while setting a pan pot to change the settings of all pan pots by the same amount Each track has a graphic fader that can be set to produce the best mix balance between the various voices Position the cursor at a fader then use any data entry method to set the fader level The graphic fader will move t...

Страница 26: ...s setting is ideal when you want a warm reverb effect but not as expansive as the Hall 1 and Hall 2 effects Simulates the type of reverb you might experience in a medium size room or club Room 2 A slightly tighter reverb than the Room 1 effect giving the impression of a smaller room Plate 1 A short tight reverb sound similar to effect produced by studio plate reverb units The faders set the reverb...

Страница 27: ...responding position above center when tuning up and below center when tuning down The fader positions also have numeric values that appear in the upper right corner of the display in the coarse tuning display the range is from 24 down two octaves through 00 standard pitch to 24 up two octaves In the fine tuning display the range is from 100 down a semitone through 00 standard pitch to 99 up a semi...

Страница 28: ...s The MIDI CH settings determine which MIDI channels are assigned to the corresponding tracks for both reception and transmission The TG CH settings determine which internal tone generator channel this is unrelated to the MIDI channel will be controlled by the corresponding sequencer track This type of setting is provided because in some cases it may be necessary to control a single channel of the...

Страница 29: ...let The Str strength parameter determines how strongly the notes are at tracted to the specified quantize value The strength range is from 0 to 100 At a setting of 0 no quantization will occur while a setting of 100 will cause all notes to be aligned precisely to the nearest specified beat value In between settings produce a corresponding shift in the position of all off beat notes to the nearest ...

Страница 30: ...et The faders set the amount of swing for the corresponding tracks Position the cursor at a fader then use any data entry method to set the swing rate as required The graphic fader will move to the corresponding position The current swing setting will appear in the upper right corner of the display Hold the SHIFT key while setting a fader to change the settings of all faders by the same amount The...

Страница 31: ...te The rotary Trans controls set the amount of transposition for the correspond ing tracks The transpose range is from 99 full left through 00 center position to 99 full right with each increment corresponding to a semi tone The current numeric transpose setting for the selected track appears in the upper right hand comer of the display The faders set the amount of clock shift for the correspondin...

Страница 32: ...ity rate parameter sets the ratio between the lower and higher velocity values A setting of 100 maintains the original relationship between the notes lower values produce a narrower dynamic range minimum 1 and higher values produce a broader dynamic range maximum 200 The V Ofs velocity offset parameters determines the amount of veloc ity change settings reduce the velocity while settings increase ...

Страница 33: ...time Recording If for some reason all 10 songs contain data and you want to start re cording with an empty song use the Clear Song job described on page 53 to clear a song for recording If you want to save the existing song data to floppy disk before clearing see Disk Operations page 119 In the realtime record mode you select the track you want to record and then play the part on the micro keyboar...

Страница 34: ... a slow tempo for realtime recording so you have plenty of time to enter t h e d a t a Engage the Record Ready Mode Press the key to engage the record ready mode The red LED above the key will light Select the Realtime Record Mode Press the F4 function key REAL to select the realtime record mode Select the Record Tempo and Time Signature Move the cursor to the tempo and time signature parameters a...

Страница 35: ...und and you ll be given a two measure count in prior to the first measure actually recorded The count in is also indicated by negative numbers in the Meas parameter If a 4 4 time signature is selected for example the count in will run from measure 08 to 01 then recording will begin from measure 001 The Click parameter determines whether the metronome sounds during recording playback and recording ...

Страница 36: ...ome will sound the PLAY key indicator will also flash on the specified beat Move the cursor to this pararneter and set as required using the data dial or 1 NO and 1 YES keys The metronone sounds on every sixteenth note The metronone sounds on every eighth note The metronone sounds on every quarter note The metronone sounds on every half note The metronone sounds on every whole note beat Punch in R...

Страница 37: ...eat parameters and set as required Then before actually starting recording set the measure parameter a few measures before the punch in point so you ll be ready to record when the punch in point is reached Start the Punch in Record Operation Start the punch in operation by pressing the key there is no count in when punch in recording is started Recording will begin automatically at the specified p...

Страница 38: ...ed simultaneously assuming of course that appropriate MIDI data is received on the corresponding MIDI channels see Channel Assignments on page 18 Step Recording The step record mode lets you enter data note by note with precise control over the timing length and loudness of each note You can record complete tracks using the step mode or use it to brush up and add data to existing tracks Select a S...

Страница 39: ...ideways to select the track you want to record 1 16 Move the cursor vertically to move to other areas of the screen The selected track will remain highlighted Engage the Record Ready Mode Press the key to engage the record ready mode The red LED above the key will light Select the Step Record Mode Press the F5 function key STEP to select the step record mode 29 ...

Страница 40: ...e note length parameter the numeric keypad can be used to enter the note lengths marked on the keys The dot key the 0 key can be used to add one or more dots to the currently selected note length In between values can be entered using the 1 NO and 1 YES keys or the data dial or by using the numeric keypad while holding a SHIFT key When the cursor is located at the velocity parameter the numeric ke...

Страница 41: ...an be entered simply by moving the note pointer back to a note and entering another note at the same location this can be repeated as many times as necessary See Moving Around In the Note Display below The Note Keyboard Displays The note display shows up to four 1 4 notes worth of data at once that s one measure in 4 4 time If the selected time signature results in more than four 1 4 notes per mea...

Страница 42: ...inter position Lengthens the previously entered note by tying another note of the same length and pitch to it An alternative method is simply to change the length of the note as required via the note length keys on the numeric keypad Deletes the note or chord at the note pointer Moves the note pointer backward by the currently selected note length and deletes the corresponding note or chord Displa...

Страница 43: ...ss the left OCT DOWN and OCT UP keys simultaneously to see the current pitch of the micro keyboard as determined by the OCT DOWN and OCT UP keys and a list of the drum instruments currently played by the micro keyboard keys Press the right OCT DOWN and OCT UP keys simultaneously to see how much of the available QY300 memory is currently used When the bar ap proaches 100 it is advisable to save dat...

Страница 44: ...eys to directly return to the SONG mode 00 Undo Redo This job will undo any other song job edit or record function if it is executed before any other operation is performed In all cases the affected data is restored to the state it was in before performing the job edit or record operation This job will also undo the last undo operation redo performed is forgotten by the UNDO job The last operation...

Страница 45: ...note data in the specified track will be aligned If you select for example all notes in the track will be aligned to the nearest 16th note beat to a degree determined by the Strength parameter Quantize Values Value Effect Off No quantization Swing settings also ignored Aligns to the nearest 32nd note Aligns to the nearest 16th note triplet Aligns to the nearest 16th note Aligns to the nearest 8th ...

Страница 46: ...lines in the sensitivity graph represent the range over which notes will be quantized At a setting of 50 for example only notes that fall within the range that is less than halfway to the quantize range of the adjacent note will be quantized Notes outside this range and those of adjacent notes will be left un quantized The Swing Rate parameter produces a swing feel by shifting the timing of back b...

Страница 47: ...n will appear on the display while the data is being processed then Completed will appear briefly when the job is done Press the F6 key Exit to return to the job list or a mode key to go directly to the selected mode 02 Modify Velocity Increases or decreases the velocity values of all notes in the specified track and range of measures The TR parameter selects the track to be affected by the Modify...

Страница 48: ...b list or a mode key to go directly to the selected mode 03 Modify Gate Time Increases or decreases the gate times length of all notes in the specified track and range of measures The TR parameter selects the track to be affected by the Modify Gate Time job 01 16 The M parameters above the graphic bar are used to specify the first measure beat and last measure beat of the range to be modified The ...

Страница 49: ...6 key Exit to return to the job list or a mode key to go directly to the selected mode 04 Crescendo Produces a gradual crescendo increase in note velocity or decrescendo de crease in note velocity in the specified track over the specified range of measures The TR parameter selects the track to be affected by the Crescendo job 01 16 The M parameters above the graphic bar are used to specify the fir...

Страница 50: ...odulations to another key or to create har mony with another track Transposes all notes in the specified part up or down by the specified number of semitones The TR parameter selects the track to be affected by the Transpose job 01 16 for the sequncer tracks or Chd for the accompaniment chord track The M parameters above the graphic bar are used to specify the first measure beat and last measure b...

Страница 51: ...the specified measure range will be shifted and the destination note parameter determines to what note they will be shifted to The range of both parameters is from C 2 to G8 The notes can be enter via the micro keyboard the data dial or the 1 NO and 1 YES keys After setting the parameters as required press ENTER to execute the Shift Note job The metronome icon will appear on the display while the ...

Страница 52: ...ocks 96 clocks per 1 4 note The TR parameter selects the track to be affected by the Shift Clock job 01 16 for the sequencer tracks or Tmp for the tempo track The M parameters above the graphic bar are used to specify the first measure beat and last measure beat of the range to be modified The Clock parameter determines the direction and number of clocks by which the notes in the specified measure...

Страница 53: ...t measure beat and last measure beat of the range to be modified The Type parameter determines whether the chords in the specified range are arrange from lowest to highest note Norm or from highest to lowest note Rev After setting the parameters as required press ENTER to execute the Chord Sort job The metronome icon will appear on the display while the data is being processed then Completed will ...

Страница 54: ...ack or All for all tracks When Pat Chd Tmp or All is selected the lower TR parameter is automatically set to the same track The lower TR parameter selects the destination track i e the track to which the data is to be copied 01 16 for the sequencer tracks Pat for the accompaniment pattern track Chd for the accompaniment chord track Tmp for the tempo track or All for all tracks When Pat Chd Tmp or ...

Страница 55: ...e specified track An erase operation leaves the specified measures intact specified measures only in the speci fied track Also the data is erased but the measures remain intact i e the subsequent measures are not moved back After an erase opera tion you can record new material in the resulting blank measures as re quired but blank The TR parameter selects the track to be affected by the Erase Even...

Страница 56: ...he type of event data to be extracted NOTE Note events When this event type is selected a note parameter appears at the right end of the bar The note parameter determines the pitch of the notes to be extracted C 2 G8 for individual notes or All for all notes Although you can remove events individually in the edit mode page 104 the PRGM P BEND CTRL CH A T POILY A T EXCL Program change events Pitch ...

Страница 57: ... sequencer tracks or Tmp for the tempo track The M parameters above the graphic bar are used to specify the first measure beat and last measure beat of the range to be modified The data type parameter determines the type of data to be thinned P BEND CTRL Pitch bend events Control change events When this event type is selected a control change number parameter appears to the right of the type param...

Страница 58: ...ll subsequent measures are moved forward to make room The M parameter above the graphic bar specifies the measure at which the newly created measures will be inserted The time signature parameter below the graphic bar determines the time signature of the measures to be created 1 16 16 16 1 8 16 8 1 4 8 4 The Meas parameter below the bar specifies the number of measures to be created After setting ...

Страница 59: ... upper Song parameter selects the source song i e the song from which the data is to be copied 01 10 The lower Song parameter selects the destination song i e the song to which the data is to be copied 01 10 The upper TR parameter selects the source track i e the track from which the data is to be copied 01 16 Pat Chd or Tmp When Pat Chd or Tmp is selected the lower TR parameter is set to the same...

Страница 60: ...racks onto a single track 17 Clear Track Combines the data contained in two specified tracks and places the result in the second track The upper and center Song parameters select the first and second source songs i e the songs containing the tracks which are to be mixed 01 10 Both of these Song parameters should be set to the same song number if you re mixing tracks from a single song The upper an...

Страница 61: ...y to the selected mode 18 Expand Backing Expands the accompaniment track data i e the pattern and chord data and places the results in the normal sequencer tracks after converting the data to standard MIDI format The expanded data is placed in sequencer tracks 8 9 11 12 13 14 15 and 16 see chart below Any previous data in those tracks will be erased Press ENTER to execute the Expand Backing job Th...

Страница 62: ...e job list or a mode key to go directly to the selected mode 20 Normalize Effect Actually applies the Play Effect settings to the sequence data modifying the se quence data accordingly The Play Effect settings are initialized after execution The TR parameter selects the track s to be affected by the Normalize Effect job 01 16 for the sequencer tracks or All for all tracks After setting the paramet...

Страница 63: ...lay while the data is being processed then Completed will appear briefly when the job is done Press the F6 key Exit to return to the job list or a mode key to go directly to the selected mode 22 Clear Song Completely clears all data from all tracks of the currently selected song Also initializes the play effect voice and output settings The Song parameter selects the song to be cleared 01 10 After...

Страница 64: ...n press the micro keyboard key corresponding to the character to be entered NOTE If a series of asterisks ap pears in the song name area the selected song contains no data and a song name cannot be as signed When the name has been entered press the F6 key Exit to return to the job list or a mode key to go directly to the selected mode it is not necessary to press the ENTER key to enter the specifi...

Страница 65: ... Patterns on page 57 The number that appears at the top of the main PATTERN mode display is therefore actually the style number since it selects a complete set of related patterns Several of the PATTERN mode jobs page 86 also use the term style when they operate on a complete set of patterns rather than an individual pattern Loading the Pre programmed Patterns From Disk The QY300 is initially ship...

Страница 66: ... DEMO File Press the ENTER key top go to the load all data display then use the cursor keys the 1 NO and 1 YES keys or the data dial to select the DEMO file Press ENTER Press the ENTER key to execute the load operation The QY300 will display a confirmation prompt asking you if you re sure you want to delete all previ ous data in memory Press 1 YES to Confirm Load the Data Press 1 YES if you want t...

Страница 67: ...les are numbers 001 through 100 the currently selected section is shown in the square brackets to the right of the style name Start Playback Press the key to start playback of the selected style and section The play indicator will appear in the display and the green LED above the key will flash at the current playback tempo Listen to the Sections Each style can have 8 sections INTRO MAIN A MAIN B ...

Страница 68: ...ection name and using the 1 NO and 1 YES keys or the data dial The newly selected section will begin playing from the top of the next measure You can also change sections directly by pressing the appropriate key on the micro keyboard while the cursor is located at either the style number or the section name on the display Select Different Styles Sections With the cursor positioned over the style n...

Страница 69: ... Cursor to the Chord Symbol The micro keyboard can be used to enter chords only when the cursor is located over the chord symbol on the display Use the cursor keys to move the cursor to the chord symbol at the bottom of the display Enter a Chord Note that the lower octave of the micro keyboard has chord root names E through D marked on the keys and the upper octave keys are marked with a variety o...

Страница 70: ...h sharp five M7 major seventh seventh flat five aug augmented 7 9 seventh sharp nine 6 9 sixth ninth seventh flat nine 6 sixth seventh flat thirteen 7 9 ninth 7 13 seventh thirteen 7 seventh 7sus4 seventh suspender add9 minor added ninth sus4 suspended four The chord type marking is a special THRU or non ABC m minor m7 11 minor seven eleven type that can be used to create accompaniment patterns wi...

Страница 71: ...escribed above allows you to specify the actual root of the bass phrase to be used with a chord the ORG BASS function also lets you specify a chord type on which the bass pattern will be based To do this use the left OCT UP key note the ORG BASS marking below the key Enter the chord in the normal way then while holding the OCT UP ORG BASS key press the key on the micro keyboard correspond ing to t...

Страница 72: ...s the SONG mode The main difference is that while the SONG mode has 16 tracks the PATTERN mode has only 8 Refer to the page numbers listed with the displays below for details Voice Mixer display for voice assignment panning and level control page 14 The Voice parameter in this display additionally lets you switch between the pattern and phrase voice assignments Voice Reverb display for voice assig...

Страница 73: ...18 Effect Swing display to automatically create a swing feel page 20 Effect Transpose Clock Shift display to transpose tracks and shift note timing forward or backward page 21 Effect Gate Time Velocity display to modify gate time and velocity values page 22 63 ...

Страница 74: ... Track display shows all playback effect parameters for one track at a time and allows monitoring of only the selected track page 22 Output display for pattern track to MIDI channel assignments for all styles 64 ...

Страница 75: ... in the PAT TERN mode see the preceding sections recording a basic accompaniment in real time is easy Tempo changes can be added later using the EDIT mode page 112 Select the SONG Mode an Empty Song Press the SONG mode key to select the SONG mode and with the cursor located over the song number at the top of the display use any data entry method to select an empty song number if necessary Empty so...

Страница 76: ...ctually recorded The count in is also indicated by negative numbers in the Meas parameter If a 4 4 pattern is selected for example the count in will run from measure 08 to 01 then recording will begin from measure 001 Since you selected Pat recording the cursor will automatically move to the style number when you start recording All you have to do to record style and section changes is to select t...

Страница 77: ...nd Select Chd Press the key to engage the record ready mode again the red REC key indicator should light and the REAL mode will still be selected then move the cursor to the track section of the display and select Chd in order to record chord changes Record Press the key to begin recording chord changes The metronome will sound and you ll be given a two measure count in Since you selected Chd reco...

Страница 78: ...es or additions Engage the Record Ready Mode Press the key to engage the record ready mode The red LED above the key will light Select the Step record Mode Press the F5 function key STEP to select the step record mode Select the Pat or Chd Track Tmp track data is entered in the Edit mode page 112 Move the cursor to the track area of the display and then shift the cursor sideways to select Pat or C...

Страница 79: ...round Entering Data As usual the cursor keys are used to move the cursor to the location at which you want to enter data and the 1 NO and 1 YES keys data dial or numeric keypad are used to actually enter or change data The cursor keys also move you forward or backward through the song moving the cursor past the bottom of the screen accesses subsequent measures while moving it above the top of the ...

Страница 80: ...ered In the example display below the intro section of style 001 plays for the first measure the MAIN A section of the same style is selected in measure 2 Time Signature Although the original time signature for the selected pattern is automatically selected the time signature value for each measure can be changes as required The available time signatures are 1 16 16 16 l 8 16 8 1 4 8 4 If a time s...

Страница 81: ...d chord display will look if you ve selected an empty song the appropriate chord data will appear if the selected song con tains data Chords One chord can be entered per quarter note Place the cursor at the required quarter note division on the display and enter the chord via the micro key board in the normal way page 59 In the example display below a C major chord is entered on the first beat of ...

Страница 82: ...ed bass note the bass note will appear below the chord root In the example display below the Dm7 chord will be played on a C bass note in this case the 7th degree of the chord 72 Specifying the Bass Phrase Chord Type Harmonization While the ON BASS function described above allows you to specify the actual root of the bass phrase to be used with a chord the ORG BASS function also lets you specify a...

Страница 83: ...on which it is entered by using the right OCT DOWN and OCT UP keys note the and markings below the keys Enter the chord in the normal way then press the right OCT DOWN key to syncopate to one sixteenth note before the beat or the right OCT UP key to syncopate an eighth note before the beat the appropriate syncopation symbol will appear before the chord root crossing the beat line In the exam ple d...

Страница 84: ...ginal phrases The phrases are actually combined to create complete patterns in the PATTERN mode The Preset Phrases You can listen to the preset phrases in the PHRASE mode by simply selecting a phrase and pressing the key The preset phrase numbers have four sections as shown below The cursor can be placed at any of these four sections to select as required Category DR PC BA GC GR Drums Percussion B...

Страница 85: ...rom different categories you will end up with a specific pattern Combining Phrases In the Pattern Mode The phrases are combined to create patterns which can be used in accompani ments in the PATTERN mode Select the PATTERN Mode a Style a Section Press the PATTERN mode key to select the PATTERN mode then with the cursor located at the style number select a style As in the SONG mode empty patterns a...

Страница 86: ... to engage the patch mode i e the mode in which phrases are patched together to create patterns The patch display for an empty pattern will appear as follows Enter the Required Phrase Numbers With the cursor in the appropriate locations use any data entry method to enter the required phrase numbers You can enter different phrases at different meas ures of the same track If no other data is entered...

Страница 87: ...or is currently located The rest will stop phrase playback until the end of the pattern or until the next phrase number is encountered in that track Clearing Phrases Rests Phrase numbers and rests can be cleared by placing the cursor at the appropri ate phrase number or rest and pressing the F5 key Clear Exit From the Patch Mode When Done Press the F6 key Exit when the current section of the style...

Страница 88: ...SE Mode an Empty User Phrase Press the PHRASE mode key to select the PHRASE mode place the cursor at the category section of the phrase number and select US user then move the cursor to the phrase number and select an empty user phrase the programmable user phrases are numbered US 001 through US 100 Empty phrases are indicated by a row of asterisks following the phrase number If for some reason al...

Страница 89: ...only be set if the phrase does not already contain data Select a Voice Move the cursor to the voice parameter and select the voice you want to record with Select the Source Chord Move the cursor to the chord parameter and use the standard chord entry procedure to enter the source chord for the phrase you are recording i e the chord on which the phrase is based You can also enter ON BASS and ORG BA...

Страница 90: ...measure so you can continue to add notes until the current part is complete Delete Mistakes as Required To delete mistakes simply play the note to be deleted on the micro keyboard while holding one of the SHIFT keys All corresponding notes that occur while the micro keyboard key is held will be deleted Stop Recording Press the key to stop recording The normal PHRASE play mode is auto matically re ...

Страница 91: ... of the phrase number and select US user then move the cursor to the phrase number and select an empty user phrase the programmable user phrases are numbered US 001 through US 100 Empty phrases are indicated by a row of asterisks following the phrase number If for some reason all 100 user phrases contain data use the Clear Phrase job described on page 102 to clear a phrase for recording Patterns E...

Страница 92: ...ursor to the voice parameter and select the voice you want to record with Select the Source Chord Move the cursor to the chord parameter and use the standard chord entry procedure to enter the source chord for the phrase you are recording i e the chord on which the phrase is based You can also enter ON BASS and ORG BASS specifications as described on page 72 The source chord speci fication allows ...

Страница 93: ...e been specified the note can be entered simply by playing the appropriate key on the micro keyboard or on your external MIDI keyboard A note symbol appears on the note display an the note pointer advances to the next note position The note symbol always appears as a 1 4 note regardless of the actual note entered chords are also indicated by the 1 4 note symbol Here s how the display will look aft...

Страница 94: ...sure of the phrase will appear The Step Mode Function Keys The six function keys immediately below the display provide access to a number of handy functions in the step record mode F1 Rest Enters a rest of the currently selected note length at the note pointer position F2 Tie Lengthens the previously entered note by tying another note of the same length and pitch to it the tie key only works immed...

Страница 95: ...ying phrases The Measure Beat Clock Display The Meas area of the step record display shows the current position of the note pointer in measures 1 4 note beats and clocks there are 96 clocks per 1 4 note If you re not sure what measure you re seeing on the note display while recording check the measure beat clock display Complete the Phrase Repeat steps 8 and 9 until the current phrase is complete ...

Страница 96: ...g to the PATTERN Mode The F6 function key Exit can be used to exit from any pattern job and then from the job list thereby returning you to the PATTERN mode You can also press the F6 function key Exit while holding one of the SHIFT keys to directly return to the PATTERN mode 00 Undo Redo This job will undo any other pattern job edit or record function if it is executed before any other operation i...

Страница 97: ... is automatically set to All if All is selected here The upper Track parameter selects the source track i e the track of the source section of the source style from which the data is to be copied 1 8 for individual tracks or All for all tracks the destination track is automatically set to All if All is selected here The lower Style parameter selects the destination style i e the style to which the...

Страница 98: ...e lower Style parameter selects the destination style i e the style to which the data is to be appended 001 100 The lower Section parameter selects the destination style i e the section of the destination style to which the data is to be appended Intro MianA MainB Ending Fills cannot be selected as the destination sec tion since they can be only one measure in length After setting the parameters a...

Страница 99: ...parameter selects the destination section i e the section of the destination style to which the latter half of the split source section is to be moved Intro MainA MainB FillAA FillBB FillAB FillBA Ending After setting the parameters as required press ENTER to execute the Split Pattern job The metronome icon will appear on the display while the data is being processed then Completed will appear bri...

Страница 100: ...s After setting the parameter as required press ENTER to execute the Clear Pattern job The metronome icon will appear on the display while the data is being processed then Completed will appear briefly when the job is done Press the F6 key Exit to return to the job list or a mode key to go directly to the selected mode 06 Style Name Allows an original name of up to 8 characters to be assigned to t...

Страница 101: ...elete Hold the left OCT DOWN key CAPS while pressing the micro keyboard key corresponding to the character to be entered Hold the left OCT UP key SHIFT while entering to enter the symbols listed above the characters corresponding to each micro keyboard key The right OCT DOWN key enters a space Numbers can be entered via the numeric keypad The right OCT UP key deletes the character at the cursor po...

Страница 102: ...o the PHRASE Mode The F6 function key Exit can be used to exit from any phrase job and then from the job list thereby returning you to the phrase mode You can also press the F6 function key Exit while holding one of the SHIFT keys to directly return to the PHRASE mode 00 Undo Redo This job will undo any other phrase job edit or record function if it is executed before any other operation is perfor...

Страница 103: ...tes in the phrase will be aligned to the nearest 16th note beat to a degree determined by the Strength parameter Quantize Values Value Effect Off No quantization Swing settings also ignored Aligns to the nearest 32nd note Aligns to the nearest 16th note triplet Aligns to the nearest 16th note Aligns to the nearest 8th note triplet Aligns to the nearest 8th note Aligns to the nearest quarter note t...

Страница 104: ... a swing feel If the quantize value is set to a compound note length e g 8th note 8th note triplet the even numbered back beats will be shifted The Swing Rate pa rameter determines how much the timing of the affected notes will be shifted The range is from 50 no swing to 75 maximum swing The Gate Time and Velocity parameters increase or decrease the gate times length and velocity of all notes affe...

Страница 105: ...gh 0 to 99 The Modify Velocity job is a great way to soften the sound of material that has too great a variation between the softest and loudest notes or con versely to add extra punch to dull sounding material Experiment with the parameters to get a feel for what they do New Velocity Original Velocity x rate 100 offset If the right side of the equation is less than 0 the New Velocity becomes 1 Af...

Страница 106: ...1 The Modify Gate Time job After setting the parameters as required press ENTER to execute the Modify can be used to produce a more staccato or legato Gate Time job The metronome icon will appear on the display while the data feel as required Experiment with is being processed then Completed will appear briefly when the job is done the parameters to get a feel for what Press the F6 key Exit to ret...

Страница 107: ...ly when the job is done Press the F6 key Exit to return to the job list or a mode key to go directly to the selected mode 05 Transpose Transposes all notes in the specified user phrase up or down by the specified number of semitones The Phrase parameter selects the user phrase to be affected by the Trans pose job 001 100 The Transpose parameter determines the amount of transposition in semitone in...

Страница 108: ...rom C 2 to G8 The notes can be enter via the micro keyboard as well as by using the data dial or 1 NO and 1 YES keys After setting the parameters as required press ENTER to execute the Shift Note job The metronome icon will appear on the display while the data is being processed then Completed will appear briefly when the job is done Press the F6 key Exit to return to the job list or a mode key to...

Страница 109: ...Completed will appear briefly when the job is done Press the F6 key Exit to return to the job list or a mode key to go directly to the selected mode 08 Copy Phrase Copies the specified preset or user phrase to a specified user phrase number using the specified source chord The upper Phrase parameter selects the source phrase i e the preset or user phrase to be copied any preset or user phrase numb...

Страница 110: ...iefly when the job is done Press the F6 key Exit to return to the job list or a mode key to go directly to the selected mode 10 Split Phrase Splits a specified user phrase into two parts at the specified measure and moves the latter half to another specified user phrase The upper Phrase parameter selects the source phrase i e the user phrase which is to be split 001 100 The M parameter specifies t...

Страница 111: ...lity can make recording easier Copies the data from the specified range of measures in the specified track of a specified song to the specified phrase The Song parameter selects the source song i e the song from which the data is to be copied 01 10 The TR parameter selects the source track i e the track from which the data is to be copied 01 16 The M parameters above the upper graphic bar are used...

Страница 112: ...affect the time signature of the song After setting the parameters as required press ENTER to execute the Put Phrase job The metronome icon will appear on the display while the data is being processed then Completed will appear briefly when the job is done Press the F6 key Exit to return to the job list or a mode key to go directly to the selected mode 13 Clear Phrase Completely clears all data fr...

Страница 113: ... while pressing the micro keyboard key corresponding to the character to be entered Hold the left OCT UP key SHIFT while entering to enter the symbols listed above the characters corresponding to each micro keyboard key The right OCT DOWN key enters a space Numbers can be entered via the numeric keypad The right OCT UP key deletes the character at the cursor position NOTE If a series of asterisks ...

Страница 114: ... change channel aftertouch polyphonic aftertouch or exclusive events at any point in the pattern Engaging the Edit Mode Moving Around To engage the edit mode place the cursor at the track you want to edit in the normal SONG or PHRASE play mode then press the EDIT key The edit display will look something like this of course the note data will be different The phrase edit display is almost exactly t...

Страница 115: ... simply moving the cursor Move below the bottom of the display and the note data will scroll up moving towards the end of the pattern The opposite occurs when you move up above the top of the display The shuttle dial can also be used to move down for ward or up backward through the data In addition to the lines of note data there are markers for the top of the song measure lines and the end of the...

Страница 116: ... the current line is the 1 4 note beat within the current measure 1 through 4 in a 4 4 measure and the right number is the clock within that beat 00 through 95 The beat and clock values can be selected and edited independently Note This is the actual pitch of the note The range is from C 2 to G8 Gate Time Gate time is the length of the note in clocks A normal 1 4 note for example is 86 clocks long...

Страница 117: ...thod to specify the number of the track you want to change to use the 1 YES key or data dial to select the tempo track see Editing the Tempo Track page 112 and then press the ENTER key n Assigning a Track Name Each track can be assigned a track name for easy identification when editing To assign a name to the current track press the F4 function key TrName The cursor will move to the track name loc...

Страница 118: ...select the type of event you want to enter Set the Event Parameters All events have at least two parameters Move the cursor to the event param eters and set as required by using the 1 NO and 1 YES keys Note New notes can be inserted at any specified location The note parameters are the same as those available in the change edit mode 108 ...

Страница 119: ...ram Change Program change events can be used to switch voices at any point in the track The program change parameter has three sections The MSB most significant byte of the bank select number the LSB least significant byte of the bank select number and the program change number itself The bank select number parameters can be set from 000 through 127 while the program change number parameter can be...

Страница 120: ...el Aftertouch This event can be used to apply channel monophonic after touch in which pressure on any key controls all notes being played by the same amount The channel aftertouch value can be set from 000 to 127 PAT Polyphonic Aftertouch Polyphonic aftertouch allows independent aftertouch values to be applied to each note played This event has two parameters a note number and a value The note num...

Страница 121: ... the initial F0 byte and use the 1 NO and 1 YES keys of the data dial to enter as required Since the data is entered in hexadecimal format the numeric keypad cannot be used Enter the Specified Event Press the ENTER key to enter the event as specified A click will be heard as the event is entered Return to the Change Edit Mode Press the F6 function key Exit to return to the change edit display and ...

Страница 122: ...it mode Editing procedure is essentially the same as for the normal sequencer tracks To change an existing tempo parameter location or tempo value simply move the cursor to the appropriate parameter edit and press ENTER or move to a different line to cancel the edit To insert new tempo values first move to the insert location press the F2 function key Insert set the tempo value and press ENTER Pre...

Страница 123: ...in numbers and use any data entry method to enter the required song numbers The number following the song name is the number of times that song is to be repeated Place the cursor at the repeat number and use any data entry method to set the number of repeats for each song In the example chain shown here the first two songs in the chain will play through in sequence then the third song will be repe...

Страница 124: ...to be deleted and press the F2 function key Delete Inserting New Songs In the Chain To insert a new song in the middle of a chain and move all subsequent songs down to make room place the cursor at the poing at which inserted and press the F1 function key Insert You can song number at the insert point the song is to be then enter a new 114 ...

Страница 125: ...l for communication with external equipment To ac cess the system parameters press the F1 function key System after engag ing the UTILITY mode Master Tuning This parameter tunes the QY300 tone generator over approximately a whole tone range one semitone in l cent increments a cent is 1 100th of a semitone The range is from 99 through 00 to 99 A setting of 00 produces normal pitch Negative values t...

Страница 126: ...his parameter sets the delay time between exclusive data blocks between 0 and 900 milliseconds in 100 millisecond increments This type of delay is some times necessary to allow an external device to receive the data without errors The input filter parameters allow reception of various types of MIDI data to be turned on or off as required Reception of the various types of data listed on the display...

Страница 127: ...yboard or other controller without switching the QY300 voices as the same time As mentioned aove aftertouch generates a lot of data that can rapidly fill the available memory if used indiscriminately When on this filter blocks reception of polyphonic aftertouch data Similar to the polyphonic aftertouch filter but this filter blocks reception of monophonic channel aftertouch data Blocks reception o...

Страница 128: ...he Fingered parameter in this dis play and the Fng parameter in the SONG or PATTERN mode display are turned On chords played within the specified ABC range will be recognized by the ABC system and the accompaniment chord will change accordingly during song playback or realtime chord track recording Chords played within the specified range of either the QY300 micro keyboard or an external MIDI keyb...

Страница 129: ...d or Loaded Single songs 01 10 When saving you can specify the song number to be saved and the file name under which it will be saved on disk When loading you specify the song file to be loaded and the song number to which it is to be loaded PATTERN Single styles 001 100 When saving you can specify the number of the style to be saved and the file name under which it will be saved to disk When load...

Страница 130: ...disk save display After specifying the song style or phrase to be saved there s no need to specify a file to be saved from the CHAIN mode since all data is saved and the file name under which the data is to be saved press the ENTER key to begin the save operation If the specified file name already exists on the disk the QY300 will ask you to confirm that you want to overwrite the existing file wit...

Страница 131: ...0 will ask you to confirm that you want to overwrite the existing data with the Delete Old Data display You can use the F6 function key Exit to Press the 1 YES key to go ahead with the load operation or the exit from the DISK 1 NO key to cancel An Executing bar graph will appear while the data is mode at any time except during being loaded then the SONG PATTERN PHRASE or CHAIN mode display the act...

Страница 132: ...ong 01 10 saved in or loaded from ESEQ format The ESEQ format is used by some sequencers and synthe sizers with built in sequencers This option provides data compat ibility with such devices The voice output select and play effect data is not saved with au ESEQ file The tempo data is saved Song SMF A single specified song 01 10 saved in or loaded from Stand ard MIDI File format The Standard MIDI F...

Страница 133: ...required if saving 1 All Data enter a file name if necessary and press ENTER If a file having the specified file name already exists on the current disk the Delete Old Data display will appear Respond to this display with the 1 YES key to go ahead with the operation or the 1 NO key to cancel An Executing bar graph will appear to show the progress of the save operation Completed will appear briefly...

Страница 134: ...nt to delete you can also use the data dial to select files or directly enter the file number via the numeric keypad then press the ENTER key Respond to the Delete Old Data display with the 1 YES key to go ahead with the operation or the 1 NO key to cancel Completed will appear briefly when the operation has finished The Rename function function makes it easy to directly change the name of a file ...

Страница 135: ...It can also be used to format disks previously used with other equip ment for use with the QY300 The format operation is also a convenient way to clear all data from a disk that contains unwanted material Select the Format operation insert the disk to be formatted and press ENTER Respond to the Delete Old Data display with the 1 YES key to go ahead with the operation or the 1 NO key to cancel An E...

Страница 136: ...terrupted OCT DOWN or OCT UP has been set The QY300 s maximum polyphony maximum number of notes that can be played at one time has been exceeded 7 PLAY button fails to start playback Can t set the time signature The selected song pattern or phrase does not contain data 23 75 78 MIDI Sync has been set to external 115 The song or phrase already contains data 24 79 Can t change phrase length The phra...

Страница 137: ...not in MS DOS format Bad Disk Disk is damaged cannot read data File Not Found Unable to find the specified file Write Protected Cannot write to disk the disk s write protect tab is on Disk Full Cannot write more data to disk the disk s data capacity 712K or directory capac ity 112 is full Illegal File Attempted to read file type not supported by QY300 QY300 supports SMF and ESEQ only Can t Change ...

Страница 138: ...Original Bass 10 songs QY300 Original Sequence Format ESEQ SMF Tone Generator Type Max Polyphony Multi timbre Parts Preset Voices Voice Parameter Display External Memory Connectors Power Supply Dimensions Weight AWM Advanced Wave Memory 28 notes Song mode 24 sequence track 16 pattern 8 Pattern mode 8 Phrase mode single with dynamic voice allocation 128 normal voices 8 drum kits GM System Level 1 V...

Страница 139: ... event song job 44 Copy pattern pattern job 87 Copy phrase phrase job 99 Copy song song job 53 Copy track song job 49 Create measure song job 48 Crescendo phrase job 96 Crescendo song job 39 Cursor keys 6 D Data backup v Data dial 7 Delete disk file 124 Delete measure song job 48 Deleting events edit mode 107 Demo playing 8 Direct load disk 121 Direct save disk 120 Disk file types 122 Disk mode 12...

Страница 140: ... 52 Note keyboard displays step record 31 Note display moving around in step record mode 32 Note entry step record 31 Note event insert edit 108 Note parameter edit mode 106 Note parameters step record 30 Numeric keypad 7 O Octave keys 7 P Pan pots 15 Patch mode 76 Pattern changes erasing 71 Pattern changes step record 69 Pattern jobs 86 Pattern step record display 69 Pattern monitoring while patc...

Страница 141: ...job 100 Step recording 28 Step recording accompaniment 68 Style name pattern job 90 Style number setion pattern step record 70 Swing effect playback 20 System parameters 115 T Tempo control 12 Tempo track editing 112 Thin out song job 47 Time signature pattern step record 70 Track muting 13 Track muting pattern mode 62 Track name edit mode 107 Transpose clock shift playback 21 Transpose phrase job...

Страница 142: ...MEMO ...

Страница 143: ...products please contact your nearest Yamaha or the authorized distributor listed below HEAD OFFICE Yamaha Corporation Electronic Musical Instrument Division Nakazawa cho 10 1 Hamamatsu Japan 430 Tel 053 460 2445 SYO4 ...

Страница 144: ......

Отзывы: