background image

4


Accessory CD-ROM for Windows Installation Guide

English

Software Installation

• • • • • • • • • • • • • • • • • • • • • • • • • • • • • • • • • • • • • • • • • • • • • • • • • • • • • • • 


USB-MIDI Driver


To operate the instrument from your computer via USB, you’ll 
need to install the appropriate driver software.


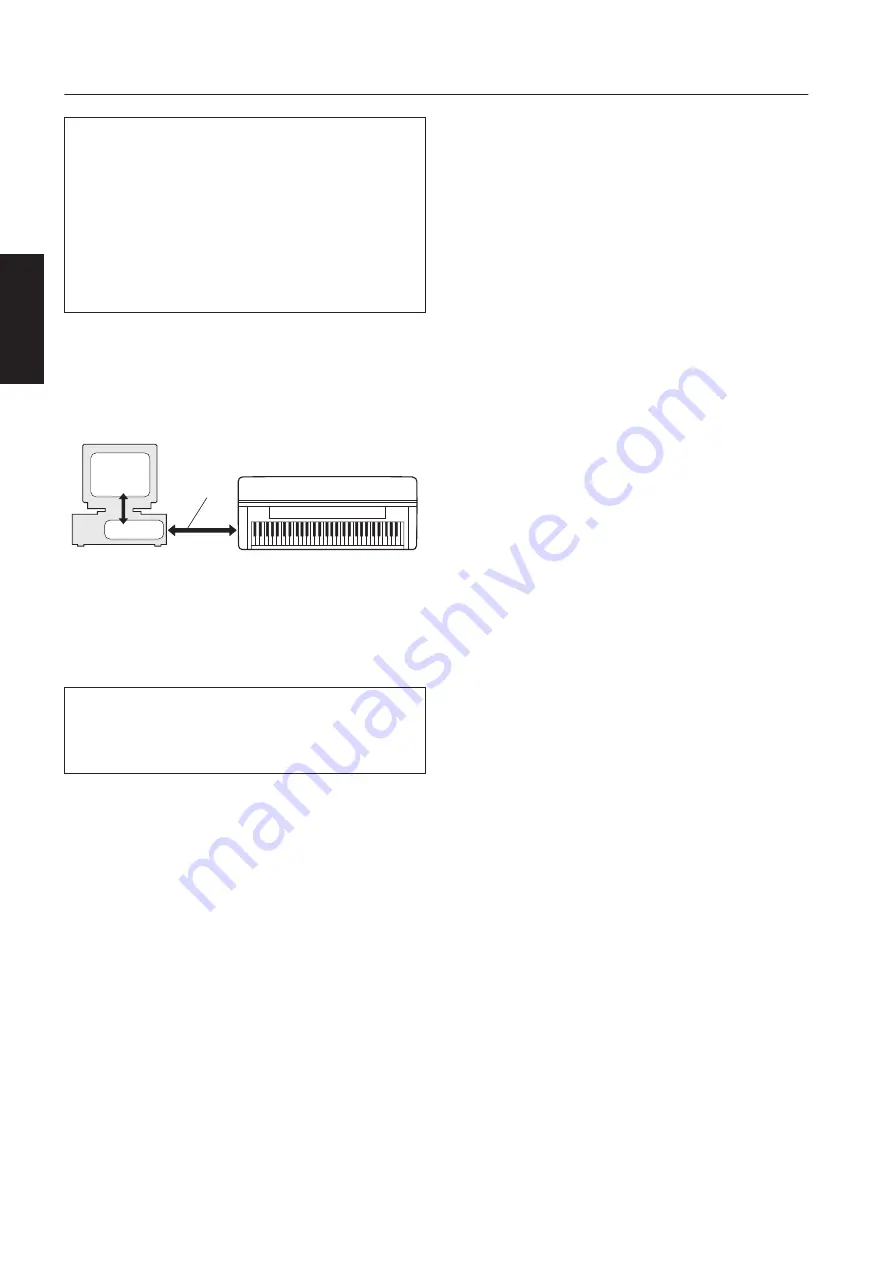
The USB-MIDI driver is software that transfers MIDI data back and 
forth between sequence software and the instrument via a USB cable.


For Windows XP: See the column at right.
For Windows 2000: See page 5.
For Windows Vista: See page 5.


n


See the Yamaha Download page at the following URL for up-to-date 
news on USB-MIDI driver:


http://music.yamaha.com/download/


Installing the driver on Windows XP

1

Start the computer and use the “Administrator” account 
to log on to Windows XP.

2

Select [Start] 

 [Control Panel]. 

If the control panel appears as “Pick a category”, click 
“Switch to Classic View” in the upper left of the window. 
All control panels and icons will be displayed.

3

Go to [System] 

 [Hardware] 

 [Driver Signing] and 

check the radio button to the left of “Ignore–Install the 
software anyway and don’t ask for my approval” and 
click [OK].

n

After completing the driver installation, make sure to restore the 
original setting if necessary.

4

Click the [OK] button to close System Properties, and 
then click “X” in the upper right of the window to close 
the Control Panel.

5

Insert the included CD-ROM into the CD-ROM drive.

The Start window will appear automatically.

6

First, make sure the instrument is turned off, then use a USB 
cable to connect the USB connector of the computer to the 
USB TO HOST connector of the instrument. When the 
instrument is turned on, the computer automatically displays 
the “Found New Hardware Wizard.”

If the Wizard window is not displayed automatically, refer to 
“Troubleshooting.”

If the system displays “Found New Hardware” in the lower right 
corner, wait until “Found New Hardware Wizard” is displayed. (The 
Wizard window may take a while to display on some computers.)

If the Wizard window prompts you to specify whether or not 
to connect to Windows Update, select the radio button for 
“No, not this time,” then click [Next].

n

Refer to the Owner’s Manual of the instrument to connect the 
instrument to the computer.

7

Check the radio button to the left of “Install the 
software automatically (Recommended),” then click 
[Next]. The system starts the installation.

n

If during the installation the system displays “...has not passed 
Windows Logo testing to verify its compatibility with Windows 
XP,” click [Continue Anyway].

8

When the installation is complete, the system displays 
“Completing the Found New Hardware Wizard.” Click [Finish].

(The Wizard window may take a while to display on some computers.)

9

Restart the computer.

If the system displays “Found New Hardware” in the lower right 
corner, wait until “System Settings Change” is displayed. (The 
Wizard window may take a while to display on some computers.)

n

This Wizard window will not appear when using Windows XP 
Professional x64 Edition. There is no need to restart the computer.

The USB-MIDI driver installation is complete.

Uninstall (Removing the installed application)

To remove any installed application software:
Select [Start] 

 [Settings] 

 [Control Panel] 

 [Add/

Remove Programs] 

 [Change or Remove Programs], then 

select the application to be removed and click [Remove]. 
Follow the on-screen instructions to uninstall the 
application.

n

The button names or menus may differ depending on the 
computer OS.

n

For instructions on uninstalling the USB-MIDI driver, refer to 
“How can I remove the driver?” in the “Troubleshooting” 
section (page 7).

Check the drive name of the CD-ROM drive you will be using 
(D:, E:, Q:, etc.) The drive name is displayed beside the CD-
ROM icon in your “My Computer” folder. The root directory 
of the CD-ROM drive will be D:\ , E:\ , or Q:\ , respectively.

Computer

MIDI instrument 
(Clavinova, Digital Workstation, etc.)

USB cable

Driver

Sequence

Software

4

Содержание PSR-S710

Страница 1: ...ngs und Systemsoftware sowie jede nderung der technischen Daten und Funktionen werden separat bekanntgegeben REMARQUES PARTICULIERES Les droits d auteurs copyright de ce logiciel et de ce manuel d ins...

Страница 2: ...ements to make sure that the software will run on your computer page 3 2 Insert the included CD ROM into the CD ROM drive The Start window will appear automatically Users of Windows Vista will need to...

Страница 3: ...er your model name in the Model Name area to search the manuals Reference Manual Explains the advanced features of your instrument Internet Connection Guide Explains how to connect your instrument dir...

Страница 4: ...e Wizard is displayed The Wizard window may take a while to display on some computers If the Wizard window prompts you to specify whether or not to connect to Windows Update select the radio button fo...

Страница 5: ...ontain a Microsoft digital signature click Yes 8 When the installation is complete the system displays Completing the Found New Hardware Wizard Click Finish The Wizard window may take a while to displ...

Страница 6: ...your system meets the requirements before installing the software Musicsoft Downloader IMPORTANT When installing Musicsoft Downloader to Windows XP 2000 or Vista make sure to log on to the Administrat...

Страница 7: ...the instrument from your computer via USB the instrument does not operate correctly or no sound is heard Did you install the driver page 4 Is the USB cable connected correctly Are the volume settings...

Страница 8: ...3 2 Legen Sie die mitgelieferte CD ROM in das CD ROM Laufwerk ein Daraufhin erscheint automatisch das Startfenster Anwender von Windows Vista m ssen nach dem Einlegen der CD ROM auf Start exe klicken...

Страница 9: ...hres Modells ein um die Anleitungen zu durchsuchen Referenzanleitung Beschreibt die erweiterten M glichkeiten Ihres Instruments Internet Connection Guide Beschreibt wie Sie das Instrument direkt mit d...

Страница 10: ...echts im Fenster auf die Schaltfl che X um die Systemsteuerung zu schlie en 5 Legen Sie die mitgelieferte CD ROM in das CD ROM Laufwerk ein Daraufhin erscheint automatisch das Startfenster 6 Vergewiss...

Страница 11: ...s Ja 8 Sobald die Installation erfolgreich beendet wurde erscheint das Fenster Fertig stellen des Assistenten Klicken Sie auf Fertig stellen Bei einigen Computern kann es eine Weile dauern bis das Ass...

Страница 12: ...ebssystem die Anforderungen der Software erf llt Musicsoft Downloader WICHTIG Achten Sie bei der Installation von Musicsoft Downloader unter Windows XP 2000 oder Vista darauf sich als Administrator an...

Страница 13: ...nt vom Computer aus ber USB bedient wird funktioniert es nicht richtig oder erzeugt keinen Ton Wurde der Treiber installiert Seite 4 Ist das USB Kabel richtig angeschlossen Sind die Lautst rkeeinstell...

Страница 14: ...ertain de pouvoir utiliser le logiciel sur votre ordinateur page 3 2 Ins rez le CD ROM inclus dans le lecteur de CD ROM La fen tre de d marrage appara t automatiquement Les utilisateurs de Windows Vis...

Страница 15: ...l name Nom de mod le pour lancer la recherche Manuel de r f rence D crit les fonctions avanc es de l instrument Guide de la connexion Internet Explique les modalit s de connexion de l instrument direc...

Страница 16: ...la configuration d origine si n cessaire 4 Cliquez sur le bouton OK pour fermer la bo te de dialogue Propri t s syst me puis cliquez sur X dans le coin sup rieur droit de la fen tre afin de fermer le...

Страница 17: ...quez sur Oui 8 Lorsque l installation est termin e l ordinateur affiche le message Fin de l assistant Ajout de nouveau mat riel d tect Cliquez sur Terminer Sur certains ordinateurs l affichage de la f...

Страница 18: ...minimale requise avant d installer le logiciel Musicsoft Downloader IMPORTANT Lors de l installation de Musicsoft Downloader sous Windows XP 2000 ou Vista prenez soin d ouvrir une session avec le com...

Страница 19: ...votre ordinateur via USB il ne fonctionne pas correctement ou aucun son n est audible Avez vous install le pilote page 4 Le c ble USB est il raccord correctement Les volumes de l instrument du p riph...

Страница 20: ...rse de que el software funcionar en su ordenador p gina 3 2 Inserte el CD ROM en la unidad de CD ROM La ventana Inicio aparecer autom ticamente Los usuarios de Windows Vista tendr n que hacer clic en...

Страница 21: ...buscar los manuales Manual de referencia en este manual se explican las funciones avanzadas del instrumento Gu a de conexi n a Internet en esta gu a se explica c mo conectar el instrumento directamen...

Страница 22: ...a clic en el bot n Aceptar para cerrar el cuadro de di logo Propiedades del sistema y haga clic en la X en la esquina superior derecha de la ventana para cerrar el Panel de control 5 Inserte en la uni...

Страница 23: ...digital de Microsoft haga clic en S 8 Cuando se haya completado la instalaci n el sistema mostrar el asistente Finalizaci n del Asistente para hardware nuevo encontrado Haga clic en Finalizar En algun...

Страница 24: ...compruebe que el sistema re ne los requisitos necesarios Musicsoft Downloader IMPORTANTE Cuando instale Musicsoft Downloader en un ordenador con Windows XP 2000 o Vista aseg rese de iniciar la sesi n...

Страница 25: ...strumento desde el ordenador a trav s de USB el instrumento no funciona correctamente o no se oye ning n sonido Ha instalado el controlador p gina 4 Est conectado correctamente el cable USB Est ajusta...

Страница 26: ...ive media if it is returned to Yamaha or an authorized Yamaha dealer within fourteen days with a copy of the receipt Yamaha is not responsible for replacing media damaged by accident abuse or misappli...

Страница 27: ...r von Yamaha innerhalb von vierzehn Tagen zusammen mit einer Kopie des Kaufbelegs Lieferscheins Yamaha ist nicht zum Ersatz von Medien verpflichtet die durch Unf lle Misbrauch oder fehlerhafte Anwendu...

Страница 28: ...agr dans un d lai de quatorze jours avec une copie du re u Yamaha n est pas tenu de remplacer un support endommag la suite d un accident d un usage abusif ou d une utilisation incorrecte DANS TOUTE L...

Страница 29: ...sustituci n del soporte defectuoso si se devuelve a Yamaha o a un distribuidor autorizado de Yamaha dentro del per odo de catorce d as con una copia del recibo Yamaha no se har responsable de sustitui...

Страница 30: ...MEMO English...

Страница 31: ...MEMO...

Страница 32: ...U R G Pro Audio Digital Musical Instrument Division Yamaha Corporation 2009 Yamaha Corporation Printed in China WR24990 906MWAPX X 02B0...

Отзывы: