background image

Troubleshooting

113

P-515 Owner’s Manual

*For information on whether 

Bluetooth

 functionality is included or not, refer to page 8.

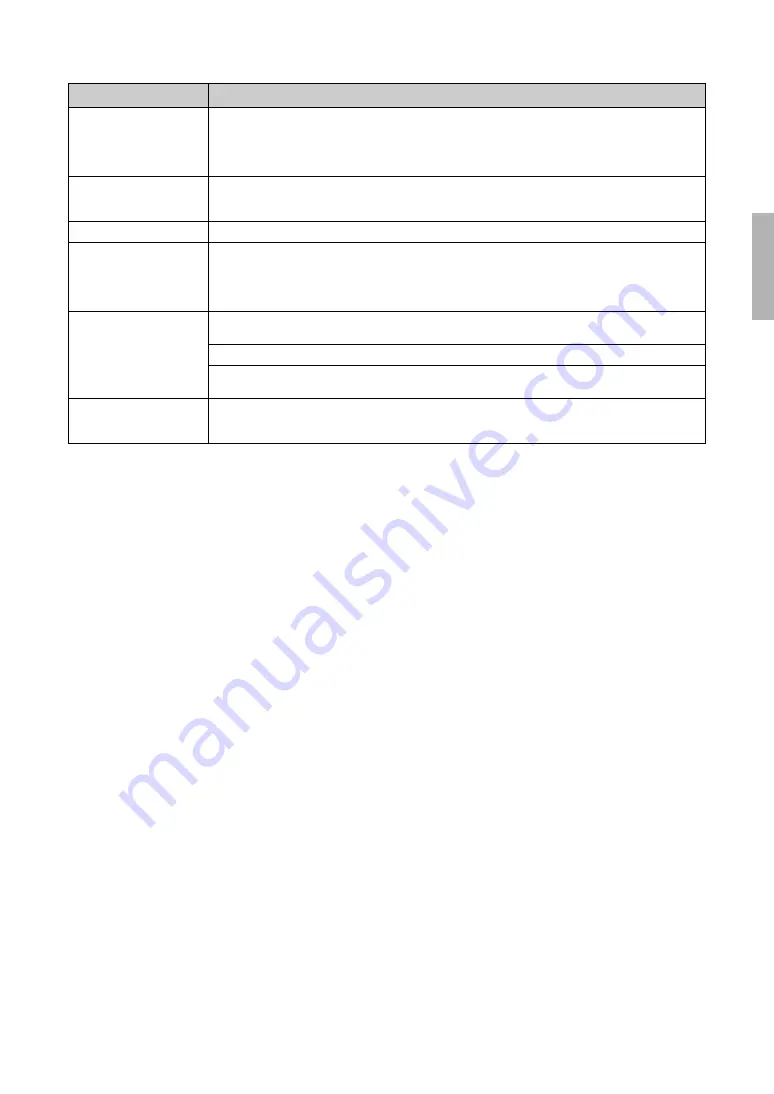
The Song title is not correct.

The “Language” setting may be different than that is selected when you named the Song. Also, if the Song was 
recorded on another instrument, the title might be displayed incorrectly. Set the “Language” parameter 
(page 102) via the “System” menu display: “Utility” 

 “Language” 

 “Song” to change the setting. However, if 

the Song was recorded on another instrument, changing the “Language” parameter setting may not resolve the 
problem.

Menu display cannot be 
called up.

When Song is being played back, menu display other than “Voice” menu and “Song” menu will not appear. Stop 
the Song by pressing the [PLAY/PAUSE] button. Also, in the recording ready mode, only “Recording” menu 
display will appear.

Rhythm does not start.

“SynchStart” setting is on. Set “SynchStart” off in the “Metronome/Rhythm” menu display.

The contents of the Wireless 
LAN is not shown in the 
display even though the USB 
wireless LAN adaptor is 
connected.

Disconnect the USB wireless LAN adaptor and connect it again.

The 

Bluetooth

-equipped 

smart device cannot be 
paired with nor connected to 
the instrument.

Check the 

Bluetooth

 function of the smart device is activated. To connect the smart device and the instrument 

via 

Bluetooth

, both devices need to be functional.

The smart device and the instrument need to be paired to connect each other via 

Bluetooth

 (page 8).

In case there is a device (microwave oven, wireless LAN device, etc.) that outputs signals in the 2.4 GHz 
frequency band nearby, move this instrument away from the device that is emitting radio-frequency signals.

Sound input via the [AUX IN] 
jack or 

Bluetooth

 is 

interrupted.

The Noise Gate function of this instrument cuts unwanted noise from the input sound. However, this may result in 
wanted sounds also being cut, such as the soft decay sound of a piano. This is normal and not a sign of 
malfunction.

Problem

Possible Cause and Solution

Содержание P-515

Страница 1: ...Digital Piano This instrument provides exceptionally high quality sound and expressive control for your playing enjoyment We recommend that you read this manual carefully so that you can fully take advantage of the advanced and convenient functions of the instrument We also recommend that you keep this manual in a safe and handy place for future reference Before using the instrument be sure to rea...

Страница 2: ... works when the unit is operating as designed are not covered by the manu facturer s warranty and are therefore the owners responsibility Please study this manual carefully and consult your dealer before requesting service ENVIRONMENTAL ISSUES Yamaha strives to produce products that are both user safe and environmentally friendly We sincerely believe that our products and the production methods us...

Страница 3: ...is equipment generates uses radio frequencies and if not installed and used according to the instructions found in the users manual may cause interference harmful to the operation of other electronic devices Compliance with FCC regulations This applies only to products distributed by YAMAHA CORPORATION OF AMERICA class B does not guarantee that interference will not occur in all installations If t...

Страница 4: ...cement of the obsolete outlet 10 Protect the power cord from being walked on or pinched particularly at plugs convenience receptacles and the point where they exit from the apparatus 11 Only use attachments accessories specified by the manufacturer 12 Use only with the cart stand tripod bracket or table specified by the manufacturer or sold with the apparatus When a cart is used use caution when m...

Страница 5: ... which may have accumulated on it This instrument contains no user serviceable parts Do not open the instrument or attempt to disassemble or modify the internal components in any way If it should appear to be malfunctioning discontinue use immediately and have it inspected by qualified Yamaha service personnel For information on whether Bluetooth functionality is included or not refer to page 81 R...

Страница 6: ...nstrument falling over Before connecting the instrument to other electronic components turn off the power for all components Before turning the power on or off for all components set all volume levels to minimum Be sure to set the volumes of all components at their minimum levels and gradually raise the volume controls while playing the instrument to set the desired listening level Do not insert a...

Страница 7: ...dio data is strictly prohibited except for your personal use This product incorporates and bundles contents in which Yamaha owns copyrights or with respect to which Yamaha has license to use others copyrights Due to copyright laws and other relevant laws you are NOT allowed to distribute media in which these contents are saved or recorded and remain virtually the same or very similar to those in t...

Страница 8: ...tible Formats GM System Level 2 GM General MIDI is one of the most common Voice allocation formats GM System Level 2 is a standard specification that enhances the original GM and improves Song data compatibility It provides for increased polyphony greater Voice selection expanded Voice parameters and integrated effect processing XG XG is a major enhancement of the GM System Level 1 format and was ...

Страница 9: ...her reference material Online Materials Downloadable from the web Smart Device Connection Manual Explains how to connect the instrument to a smartphone or tablet etc You can choose from two versions for iOS and Android depending on your device Computer related Operations Includes instructions on connecting this instrument to a computer and operations related to transferring song data MIDI Referenc...

Страница 10: ...nce potential Virtual Resonance Modeling VRM reproduces the distinctive reverberation of a concert grand piano Rhythm Tracks The P 515 keyboard features white keys made from select quality wood and fitted with the highest quality synthetic ivory while the black keys are finished in synthetic ebony What s more this keyboard features the characteristic escapement mechanism in a grand piano which mov...

Страница 11: ...ngs 48 Playing Back a Song Repeatedly 49 Adjusting the Volume Balance 52 Useful Playback Functions 53 Recording Your Performance 54 Recording Methods 54 Quick MIDI Recording 55 MIDI Recording Independent Tracks 57 MIDI Recording to the USB Flash Drive 59 Audio Recording to the USB Flash Drive 61 Other Recording Techniques 62 Handling Song Files 66 Song Types and File Operation Limitations 66 Basic...

Страница 12: ...the tempo 9 FUNCTION button page 88 Pressing this button alternates the displays among Voice menu Song menu Metronome Rhythm menu Recording menu and System menu from which you can make detailed settings for the related functions Bluetooth logo page 81 If the instrument is equipped with Bluetooth functionality this logo is printed on the front panel Depending on the country in which you purchased t...

Страница 13: ...For connecting a pair of headphones USB TO DEVICE terminal page 72 74 75 For connecting a USB flash drive or a smart device such as an iPhone iPad Rear Panel AUX IN jack page 72 For connecting headphone jack of a portable audio player etc A AUX OUT R L L R jacks page 73 For connecting to external powered speaker systems etc B USB TO HOST terminal page 73 75 For connecting a computer or a smart dev...

Страница 14: ...n your area Do NOT modify the plug provided with your instrument If the plug does not fit the outlet have a proper outlet installed by a qualified electrician WARNING Use the specified adaptor page 115 only The use of other adaptors may result in irreparable damage to both the adaptor and the instrument NOTE When disconnecting the power cord AC adaptor first turn off the power then follow this pro...

Страница 15: ...turned off is approximately 30 minutes by default however you can change the setting page 102 CAUTION Even when the instrument is turned off electricity is still flowing to the instrument at the minimum level When you are not using the instrument for a long time or during electrical storms make sure you unplug the AC power plug from the wall AC outlet NOTICE Any data which are not saved will be lo...

Страница 16: ...lt setting for this function is On Connect a pair of headphones to one of the PHONES jacks When the headphones are plugged into either of the PHONES jacks the internal speaker system is automatically shut off Two PHONES jacks are provided Two sets of standard stereo headphones can be plugged in If you are using only one pair of headphones you can plug them into either of these jacks Setting the Vo...

Страница 17: ...ural sampling even though you hear it on headphones When a Voice in the Piano group other than CFX Grand is selected connecting the headphones automatically enables the Stereophonic Optimizer Sampling A technology which records the sounds of an acoustic instrument then stores them to the tone generator to be played based on information received from the keyboard NOTE Voices in the Piano group are ...

Страница 18: ...otswitch pedal while turning the power on Doing this changes the recognized polarity of the footswitch pedal resulting in reversed footswitch pedal operation Default setting Sustain Continous NOTE Damper Resonance cannot be used while Duo page 32 is on Half pedal function This function can be used when a separately sold FC3A foot pedal or LP 1 pedal unit page 19 is connected and allows you to vary...

Страница 19: ...pedal depending on the selected Voice When the Jazz Organ is selected pressing and releasing this pedal switches between fast and slow of the Rotary Speaker speed Rotary Speed on page 90 When the Vibraphone is selected this pedal switches Vibrato on and off VibeRotor on page 90 Using the Pedal Unit sold separately NOTE Make sure that power is off when connecting or disconnecting the pedal unit L 5...

Страница 20: ...Press the buttons simultaneously to select the first Voice in the Voice group Song display 1 Press the DEMO SONG button to call up the Song category list 2 Use the u d buttons to select a Song category Press to select a Song category Press to return Detailed settings display 1 Press the FUNCTION button repeatedly to select the desired menu 2 Use the u d buttons to select a parameter of the current...

Страница 21: ... display was previously shown While the pop up window is shown pressing the EXIT button closes the pop up window Return to the Voice Song display 3 Use the u d buttons to select a Song 4 Press PLAY PAUSE button to playback the Song Use the u or d buttons to select the previous or next bars When this is shown here you can scroll through the display vertically NOTE If your instrument is the P 515WH ...

Страница 22: ...changes in order After the Voice display is called up you can also select the Voice by using the buttons Pressing the buttons simultaneously selects the first Voice in the current selected Voice group page 107 2 Play the keyboard Selecting Voices NOTE To hear and experience the characteristics of the Voices listen to the Demo Songs for each Voice page 24 NOTE For information about the Voices refer...

Страница 23: ... called up select a Voice from the XG Voices following the instructions below 1 Press the OTHERS button while pressing the FUNCTION button to call up the XG Voice group list display 2 Use the u d buttons to select one of the XG Voice groups then press the button 3 Use the u d buttons to select the desired XG Voice then press the button For details on XG Voices refer to the XG Voice list in the Dat...

Страница 24: ...utton to call up the next display 3 Use the u d buttons to select the desired Voice Demo and then press the button to call up the Demo display The currently selected Voice Demo name is shown in the display 4 Press the PLAY PAUSE button to start playback 5 Press the PLAY PAUSE button again to stop playback The Piano Demo stops automatically when Piano Demo playback reaches the end Selecting Other D...

Страница 25: ...s lid position string resonance damper resonance touch response and so on 1 Press the PIANO ROOM button to call up the Piano Room display 2 Press the u d buttons to select items page 26 3 Press the buttons to change the settings page 26 4 Press the EXIT button to exit from the Piano Room display Customizing the Sound and the Touch Response of Piano Voices Piano Room PIANO ROOM button u d buttons E...

Страница 26: ...er instruments or CD music A3 440 0 Hz A3 414 8 Hz 466 8 Hz approx 0 2 Hz steps VRM Turns the VRM effect on off For information about the VRM function refer to page 27 For details about the Piano Voices compatible with VRM refer to the Preset Voice List on page 107 Listening to the VRM Demo You can hear the difference of VRM On Off by pressing the PLAY PAUSE button while VRM On Off display is bein...

Страница 27: ...iant resonance that sustains and expands The VRM Virtual Resonance Modeling technology featured in this instrument reproduces the complicated interaction between both string and soundboard resonance and make the sound more like that of a real acoustic grand piano Since resonance instantaneously occurs depending on the action of the keys and pedal you can expressively vary the sound by changing the...

Страница 28: ...able Chorus types To select a desired Chorus type use the Voice menu display Chorus page 89 This setting is applied commonly to all parts keyboard Voices Song MIDI Effects This instrument features a wide variety of Effects letting you apply enhancements such as Echo or Tremolo to the selected Voice for your keyboard performance You can select any of the available Effect types from the Voice menu d...

Страница 29: ... 1 and the one at bottom is Voice 2 2 Select the Voices for layering 2 1 Use the u d buttons to highlight Voice 1 in the display 2 2 Use the Voice button to select the desired Voice page 22 2 3 Use the u d buttons to highlight Voice 2 and then select a Voice according to step 2 2 3 Play the keyboard 4 To exit from the Dual mode press the DUAL SPLIT button repeatedly to turn the lamp off Playing Tw...

Страница 30: ... the display 2 2 Use the Voice button to select the desired Voice page 22 2 3 Use the u d buttons to highlight Voice L and then select a Voice according to step 2 2 3 Play the keyboard 4 To exit from the Split mode press the DUAL SPLIT button repeatedly so that the lamp turns off Splitting the Keyboard Range and Playing Two Different Voices Split Mode u d buttons DUAL SPLIT button Voice R Voice L ...

Страница 31: ...ons to highlight Voice R1 in the display 2 2 Use the Voice button to select the desired Voice page 22 2 3 Use the u d button to highlight Voice R2 or Voice L and then select Voices according to step 2 2 3 Play the keyboard 4 Press the DUAL SPLIT button to exit from the Dual and Split mode The lamp of the DUAL SPLIT button turns off Using Dual and Split Simultaneously u d buttons DUAL SPLIT button ...

Страница 32: ...tails When using the separately sold pedal unit the pedal function changes as follows Playing Duo u d buttons DUAL SPLIT button EXIT button FUNCTION button System menu display 1 1 Use the u d buttons to select Keyboard 1 2 Press the button to call up the next display 1 3 Use the u d buttons to select Duo 1 4 Press the button to select On DUAL SPLIT button lights in blue Keyboard display NOTE While...

Страница 33: ...n the Duo indication is shown on the Voice display 3 Play the keyboard The sound of left hand range is emitted from the left the sound of right hand range is emitted from the right 4 Press the DUAL SPLIT button to exit from the Duo mode You can also exit from the Duo mode by following either of the instructions below Press the PIANO ROOM button Repeat the same procedure from step 1 to set it to Of...

Страница 34: ...then press the button 2 Set the Transpose amount by using the buttons To reset the parameter to the default setting press the and buttons simultaneously 3 Press the EXIT button to close the Transpose display Transposing the Pitch in Semitones Transpose u d buttons EXIT button FUNCTION button Voice menu display Default setting 0 Setting range 12 1 octave 0 normal pitch 12 1 octave NOTE The setting ...

Страница 35: ...s the button 3 Set the tuning value by using the buttons To reset the value to the default setting A3 440 0Hz press the buttons simultaneously 4 Press the EXIT button to close the Master Tune display Fine Tuning the Pitch Master Tune u d buttons EXIT button FUNCTION button System menu display Default setting A3 440 0Hz Setting range A3 414 8Hz 440 0Hz 466 8Hz in approximately 0 2 Hz increments NOT...

Страница 36: ... Voices you can also determine the touch sensitivity in the Piano Room display For details refer to What you can do in the Piano Room on page 26 System menu display Default setting Medium NOTE If you change the touch sensitivity here the setting in the Piano Room display page 26 is also changed The setting here will not be recorded to a MIDI Song nor be transmitted as MIDI messages The touch sensi...

Страница 37: ...e Sound Boost function The SOUND BOOST EQ button lights 3 Press the d button to highlight Type 4 Press the button to call up the Type display then use the u d buttons to select the Sound Boost type Sound Boost type list 5 Press the EXIT button to exit from the Type display Boosting the Overall Sound SOUND BOOST u d buttons Default setting Off Sound Boost display Default setting 2 1 Producing smoot...

Страница 38: ...splay You can even create your own custom EQ settings by adjusting the frequency bands and save the settings to the User Master EQ Selecting the Master EQ type 1 Press the SOUND BOOST EQ button twice to call up the Master EQ display 2 Use the u d buttons to select the Master EQ type Master EQ type list 3 Press the EXIT button to exit from the Master EQ display Adjusting the Sound Master EQ u d but...

Страница 39: ...then press the button to call up the User display in which the three bands can be boosted or cut 2 Use the buttons to select a band then use u d buttons to boost or cut it To reset the setting to the default press the u d buttons simultaneously 3 Press the EXIT button to close the User display Default setting 0 dB Setting range 6 dB 0 6 dB SOUND BOOST EQ button ...

Страница 40: ...ith the exception of the P Standby On switch will be disabled 2 Press the SOUND BOOST EQ and REVERB buttons simultaneously again to unlock the front panel Locking the Front Panel SOUND BOOST EQ button REVERB button NOTE It is impossible to lock the front panel during Song playback and recording When the front panel is locked during playback of the metronome rhythm and Song playback cannot be stopp...

Страница 41: ... from the Tempo display press the EXIT button Adjusting the Tempo 1 Press the TEMPO button to call up the Tempo display 2 Use the buttons to adjust the tempo To reset the tempo to the default setting press the and buttons simultaneously 3 Press the EXIT button to exit from the Tempo display Using the Metronome u d buttons EXIT button METRONOME button TEMPO button NOTE For information on setting th...

Страница 42: ... the instrument the value will be changed to fit within the setting range Note type will be fixed to quarter note as long as the BPM parameter in the Metronome Rhythm menu display is set to Crotchet regardless of the Time Signature you set 3 Turn the Bell setting on For details refer to Bell in the Metronome Rhythm menu page 96 The Metronome plays back according to the selected Time Signature with...

Страница 43: ...r the Ending is played 5 Press the EXIT button to exit from the Rhythm display RHYTHM button u d buttons EXIT button About the Rhythm Tempo The Rhythm tempo is equivalent to that set for the Metronome page 41 Although you set the Rhythm tempo selecting a MIDI Song will change the tempo value to that specified in the selected MIDI Song data When you press the TEMPO button to call up the Tempo displ...

Страница 44: ...d Audio Songs A MIDI Song is comprised of your keyboard performance information and is not a recording of the actual sound itself The performance information refers to which keys are played at what timing and at what strength just as in a musical score Based on the recorded performance information the tone generator of the Clavinova etc outputs the corresponding sound A MIDI Song uses a small amou...

Страница 45: ...PLAY PAUSE button NOTE Before using a USB flash drive be sure to read Connecting USB Devices USB TO DEVICE terminal on page 74 NOTE USB folder appears only when USB flash drive is connected to the USB TO DEVICE terminal Demo Voice Demos let you experience the characteristics of the Voices MIDI Song page 24 50 Classics 50 classical Preset Songs MIDI Songs For these Songs see the music book 50 Class...

Страница 46: ...your keyboard performance To adjust the volume balance between your keyboard performance and MIDI Song playback or to adjust the Audio Volume set the appropriate Volume parameters individually in the Song menu display page 52 NOTE NoSong will be shown in the display when no data exists in that folder NOTE Press the button to return to the category folder Icon Song List icon Data format Folder MIDI...

Страница 47: ...on during Song playback 2 Change the Tempo value using the buttons The original tempo of the current Song can be recalled by pressing the and buttons simultaneously When a MIDI Song is selected the tempo range differs depending on the Time Signature for a selected Song When an Audio Song is selected the tempo range is between 75 125 100 is the original tempo value Higher values result in a faster ...

Страница 48: ...lect Off for the selected part 4 Press the PLAY PAUSE button to start playback Play and practice the part you just muted 5 Press the PLAY PAUSE button again to stop playback Even if you don t press the PLAY PAUSE button the Song stops automatically when Song playback reaches the end Playing a One hand Part Part Cancel Function MIDI Songs MIDI Audio u d buttons PLAY PAUSE button FUNCTION button NOT...

Страница 49: ... saved in a designated folder repeatedly in order or in random order The explanations here apply only to AB Repeat and Song Repeat For Phrase Repeat refer to page 93 1 Select a Song to be played back For instructions refer to page 45 2 Call up the Repeat display Press the FUNCTION button repeatedly to call up the Song menu display Select Repeat then press the button 3 In the Repeat display select ...

Страница 50: ...ighted or select another Song MIDI Audio A B display Specifying the top of a Song as Point A Specify Point A before starting playback then start playback and specify Point B Specifying the end of a Song as Point B Specifying only Point A results in repeat playback between Point A and the Song end as Point B NOTE You can also specify the repeat range by the following procedure 1 Highlight the measu...

Страница 51: ...Random Continuously plays back all Songs within a designated range in random order 4 2 Press the PLAY PAUSE button to start Repeat playback Icons corresponding to each Repeat setting are shown on the Song display While the Repeat setting is on Single All or Random is shown in the upper right corner of the Song display 5 To turn off the Repeat function press the PLAY PAUSE button again to stop play...

Страница 52: ... u d buttons then press the button to call up the setting display When an Audio Song is selected use the buttons to set the Audio playback volume After setting the value go on to step 5 Song Keyboard Adjust the Volume balance between the MIDI Song playback and the sound you are playing on the keyboard Song L R Adjust the Volume balance between the Right and Left parts of the selected MIDI Song Adj...

Страница 53: ...a Song You can shift the pitch of Song playback up or down in semitone intervals You can change the settings via the Song menu display Press the FUNCTION button repeatedly to call up the Song menu display Transpose page 93 In the case of Song Keyboard In the case of Song L R R part volume will be lower L part volume will be lower The volume of your playing will be lower The Song playback volume wi...

Страница 54: ...nstrument from the external devices such as a computer or a smart device etc when connecting the instrument with the devices via AUX IN jack USB TO HOST terminal wireless LAN or Bluetooth For example if the audio data is played back on a smartphone connected with this instrument via Bluetooth the audio data sounds from the internal speaker of this instrument For details about the difference betwee...

Страница 55: ... parts individually refer to MIDI Recording independent Tracks page 57 since the Recording method here assumes that both the left and right parts are being recorded together Using the Metronome Rhythm You can use the Metronome Rhythm while recording While the Metronome sound cannot be recorded the Rhythm sound can Make sure to start enter the Recording mode before starting Rhythm playback since en...

Страница 56: ...ost if you change to another Song or you turn the power off without executing the Save operation NOTE After saving your recorded performance if you want to record it again refer to Re recording a MIDI Song in parts page 62 Renaming the recorded Song The recorded Songs are named automatically but you can rename Songs as you like page 71 Data that can be recorded to MIDI Songs Data for each Track No...

Страница 57: ...ct the desired track for recording from any except for these tracks MIDI Recording Independent Tracks MIDI NOTE If you want to record your performance to the USB flash drive or you want to add the recording to the MIDI Song in the USB flash drive refer to MIDI Recording to the USB flash drive page 59 NOTE Because bass accompaniment of the Rhythm sounds only when playing the keyboard in order to re...

Страница 58: ...ry recording again from step 3 If you do not want to save the recorded data highlight Cancel then press the button After the Save operation is completed the display shows Save Completed then returns to the Song display The recorded Song will be named USERSONGxxx xxx number and saved in the User category 6 To hear the recorded performance press the PLAY PAUSE button 7 To record another Track enter ...

Страница 59: ...ct the USB flash drive to the USB TO DEVICE terminal 2 Select a MIDI Song as Recording target then enter the Recording mode 2 1 If you want to record an additional Track to the already recorded MIDI Song select the desired MIDI Song in the USB flash drive If you want to record from scratch skip this step 2 2 Press and hold the REC button for a second to call up the display which lists the Recordin...

Страница 60: ...ndependent Tracks on page 57 When you want to quick record to a blank MIDI Song Execute steps 3 6 in Quick MIDI Recording on page 55 Recording Target Song Description New Song Select this when you want to record your performance to a blank MIDI Song and save to User category in this instrument s internal memory New Song USB Select this when you want to record your performance to a blank MIDI Song ...

Страница 61: ...d time is shown on the display while Audio Recording is being executed In the case of Audio recording the audio input from the external device such as a computer or a smart device via AUX IN jack USB TO HOST terminal wireless LAN or Bluetooth is also recorded For connection with these devices refer to page 72 Audio Recording to the USB Flash Drive Audio NOTE To connect a USB flash drive be sure to...

Страница 62: ...recorded data will be replaced with the new one as soon as recording starts KeyOn The already recorded data will be maintained until you press a key and actual recording starts as soon as you press a key 1 3 Use the u d buttons to select RecEnd then select the value which determines how recording stops by using the button Replace The data after the point you stop recording will also be erased Punc...

Страница 63: ...t the desired settings if you wish to change the previous ones 5 Press and hold the REC button for a second to call up the display which lists the Recording Target Songs then select the 4th item Song selected in step 3 then press the button to enter the recording mode 6 Use the buttons to select a Track for re recording 7 Play the keyboard or press the PLAY PAUSE button to start recording 8 Press ...

Страница 64: ...en select the highlighted item in each display as illustrated below 4 Apply the selected Tempo value to the current MIDI Song data Press the d button to highlight Execute then press the button to apply the new Tempo value to the current MIDI Song data When this operation is completed Completed is shown on the display and the Tempo Change display will be restored after a while 5 Press the EXIT butt...

Страница 65: ...elected in step 2 for the Track selected in step 4 to the current MIDI Song data Press the button to return to the Voice Change display Press the d button to highlight Execute then press the button to apply the new Voice to the current MIDI Song data When this operation is completed Completed is shown on the display and the Voice Change display will be restored after a while 6 Press the EXIT butto...

Страница 66: ...yback cannot be done Operation File menu Page Deleting files Delete pages 67 68 Copying files Copy pages 67 68 Moving files Move pages 67 69 Converting a MIDI Song to an Audio Song during playback MIDI to Audio pages 67 70 Renaming files Rename pages 67 71 File A file contains a group of data On this instrument a Song file includes Song data and a Song name Restrictions for protected Songs Commerc...

Страница 67: ...tion from Delete Copy Move MIDI to Audio or Rename From here if you wish to close the File mode press the EXIT button once or twice 4 Execute the selected operation For specific instructions refer to the corresponding section Delete page 68 Copy page 68 Move page 69 MIDI to Audio page 70 Rename page 71 During operation messages information confirmation etc may be shown on the display For explanati...

Страница 68: ...the USER FILES folder as the destination As for a MIDI Song in a USB flash drive you can Copy Move it to the User category in the instrument See page 67 for information on basic operations The following is a detailed procedure of step 4 on that page Deleting Files Delete NOTICE Do not turn off the power or eject the USB flash drive while Executing is shown in the display Copying Files Copy USER FI...

Страница 69: ...ssage appears when a Song with the same name already exists in the copy destination Select Overwrite when you want to overwrite the selected Song or Cancel to cancel by using the u d buttons and then press the button NOTICE Overwrite operations erase any existing data of the copy destination file and overwrite with data of the copy source file NOTICE Do not turn off the power or eject the USB flas...

Страница 70: ...onvert the Song a message Convert completed will be shown and the display returns to Song List display The Audio Song converted from a MIDI Song is saved with the same name as the MIDI Song The icon displayed to the left of the Song name on the instrument display is changed and the Song file extension on the computer is changed to wav Converting a MIDI Song to an Audio Song during Playback MIDI to...

Страница 71: ...sition Pressing both buttons simultaneously will delete the character at the current cursor position A Song name can contain up to 46 characters Characters which extend beyond the display capacity and are not visible can be viewed by moving the highlight by using the buttons 4 3 Press the FUNCTION button After the Song is renamed the display returns to Song List display where the renamed Song can ...

Страница 72: ...l volume levels to minimum 0 Otherwise damage to the components electrical shock or even permanent hearing loss may occur Rear Panel Front Panel NOTE For details on PEDAL UNIT terminal and DC IN jack refer to Panel Controls and Terminals on page 13 NOTE There are two different types of USB terminals on the instrument USB TO DEVICE and USB TO HOST Take care not to confuse the two terminals and the ...

Страница 73: ...jack for connection with a monaural device NOTICE To avoid possible damage first turn on the power to the instrument then to the external device When turning off the power first turn off the power to the external device then to the instrument Since this instrument s power may automatically be turned off due to the Auto Power Off function page 15 turn off the power to the external device or disable...

Страница 74: ...ection NOTICE Avoid connecting or disconnecting the USB device during playback recording and file management operations such as Save Copy Delete and Format or when accessing the USB device Failure to observe this may result in freezing of the operation of the instrument or corruption of the USB device and the data When connecting then disconnecting the USB device and vice versa make sure to wait a...

Страница 75: ...he settings of the computer or the application software Do not place your computer or smart device in an unstable position Doing so may cause the device to fall and result in damage NOTE When using a USB cable to connect the instrument to your computer or smart device make the connection directly without passing through a USB hub Before using the USB TO DEVICE terminal be sure to read Connecting U...

Страница 76: ...tely to the USB TO DEVICE terminal otherwise the displays for setup below will not be shown 1 Press the FUNCTION button repeatedly to call up the System menu display then select the highlighted item in each display as illustrated below 2 Press the button to call up the network list For a network with a lock icon you need to enter the proper password NOTE If the menus shown in the Wireless LAN disp...

Страница 77: ...Manual on the website page 9 Automatic Setup by WPS Make sure to connect the USB wireless LAN adaptor sold separately to the USB TO DEVICE terminal otherwise the displays for setup will not be shown If your access point supports WPS you can easily connect the instrument to access point by WPS without making settings such as password input etc Press the WPS button on the USB wireless LAN adaptor mo...

Страница 78: ...rs refer to Renaming files on page 71 After entering the SSID press the FUNCTION button to finalize the setting Operation returns to the Other display 3 2 Select Security then press the button to call up the Security list Select the security then return to the Other display by pressing the button 3 3 Select Password then set the password in the same way as SSID 4 Select Connect at the bottom of th...

Страница 79: ...hlighted item in each display as illustrated below 2 2 Set the SSID Security Password and Channel Select and enter each value setting in the same way as in step 3 in Manual Setup For the setting range for each item refer to the table on page 104 NOTE This cannot be used to connect to the internet or another wireless LAN device System menu display 1 1 Use the u d buttons to select Utility 1 2 Press...

Страница 80: ...nals and standard MIDI cables to connect external MIDI devices keyboard sequencer etc MIDI IN Receives MIDI messages from another MIDI device MIDI OUT Transmits MIDI messages generated on this instrument to another MIDI device Connecting External MIDI Devices MIDI Terminals CAUTION Before connecting the instrument to other MIDI devices turn off the power of all the components NOTE Since MIDI data ...

Страница 81: ...whether the Audio sound input to the instrument by using this function is output to a computer or smart device or not along with the performance played on the instrument For details refer to Audio Loop Back On Off on page 85 NOTE For details on transmitting receiving MIDI data or transferring MIDI Songs backup files to a computer refer to the Computer related Operations on the website Listening to...

Страница 82: ... connection list on the smart device Pairing Pairing means to register Bluetooth equipped smart devices on this instrument and establish the mutual recognition for wireless communication between the two NOTICE When you force quit the instrument after pairing the paring data is lost After restarting the instrument execute the steps 1 and 2 again for paring NOTE Only one smart device can be connecte...

Страница 83: ... can set the function to off 1 Press the FUNCTION button repeatedly to call up the System menu display then select the highlighted item in each display as illustrated below 2 Press the button to switch on off To exit from the System menu display press the EXIT button System menu display 1 1 Confirm that Bluetooth is selected 1 2 Press the button to call up the next display 1 3 Confirm that Bluetoo...

Страница 84: ...etails access the Smart Pianist page on the website above For instructions on connecting the instrument to a smart device the connection wizard of the Smart Pianist will guide you according to the operating condition and environment To start the connection wizard tap Menu located at the upper left on the Smart Pianist screen to open the Menu and then tap Instrument Start Connection Wizard NOTICE A...

Страница 85: ... this to Off To make the setting press the FUNCTION button repeatedly to call up the System menu display Utility Audio Loop Back page 102 Audio EQ On Off This allows you to set whether the optimum EQ or Equalizer settings are provided for audio sound input page 54 from the connected computer or smart device or not This function also affects the audio input sound that is output to a computer etc al...

Страница 86: ...r you can connect the instrument to the PA mixer or not 3 Connect the instrument as the following illustration Your instrument should now be fully connected The next step will be to balance your performance sounds NOTICE Please read the following before setting up Ensure that the instrument is turned off before making any connections Make sure to check with the PA operator when connecting or disco...

Страница 87: ...uld be set between 5 and 7 for playing accompaniment and to 8 or 9 when you need to play louder If set too high your sound may become distorted if too low any background noise will be more noticeable Turn on the Sound Boost function if you are finding it difficult to make your instrument heard within the overall mix Choose from three different Sound Boost types page 37 The Master EQ function may h...

Страница 88: ...following menu displays in order according to the vertical menu at the left of the display Voice menu page 89 Song menu page 93 Metronome Rhythm menu page 96 Recording menu page 97 System menu page 98 3 Use the u d buttons to select the desired parameter While referring as needed to the parameter list on each page listed in step 2 use the u d buttons to navigate through the display vertically and ...

Страница 89: ...set Voice List on page 107 On On Off Damper Res Setting display Determines the depth of the string resonance effect which is applied when the damper pedal is pressed This is available only when VRM is on 5 0 10 String Res Setting display Determines the depth of the string resonance effect which is applied when a note on the keyboard is pressed This is available only when VRM is on 5 0 10 Aliquot R...

Страница 90: ...yback setting for a Song part is used priority order Ch 1 Ch 2 Ch 16 while the setting for a keyboard part is used when Song playback is stopped priority order R1 L and R2 Voices Differs depending on the Voice or Voice combination 0 127 Effect page 28 In addition Reverb and Chorus another Effect can be applied to the R1 R2 L Voices of the keyboard independently Note that this Effect type can be se...

Страница 91: ...e for example that the pedal function affects the right hand performance but does not affect the left hand performance Differs depending on the Voice or Voice combination On Off Pedal Assign When using the separately sold pedal unit page 19 Right Setting display Assigns one of various functions other than the original one to the Right pedal Sustain Cont Refer to the Pedal Function List page 92 Cen...

Страница 92: ... similar to the sound of an ascending or descending jet plane Off No effect DelayLCR Delay applied at left center and right positions DelayLR Delay applied at left and right positions Echo Echo like delay CrossDelay Left and right delays cross each other in alternation Symphonic Adds a rich and deep acoustic effect Rotary Adds the vibrato effect of a rotary speaker Tremolo The volume level changes...

Страница 93: ... Phrase set to On the countdown starts followed by repeated playback of the specified phrase or phrases until you press the PLAY PAUSE button 000 000 the last phrase number of the Song Repeat Off On repeat playback Off no repeat Song Setting display By setting this parameter you can play back only a specific Song or specific Songs in order repeatedly or randomly For details refer to page 49 Off Of...

Страница 94: ...ay set the desired Tempo value for changing Move the highlight to Execute then press the button to actually change the Tempo value as MIDI Song data Differs depending on the Song Execute Voice Change Track Changes the Voice of a specific track in the current MIDI Song to the current Voice as data 1 Select a track of which the Voice will be changed 2 Move the highlight to Execute then press the but...

Страница 95: ...rt are quantized to straight eighth notes completely eliminating any triplet feel However if you use the eighth note eighth note triplet setting both the straight and triplet notes will be quantized correctly Strength setting range 1 4 1 8 1 16 1 6 1 12 1 24 1 8 1 12 1 16 1 24 1 32 1 16 1 12 quarter note quarter note triplet eighth note eighth note triplet sixteenth note sixteenth note triplet thi...

Страница 96: ... Rhythm playback 82 0 127 BPM Determines whether the note type of the tempo indication is affected by the Metronome Time Signature page 42 or not crotchet When Time Sig is selected the denominator of the Time Signature is shown as the note type of the tempo indication The dotted quarter note is shown as the note type of the tempo indication only when the Time Signature is set to 6 8 9 8 or 12 8 Ti...

Страница 97: ...MIDI Song determines when the actual MIDI Recording starts after you execute the Recording Start operation When set to Normal actual recording will starts as soon as you execute the Recording Start operation When set to KeyOn actual recording starts as soon as you press any key after you execute the Recording Start operation Normal Normal KeyOn RecEnd This parameter which is used when you overwrit...

Страница 98: ...d in the 16th to 19th centuries Equal Temperament Refer to the Scale Tune List below Base Note Setting display Determines the base note for the Scale selected above When the base note is changed the pitch of the keyboard is transposed yet maintains the original pitch relationship between the notes This setting is necessary when Scale Tune is set to something other than Equal Temperament NOTE When ...

Страница 99: ...es the range of the pitch bend that is produced via the pedal in semitone steps This setting is available only for the pedal to which Pitch Bend Up or Pitch Bend Down page 92 is assigned NOTE For some Voices the pitch may not be changed according to the Pitch Bend Range value set here 2 0 12 pressing the pedal will raise lower the pitch by 12 semitones 1 octave Aux Polarity page 18 A pedal connect...

Страница 100: ...ted via MIDI to a connected MIDI device or computer which can produce the sound The Local Control Off setting is useful when you wish to play only an external sound source while playing the keys on this instrument On On Off Receive Param Setting display Determines which types of MIDI messages can be received or recognized by this instrument MIDI message types Note on off Control Change Program Cha...

Страница 101: ...ower or disconnect the USB flash drive while Executing is shown in the display Execute USB Properties Shows the amount of free space and entire memory in the USB flash drive connected to the USB TO DEVICE terminal USB Autoload When this is set to On the Song saved in the root directory can be selected shown on the display automatically as soon as the USB flash drive is connected to the USB TO DEVI...

Страница 102: ...ge 85 The optimum or Equalizer setting is provided for audio playback When not using this EQ set this parameter to Off Off On Off Version Displays the model name and the firmware version of this instrument Language System Determines the type of characters shown on the display for the System general indication other than Song name and Song Song name individually Character list International Japanes...

Страница 103: ... DNS Server2 can be set when DHCP is set to Off while cannot be set when DHCP set to On Use the buttons to select each octet in the entry display then enter the value using the u d buttons To finalize the setting press the FUNCTION button On On Off IP Address 0 0 0 0 0 0 0 0 255 255 255 255 Subnet Mask 0 0 0 0 0 0 0 0 255 255 255 255 Gateway 0 0 0 0 0 0 0 0 255 255 255 255 DNS Server1 0 0 0 0 0 0 ...

Страница 104: ...PA WPA2 mixed PSK Password Sets the Password as an access point 00000000 Up to 64 characters half size alphanumeric characters marks Channel Sets the channel as an access point 11 Differs depending on the USB wireless LAN adaptor models Models for United States and Canada 1 11 Others 1 13 When no USB wireless LAN adaptor is connected setting range is channels 1 13 DHCP Server Sets the IP address r...

Страница 105: ...o exit from the System menu display This lets you save data on internal memory to the connected USB flash drive as a backup file named p 515 bup This backup file can be loaded to the instrument via the Restore function page 106 for future NOTICE It may take 1 2 minutes to complete this operation Never turn off the power during this operation while Executing is shown Doing so could result in damage...

Страница 106: ...tory and is called up when you first turn on the power to this instrument Note that the following points This operation resets the Backup Setting page 105 to the default setting This operation will not delete the Songs saved in the User folder This operation will not delete the Bluetooth pairing information page 82 For information on whether Bluetooth functionality is included with the instrument ...

Страница 107: ...istinctive phaser effect makes this ideal for fusion styles DX Bright A variation of electronic piano sound produced by an FM synthesizer Its bright and sparkling sound character spice up the music Tremolo Vintage Includes tremolo ideal for Vintage EP Frequently used in rock music Organ Jazz Organ Slow The sound of a tonewheel type electric organ Sampled with Rotary SP effect its rotation speed is...

Страница 108: ... electric piano sound but also produces a bright gorgeous sound on its own Others Acoustic Bass The sound of a finger plucked acoustic bass Frequently used in jazz and Latin music Electric Bass The sound of an electric bass Frequently used in jazz rock and popular music Bass Cymbal The sound of a cymbal layerd with acoustic bass Effective when used for jazz walking bass lines Fretless Bass The sou...

Страница 109: ...art 25 Piano Sonate op 13 Pathétique 2nd mov L v Beethoven 26 Für Elise L v Beethoven 27 Piano Sonate op 27 2 Mondschein 1st mov L v Beethoven 28 Impromptu op 90 2 F P Schubert 29 Frühlingslied op 62 6 J L F Mendelssohn 30 Fantaisie Impromptu F F Chopin 31 Etude op 10 3 Chanson de l adieu F F Chopin 32 Etude op 10 12 Revolutionary F F Chopin 33 Valse op 64 1 Petit chien F F Chopin 34 Nocturne op 9...

Страница 110: ...e to which recording deleting operations are repeated Execute the Format operation after making sure there is no important data in the USB flash drive page 101 and try again Device removed This message appears when the USB flash drive is removed from the instrument Duplicate name This message indicates that an identically named file already exists Rename the file page 71 Executing The instrument i...

Страница 111: ...s approx 500KB MIDI 80 minutes Audio The recording will end automatically and the recorded data before the end is saved The Song size exceeds the limitation during converting a MIDI Song to an Audio Song The limitation is 80 minutes Audio System limit This message appears when the number of files exceeds the system limit The maximum number of files and folders which can be saved in a folder is 250...

Страница 112: ...the System menu display Utility Speaker page 101 Local Control is Off Set Local Control On via the System menu display MIDI Local Control page 100 The speakers do not switch off when a pair of headphones is connected to the PHONES jack The Speaker setting is On Set the speaker setting to Normal via the System menu display Utility Speaker page 101 Pedals do not function The pedal cord may not be se...

Страница 113: ...n the Metronome Rhythm menu display The contents of the Wireless LAN is not shown in the display even though the USB wireless LAN adaptor is connected Disconnect the USB wireless LAN adaptor and connect it again The Bluetooth equipped smart device cannot be paired with nor connected to the instrument Check the Bluetooth function of the smart device is activated To connect the smart device and the ...

Страница 114: ...Yes Key off Samples Yes Smooth Release Yes Polyphony max 256 Preset Number of Voices 40 Voices 18 Drum SFX Kits 480 XG Voices Compatibility XG GM GS for Song playback GM2 for Song playback Effects Types Reverb 6 types Chorus 3 types Effect 12 types Intelligent Acoustic Control IAC Yes Stereophonic Optimizer Yes Functions Dual Yes Split Yes Duo Yes Master EQ 3 Preset 1 User Soundboost 3 types Songs...

Страница 115: ...xternal Device USB flash drive Connectivity DC IN 16 V Headphones Standard stereo phone jack x 2 MIDI IN OUT AUX IN Stereo mini jack AUX OUT L L R R AUX PEDAL Yes PEDAL UNIT Yes USB TO DEVICE Yes USB TO HOST Yes Sound System Amplifiers 15 W 5 W x 2 Speakers Oval 12 cm x 6 cm 2 5 cm dome x 2 Acoustic Optimizer Yes Power Supply AC Adaptor PA 300C or an equivalent recommended by Yamaha Power Consumpt...

Страница 116: ...al 19 Damper Resonance 18 Damper Resonance Damper Res 26 Delete 68 Demo 24 Detailed Settings 88 Display 20 Dual 29 31 Duo 32 E Edit Song 94 Edit Voice 90 Effect 28 Effect Depth 90 Effect Type List 92 Ending 43 EQ Equalizer 38 F Factory Reset 106 Fast forward 47 File Operation 66 Footswitch 18 Format 8 Format USB flash drive 101 H Half Pedal Point 27 Half pedal 18 Headphones 16 I IAC 16 Infrastruct...

Страница 117: ...Smart Device Connection Manual 9 Smart Pianist 84 Soft pedal 19 Song 44 66 Song List 109 Song Menu 93 Song Repeat 51 Sostenuto pedal 19 SOUND BOOST 37 87 Sound Boost type list 37 Split 30 31 Split Point 30 Stage setup 86 Stereophonic Optimizer 17 String Resonance String Res 26 System Menu 98 T Tempo 41 Tempo Song 47 64 Time signature 42 Touch 26 36 Touch Sensitivity list 36 Track 48 57 Transpose K...

Страница 118: ... any potential negative effects on human health and the environment which could otherwise arise from inappropriate waste handling For more information about collection and recycling of old products please contact your local municipality your waste disposal service or the point of sale where you purchased the items For business users in the European Union If you wish to discard electrical and elect...

Страница 119: ...119 P 515 Owner s Manual Memo ...

Страница 120: ...de l appareil doit accepter tout brouillage radioélectrique subi même si le brouillage est susceptible d en compromettre le fonctionnement This equipment complies with FCC IC radiation exposure limits set forth for an uncontrolled environment and meets the FCC radio frequency RF Exposure Guidelines and RSS 102 of the IC radio frequency RF Exposure rules This equipment has very low levels of RF ene...

Страница 121: ...sts ir pieejams d interneta vietnZ https europe yamaha com en support compliance doc html LT Lithuanian SUPAPRASTINTA ES ATITIKTIES DEKLARACIJA A Yamaha Music Europe GmbH patvirtinu kad radijo rengini tipas P 515 atitinka Direktyv 2014 53 ES Visas ES atitikties deklaracijos tekstas prieinamas iuo interneto adresu https europe yamaha com en support compliance doc html HU Hungarian EGYSZER SÍTETT EU...

Страница 122: ......

Страница 123: ...Tel 45 44 92 49 00 FINLAND F Musiikki Oy Antaksentie 4 FI 01510 Vantaa Finland Tel 358 0 96185111 NORWAY Yamaha Music Europe GmbH Germany Norwegian Branch Grini Næringspark 1 1332 Østerås Norway Tel 47 6716 7800 ICELAND Hljodfaerahusid Ehf Sidumula 20 IS 108 Reykjavik Iceland Tel 354 525 5050 CYPRUS Nakas Music Cyprus Ltd Nikis Ave 2k 1086 Nicosia Tel 357 22 511080 Major Music Center 21 Ali Riza A...

Страница 124: ...Yamaha Global Site https www yamaha com Yamaha Downloads https download yamaha com Manual Development Group 2018 Yamaha Corporation Published 06 2018 POMA A0 VAA7850 ...

Отзывы: