71
MODX6/MODX7
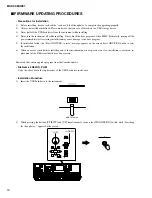
3) Once “Searching for the updater...OK” appears on the screen, installation startes. Also the Super Knob flickers in red
during installation.
Super Knob
4) When installation is completed, the Super Knob flickers in blue. Also “Finish./Please turn off.” appears on the screen.
5) Turn off the power and remove the USB flash drive.
6) Start the Test program, and then confirm the firmware version. After that, execute Factory Set.
7) As the screen for touch panel calibration appears when turning the power on, touch the mark (
□
) as shown in the test
number 22 procedure to calibrate.
Содержание MODX6
Страница 23: ...23 MODX6 MODX7 C C Pattern side DM Circuit Board C C 2NA ZW84620 1...
Страница 24: ...MODX6 MODX7 24 PNC Circuit Board Component side 2NA ZX42110...
Страница 28: ...MODX6 MODX7 28 PNR Circuit Board Component side 2NA ZX42110...
Страница 29: ...29 MODX6 MODX7 to PNC CB107 Pattern side PNR Circuit Board 2NA ZX42110...
Страница 31: ...31 MODX6 MODX7 TOME4 Circuit Board Component side Pattern side 2NA ZX42110...
Страница 32: ...MODX6 MODX7 32 2NAK8 V869520 1 61L Circuit Board Component side D D D D to 61H CN3 to KEY IF CB504...
Страница 35: ...35 MODX6 MODX7 76H Circuit Board 2NAK8 ZW58960 Component side to KEY IF CB508 to 76L CN3 G G G G H H H H...
Страница 73: ...73 MODX6 MODX7 3 Searching for the updater 4 Searching for the updater OK 5 Finish Please turn off 6 USB 7 8 22...
Страница 74: ...MODX6 MODX7 74 SYSTEM BOOTING FLOWCHART...
Страница 99: ...14 MODX6 MODX7 MODX6 KEYBOARD ASSEMBLY Ass y 120 120 220 100 151 152 100 10 10 30 50 50 60 85 90 80 20 40 40 20...


