background image

MAINTENANCE SPECIFICATIONS

Electrical

Model

Voltage:
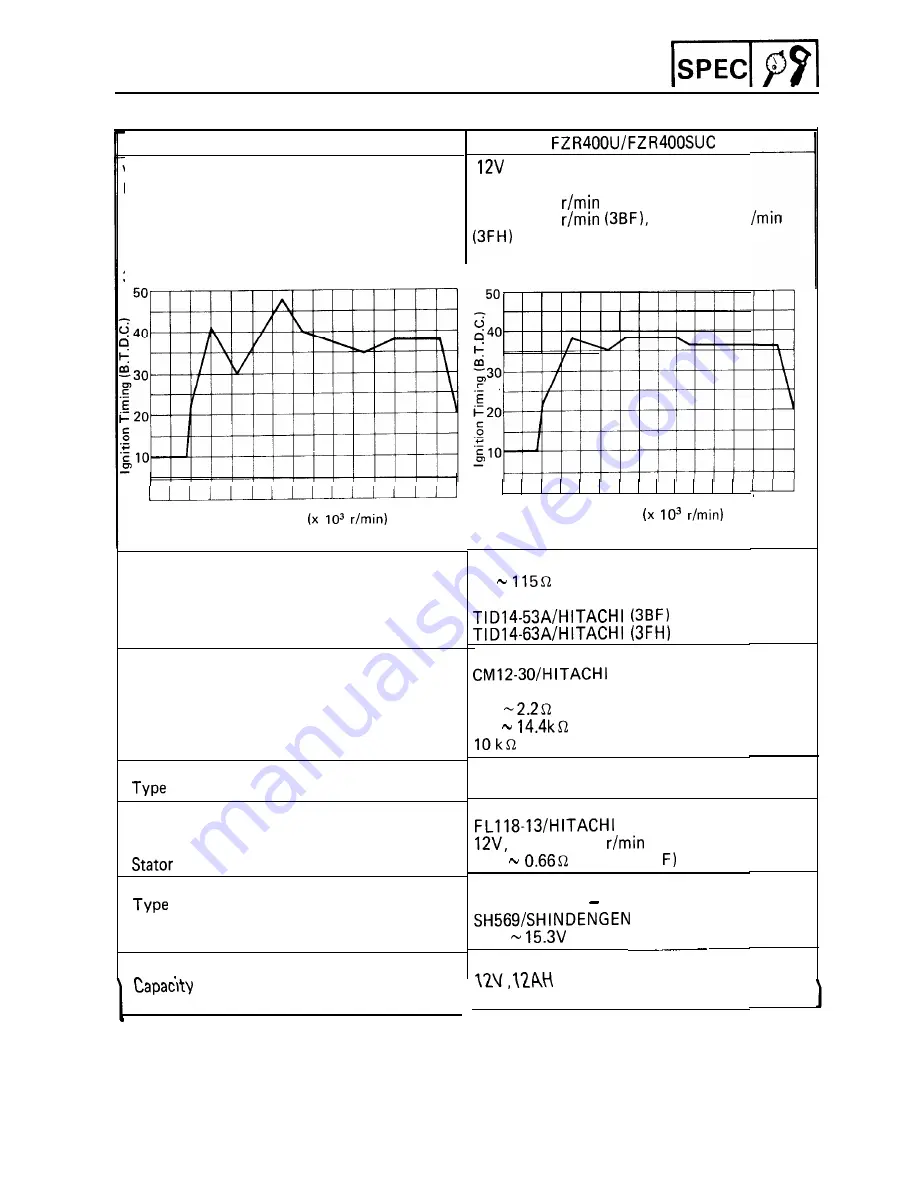
Ignition System:

Ignition Timing (B.T.D.C.)

Advanced Timing (B.T.D.C.)

Advancer Type

3BF:

0

1

2

3

4

5

6

7 8 9 1 0 11 1 2 1 3 1 4 15

Engine Speed   


T.C.I.:

Pickup Coil Resistance

(Color)

T.C.I. Unit/Manufacturer

Ignition Coil:

Model/Manufacturer
Minimum Spark Gap
Primary Winding Resistance
Secondary Winding Resistance
Spark Plug Cap Resistance

Charging System:

A.C. Generator:

Model/Manufacturer
Nominal Output

 Coil Resistance

Voltage Regulator:

Model/Manufacturer
No Load Regulated Voltage

Battery:

Specific Gravity

IO” at 1,300 

48” at 6,500 


 38” at 3,500 r

Electrical

3FH:

0

1 2 3

4

5 6

7 8 9 1 0 1 1 1 2 1

Engine Speed   


85   

 at 20°C (68°F)

(White/Red -White/Black)


6 mm (0.24 in)

1.8 

 at 20°C (68°F)

9.6   

 at 20°C (68°F)

A.C. Magneto Generator

 18A at 5,000 

0.44   

 at 20°C (68” 

Semi conductor   short circuit

14.3   


1.280

314 15

2-14

Содержание FZR400 1988-1989

Страница 1: ...Yamaha FZR400 Service Manual 1988 1989 Models ...

Страница 2: ......

Страница 3: ... PINS l 3 BEARINGS AND OIL SEALS l 3 CIRCLIPS l 3 SPECIAL TOOLS l 4 FOR TUNE UP 1 4 FOR ENGINE SERVICE l 5 FOR CHASSIS SERVICE 1 B FOR ELECTRICAL COMPONENTS l 9 CHAPTER 2 SPECIFICATIONS SPECIFICATIONS 2 l GENERAL SPECIFICATIONS 2 l MAINTENANCE SPECIFICATIONS 2 4 ENGINE 2 4 CHASSIS 2 11 ELECTRICAL 2 14 GENERAL TORQUE SPECIFICATIONS 2 16 DEFINITION OF UNITS 2 16 LUBRICATION POINT AND GRADE OF LUBRIC...

Страница 4: ...OIL REPLACEMENT 3 23 ENGINE OIL FILTER REPLACEMENT 3 24 CLUTCH ADJUSTMENT 3 26 AIR FILTER CLEANING 3 27 CARBURETOR JOINT INSPECTION 3 27 FUEL LINE INSPECTION 3 27 CRANKCASE VENTILATION HOSE INSPECTION 3 28 EXHAUST SYSTEM INSPECTION 3 28 COOLANT LEVEL INSPECTION 3 29 COOLANT REPLACEMENT 3 29 CHASSIS 3 32 FRONT BRAKE ADJUSTMENT 3 32 REAR BRAKE ADJUSTMENT 3 32 BRAKE FLUID INSPECTION 3 33 BRAKE PAD IN...

Страница 5: ... 4 ENGINE REMOVAL 4 5 ENGINE DISASSEMBLY 4 7 CYLINDER HEAD COVER CAMSHAFT AND CYLINDER HEAD 4 7 CYLINDER AND PISTON 4 10 STARTER CLUTCH 4 12 CLUTCH 4 13 A C MAGNETO 4 14 WATER PUMP 4 15 OIL PUMP AND SHIFT SHAFT 4 16 OIL PAN AND OIL STRAINER 4 17 STARTER MOTOR 4 18 CRANKCASE DISASSEMBLY 4 18 TRANSMISSION SHIFTER AND SHIFT CAM 4 19 CRANKSHAFT 4 20 VALVE PAD AND VALVE 4 21 CONNECTING ROD 4 23 INNER R...

Страница 6: ...AND ADJUSTMENT 4 49 INNER ROTOR OIL PUMP 4 49 CONNECTING ROD 4 49 CRANKSHAFT 4 50 VALVE PAD AND VALVE 4 51 CRANKCASE 4 54 TRANSMISSION 4 55 TRANSMISSION SHIFTER AND SHIFT CAM 4 56 CRANKCASE ASSEMBLY 4 57 STARTER MOTOR 4 59 OIL PAN AND OILSTRAINER 4 59 OIL PUMP AND SHIFT SHAFT 4 60 A C MAGNETO 4 61 CLUTCH 4 6 3 STARTER CLUTCH 4 65 PISTON AND CYLINDER 4 67 CYLINDER HEAD AND CAMSHAFT 4 70 CAM CHAIN T...

Страница 7: ...EMOVAL 5 7 lNSPECTlON 5 9 INSTALLATION 5 10 CHAPTER 6 CARBURETOR CARBURETOR 6 l SECTIONVIEW 6 2 REMOVAL 6 3 DISASSEMBLY 6 5 INSPECTION 6 6 ASSEMBLY 6 B INSTALLATION 6 9 i ADJUSTMENT 6 10 CHAPTER 7 CHASSIS FRONT WHEEL 7 l REMOVAL 7 2 INSPECTION 7 2 INSTALLATION 7 4 REAR WHEEL 7 7 REMOVAL 7 B INSPECTION 7 B INSTALLATION 7 9 ...

Страница 8: ...AL 7 2 9 DISASSEMBLY 7 30 lNSPECTlON 7 3 1 ASSEMBLY 7 32 INSTALLATION 7 34 STEERING HEAD AND HANDLEBAR 7 36 REMOVAL 7 3 8 lNSPECTlON 7 4 1 INSTALLATION 7 42 REAR SHOCK ABSORBER AND SWINGARM 7 47 HANDLING NOTES 7 49 DISPOSAL NOTES 7 49 REMOVAL 7 4 9 lNSPECTlON 7 5 2 INSTALLATION 7 54 DRIVE CHAIN AND SPROCKET 7 56 REMOVAL 7 5 6 INSPECTION AND CLEANING 7 56 INSTALL ATION 7 57 ...

Страница 9: ... 8 13 TROUBLESHOOTING 8 14 ELECTRIC STARTING SYSTEM 8 21 CIRCUIT DIAGRAM 8 21 STARTING CIRCUIT OPERATION 8 23 TROUBLESHOOTING 8 24 STARTER MOTOR 8 30 CHARGING SYSTEM 8 33 CIRCUITDIAGRAM 8 3 3 TROUBLESHOOTING 8 35 LIGHTING SYSTEM 8 39 CIRCUIT DIAGRAM 8 39 TROUBLESHOOTING 8 41 LIGHTING SYSTEM CHECK 8 44 SIGNALSYSTEM 8 49 CIRCUIT DIAGRAM 8 49 TROUBLESHOOTING 8 51 SIGNAL SYSTEM CHECK 8 53 COOLING SYST...

Страница 10: ... 9 TROUBLESHOOTING STARTING FAILURE HARD STARTING 9 l POOR IDLE SPEED PERFORMANCE 9 3 POOR MEDIUM AND HIGH SPEED PERFORMANCE 9 4 FAULTY GEAR SHIFTING 9 4 CLUTCH SLIPPING DRAGGING 9 5 OVERHEATING OR OVER COOLING I 9 6 FAULTY BRAKE _ 9 7 FRONT FORK OIL LEAKAGE MALFUNCTION 9 7 INSTABLE HANDLING 9 8 FAULTY SIGNALS AND LIGHTS 9 9 FAULTY EXUP For California only 9 l 0 ...

Страница 11: ...S 3 CHASSIS 3 TIGHTENING TORQUE 4 GENERAL TORQUE SPECIFICATIONS 5 PERIODIC INSPECTIONS AND ADJUSTMENTS 6 CHASSIS 6 DRIVE CHAIN SLACK ADJUSTMENT 6 CHASSIS 8 REARWHEEL 8 REMOVAL 9 INSPECTION 10 INSTALLATION 10 STATIC WHEEL BALANCE ADJUSTMENT 11 FRONT AND REAR BRAKE 12 BRAKE PAD REPLACEMENT 14 CALIPER DISASSEMBLY 19 MASTER CYLINDER DISASSEMBLY 21 INSPECTION AND REPAIR 23 ASSEMBLY 26 ...

Страница 12: ...n number is used to identify your motorcycle and may be used to register your motorcycle with the licensing authority in your state ENGINE SERIAL NUMBER The engine serial number is stamped into the right side of the engine Starting serial number FZR400A Except for California 3BF 012101 FZR400SAC For California I 3FH 003101 1 NOTE The first three digits of these numbers are for model identification...

Страница 13: ...ull Fuel Tank Tire Type Size Manufacture Type FZR400A FZR400SAC 3BF5 FZR400A 3FH3 FZR400SAC JYA3BFEO X L A 0 1 2 1 0 1 FZR400A JYA3FHCO X L A 0 0 3 1 0 1 FZR400SAC 3BF 012101 FZR400A 3FH 003101 FZR400SAC 188 kg 414 lb FZR400A 191 kg 421 lb FZR400SAC Front Rear Tubeless Tubeless 110 70R17 54H 140 60R 1 B 64H BRIDGESTONE BRIDGESTONE CYl5 CY16 DUNLOP D U N L O P K5lOF K510 2 ...

Страница 14: ... 3 54 5 12 in Optional Spring No Oil Capacity 440 cm3 15 5 Imp 02 14 9 US oz Oil Level Fully Compression 92 mm 3 62 in Bellow the top of inner fork tube without fork spring Oil Grade Yamaha Fork Oil 10WT or equivalent Front Disc Brake Type Dual Disc Outside Diameter x Thickness 282 x 4 mm 11 lO x 0 16 in Pad Thickness Inner 5 5 mm 0 22 in Limit 0 5 mm 0 02 in Pad Thickness Outer 5 5 mm 0 22 in Lim...

Страница 15: ... Bracket Cowling and Stay Compression Bar and Brake Caliper Bracket Front Fork Pinch Bolt Sprocket and Clutch Hub Brake Disc and Clutch Hub Inner Tube and Steering Stem Frame and Rear Frame Upper Lower Thread size MI4x I 5 Ml6 x 1 5 M8 x I 25 M22 x 1 0 MIOx 1 25 M8 x 1 25 MIOx 1 25 M6 x 1 0 M5 x 0 8 M6 x 1 0 M8 x 1 25 MlOx 1 25 MlOx 1 25 M8 x 1 25 MlOx I 25 M8 x 1 25 Ml0 x 1 25 Ml4x 1 5 MIOx 1 25 ...

Страница 16: ... torque is reached Unless otherwise specified torque specifications call for clean dry threads Components should be at room temperature A Distance across flats 6 Outside thread diameter DEFINITION OF UNITS Unit Read m m millimeter cm centimeter kg kilogram N Newton Nm Newton meter mskg Meter kilogram Pa Pascal N mm Newton per millimeter L Liter cm3 Cubic centimeter r min Revolution per minute Defi...

Страница 17: ...his tight chain position Too little of chain slack will overload the engine and over vital parts keep the slack within the specified limits Securely support the motorcycle so there is no danger of it falling over 1 Place the motorcycle on a level place and hold it in an upright position 2 Check Drive chain slack Out of specification Adjust 3 Adjust Drive chain slack Adjustment steps Remove the cot...

Страница 18: ...ingarm use them to check for proper alignment Tighten the locknut Tighten the axle nut to specification while pushing up or down on the chain to zero slack 107 Nm 10 7 m kg 77 ft lb Install the cotter pin Always use a new cotter pin on the axle nut Do not loosen the axle nut after torque tightening If the axle nut groove is not aligned with the cotter pin hole align groove rnrith the hole by tight...

Страница 19: ...EEL 1 CHASSIS REAR WHEEL Collar Oil seal Bearing Spacer Clutch hub Collar Cotter pin Tension bar WEAR LIMIT 1 O mm 0 04 in 140160R 18 64H RIM SIZE MT4 00 x 18 RIM RUNOUT LIMIT RADIAL 2 0 mm 0 08 in LATERAL I 8 ...

Страница 20: ...able stand under the swingarm 3 Remove Bolts brake caliper NOTE Do not depress the brake pedal while the caliper is removed 4 Loosen Locknut Adjuster 5 Remove Cotter pin I Axle nut I Washer 6 Push the rear wheel forward and disconnect the drive chain from the driven sprocket 0 7 Remove Rear wheel axle Adjuster collars left and right Rear wheel 8 Remove Collar left and right 9 ...

Страница 21: ... TION 3 Check Wheel balance Refer to the FRONT WHEEL INSPEC TION INSTALLATION Reverse the Removal procedure Note the following points 1 Lubricate Rear wheel axle Bearings Oil seals Spacer Collar Lithium soap base grease 2 Adjust Drive chain slack Drive chain slack 10 20 mm 0 4 0 8 in Refer to the DRIVE CHAIN SLACK ADJUSTMENT 3 Tighten Nut rear wheel axle Bolts brake caliper ...

Страница 22: ...ut 4 Install aCotter pin Always use a new cotter pin on the axle nut Make sure that the brake hose is routed prop erly Brake hose Brake hose guide STATIC WHEEL BALANCE ADJUSTMENT NOTE After replacing the tire and or rim wheel balance should be adjusted Adjust the wheel balance with brake disc and wheel hub installed 1 Adjust Wheel balance Refer to the FRONT WHEEL STATIC WHEEL BALANCE ADJUSTMENT se...

Страница 23: ...r cylinder Piston seal Brake hose Dust seal Union bolt Brake pad Copper washer Brake disc Joint The arrow mark on the pad spring must pointing the disc rotating direction 1 BRAKE FLUID TYPE A DOT 4 If DOT 4 is not available 2 Nm 0 2 rn kg 1 4 ftslb I 1 PAD SPRING SYL I 135 3 5 m kg 25 ft lb 1 20 Nm 2 0 ma kg rd lJSF NEW ONE 1 yr r 26 ONA k ...

Страница 24: ...aphragm Reservoir tank Reservoir hose Master cylinder Master cylinder kit Brake hose Brake pedal Union bolt 0 Copper washer Brake caliper Piston Piston seal Dust seal I Brake pad Pad shim I Pad spring Brake disc 26Nm 2 6m kg 19ft Ib I 20NmI2 0m kn 14ft lhl 13 ...

Страница 25: ...s otherwise eye injury may occur Allow brake fluid to contact painted surfaces or plastic parts otherwise damage may occur Disconnect any hydraulic connection other wise the entire system must be disassembled drained cleaned and then properly filled and bled after reassembly BRAKE PAD REPLACEMENT NOTE It is not necessary to disassemble the brake caliper and brake hose to replace the brake pads Sec...

Страница 26: ...g Installation steps Connect a suitable hose tightly to the caliper bleed screw Then place the other end of this hose into an open container Loosen the caliper bleed screw and push the piston into the caliper by your finger Tighten the caliper bleed screw Caliper bleed screw 6 Nm 0 6 m kg 4 3 ft lb Install the brake pad new and pad spring new NOTE The arrow mark on the pad spring must point in the...

Страница 27: ... FLUID INSPEC TION section in the CHAPTER 3 LOWER level line 7 Check Brake lever operation A softy or spongy filling Bleed brake system Refer to the Al R BLEEDING section in the CHAPTER 3 3 Remove e Retaining bolts 16 Rear brake 1 Remove Seat 2 Remove Bolts brake caliper ...

Страница 28: ...Pad shims Pad spring Brake pads with shims Installation steps Connect a suitable hose tightly to the caliper bleed screw Then place the other end of this hose into an open container Loosen the caliper bleed screw and push the piston into the caliper by your finger Tighten the caliper bleed screw Caliper bleed screw 6 Nm 0 6 m kg 4 3 ft lb Install the brake pads new pad spring new and pad shims new...

Страница 29: ...rake caliper Bolts brake caliper 35 Nm 3 5 rn kg 25 ft lb 8 Inspect Brake fluid level Refer to the BRAKE FLUID INSPEC TION section in the CHAPTER 3 LOWER level line 9 Check Brake pedal operation A softy or spongy filling Bleed brake system Refer to the AIR BLEEDING section in the CHAPTER 3 10 Install Seat 18 ...

Страница 30: ...ke fluid Securely support the motorcycle so there is no danger of it falling over Front brake 1 Remove 0 Cover 0 Reflector 0 Retaining clips Retaining pins Pad spring Brake pads Refer to the BRAKE PAD REPLACE MENT section 2 Remove Union bolt Copper washers Brake hose Place the open hose end into a container and pump the old fluid out carefully 3 Remove Caliper body Do not loosen the bridge bolts 1...

Страница 31: ... with a rag Use care so that piston does not cause injury as it is expelled from the cylinder Rear brake 1 Remove Bolts brake caliper Retaining bolts Brake pads with Sims Brake spring Refer to BRAKE PAD REPLACEMENT section 2 Remove Union bolt Copper washers Brake hose Place the open hose end into a container and pump the old fluid out carefully 3 Remove Pistons 0 Dust seals 0 Piston seals Do not l...

Страница 32: ...pelled from the cylinder MASTER CYLINDER DISASSEMBLY NOTE Before disassembling the front or rear brake master cylinders drain the brake hose master cylinder brake caliper and reservoir tank of their brake fluid Securely support the motorcycle so there is no danger of it falling over Front brake 1 Remove Brake lever I Brake switch 2 Remove Union bolt Copper washer Brake hose Place the open hose end...

Страница 33: ...at Side cover right 2 Remove Cotter pin Washer ePin I 3 Disconnect Reservoir hose Place the open hose end into a container and pump the old fluid out carefully 4 Remove Union bolt Copper washers Place the open hose end into a container and pump the old fluid out carefully 5 Remove Master cylinder 6 Remove Dust boot 0 Circlip Push rod Master cylinder kit 22 ...

Страница 34: ...uid only Do not use solvents will cause seals to swell and distort a L 1 Inspect Caliper pistons iJ Scratches Rust Wear Replace I Caliper cylinders Wear Scratches Replace Front Rear Replace the piston seal and dust seal whenever a caliper is disassembled 2 Inspect Caliper body Cracks Damage Replace 0il delivery passage caliper body 3 il Blow out with compressed air J I s m F r o n t Rear 23 ...

Страница 35: ...ks Damage Replace Oil delivery passage master cylinder body Blow out with compressed air I F r o n t Et1 Rear 4 Inspect Master cylinder kit Scratches Wear Damage f Replace Front m Rear 5 Inspect Diaphragm front Diaphragm rear Wear Damage Replace Reservoir tank Cracks Damage Replace j F r o n t Rear 24 ...

Страница 36: ...mage Replace Front Bl Rear 7 Measure Brake pads thickness Out of specification Replace Wear limit 0 5 mm 0 02 in NOTE Replace the pad spring as a set if pad replace ment is required Replace the pads as a set if either if found to be worn to the wear limit 25 ...

Страница 37: ...led Securely support the motorcycle so there is no danger of it falling over Brake fluid DOT 4 If DOT 4 is not available 3 can be used Front brake 1 Install Piston seals 0 Dust seals Pistons Always use new piston seal and dust seal 2 Install Brake pads Pad spring 0 Retaining pins 0 Retaining trips Cover Refer to the BRAKE PAD REPLACE MENT section 3 Install Brake caliper Reflector Bolts brake calip...

Страница 38: ... 0 lightly touch the brake pipe with the projec tion on brake caliper Proper hose routing is essential to insure safe motorcycle operation Refer to CABLE ROUTING Always use new copper washers 5 Install Master cylinder kit 0 Circlip Dust boot 6 Install Master cylinder NOTE Tighten first the upper bolt then the lower bolt Bolts master cylinder bracket 9 Nm 0 9 m kg 6 5 ft lb 27 ...

Страница 39: ...id DOT 4 If DOT 4 is not available 3 can be used Brake fluid may erode painted surfaces or plastic parts Always clean up spilled fluid immediately Use only the designated quality brake fluid otherwise the rubber seals may deteriorate causing leakage and poor brake performance Refill with the same type of brake fluid mixing fluids may result in a harmful chemical reaction and lead to poor performan...

Страница 40: ...ection in the CHAPTER 3 12 Inspect Brake fluid level Fluid lever is under LOWER level line Replenish Refer to the BRAKE FLUID INSPEC TION section in the CHAPTER 3 Rear brake 1 Install 0 Piston seals iJ Dust seals aPistons 2 Install Pad spring Brake pads with shims Retaining bolts Retaining bolts 10 Nm 1 0 m kg 13 ft lb Refer to the BRAKE PAD REPLACE MENT section 29 ...

Страница 41: ...iper 35 Nm 3 5 m kg 25 ft lb 4 Install Master cylinder kit Push rod 0 Circlip Dust boot 5 Install Master cylinder assembly Bolts master cylinder assembly 35 Nm 3 5 m kg 25 ft lb 6 Install OPin 0 Plain washer Cotter pin Always use new cotter pin 7 Install Reservoir tank ...

Страница 42: ... the brake pipe with the projections on the caliper and master cylinder Master cylinder Bl Brake caliper aProper hose routing is essential to insure safe motorcycle operation Refer to the CABLE ROUTING Always use new copper washers Brake hose Brake hose guide 9 Fill Brake fluid Brake fluid may erode painted surfaces or plastic parts Always clean up spilled fluid immediately 3l ...

Страница 43: ...der when refilling Water will significantly lower the boiling point of the fluid and may result in vapor lock IO Install Diaphragm Bush Reservoir tank cap 11 Air bleed Brake system Refer to the AIR BLEEDING in the CHAPTER 3 12 Inspect Brake fluid level Fluid level is under LOWER level line Replenish Refer to the BRAKE FLUID INSPEC TION section in the CHAPTER 3 13 Adjust Rear brake pedal height Ped...

Страница 44: ... PINS l 3 BEARINGS AND OIL SEALS l 3 CIRCLIPS l 3 SPECIAL TOOLS l 4 FOR TUNE UP 1 4 FOR ENGINE SERVICE l 5 FOR CHASSIS SERVICE 1 B FOR ELECTRICAL COMPONENTS l 9 CHAPTER 2 SPECIFICATIONS SPECIFICATIONS 2 l GENERAL SPECIFICATIONS 2 l MAINTENANCE SPECIFICATIONS 2 4 ENGINE 2 4 CHASSIS 2 11 ELECTRICAL 2 14 GENERAL TORQUE SPECIFICATIONS 2 16 DEFINITION OF UNITS 2 16 LUBRICATION POINT AND GRADE OF LUBRIC...

Страница 45: ...OIL REPLACEMENT 3 23 ENGINE OIL FILTER REPLACEMENT 3 24 CLUTCH ADJUSTMENT 3 26 AIR FILTER CLEANING 3 27 CARBURETOR JOINT INSPECTION 3 27 FUEL LINE INSPECTION 3 27 CRANKCASE VENTILATION HOSE INSPECTION 3 28 EXHAUST SYSTEM INSPECTION 3 28 COOLANT LEVEL INSPECTION 3 29 COOLANT REPLACEMENT 3 29 CHASSIS 3 32 FRONT BRAKE ADJUSTMENT 3 32 REAR BRAKE ADJUSTMENT 3 32 BRAKE FLUID INSPECTION 3 33 BRAKE PAD IN...

Страница 46: ... 4 ENGINE REMOVAL 4 5 ENGINE DISASSEMBLY 4 7 CYLINDER HEAD COVER CAMSHAFT AND CYLINDER HEAD 4 7 CYLINDER AND PISTON 4 10 STARTER CLUTCH 4 12 CLUTCH 4 13 A C MAGNETO 4 14 WATER PUMP 4 15 OIL PUMP AND SHIFT SHAFT 4 16 OIL PAN AND OIL STRAINER 4 17 STARTER MOTOR 4 18 CRANKCASE DISASSEMBLY 4 18 TRANSMISSION SHIFTER AND SHIFT CAM 4 19 CRANKSHAFT 4 20 VALVE PAD AND VALVE 4 21 CONNECTING ROD 4 23 INNER R...

Страница 47: ...AND ADJUSTMENT 4 49 INNER ROTOR OIL PUMP 4 49 CONNECTING ROD 4 49 CRANKSHAFT 4 50 VALVE PAD AND VALVE 4 51 CRANKCASE 4 54 TRANSMISSION 4 55 TRANSMISSION SHIFTER AND SHIFT CAM 4 56 CRANKCASE ASSEMBLY 4 57 STARTER MOTOR 4 59 OIL PAN AND OILSTRAINER 4 59 OIL PUMP AND SHIFT SHAFT 4 60 A C MAGNETO 4 61 CLUTCH 4 6 3 STARTER CLUTCH 4 65 PISTON AND CYLINDER 4 67 CYLINDER HEAD AND CAMSHAFT 4 70 CAM CHAIN T...

Страница 48: ...EMOVAL 5 7 lNSPECTlON 5 9 INSTALLATION 5 10 CHAPTER 6 CARBURETOR CARBURETOR 6 l SECTIONVIEW 6 2 REMOVAL 6 3 DISASSEMBLY 6 5 INSPECTION 6 6 ASSEMBLY 6 B INSTALLATION 6 9 i ADJUSTMENT 6 10 CHAPTER 7 CHASSIS FRONT WHEEL 7 l REMOVAL 7 2 INSPECTION 7 2 INSTALLATION 7 4 REAR WHEEL 7 7 REMOVAL 7 B INSPECTION 7 B INSTALLATION 7 9 ...

Страница 49: ...AL 7 2 9 DISASSEMBLY 7 30 lNSPECTlON 7 3 1 ASSEMBLY 7 32 INSTALLATION 7 34 STEERING HEAD AND HANDLEBAR 7 36 REMOVAL 7 3 8 lNSPECTlON 7 4 1 INSTALLATION 7 42 REAR SHOCK ABSORBER AND SWINGARM 7 47 HANDLING NOTES 7 49 DISPOSAL NOTES 7 49 REMOVAL 7 4 9 lNSPECTlON 7 5 2 INSTALLATION 7 54 DRIVE CHAIN AND SPROCKET 7 56 REMOVAL 7 5 6 INSPECTION AND CLEANING 7 56 INSTALL ATION 7 57 ...

Страница 50: ... 8 13 TROUBLESHOOTING 8 14 ELECTRIC STARTING SYSTEM 8 21 CIRCUIT DIAGRAM 8 21 STARTING CIRCUIT OPERATION 8 23 TROUBLESHOOTING 8 24 STARTER MOTOR 8 30 CHARGING SYSTEM 8 33 CIRCUITDIAGRAM 8 3 3 TROUBLESHOOTING 8 35 LIGHTING SYSTEM 8 39 CIRCUIT DIAGRAM 8 39 TROUBLESHOOTING 8 41 LIGHTING SYSTEM CHECK 8 44 SIGNALSYSTEM 8 49 CIRCUIT DIAGRAM 8 49 TROUBLESHOOTING 8 51 SIGNAL SYSTEM CHECK 8 53 COOLING SYST...

Страница 51: ... 9 TROUBLESHOOTING STARTING FAILURE HARD STARTING 9 l POOR IDLE SPEED PERFORMANCE 9 3 POOR MEDIUM AND HIGH SPEED PERFORMANCE 9 4 FAULTY GEAR SHIFTING 9 4 CLUTCH SLIPPING DRAGGING 9 5 OVERHEATING OR OVER COOLING I 9 6 FAULTY BRAKE _ 9 7 FRONT FORK OIL LEAKAGE MALFUNCTION 9 7 INSTABLE HANDLING 9 8 FAULTY SIGNALS AND LIGHTS 9 9 FAULTY EXUP For California only 9 l 0 ...

Страница 52: ...umber is used to identify your motorcycle and may be used to register your motorcycle with the licensing authority in your state ENGINE SERIAL NUMBER The engine serial number is stamped into the right side of the engine FZR400U Except for California NOTE The first three digits of these numbers are for model identifications the remaining digits are the unit production number Designs and specificati...

Страница 53: ...all parts and place them in trays in the order of disassembly This will speed up assembly time and help assure that all parts are correctly reinstalled 5 Keep away from fire ALL REPLACEMENT PARTS 1 Use only genuine Yamaha parts for all re placements Use oil and or grease recom mended by Yamaha for assembly and adjust ment Other brands may be similar in func tion and appearance but inferior in qual...

Страница 54: ...s the stamped letters must be on the side exposed to view When installing oil seal s apply a light coating of light weight lithium base grease to the seal lip s Oil the bearings libe rally when installing Oil seal Do not use compressed air to spin the bearings dry This causes damage to the bearing surfaces Bearing CIRCLIPS 1 All circlips should be inspected carefully be fore reassembly Always repl...

Страница 55: ...tools or impro vised techniques FOR TUNE UP 1 Inductive Tachometer P N W 08036 This tool is needed for detecting engine rpm 2 Inductive Timing Light P N Y U 08037 This tool is necessary for checking ignition timing 3 Compression Gauge P N YU 33223 This gauge is used to measure the engine com pression 4 Fuel Level Gauge P N YU 01312 This gauge is used to measure the fuel level in the float chamber ...

Страница 56: ... Cutter P N Y M 01 112 This tool is used when cutting the cam chain 2 Piston Pin Puller P N YU 01304 This tool is used to remove the piston pin 3 Universal Clutch Holder P N YM 91042 This tool is used to hold the clutch when re moving or installing the clutch boss locknut 4 Rotor Puller P N YM 01080 This tool is used to remove the rotor 1 5 ...

Страница 57: ...Puller P N Y U 33270 This tool is used to remove the starter clutch 7 Camshaft Wrench P N YM 04115 This tool is used to turn the camshaft 8 Valve Spring Compressor P N YM 04019 Attachment P N YM 04114 This tool is needed to remove and install the valve assemblies 9 Valve Guide l emover 4 5 mm P N YM 04116 This tool is used to remove the valve guides I 6 ...

Страница 58: ... tool is used to rebore the new valve guide 12 Valve Seat Cutter P N YM 91043 This tool is needed to resurface the valve seat 13 Plastigage Set Green P N YU 33210 This gauge is needed to measure the clearance for the connecting rod bearing and the crank shaft bearing 14 Quick Gasket P N ACC I 1001 05 01 This sealant Bond is used for crankcase mating surfaces etc 1 7 ...

Страница 59: ...ecking the cooling system FOR CHASSIS SERVICE I T Handle P N YM 01326 Front Fork Cylinder Holder P N YM 01300 1 This tool is used to loosen and tighten the front fork damper rod holding bolt 2 Front Fork Seal Driver weight P N YM 33963 Adapter 38 mm P N YM 01372 These tools are used when installing the fork seat 3 Ring Nut Wrench P N Y U 33975 This tool is used to loosen and tighten the steer ing ...

Страница 60: ...R ELECTRICAL COMPONENTS 1 Dynamic Coil Tester P N Y M 34487 This tester is necessary for checking the ignition system components 2 Pocket Tester P N Y U 031 12 This instrument is invaluable for checking the electrical system l 9 ...

Страница 61: ...ge With Oil Filter Replacement Total Amount Coolant Total Amount Including All Routes 4ir Filter FZf 400U FZR400SUC 3BF FZR400U 3FH FZR400SUC JYA3FHCO JAOOOlOl JYA3BFEO JAOOOlOl 3BF 000101 FZR400U 3FH 000101 FZR400SUC 2 070 mm 81 5 in 690 mm 27 2 in 1 125 mm 44 3 in 785 mm 30 9 in 1 400 mm 55 1 in 135 mm 5 31 in 186 kg 410 lb FZR400U 189 kg 417 lb FZR400SUC 3 100 mm 122 in Liquide cooled 4stroke g...

Страница 62: ...4 MIKUNI CR8E NGK U24ESR N N D 0 7 0 8 mm 0 028 0 032 in Wet multiple disc Spur gear 89 41 2 170 Chain drive 55 19 2 894 Constant mesh 6 speed Left foot operation 43 l 3 3 307 40 18 2 222 36 21 1 714 33123 1 434 28 22 1 272 1 27 23 1 173 Double cradle 24 89 mm 3 5 in Front Rear Tubeless Tubeless 110 70R17 53H 140 60 R 18 64H BRIDGESTONE BRIDGESTONE CY ROX 03 CY ROX 04 DUNLOP DUNLOP K455F K455 156 ...

Страница 63: ...e Light Rear Flasher Light Front Position Light Front Flasher Light License Light Meter Light Auxiliary Light Indicator Light Wattage x Quantity NEUTRAL HIGH BEAM TURN 01 L LEVEL FZR400U FZR400SUC Dual disc brake Right hand operation Single disc brake Right foot operation Telescopic fork Swingarm New monocross Coil spring Oil damper Coil gas spring Oil damper 130 mm 5 12 in 130 mm 5 12 in T C I Di...

Страница 64: ... 23 000 23 021 mm 0 9055 0 9063 ir 22 967 22 980 mm 0 9042 0 9047 ir 0 020 0 054 mm 0 0008 0 0021 in 0 08 mm 0 0031 in 32 55 32 65 mm 1 2815 1 2854 in 32 51 mm 1 2799 in 25 045 25 145 mm 0 986 0 990 in 25 005 mm 0 9844 in 32 25 32 35 mm 1 2697 1 2736 in 32 21 mm 1 2681 in 25 0 25 1 mm 0 9843 0 9882 in 24 96 mm 0 9827 in zamshaft Runout Limit 0 03 mm 0 0012 in Cam Chain Type No of Links Cam Chain A...

Страница 65: ...762 0 1768 in EX 4 460 4 475 mm 0 1756 0 1762 in IN 4 45 mm 0 175 in EX 4 435 mm 0 175 in IN 4 500 4 512 mm 0 1772 0 1776 in EX 4 500 4 512 mm 0 1772 0 1776 in IN 4 542 mm 0 179 in EX 4 542 mm 0 179 in IN 0 010 0 037 mm 0 0004 0 0015 in EX 0 025 0 052 mm 0 001 0 002 in IN 0 08 mm 0 0031 in EX 0 1 mm 0 0039 in 0 02 mm 0 0008 in i Valve Seat Width IN 0 9 1 l mm 0 0354 0 0433 in EX 0 9 1 l mm 0 0354 ...

Страница 66: ...r LAB B 0 8 mm 0 0315 in T 2 1 mm 0 0827 in Oil Ring Expander IL B 2 0 mm 0 0787 in T 2 2 mm 0 0866 in End Gap Installed Top Ring 0 15 0 30 mm 0 0059 0 0118 in 2nd Ring 1 0 15 0 30 mm 0 0059 0 0118 in Oil Ring 0 2 0 8 mm 0 0079 0 0315 in Side Clearance Top Ring 0 03 0 07 mm 0 0012 0 0028 in Limit 0 10 mm 0 004 in 2nd Ring 0 02 0 06 mm 0 0008 0 0024 in Limit 0 10 mm 0 004 in Oil Ring zonnecting Rod...

Страница 67: ...osition J N Needle Jet N J Pilot Jet P J Pilot Outlet Size P O Pilot Air Jet P A J Pilot Screw P S Valve Seat Size V S Starter Jet G Sl G Sz Bypass 1 B P 1 Bypass 2 B P 2 Throttle Valve Size Th V Fuel Level F L FZ R400U FZR400SUC 0 025 0 043 mm 0 0010 0 0017 in 1 Blue 2 Black 3 Brown 4 Green 5 Yellow 2 9 3 1 mm 0 114 0 122 in x 8 2 8 mm 0 11 in 1 8 2 2 mm 0 072 0 085 in x 7 0 1 mm 0 04 in 0 1 mm 0...

Страница 68: ...ing Pressure Reservoir Tank Capacity To Full level Water Pump Type Reduction Ratio FZR400U FZR400SUC Paper Trochoid pump 0 09 0 15 mm 0 0035 0 0060 in 0 2 mm 0 008 in 0 03 0 08 mm 0 0012 0 0031 in 0 15 mm 0 006 in 80 1 2 0 kPa 0 8 1 2 kg cm 11 38 17 06 psi 450 550 kPa 4 5 5 5 kg cm 63 99 78 21 psi 325 mm 12 8 in 160 mm 6 3 in 32 mm 1 26 in 74 103 kPa 0 75 1 05 kg cm 10 7 14 9 psi 0 28 L 0 25 Imp q...

Страница 69: ...0SUC Lubrication chart 4 Pressured feed Splashed M Nozzle Main journal bearing 1 Main journal bearing Oil pan Crankcase lightening Sequence Crankcase Upper Crankcase Lower O O 8 mm Bolt 24 Nm 2 4 m kg 17 ft lb 86mm Bolt 12 Nm 1 2 m kg 8 7 ft Ib 2 9 ...

Страница 70: ...olt Cap bolt Bolt Flange bof Bolt Flange bol Bolt Bolt Bolt Screw Screw Bolt Bolt Bolt Bolt Nut Bolt Bolt lange boll Ilange boll Screw Bolt Bolt Bolt Bolt Bolt lange bolt Screw Bolt Nut Screw Nut Nut lange bolt Bolt Bolt Screw Bolt Screw lange bolt Threat size Q Q Tightening torque Nm M6 24 10 M8 12 25 Ml0 4 13 M6 8 10 Ml2 6 37 M6 3 7 M7 8 23 M7 4 24 M6 2 10 M6 2 10 Ml1 1 20 M6 6 10 M6 1 10 M6 2 1...

Страница 71: ...k spring Oil Grade Yamaha Fork Oil IOWT or equivalent Rear Suspension Shock Absorber Travel 50 mm I 97 in Spring Free Length 196 5 mm 7 74 in Limit 186 5 mm 7 34 in Fitting Length 174 mm 6 85 in Spring Rate Kl 98 1 N mm IO kg mm 560 lb in Stroke Kl 0 50 mm 0 0 1 97 in Optional Spring No Hard S T D S o f t Adjusting 7 6 5 4 3 2 1 position Swingarm Free Play Limit End 1 O mm 0 04 in Side 1 O mm 0 04...

Страница 72: ...e 15 87 mm 0 62 in 42 85 mm 1 69 in DOT 4orDOT 3 Single Disc Outside Diameter x Thickness 210 x 5 mm 8 27 x 0 20 in Pad Thickness Inner 5 5 mm 0 22 in Limit 0 5 mm 0 02 in Pad Thickness Outer 5 5 mm 0 22 in Limit 0 5 mm 0 02 in 4 I Master Cylinder Inside Diameter Caliper Cylinder Inside Diameter Brake Fluid Type Clutch Lever Clutch Lever Free Play 14 0 mm 0 55 in 38 18 mm 1 5 in DOT 4 or DOT 3 10 ...

Страница 73: ...55 5 5 40 Rear Lower MlOx 1 25 45 4 5 3 2 Down Tube and Frame Front MlOx 1 25 60 6 0 43 Rear MB x 1 25 33 3 3 24 Footrest Bracket and Frame MB x 1 25 28 2 8 20 Pivot Axle and Nut M14x 1 5 90 9 0 65 Relay Arm and Frame MlOx 1 25 40 4 0 29 Arm and Swingarm MlOx 1 25 40 4 0 29 Arm and Relay Arm MlOx 1 25 40 4 0 29 Swingarm and Frame Ml0 x 1 25 40 4 0 2 9 Rear Shock Absorber Ml0 x 1 25 40 4 0 29 Footr...

Страница 74: ...ufacturer Nominal Output Stator Coil Resistance Voltage Regulator Type Model Manufacturer No Load Regulated Voltage Battery Capacjty Specific Gravity FZR400U FZR400SUC 12v IO at 1 300 r min 48 at 6 500 r min 3BF 38 at 3 500 r 3FI i Electrical 3FH 0 1 2 3 4 5 6 7 8 9 1 0 1 1 1 2 1 Engine Speed x IO3 r min 85 115s2 at 20 C 68 F White Red White Black TID14 53A HITACHI 3BF TIDl4 63A HITACHI 3FH CM12 3...

Страница 75: ...FX257N NIPPON DENS0 Self Cancelling Device Yes Flasher Frequency 60 120 cycle min Wattage 27W x 2 pcs 3 4W sidestand Relay Model Manufacturer G4MW l12lT 010 Y17 OMRON Coil Winding Resistance 67 5 82 5R at 20 C 68 F Diode No 3il Level Switch Model Manufacturer 1 WG NlPPON DENS0 starting Circuit Cut Off Relay Model Manufacturer G4MW OMRON Coil Winding Resistance 67 5 82 5s2 at 20 C 68 F Diode No uel...

Страница 76: ...hreads Components should be at room temperature A Distance across Hats B Outside thread diameter DEFINITION OF UNITS NAut General torque specifications Nm m kg ft lb 10 mm 6mm 6 0 6 4 3 12mm 8mm 15 1 5 11 14 mm 10 mm 30 3 0 22 17 mm 12 mm 55 5 5 40 19 mm 14mm 85 8 5 61 22 mm 16 mm 130 13 0 94 Unit Read Definition Measure mm millimeter 10e3 meter Length cm centimeter lo meter Length kg kilogram lo3...

Страница 77: ...al Connecting rod bolt Nut Camshaft cam lobe Journal Valve stem IN EX Valve stem end IN EX Valve lifter Water pump impeller shaft Oil pump rotor Inner Outer housing Oil strainer assembly Idle gear surface Bearing Starter idle gear Starter idle gear shaft Primary driven gear Transmission gear Wheel Pinion Axe Main Drive Push lever assembly Push rod Shift cam Shift fork Guide bar Shift shaft assembl...

Страница 78: ...Clutch hub oil seal Clutch hub fitting area Rear brake pedal shaft Change pedal Side stand sliding surface Tube guide Throttle grip inner surface Brake lever bolt sliding surface Clutch lever bolt sliding surface Rear shock absorber Upper Lower Swingarm pivot bearing Pivot shaft Arm bearing Thrust cover Inner Swingarm bearing Inner Rear footrest ball Rear footrest pin 2 18 ...

Страница 79: ...LUBRICATION DIAGRAM ISPEC l LUBRICATION DIAGRAM Oil filter Oil strainer Oil pump ...

Страница 80: ...COOLANT DIAGRAM p Ql COOLANT DIAGRAM Radiator Water pump Thermostat housing Thermostatic valve Radiator cap Q 5 2 20 ...

Страница 81: ...CABLE ROUTING pqj q CABLE ROUTING I Band Throttle cables Brake hose Clutch cable h Insert the clutch cable into the frame inner hole 2 21 ...

Страница 82: ...CABLE ROUTING bpEcl p91 CABLE ROUTING 2 Brake hose Clamp m Pass the handlebar switch lead Left behind the inner tube I To headlight unit a To flasher light Left a To flasher light Right ...

Страница 83: ...CABLE ROUTING CABLE ROUTING 3 2 24 ...

Страница 84: ...fornia only To handlebar switch Left To clutch lever Pass the speedometer cable outside the inner tube To air filter case To fuel tank To fuel pump Pass the sidestand switch lead inside the water pipe To oil lever gauge Get these cords together put them in the recess on the left inside of the frame and place the cover on them Fasten the lead and the rectifier regulator together Fasten the lead und...

Страница 85: ...CABLE ROUTING bPECl j 39I CABLE ROUTING 4 2 26 ...

Страница 86: ...Fuel hose air vent hose on the side of the l and 2 cylinders and clamp this hose together with the carburetor Water pipe air vent hose on the side of the 3 and 4 cylinders Breather hose Fuel tank Then let these hoses go down in front of the starter I Rear brake reservoir tank motor Rear brake switch To fuel pump Rear brake switch lead m Pass breather hose Fuel tank Breather hose Recovery Rear brak...

Страница 87: ...CABLE ROUTING ISPEC l CABLE ROUTING 5 2 28 ...

Страница 88: ...Therm0 unit Relay assembly Exup servo motor For California only Exup control unit For California only To fuel pump Pass the starter motor lead under the starter motor Pass on the inside of the water pipe the carburetor air vent hose on the side of the I and 2 cylinders and clamp this hose together with the carburetor air vent hose on the side of the 3 and 4 cylinders Then let these hoses go down i...

Страница 89: ... 1 xx 2 XX 3 IO Item 1 000 km 7 000 km 13 000 km 19 000 km 25 000 km 31 000 kr or or or or or or 1 month 7 months 13 months 19 months 25 months 31 month 6 0 0 mi 4 400mi 8 200mi 12 OOOmi 15 800mi 19 600m I Valve Check and adjust valve clearance when engine is 0 clearance cold Check condition Adjust Spark gap ahd clean Replace at Plug 13 000 km or 13 months 0 Replace 0 Replace 0 and thereafter ever...

Страница 90: ...be or SAE 1 OW30 motor oil Yamaha chain and cable lube or SAE 1 OW30 motor oil Remarks Engine oil Warmup engine before draining Oil filter Air filter Cooling system Brake system Drive chain Replace Clean with compressed air Replace if necessary Check hose for cracks or damage replace if necessary Replace coolant 24 months Adjust free play Replace pads if necessary Check chain condition Adjust and ...

Страница 91: ...ness 3 Steering Moderately weight wheel 0 0 0 Repack 0 bearing repack every bearing 24 000 km grease 15 000 mi Check bear 4 Wheel ings for 0 0 0 0 0 bearings smooth rotation Check speci fic gravity 1 5 Battery and breather 0 0 0 0 0 pipe forpro per operation Check and 16 Sidestand clean or 0 0 0 0 0 0 switch replace if necessary d I If ambient temperature does not go below 5 C 41yF 2 If ambient te...

Страница 92: ...COWLINGS REMOVAL AND INSTALLATION COWLING REMOVAL AND INSTALLATION REMOVAL 1 Remove Lower cowling Left 2 Remove Lower cowling Right 3 Remove Center cowling Left 4 Remove Center cowling Right ...

Страница 93: ...5 Remove Rear view mirrows Left and right 9 Remove 0 Upper cowling ...

Страница 94: ... the lock and turn it clockwise 11 Remove Top cover INSTALLATION Reverse the REMOVAL procedure Note the following points 1 install Seat NOTE Make sure that the seat is securely fitted When reinstalling the seat insert the lobes on the seat front into the receptacles on the frame then push down the seat 3 6 ...

Страница 95: ...8 4 Check Alignment mark Not aligned Adjust EXUP cables 5 Adjust EXUP cables Adjustment steps Loosen both locknuts and turn in both adjuster Insert a 4 mm 0 16 in pin through the aligning indent in the pulley and into the hole Turn both adjusters counterclockwise so that the cables free play becomes Zero mm Zero in with fingers Turn both adjuster l 2 turn clockwise Tighten the locknuts Locknuts 8 ...

Страница 96: ...E Measure and adjust valve clearance when piston is at TDC on compression stroke REMOVAL 1 Remove Lower cowlings Left and Right Center cowlings Left and Right Seat Refer to the COWLING REMOVAL AND INSTALLATION REMOVAL section 2 Remove Fuel tank Refer to the C A R B U R E T O R R E MOVAL section in the CHAPTER 6 3 Place a drain pan under the drain bolts 4 Remove Drain bolt Outlet pipe Drain bolt Cy...

Страница 97: ...Disconnect Hose Radiator Inlet Hose Radiator Outlet 9 Remove Radiator 10 Remove Spark plug leads Cylinder head cover Generator cover Valve Clearance Measurement 1 Measure 0 Valve clearance Valve clearance measurement steps Turn the crankshaft counterclockwise Align the T mark on the magneto with the crankcase end when l piston is at TDC on compressionstroke 3 9 ...

Страница 98: ...alve Cold 0 21 0 30 mm 0 008 0 012 in Record the measured amount if the clearance is incorrect Measure the valve clearance in sequence for 2 4 and 3 cylinders Out of specification Adjust valve clearance Firing Sequence 1 2 4 3 8 Front NOTE Turn crankshaft each degrees counterclock wise from l Cylinder TDC Crankshaft counterclockwise turning angle Cylinder Combustion Adjusting Pad Replacement 1 Rem...

Страница 99: ...ace a piece of rug in the cam chain room to prevent the pad from falling into the crankcase Remove the rug after adjustment 3 Select Proper pad Proper pad selection steps Select the proper pad from the table Pad range Pad Availability 25 increments No 120 1 20 mm 0 047 in Pads stepped in No 240 2 4 mm id 094 in p 05 mm 0 002 in Increments NOTE Thickness of each pad is marked on the pad side wall R...

Страница 100: ...nates intersect is the new pad number NOTE Use the new pad number as a guide only as the number must be verified 4 Install Pad New 5 Install aValve lifter NOTE Apply molybdenum disulfide grease to the pad Valve lifter must be rotated smoothly by a finger 5 Install Camshafts Cam chain a Camshaft caps Bolts Camshaft Cap 10 Nm 1 0 me kg 7 2 ft lb1 NOTE Install the exhaust camshaft first Align the mat...

Страница 101: ...e is 0 24 mm 0 009 in Replace 170 pad with 180 pad EXHAUST i0 155 160 1651170 175 180 185 190 195 200 205 210 215 roll75 180118511901195 200 205 210 215 220 225 230 23E ZOO 205 210 215 220 225 230 235 1240 512001205 210 215 220 225 230 235 2401 195 200 205 210 215 2x0 2 5 230 235 240 VALVE CLEARANCE cold 0 21 0 30 mm 0 008 0 012 in Example installed is 175 Measured clearance is 0 35 mm 0 014 in Re...

Страница 102: ...lve clearance Valve clearance verification steps Follow the valve clearance measurement steps If the clearance is incorrect repeat all Adjusting Pad Replacement steps until the proper clearance is obtained INSTALLATION Reverse the REMOVAL procedure Note the following points 1 Install Cam chain tensioner NOTE Install the cam chain tensioner with the UP mark facing upward Bolts Cam Chain Tensioner I...

Страница 103: ...0 m kg 7 2 ft lb I 5 Install Cylinder head cover Bolts Cylinder Head Cover 10 Nm 1 0 m kg 7 2 ft lb 6 Fill Cooling system Coolant Total Amount Including All Routes 1 9 L 1 7 Imp qt 2 0 US qt CARBURETOR SYNCHRONIZATION Carburetors must be adjc sted to open and close simultaneously Valve clearance must be set properly before synchronizing the carburetors 3 15 ...

Страница 104: ...Vacuum gauge Sub tank Vacuum Gauge P N Y U 08030 5 Start the engine and let it warm up 6 Adjust Idle speed Turn the throttle stop screw Turn in Engine speed is increased Turn out Engine speed is decreased Idle Speed 1 250 1 350 r min I 7 Adjust carburetors synchronization Carburetor synchronization adjustment steps Lift up the front of fuel tank synchronize carburetor No 1 to carbure tor No 2 by t...

Страница 105: ...3 by turning synchronizing screw until both gauges read the same Repeat the same steps to synchronize No 2 carburetor to No 3 carburetor by turn ing synchronizing screw until both gauges read the same 8 Adjust Idle speed 9 Install 0 Vacuum plug Fuel tank 0 Seat Center cowlings IDLE SPEED ADJUSTMENT 1 Start the engine and let it warm up 2 Inspect Idle speed Out of specification f Adjust Idle Speed ...

Страница 106: ...r filter case Refer to the CARBURETOR REMO VAL section in the CHAPTER 6 Loosen the locknut Throttle cable 1 Turn the adjuster Throttle cable 1 clockwise or counterclockwise until proper free play Throttle grip is attained I Throttle cable 2 Throttle Cable Free Play Tighten the locknut If the free play is incorrect adjust the throttle cable free play with the adjuster Throttle grip side Loosen the ...

Страница 107: ...of free play at the throttle cable length adjuster Throttle grip SPARK PLUG INSPECTION 1 Inspect Electrode Wear Damage t Replace Insulator color Normal condition is a medium to light tan color Distinctly different color Check the engine condition Spark plug gap 2 Clean Spark plug Clean the spark plug with a spark plug cleaner or wire brush 3 Inspect Spark plug type Incorrect4 Replace Standard Spar...

Страница 108: ... not available when you are installing a spark plug a good estimate of the cor rect torque is l 4 to l 2 turns part finger tight Have the spark plug torqued to the correct value as soon as possible with a torque wrench IGNITION TIMING CHECK 1 Remove 0 Lower cowling Left Center cowling Refer to the COWLING REMOVAL AND INSTALLATION REMOVAL section 2 Remove Generator cover 3 Connect Timing light To t...

Страница 109: ...to Out of firing range Check pickup as sembly NOTE Ignition timing is not adjustable 6 Install Generator cover COMPRESSION PRESSURE MEASUREMENT NOTE Insufficient compression pressure will result in performance loss 1 Measure 0 Valve clearance Out of specification f Adjust Refer to the VALVE CLEARANCE AD JUSTMENT section 2 Warm up the engine 3 Remove Spark plugs 4 Remove 0 Lower cowling Left Center...

Страница 110: ...1 150 kPa 11 5 kg cm 164 psi When cranking the engine ground spark plug lead to prevent sparking Repeat the previous steps for the other cylinders If pressure falls bellow the minimum level 1 Squirt a few drops of oil into the affected cylinder 2 Measure the compression again Compression Pressure with oil introduced into cylinder Reading Higher than without oil Diagnosis Worn or damaged pistons VO...

Страница 111: ...between maximum and minimum marks Low oil level f Add oil to proper level NOTE Wait a few minutes until level settles before inspecting Recommended Engine Oil At 5 C 40 F or Higher Yamalube 4 cycle oil or SAE 2OW40 Type SE Motor Oil At 15 C 60 F or Lower SAE lOW30 Type SE Motor Oil ENGINE OIL REPLACEMENT 1 Warm up the engine for serveral minutes 2 Place a drain pan under the engine 3 Remove 0 Lowe...

Страница 112: ...SE Motor Oil At 15 C 60 F or Lower SAE lOW30 Type SE Motor Oil 8 Install 0 Oil filler cap ENGINE OIL FILTER REPLACEMENT 1 Remove Lower cowlings Left and right Refer to the COWLING REMOVAL AND INSTALLATION REMOVAL section 2 Warm up the engine for several minutes 3 Remove Cowling stays Left and right Exhaust pipe Refer to the E N G I N E R E M O V A L MUFFLER ASSEMBLY section in the CHAPTER 4 4 Drai...

Страница 113: ... positioned properly 9 Install 0 Oil filter cover Bolt Oil Filter Cover 15 Nm 1 5 m kg 11 ft lb I NOTE Mesh the oil filter cover projection 0 with the crankcase slot 10 Fill Crankcase With Oil Filter Replacement 2 5 L 2 2 Imp qt 2 64 US qt Il Warm up the engine for a few minutes then stop the engine 12 Observe Oil level 13 Install Center cowlings Left and right Lower cowlings Left and right 3 25 ...

Страница 114: ... the locknut Turn the adjuster in or out until the specified free play is obtained Turn in Free play is increased Turn out Free play is decreased Tighten the locknut NOTE Normally once the clutch cable length adjuster crankcase is properly set the only adjustment required is maintenance of free play at the clutch cable length adjuster handlebar lever 7 Check Clutch lever free play a 3 26 ...

Страница 115: ...lement installed excessive piston and or cylinder wear may result 3 Clean Air filter element Blow out dust in the element from the outer surface using compressed air 4 I nspect lair filter element Damage f Replace 5 Install Air filter element e Air filter case cover Top cover Seat CARBURETOR JOINT INSPECTION I Remove Fuel tank Air filter case Refer to the C A R B U R E T O R R E MOVAL section in t...

Страница 116: ...sive damage to any components is evident CRANKCASE VENTILATION HOSE INSPEC TION 1 Remove 0 Seat Top cover Refer to the COWLING REMOVAL AND I N STALLATION REMOVAL section 2 Inspect crankcase ventilation hose Cracks Damage Replace EXHAUST SYSTEM INSPECTION 1 Remove Lower cowlings Left and right Center cowlings Left and right Refer to the COWLING REMOVAL AND INSTALLATION REMOVAL section 3 28 ...

Страница 117: ...vel Add tap water Soft water Coolant reservoir tank FULL level LOW level Do not remove the radiator cap when the engine is hot A CAUTION Hard water or salt water is harmful to the engine parts use boiled or distilled water if you can t get soft water COOLANT REPLACEMENT Do not remove the radiator cap when the engine and radiator are hot Scalding hot fluid and steam may be blown out under pressure ...

Страница 118: ...t v Z7 La z e _ 2 2 i3xQsW A N D I N S T A L L A T I O N REMOVAL section 2 Place a drain pan under the drain bolts 3 Remove Drain bolt Outlet pipe Drain bolt Cylinder Radiator cap Drain the coolant NOTE Remove the drain bolts first then remove the radiator cap to prevent the coolant spilling 4 Tighten Drain bolt Cylinder Drain bolt Outlet pipe Drain Bolt Cylinder 7 Nm 0 7 m kg 5 1 ft lb Drain Bolt...

Страница 119: ...again to specified level Install the radiator cap Recommended Coolant High Quality Ethylene Glycol Anti Freeze Containing Anti Corrosion for Aluminum Engine Inhibitors Coolant and Water Mixed Ratio 50 50 Total Amount 1 9 L 1 7 Imp qt 2 0 US qt Reservoir Tank Capacity From Low to Full Level 0 28 L 0 25 Imp qt 0 30 US qt A CAUTION Hard water or salt water is harmful to the engine You may use distill...

Страница 120: ...n Proper Iever free play is essential to avoid excessive brake drag 3 Tighten Adjuster locknut REAR BRAKE ADJUSTMENT 1 Loosen Adjuster locknut 2 Adjust Brake pedal height Turn the adjuster until the brake pedal position is at the specified height Rear brake light switch Refer to the REAR BRAKE LIGHT SWITCH ADJUSTMENT section After adjusting the brake pedal height visually check the adjuster end th...

Страница 121: ...ith same type and brand of brake fluid mixing fluids could result in poor brake performance Be sure that water or other contaminants do not enter master cylinder when refilling Clean up spilled fluid immediately to avoid erosion of painted surfaces or plastic parts Rear brake fluid lower level BRAKE PAD INSPECTION 1 Activate the brake lever or brake pedal 2 Inspect Wear indicator Indicator almost ...

Страница 122: ...Cracks Damage Replace AIR BLEEDING Bleed the brake system if The system has been disassembled A brake hose has been loosened or removed oThe brake fluid is very low The brake operation is faulty A dangerous loss of braking performance may occur if the brake system is not properly bled 1 Bleed Brake system Air bleeding steps a Add proper brake fluid to the reservoir b Install the diaphragm Be caref...

Страница 123: ...emoved from the system NOTE If bleeding is difficult it may be necessary to let the brake fluid system stabilize for a few hours Repeat the bleeding procedure when the tiny bubbles in the system have dis appeared j Add brake fluid to the level line on the re servoir DRIVE CHAIN SLACK ADJUSTMENT NOTE Before checking and or adjusting the chain slack rotate the rear wheel through several revolutions ...

Страница 124: ...or proper alignment A CAUTION Too small chain slack will overload the engine and other vital parts keep the slack within the specified limits 6 Tighten Nut Rear axle Nut Rear Axle 107 Nm 10 7 m kg 77 ft lb 7 Tighten Adjuster Locknut 8 Install aCotter pin New Always use a new cotter pin on the axle nut NOTE Do not loosen the axle nut after torque tighten ing If the axle nut groove is not aligned wi...

Страница 125: ...o not use any other lubricants on the drive chain They may contain solvents that could damage the O rings Recommended Lubricant SAE 30 50 Motor Oil or Chain Lubricants Suitable for O ring Chains STEERING HEAD INSPECTION Securely support the motorcycle so there is no danger of it falling over 1 Place the motorcycle on a level place 2 Elevate the front wheel by placing a suitable stand under the eng...

Страница 126: ...at they form a right angle Install the ring nut Lower NOTE The tapered side of ring nut must faced down ward Tighten the ring nut using the Ring Nut Wrench Ring Nut Wrench P N Y U 33975 Ring Nut Initial Tightening 52 Nm 5 2 m kg 37 ft lb Loosen the ring nut completely and retighten it to specification Do not over tightening Ring Nut Final Tightening 3 Nm 0 3 rn kg 2 2 ft lb NOTE Recheck the steeri...

Страница 127: ...nd tighten the other until they are aligned 9 Install the lock washer NOTE Make sure the lock washer tab is placed in the slots Install the handle crown and tighten the steering stem nut to specification Nut Steering Stem 110 Nm 11 0 m kg 80 ft lb BTighten the pinch bolts to specification Pinch Bolt Handle Crown 20 Nm 2 0 m kg 14 ft lb 10 Install Front fork Handlebars Left and right P Nut Front Ax...

Страница 128: ...ace 3 Hold the motorcycle on upright position and apply the front brake 4 Check 0 Operation Pump the front fork up and down for several times Unsmooth operation Repair REAR SHOCK ABSORBER ADJUSTMENT The spring preload of the rear shock absorber can be adjusted to suit rider s preference weight and the course conditions 1 Adjust Spring preload Ydjustment steps DTO increase preload adjuster is turne...

Страница 129: ...sories fairing saddlebags etc if approved for this model and vehicle speed Basic weight With oil and full 186 kg 410 lb fuel tank Except for California 189 kg 417 lb For California Maximum load 156 kg 344 lb Except for California 153 kg 337 lb For California __ Cold tire pressure Front Rear Up to 90 kg 200 kPa 230 kPa I 198 lb load 2 0 kg cm 2 3 kg cm 28 psi 32 psi Load is the total weight of carg...

Страница 130: ...t is dangerous to ride with a worn out tire When a tire tread begins to show line replace the tire immediately Patching a punctured tube is not recommended If it is absolutely necessary to do so use great care and replace the tube as soon as possible with a good quality replacement Do not attempt to use tubeless tires on a wheel designed for tube type tires only Tire failure and personal injury ma...

Страница 131: ...le cables Clutch cable Starter cable Cable lubrication steps Remove the two grip ends that secure throttle to handlebar Hold cable end high and apply several drops of lubricant to cable Coat metal surface of disassembled throttle twist grip with suitable all purpose grease to minimize friction SAE lOW30 Motor Oil Lever Pedal Lubricate pivoting part of each lever and pedal SAE lOW30 Motor Oil Sides...

Страница 132: ...l to a battery 3 Connect Breather pipe Battery Be sure the hose is properly attached ant routed 4 Inspect Breather pipe Battery Obstruction f Reroute Damage Replace When inspecting the battery be sure the breather pipe is routed correctly If the breather pipe touches the frame or exits in such a way as to cause battery electrolyte or gas to exit onto the frame structural and cosmetic damage to the...

Страница 133: ...y caustic Always follow these preventive measures mAvoid bodily contact with electrolyte as it can cause servere burns or permanent eye injury Wear protective eye gear when handling or working near batteries Antidote EXTERNAL SKIN Flush with water EYES Flush with water for 15 minutes and get immediate medical attention Antidote INTERNAL Drink large quantities of water or milk follow with milk of m...

Страница 134: ...ent steps Turn off ignition and the circuit Install a new fuse of proper amperage Turn on switches to verify operation of elec trical device If fuse blows immediately again check circuit in question Do not use fuses of higher amperage rating than recommended Extensive electrical system damage and fire could result from substitution of a fuse of improper amperage HEADLIGHT BEAM ADJUSTMENT 1 Adjust ...

Страница 135: ...e bulb holder counterclockwise to release bulb Keep flammable products or your hands away from the bulb while it is on it will be hot Do not touch the bulb until it cools down 5 Install Bulb New Secure the new bulb with the bulb holder Avoid touching glass part of bulb Also keep it free from oil otherwise transparency of glass bulb life and illuminous flux will be adversely affected If oil gets on...

Страница 136: ...dlight bulb coupler 8 Install Headlight cover L TAIL BRAKE BULB REPLACEMENT 1 Remove 0 Seat Seat cowling 2 Remove Bulb socket Turn the bulb socket approximately 30 counterclockwise 3 Remove Defective bulb 4 Install Bulb socket 0 Seat cowling 0 Seat 3 48 ...

Страница 137: ...t and right 0 Upper cowling 0 Seat Top cover Refer to the COWLING REMOVAL AND INSTALLATION REMOVAL section in the CHAPTER 3 FUEL TANK 1 Remove Fuel tank Refer to the CARBURETOR RE MOVAL section in the CHAPTER 6 ENGINE OIL 1 Drain Engine oil Refer to the ENGINE OIL REPLACE MENT section in the CHAPTER 3 COOLANT 1 Drain 0 Coolant Refer to the COOLANT REPLACE MENT section in the CHAPTER 3 AIR FILTER C...

Страница 138: ...Disconnect Fan motor coupler 3 Remove Radiator assembly Cover the cylinder head cover and the fender with rugs to prevent a scratching 4 Disconnect Pipes Left and right 5 Remove Pipes Radiator Outlet MUFFLER ASSEMBLY 1 Remove Nuts Exhaust pipe Cowling stays Bolt Muffler bracket 4 2 ...

Страница 139: ...For California only 1 Remove Nuts Exhaust pipe Cowling stays Bolt Muffler bracket 2 Remove Bolt Muffler stay 3 Loosen Lock nut Adjuster 4 Remove 0 Cover Clips 0 aPulley Cables 5 Remove Washer Bracket Housing Gasket Left side Shaft arm 4 3 ...

Страница 140: ...LE AND DRIVE CHAIN 1 Remove Shift arm Crankcase cover Left 2 Remove Clutch cable 3 Straighten Lock washer tab 4 Remove Drive sprocket LEADS 1 Straighten 0 Clamp 2 Disconnect Battery leads NOTE Disconnect the negative lead first ...

Страница 141: ...Disconnect Coupler Oil level Neutral switch Coupler A C generator Coupler Sidestand switch 6 Remove Spark plug leads ENGINE REMOVAL 1 Remove Cover aStarter lever 0 2 Place a suitable stand under the engine 3 Remove i Down tube frames Left and right I Bolt Engine mount ...

Страница 142: ...ENGINE REMOVAL 4 Remove Bolt Engine mounting Lower Bolt Engine mounting Upper Collars 5 Remove Engine assembly From right side 4 6 ...

Страница 143: ...ing the following parts Lower cowlings Left and right Center cowlings Left and right Seat Top cover Radiator Air filter case Carburetor Muffler assembly Down tube frame Right 1 Remove Cylinder head cover Gasket Cylinder head cover Spark plugs 2 Remove Generator cover Dowel pins 3 Turn Crankshaft Counterclockwise 4 Align T mark Crankcase end NOTE When 1 piston is at TDC on compression stroke ...

Страница 144: ...r of the two procedures explained in this manual as follows Procedure 1 For engine service except cylinder head dis assembly Disconnect the cam chain The pistons and cylinder can be removed without removing the camshafts Procedure 2 For engine service including cylinder head disassembly f Remove the cam caps and camshafts The camshafts can be removed without dis connecting the cam chain 4 8 ...

Страница 145: ...ch 6 mm 0 24 in 4 Remove Cylinder head Gasket Cylinder head o Dowel pins 5 Go to CYLINDER AND PISTON Procedure 2 1 Remove Camshaft caps Dowel pins NOTE Remove the camshaft caps in a crisscross pattern from outermost to inner caps A CAUTIOM Do not rotate the camshaft or valve damage may occur 2 Remove Camshafts Fasten safety wire to the cam chain to pre vent it from falling into the crankcase 4 9 ...

Страница 146: ...d NOTE Remove the cylinder head as a whole to prevent the valve lifters and adjusting pads from falling into the crankcase 5 Remove aGasket Cylinder head Dowel pins CYLINDER AND PISTON NOTE With the engine mounted the cylinder and piston can be maintained by removing the following parts Lower cowlings Left and right Center cowlings Left and right Seat Top cover Radiator Air filter case Carburetor ...

Страница 147: ...on pin circlip cover the crankcase with a clean rag to prevent the circlip from falling into the crankcase cavity 5 Remove Piston pins 0 0 Pistons NOTE Before removing the piston pin deburr the clip grooved and pin hole area If the piston pin groove is deburred and piston pin is still difficult to remove use the Piston Pin Puller 0 Piston Pin Puller P N YU 01304 Do not use a hammer to drive the pi...

Страница 148: ...the following parts Lower cowling Right Starter clutch cover 1 Remove Starter clutch cover Gasket Starter clutch cover Dowel pens 2 Remove Bolt Starter clutch Washer 3 Attach Heavy Duty Puller Heavy Duty Puller Y U 33270 4 Remove Starter clutch 5 Remove woodruff key Starter clutch gear Idle gear I Idle gear 4 12 ...

Страница 149: ...isscross pattern loosen bolts l 4 turn each Remove them after all are loosened 2 Remove Bolts Clutch spring Clutch springs Pressure plate Friction plates Clutch plates NOTE Loosen the bolts in a crisscross pattern 3 Remove Push rod l aBall Push rod 2 4 Straighten the lock washer tabs 5 Loosen Nut Clutch boss Use the Universal Clutch Holder 0 Universal Clutch Holder P N Y M 91 042 NOTE Hold the clu...

Страница 150: ...aring NOTE Install the 5 mm 0 2 in screw on the spacer then remove the spacer with pulling out screw 8 Remove aClutch housing 9 Remove Thrust washer Collar A C MAGNETO NOTE With the engine mounted the A C Magneto can be maintained by removing the following parts Lower cowling Left Generator cover 4 14 ...

Страница 151: ...older P N YU 01235 I 2 Attach 0 Rotor puller P N YM 01080 3 Remove Magneto 4 Remove Starter coil assembly Pickup coil Woodruff key WATER PUMP NOTE With the engine mounted the water pump can be maintained by removing the following parts 0 Seat Top cover Lower cowling Right aShift arm Crankcase cover Right 0 Water pipe 0 Water pump cover 4 15 ...

Страница 152: ...FT NOTE With the engine mounted the oil pump and shift shaft can be maintained by removing the following parts Lower cowling Right Crankcase cover Right Clutch housing 1 Remove Oil pump assembly 2 Remove Gasket Oil pump assembly Dowel pin 4 16 ...

Страница 153: ...d the oil pan and oil strainer can be maintained by removing the following parts Lower cowlings Left and right Muffler assembly scowling stay 1 Disconnect 0il level switch lead Neutral switch lead 2 Remove 0 Oil filter cover Oil filter 3 Remove Drain plug 0il level switch Oil pan Gasket Oil pan Dowel pins 4 17 ...

Страница 154: ...ve Oil strainer assembly STARTER MOTOR NOTE With the engine mounted the starter motor can be maintained by removing the following parts 0 Seat Top cover Fuel tank 1 Remove Starter motor 0 crankcase ventilation hose CRANKCASE DlSASSErVlBLY 1 Remove 0 Oil seal stopper 4 18 ...

Страница 155: ...ankcase designate the crankcase tightening sequence 4 Place the engine upside down 5 Remove Crankcase Lower Use a soft hammer Upper case BIL ower case TRANSMISSION SHIFTER AND SHIFT CAM 1 Remove Transmission assembly Dowel pins 2 Remove Stopper lever 0 Stopper plate Shift cam 3 Remove Guide bars Shift f o r k l Shift fork 2 aShift f o r k 3 ...

Страница 156: ...ve Shift cam CRANKSHAFT 1 Remove Crankshaft assembly 2 Remove Main journal bearing NOTE Identify each main journal bearing position very carefully so that it can be reinstalled in its original place 4 Remove Neutral switch 4 20 ...

Страница 157: ...emoving the following parts Lower cowlings Left and right Center cowlings Left and right Fuel tank Carburetor Radiator Generator cover Cylinder head cover eCam chain tensioner Cylinder head 1 Remove 0 Lifters 0 Valve pads NOTE Identify each lifter and pad position very care fuly so that it can be reinstalled in its original place Lifters Valve pads 4 21 ...

Страница 158: ...hould be checked Valve seal checking steps Supply a clean solvent into the intake and exhaust ports Check the valve sealing There should be no leakage at the valve seats 0 3 Attach 0 Valve spring compressor Attachment Valve Spring Compressor P N YM 04019 Attachment P N Y M 04108 Valve retainers 4 Remove 0 Valve retainers 0 Valve spring seat Oil seal I 0 Valve spring Valve Valve spring seat NOTE Id...

Страница 159: ...ENGINE DISASSEMBLY CONNECTING ROD 1 Remove connecting rod Connecting rod bearing INNER ROTOR OIL PUMP 1 Remove Pump housing 2 Remove Outer rotor Pin 0 Inner rotor 0 Washer 0 Pump cover Pump shaft 4 23 ...

Страница 160: ...Va Ive seat 2 Inspect Cylinder head Scratches Damage Replace 3 Measure 0 Warpage Out of specification Resurface Cylinder Head Warpage Less than 0 03 mm 0 0012 in 4 Resurface Cylinder head Resurfacement steps Place a 400 600 grit wet sandpaper on the surface plate and resurface the head using a figure eight sanding pattern NOTE Rotate the head several times to avoid remov ing too much material from...

Страница 161: ... 4 mm 0 0157 in 2 Measure 0 Valve stem clearance Valve stem clearance Valve guide inside diameter Valve stem diameter Out of specification Replace either valve and or guide Use a Micrometer and Bore Gauge Valve Stem Clearance Maximum Intake 0 010 0 037 mm 0 08 mm 0 0004 0 0015 in 0 0031 in Exhaust 0 025 0 052 mm 0 1 mm 0 001 0 002 in 0 0039 in 3 Inspect Valve stem end Mushroom shape Larger diamete...

Страница 162: ...ear Oil leakage into cylinder f Replace 2 Remove Valve guide Use the Valve Guide Remover 0 Valve Guide Remover 4 5 mm P N YM 04116 3 Install Valve guide New Use the Valve Guide Installer with the valve Guide Remover P N YM 04117 p Valve Guide Installer Valve Guide Remover 4 5 mm P N YM 04116 4 Bore valve guide to obtain proper valve stem clearance Use the Valve Guide Reamer 4 5 mm Valve Guide Ream...

Страница 163: ...idth measurement steps Apply the Mechanic s bluing dye Dykem to the valve face install the valve into the cylinder head Press the valve through the valve guide and onto the valve seat to make a clean pattern Measure the valve seat width Whether the valve seat and valve face made contact bluing will have been removed elf the valve seat width is too wide too narrow or seat has not centered The valve...

Страница 164: ...d pressure to prevent chatter marks Cut sections as follows I I Section I Cutter I I B 45 C 60 I Valve seat refacing steps d Valve face indicates that valve seat is centered on valve face but is too wide 4 V I a ve seat is in the middle of the valve face but too narrow down near the bottom edge of the valve face increase its width 4 28 ...

Страница 165: ...sulfide oil to the valve stem Install the valve into the cylinder head Turn the valve until the valve face and valve seat are evenly polished then clean off all compound NOTE To obtain the best lapping result lightly tap the valve seat while rotating the valve back and forth between your hand Apply a fine lapping compound to the valve face and repeat the above steps NOTE Be sure to clean off all c...

Страница 166: ...ion reface and lap the valve seat VALVE SPRING 1 Measure Valve spring free length Out of specification f Replace Valve Spring Free Length 41 94 mm 1 65 in 2 Measure Valve spring installed force Out of specification Replace Installed length Valve Spring Installed Force 0 I 37 5 mm 1 48 in 14 2 16 4 kg 31 3 36 2 lb 3 Measure Spring Tilt Out of specification Replace Spring Tilt Less than 1 8 mm 0 070...

Страница 167: ...easure Cam lobes Use the Micrometer Out of specification Replace Intake Exhaust Cam Lobe Cam Lobe iJ Limit Limit 32 51 mm 25 005 mm 1 2799 in 0 9844 in 32 21 mm 24 96 mm 1 2681 in 0 9827 in 3 Measure Camshaft runout Use the Micrometer Out of specification Replace Camshaft Runout Limit 0 03 mm 0 0012 in Camshaft Cap Clearance Measurement 1 Install Camshaft 2 Position Strip of Plastigage Onto the ca...

Страница 168: ...the camshaft when measuring clearance with the Plastigage 5 Remove Camshaft caps 6 Measure Width of Plastigage Out of specification Follow step 7 7 Measure Camshaft outside diameter Use a micrometer Out of specification Replace the cam shaft Within specification Replace the cam shaft case Camshaft Outside Diameter Standard 22 967 22 980 mm 0 9042 0 9047 in Cam Cap Inside Diameter Standard 23 000 2...

Страница 169: ...ain guide Exhaust side Cam chain guide intake side Wear Replace Cam Chain Tensioner 1 Check One way cam 0 operation Unsmooth operation Replace 2 Inspect AlI parts Damage Wear Replace dhp ug Collar as er Tensioner body Springs Tensioner rod CYLINDER AND PISTON 1 Inspect cylinder and Piston walls Vertical scratches f Rebore or Replace cylinder and piston 2 Measure Piston to cylinder clearance 4 33 ...

Страница 170: ...2047 2 2049 in 2 2067 in C Maximum D T Maximum D or D Maximum D or D6 R Maximum D D or D Minimum D D4 or D If out of specification rebore or replace cylinder and replace piston and piston rings as a set 2nd step r Measure the piston skirt diameter P with a micrometer 5 0 mm 0 2 in from the piston bottom edge Piston Size P D If out of specification replace piston and piston rings as a set 3rd step ...

Страница 171: ... or rings NOTE Decarbon the piston ring grooves and rings before measuring the side clearance Side Clearance Standard Limit I 0 10 mm Top ring 0 03 0 07 mm 0 0012 0 0028 in 0 004 in I2nd ring 0 02 0 06 mm 0 10 mm 0 0008 0 0024 in 0 004 in 2 Position 0 Piston ring Into cylinder NOTE Insert the ring into the cylinder and push it approximately 20 mm 0 8 in into the cylinder Push the ring with the pis...

Страница 172: ...ed on the top of ring I Oversize 2 0 50 mm 0 0197 in Oil control ring Expander spacer of bottom ring oil control ring is color coded to identify sizes I Size Color I I Oversize 2 Red I Piston Pin 1 Lubricate Piston pin Lightly SAE lOW30 Motor Oil 2 Install Piston pin Into the small end of connecting rod 3 Check Free play Free play j Inspect the connecting rod for wear Wear f Inspect the connecting...

Страница 173: ...f specification t Replace Out of specification Replace 308 005 I la Runout Limit 0 03 mm 0 0012 in I 2 Inspect Crankshaft journal surfaces Wear Scratches Replace Main Journal Oil Clearance 1 Clean all parts 2 Position Crankshaft journal surfaces Place on a bench in an upside down posi tion 3 Install Main journal bearings Into the upper crankcase acrankshaft 4 Attach 0 Plastigage Onto the crankshaf...

Страница 174: ...nkcase Bolt 24 Nm 2 4 m kg 17 ft lb Bolt I 12 Nm 1 2 m kg 8 7 ftalb 7 Remove Bolts Reverse assembly procedure crankcase Lower Use care in removing 8 Measure Plastigage width Out of specification f Replace the bearings replace the crankshaft if necessary Connecting Rod Bearings 1 I nspect Connecting rod bearings Burns Flaking Roughness Scratches Replace 4 38 ...

Страница 175: ... a perfect character 5 Lubricate Bolt threads Connecting rod Nut seats Connecting rod Molybdenum Disulfide Grease 6 Tighten Nuts Connecting rod cap Do not turn the connecting rod until the clearance measurement has been completed Tighten to full torque specification without pausing Apply continuous torque between 1 2 and 2 3 m kg Once you reach 1 2 m kg DO NOT STOP TIGHTENING until final torque is...

Страница 176: ...lection Numbers used to indicate crankshaft journal sizes are stamped on the LH crankweb The first six 6 are main journal bearing numbers starting with the left journal The four 4 connecting rod bearing numbers follow in the same sequence The upper crankcase half is numbered Jl J2 J3 J4 J5 and J6 on the rear right bosse as shown The numbers are stamped in ink on the rod c a p BEARING COLOR CODE No...

Страница 177: ...mple 2 Selection of the connecting rod bearing If the connecting rod Pl and crankshaft Pl sizes are No 5 and No 1 respectively the bearing size No is Bearing Size No Connecting rod No Crankshaft No 5 1 4 Green BEARING COLOR CODE 1 01 L PUMP 1 Measure Tip clearance A Between the inner rotor and the outer rotor Side clearance B Between the outer rotor and the pump housing Use the Filler Gauge and St...

Страница 178: ...re Alighn the pins in the pump shaft and the groove on the inner rotors dualing assembly 4 Check 0 Oil pump operation With a finger Unsmooth operation Repeat step 2 or replace PRIMARY DRIVE 1 Inspect Primary drive gear Crank shaft Primary driven gear Wear Damage f Replace both gears Excessive noises during operation Replace both gears 4 42 ...

Страница 179: ...ng Wear Damage Replace 4 Check Starter clutch operation Clutch operation checking steps Install the starter clutch gear to the starter clutch and hold the starter clutch When turning the starter clutch gear clock wise the starter clutch and the wheel gear should be engaged If not the starter clutch is faulty Replace it When turning the starter clutch gear counter clockwise the starter clutch gear ...

Страница 180: ...ch boss splines Scoring Wear Damage Replace clutch boss assembly NOTE Scoring on the clutch plate splines will cause erratic operation Friction Plates 1 Inspect Friction plate Damage Wear Replace the friction plates as a set 2 Measure Friction plate thickness Measure at all four points Out of specification Replace the friction plates as a set 2 8 mm 0 11 in Clutch Plates 1 Measure Clutch plate war...

Страница 181: ...lace Push Lever Assembly and Boll Screw Housing 1 I nspect Push lever assembly Unsmooth Replace 2 Measure Push rod runout Use the V Blocks and Dial Gauge Out of specification Replace Clutch Spring 1 Measure Clutch spring free length Out of specification Replace the springs as a set Clutch Spring Minimum Free Length 29 0 mm 1 14 in ...

Страница 182: ...e Shift cam segment Damage Wear Replace Shift cam bearing Pitting Damage Replace Main and Drive Axles 1 Measure Axle runout Use the centering device and Dial Gauge Out of specification Replace Out of specification Replace Runout Limit 0 08 mm 0 0031 in Gears 1 Inspect Gears Damage Wear Replace 2 Check Gear movement Unsmooth operation Replace 3 Inspect Mating dogs Cracks Wear Damage Replace Shift S...

Страница 183: ...n Wash and blow out the passage 3 Check Water pipe Water jacket joint O rings Damage f Replace CRANKCASE 1 Inspect Case halves Bearing seat Fitting Damage Replace BEARING AND OIL SEAL 1 Inspect Bearings Clean and lubricate then rotate inner race with finger Roughness Replace the bearing see Re moval 2 Inspect Oil seals Damage Wear Replace the see Removal 4 47 ...

Страница 184: ...INSPECTION AND REPAIR YAMAHA EXHAUST VARIABLE VAiVE For California Only 1 I nspect Shaft arm Wear Cracks Damage Replace 2 Inspect Bush Wear Replace 4 48 ...

Страница 185: ...rt the inner rotor into the outer rotor 0 Then with the pump shaft dowel pin in the inner rotor slit 2 Install Pump housing CONNECTING ROD 1 Clean Crankshaft Connecting rods 2 Install Connecting rod bearings Into the connecting rod and cap 3 Lubricate Connecting rod bolt threads Connecting rod nuts Molybdenum Disulfide Oil 4 Apply engine oil to the crankshaft pins 4 49 ...

Страница 186: ...ENGINE ASSEMBLY AND ADJUSTMENT CRANKSHAFT Crankshaft g ii1 se 1 ain ournal bearing Connecting rod assembly Connecting rod bolt Connecting rod bearing N u t ...

Страница 187: ...without pausing Apply continuous torque between 1 2 and 2 3 m kg Once you reach 1 2 m kg DO NOT STOP TIGHTENING until final torque is reached If the tightening is interrupted between 1 2 and 2 3 m kg loosen the nut to less than 1 2 m kg and start again bA 23 Nm 2 3 m kg 17 ftlb 1 VALVE PAD AND VALVE Deburr any deformed valve stem end Use an oil stone to smooth the stem end Deburr Valve stem 1 Elim...

Страница 188: ... Install 0 Valve spring NOTE Install springs with wider gapped coils facing upwards as shown Larger pitch Smaller pitch 5 Attach Valve spring compressor Attachment 6 Install aValve retainers 7 Settle the valve retainer by lightly patting the valve seat with a piece of wood in between NOTE Do not hit so much as to damage the valve 4 52 ...

Страница 189: ...molybdnum disulfide oil 9 Install 0 Lifters CRANKSHAFT 1 Install Oil baffle plate Breather hose Oil Baffle Plate Bolts 10 Nm 1 0 m kg 7 2 ft lb 2 Install Neutral switch assembly 3 Install Cam chain guide Intake side O ring Bolts Chain Guide 10 Nm 1 0 m kg 7 2 ftalb ...

Страница 190: ... ADJUSTMENT CRANKCASE Crankcase assembly Oil level window Crankcase ventilation hose 8 mm bolt O ring 0 8 mm bolt 436 mm bolt 06 mm bolt 6 mm bolt 06 mm bolt 8 mm bolt I 12 Nm 1 2 m kg 8 7 ft lb 00 24 Nm 2 4 m kg 17 ft lb ...

Страница 191: ...ANSMISSION Main axle 5th pinion gear Circlip 3rd pinion gear 6th pinion gear 2nd pinion gear Bearing Circlip Drive axle 2nd wheel gear 06th wheel gear 3rd wheel gear 04th wheel gear 055th wheel gear 1st wheel gear Washer C USE NEW ONE ...

Страница 192: ...TE The stepped crankshaft end I should face to the left Pass the cam chain through the cam chain cavity Be sure to attach a retaining wire to the cam chain TRANSMISSION SHIFTER AND SHIFT CAM 1 Install Shift cam assembly aGuide bar Shift fork I Shift fork 2 I Shift fork 3 NOTE All shift fork letters should face to the left side and be in sequence 1 2 3 beginning from the left 4 56 ...

Страница 193: ...oves 4 Install Main axle assembly Drive axle assembly Oil seal NOTE Be sure the main axle bearing pin should face to front and the drive axle bearing pins should face to rear Mesh the shift fork l with the 4th wheel gear and 2 with the 5th wheel gear on the drive axle Mesh the shift fork 2 with the 3rd pinion gear on the main axle Carefully guide the shift forks so that they mesh smoothly with tra...

Страница 194: ... Tighten o Lower crankcase bolt I Upper crankcase bolt a Follow the proper tightening sequence 8mmBolt J 24 Nm 2 4 m kg 17 ft lb 6mmBolt 8 12 Nm 1 2 m kg 8 7 ft lb NOTE nstall the ground lead on bolt No nstall the copper washer on bolt No NOTE Install the washer I on bolt No I or 0 3 Install Oil seal stopper CiJ Bolts Oil Seal Stopper 10 Nm 1 0 m kg 7 2 ftalb 4 58 ...

Страница 195: ...er Assembly 10 Nm 1 0 m kg 7 2 ft lb I 2 Install Oil strainer cover Relief valve NOTE The element window must be installed verti cally against housing arrow mark 3 Install Dowel pins Gasket New Oil pan 0 Oil level switch Drain plug Bolts Oil Pan 10 Nm 1 0 rn kg 7 2 ft lb I 4 Install 0 Oil filter 0 Oil filter cover Bolt Oil Filter Cover 15 Nm 1 5 m kg 11 ft lb I Refer to the ENGINE OIL FILTER RE PL...

Страница 196: ...en spring ends 2 Install Dowel pin Gasket New 3 Install Oil pump assembly NOTE Align the oil pump arrow mark with crank case arrow mark 0 WATER PUMP 1 Install Water pump housing Bolts Water Pump Housing 10 Nm 1 0 m kg 7 2 ft lb 2 Install O ring Water pump cover iJ Bolts Water Pump Cover 10 Nm 1 0 m kg 7 2 ft lb I 4 60 ...

Страница 197: ... C MAGNETO Magneto Stator coil assembly Pickup coil 10 Nm 1 0 m kg 7 2 ftmlb ST PSOR COlC REs sT ANCE I 0 44 0 66R at 20 C 68 F White White PICKUP COIL RESISTANCE 85 115R at 20 C 68 F White Red White Black 80 Nm 8 0 m kg 58 ftelb 4 61 ...

Страница 198: ...0 5 rn kg 3 6 ft lb NOTE Clean the tapered portions of the crankshaft and magneto When installing the magneto make sure the woodruff key is properly seated in the key way of the crankshaft 2 Install Magneto Bolt Magneto 3 Attach Universal Rotor Holder NOTE Hold the magneto to tighten the nut by the Universal Rotor Holder Universal Rotor Holder P N Y U 01 235 4 Tighten Bolt Magneto 4 62 ...

Страница 199: ... plate Clutch spring Push rod 1 O ring Lock washer Boll Oil seal Push rod 2 Push lever assembly g o screw housing 1 0 ar 0 Thrust washer I Spacer Bearing SPRING FREE LENGTH LIMIT 29 0 mm 1 142 in B i C CLUTCH PLATE WARP LIMIT 0 1 mm 0 004 in FRICTION PLATE WEAR LIMIT 2 8 mm 0 11 in 16 Nm Oik 16 Nm 1 6 m kg 11 ft lb 4 63 ...

Страница 200: ...the bearing and spacer after installa tion of the clutch housing 2 Tighten Nut Clutch boss Use the Universal Clutch Holder NOTE Hold the clutch boss to tighten the nut by Universal Clutch Holder P N Y M 91 042 Nut Clutch Boss 70 Nm 7 0 m kg 50 ft lb I NOTE Bend the lock washer tab along the nut flat 3 Install Push rod 2 Boll 0 Push rod l Friction plates Clutch plates 4 64 ...

Страница 201: ... springs Bolts Clutch spring Bolts Clutch Spring 6 Nm 0 6 m kg 4 3 ft lb I 6 Install Dowel pins Gasket Crankcase cover Crankcase cover Right Bolts Crankcase Cover 10 Nm 1 0 m kg 7 2 ft lb I STARTER CLUTCH 1 Install Idle gear Idle gear Starter clutch gear Woodruff key 2 Install Starter clutch Washer Bolt Starter clutch Bolt Starter Clutch 80 Nm 8 0 m kg 58 ft lb I 4 65 ...

Страница 202: ...ENGINE ASSEMBLY AND ADJUSTMENT STARTER CLUTCH Starter drive gear Idle gear Idle gear Shaft Starter clutch assembly Starter clutch gear Woodruff key Washer 4 66 ...

Страница 203: ...ond ring Gasket Cylinder Circlip Piston pin Piston ring P i s t o n S I D E C L E A R A N C E LIMV Top 0 10 mm 0 004 in I 2nd 0 10 mm 0 004 in E N 0 G A P Top 0 15 0 30 mm I 0 0059 0 0118 in 2nd 0 15 0 30 mm P I S T O N T O C Y L I N D E R C L E A R A N C E 0 04 0 06 mm 0 0016 0 0024 in 8 B r 7 Nm 0 7 m kg 5 1 ft lb 1 JD uSENEWONE I W _ 4 67 ...

Страница 204: ...rs are located on the top side of the rings Oil the pistons and rings liberally 2 Install 0 Piston pins 0 Pistons Circlips Piston pin NOTE Be sure the piston arrow mark face to ex haust side of the engine Before installing the piston pin circlip cover the crankcase with a clean rag to prevent the circlip from falling into the crankcase cavity Be sure the marked piston numbers should be in sequence...

Страница 205: ...aps stop ring end Oil ring end Lower Oil ring end Upper 2nd ring end 6 Install Cylinder NOTE Install pistons 2 and 3 first Pass the cam chain and cam chain guide E haust side through the cam chain cavity 7 Install 0 O ring Water pipe 8 Turn Crankshaft Counterclockwise 9 Align T mark Stationary pointer Refer to E N G I N E D I S A S S E M B L Y CYLINDER HEAD AND CAMSHAFT NOTE When 1 piston is at TD...

Страница 206: ...er Head Washer Rubber washer Gasket Cylinder head cover Spark plug Nut Washer Valve guide Circlip Gasket Cylinder head Cylinder head cover Cylinder head assembly 110 Nm I 0 m Kg I L t ll 125 Nm 2 5 m kg 18 ft 7 CT 10 Nm 1 0 m kg 7 2 ft lb c I 01 C 1USE NEW ON4 4 70 ...

Страница 207: ...Spring seat Oil seal Intake valve Exhaust valve Cam chain tensioner Gasket Cam chain tensioner Cam chain guide Intake side Camshaft Exhaust Chain guide Upper 0 Cam chain Cam chain guide Exhaust side Match mark AB FC __ ___ VALVE CLEARANCE COLD ____ INTAKE 0 11 0 20 mm 0 004 0 008 in EXHAUST 0 21 0 30 mm 0 008 0 012 in I ___ 4 m ka 17 ft lb ...

Страница 208: ...onnect Procedure 2 The camshafts are removed Install Procedure 1 1 Install Camshafts and cylinder head assembly Be sure the camshaft timing marks align with the camshaft cap marks 0 aBe sure the T mark on the magneto align the stationary pointer when l piston is at TDC 2 Tighten Nuts Cylinder head Use the Hexagon Wrench 6 mm 0 24 in 0 NOTE Tighten the nuts in their proper tightening sequence and t...

Страница 209: ...sembly 2 Tighten Nuts Cylinder head Use the Hexagon Wrench 6 mm 0 24 in Tighten the nuts in their proper tightenin sequence and torque nuts in two stages Nuts Cylinder Head 25 Nm 2 5 m kg 18 ft lb 3 Install Camshafts Camshaft installation steps Turn the crankshaft counterclockwise Align the T mark on the magneto wir the crankcase end when l piston at TDC th is I A CAfXl KM Do not turn the cranksha...

Страница 210: ... valve will result y Install the dowel pins Install the camshaft caps Align the camshaft timing marks with the camshaft cap marks NOTE The numbers are punched on the camshaft caps in increments from right to left Do not install the bolts at 6 marked place in this stage Tighten the bolts Camshaft caps NOTE Tighten the camshaft caps in a crisscross pattern from innermost to outer caps A CAW ION The ...

Страница 211: ...ket into the cylinder Bolts Cam Chain Tensioner 10 Nm 1 0 m kg 7 2 ft lb Install the collar springs washer and end cap bolt 0 End Cap Bolt Cam Chain Tensioner 20 Nm 2 0 m kg 14 ft lb 3 Turn Crankshaft Counterclockwise for a several turns 4 Inspect Camshaft timing marks Align with the camshaft cap marks a Crankshaft T mark Align with the crankcase end 0 Out of alignment Adjust Refer to CAMSHAFT INS...

Страница 212: ...Note the following points 1 Install Engine assembly Bolt Engine mount Rear Lower Bolt Engine mount Rear Upper Bolt Engine Mount Rear Lower 45 Nm 4 5 m kg 32 ftslb Bolt Engine Mount Rear Upper 55 Nm 5 5 me kg 40 ft lb Collars 2 Install Down tube frames Left and right Bolt Engine Mount Bolts Down Tube Frame Lower 33 Nm 3 3 m kg 24 ftmlb Bolts Down Tube Frame Upper 60 Nm 6 0 m kg 43 ftalb Use LOCTITE...

Страница 213: ... Adjust the drive chain slack if necessary 5 Install Cover Crankcase Left Shift arm Bolts Crankcase Cover 10 Nm 1 0 m kg 7 2 ft lb Use LOCTITE Bolt Shift Arm 10 Nm 1 0 m kg 7 2 ft lb 6 Install Muffler assembly 7 Tighten Flange nuts Exhaust pipe 8 Tighten Bolt Muffler bracket Bolt Muffler stay For California only 0 Bolt Muffler Bracket 20 Nm 2 0 m kg 14 ftslb Bolt Muffler Stay For California only 2...

Страница 214: ...E For California Only 1Exhaust pipe assembly Bracket Gasket Exhaust pipe Cables Bush Washer Oil seal Pulley Gasket Valve cover Shaft arm Gasket Muffler Housing Muffler assembly 1 20 Nm 2 0 m kg 14 A USE NEW ONE I lONm 1 0 m kg 7 2 ft lb 5 Nm 0 5 m kg 3 6 ft lb ...

Страница 215: ... 1 0 m kg 7 2 ftslb 11 Install For California only Pulley Cables Clips 12 Adjust For California only Cable Refer to the EXUP CABLE ADJUST MENT section in the CHAPTER 3 13 Adjust Throttle cable Throttle Cable Free Play Throttle Gripe 2 5 mm 0 08 0 20 in Refer to the THROTTLE CABLE FREE P L A Y A D J U S T M E N T s e c t i o n i n t h e CHAPTER 3 4 79 ...

Страница 216: ...in Refer to the CLUTCH ADJUSTMEI section in the CHAPTER 3 15 Fill Coolant Total Amount 1 0 L 0 9 Imp qt 1 1 US qt Refertothe COOLANT REPLACEME section in the CHAPTER 3 16 Fill Engine oil KY 6 Total Amount 0 8 L 0 7 Imp qt 0 84 US qt Refer to the ENGINE OIL REPL MENT section in the CHAPTER 3 4 80 ...

Страница 217: ... Outlet pipe O ring Hose Radiator Inlet RADIATOR CAP OPENING PRESSURE 1 A 74 103kPa 0 75 1 05 kg cm 10 7 14 9 psi 4 COOLANT CAPACITY 1 10Nm l Om kg 7 2ft Ib h B 19 L 1 7 Imp qt 2 0 US qt lncludinq all routes I Q P I I I 1 10 Nrn 1 0 m kg 7 2 ftelh i 7 Nm 0 7 m kg 5 1 ftelh 1 1 C i USE NEW ONE _ 10 Nm 1 0 m kg 7 2 7Nm 0 7m kg 5 1ft Ib f t l b 1 5 l ...

Страница 218: ... not splash 1 painted surfaces If splashes wash it awi with water Do not remove the radiator cap drain bol and hoses especially when the engine ar radiator are hot Scalding hot fluid and stea may be blown out under pressure which cou cause serious injury When the engine has coole place a thick rag like a towel over the radiat cap slowly rotate the cap counterclockwi to the detent This procedure al...

Страница 219: ...ened fin Repair replace 2 Inspect Hose Radiator Inlet Cracks Damage Replace Hose Radiator Outlet Cracks Damage Replace 0 Outlet pipe Cracks Damage f Replace 3 Measure Radiator cap opening pressure Radiator cap opens at pressure below the specified pressure Replace Radiator Cap Opening Pressure 74 103 kPa 0 75 1 05 kg cm 10 7 14 9 psi 5 3 ...

Страница 220: ...e there is no pressure drop INSTALLATION Reverse the REMOVAL procedure Note the following points 1 Install Fan motor assembly Screws Fan Motor Assembly 10 Nm 1 0 mm kg 7 2 ft lb 2 Install Radiator Bolts Radiator 7 Nm 0 7 me kg 5 1 ft lb 3 Fill 0 Cooling system R e f e r t o t h e COOLANT REPLAC MENT section in the CHAPTER 3 4 Inspect 0 Cooling system Decrease of pressure leaks Repair required 5 4 ...

Страница 221: ...Inspection steps Attach the Cooling System Tester to the radiator Cooling System Tester Y U 24460 0 1 Apply 100 kPa 1 O kg cm 14 psi pressure Measure the indicated pressure with the gauge 5 5 ...

Страница 222: ...Hose 3 T h ermostatic cover Thermostatic Thermostatic housing Hose 1 Hose 2 0 Pipe 2 Pipe 1 Water jacket joint 8 Jng ring Water pipe O ring Water pump cover O ring Water pump housing C O ring THERMOSTATIC VALVE OPENING I lnhlmfi nm kn 73ft lhl 6 USE NEW ONE _ B USE NEW ONE 5 6 ...

Страница 223: ...e COWLING REMOVAL AND INSTALLATION REMOVAL section in the CHAPTER 3 2 Drain 0 Cooling system Refer to the COOLANT REPLACEMENT section in the CHAPTER 3 3 Remove Fuel tank Refer to the C A R B U R E T O R R E MOVAL section in the CHAPTER 6 4 Disconnect Crankcase ventilation hose lair vent hose 5 Remove Air filter case 6 Disconnect whose 1 Hose2 Hose 3 ...

Страница 224: ...THERMOSTATIC VALVE COOL rJ l 7 Disconnect Thermo unit lead Thermo switch lead 8 Remove Thermostatic housing 9 Remove Thermostatic cover Thermostatic 10 Remove Shift arm Crankcase cover Left 11 Remove Water pipe 0 5 8 ...

Страница 225: ...pen at 80 84 C 176 183 F Replace Inspection steps Suspend thermostatic valve in a vessel 0 Place reliable thermometer in a water 0 Head water slowly aObserve thermometer while stirring water continually NOTE Thermostatic valve is sealed and its setting is specialized work If its accuracy is in doubt always replace it A faulty unit could cause serious overheating or overcooling 5 9 ...

Страница 226: ...ostatic cover Bolts Water Pump Cover 10 Nm 1 0 ma kg 7 2 ftalb Bolts Pipe 10 Nm 1 0 ma kg 7 2 ft lb Bolts Crankcase Cover Left 10 Nm 1 0 me kg 7 2 ft lb Bolt Shift Arm 10 Nm 1 0 ma kg 7 2 ft Ib Bolts Thermostatic Cover 10 Nm 1 0 m kg 7 2 ftslb BCAWWN Always use new O ring 2 Fill 0 Cooling system Refer to the COOLANT REPLACEMENT section in the CHAPTER 3 3 Inspect 0 Cooling system Decrease of pressu...

Страница 227: ...Pilot jet Main jet Starter plunger assembly Pilot screw Piston valve assembly 0 Jet needle set Starter lever shaft O ring r ID Mark SPEClf MAIN JET MAIN AIR JET PI LOT JET PILOT AIR JET JET NEEDLE PILOT SCREW THROTTLE VALVE ENGINE IDLE SPEED FUEL LEVEL 13 Nm 0 3 me kg 2 2 ft lb CATIONS 3BF 00 Except for California 3FH 00 For California 87 5 60 15 I30 5CFZ2 3 I30 1 250 1 350 r min 4 5 6 5 mm 0 18 0...

Страница 228: ...crew Air vent Fuel inlet Main jet maximum performance at the factory Air inlet Float needle valve Main bleed pipe Any attempt to change these settings w Mixture outlet Valve seat Needle jet II decrease engine performance Starter plunger Pilot jet Jet needle Starter jet No 1 Float Spring clip Starter jet No 2 Throttle valve Piston valve Pilot air jet 2 Bypass hole 6 2 ...

Страница 229: ...OVAL AND INSTALLATION REMOVAL section in the CHAPTER 3 2 Turn the fuel cock to OFF position 3 Remove Fuel cock lever 4 Disconnect Fuel hose 5 Remove Fuel pump Gasoline is highly flammable Avoid spilling fuel on the hot engine 6 Remove Fuel tank bracket 7 Remove Fuel tank 6 3 ...

Страница 230: ... Air vent hose 9 Remove Air filter case 10 Loosen 0 Screw Starter cable clamp 11 Disconnect Starter cable 12 Disconnect Fuel hose 13 Loosen Screws Carburetor joint clamp UI 0 14 Remove Carburetor assembly 15 Disconnect Throttle cable 1 aThrottle cable 2 6 4 ...

Страница 231: ...uretor separation Throttle valve 0 Piston valve 0 Starter plunger Float chamber components 1 Remove Bracket Upper Bracket Lower Starter lever shaft 2 Remove Spring 0 Starter plunger 3 Remove Vacuum chamber cover Spring Piston valve assembly 4 Remove Plug Jet needle 0 Spring Washer aJet needle I 6 5 ...

Страница 232: ...Main jet Washer 0 Pilot jet 0 Needle jet Pilot air jet 8 INSPECTION 1 Inspect Carburetor body Float chamber Fuel passage Contamination Clean as indicated Carburetor cleaning steps Wash carburetor in petroleum based sol Do not use any caustic carburetor clea solution 1 Blow out all passages and jets with a pressed air 2 Inspect Floats Damage4 Replace 6 6 ...

Страница 233: ...valve Scratches Replace Rubber diaphragm Tears Replace 5 Inspect Needle jet Main jet Holder 0 Pilot jet Pilot adjust screw 0 Pilot air jet Bends Wear Damage Replace Contamination Blow out jets with a compressed air 6 Check Free movement Insert the throttle valve into the carburetor body and check for free movement Stick Replace 6 7 ...

Страница 234: ...parts in clean gasoline Always use a new gasket 1 Install Piton valve assembly NOTE Note position of tab on diaphragm This tab must be placed in the cavity of the carburetor body during reassembly 2 Install Float chamber cover Vacuum chamber cover 3 Connect Throttle shaft Throttle valves must be fully closed 4 Install Starter lever shaft ...

Страница 235: ...Lower Bracket 5 Nm 0 5 m kg 3 6 ft lb INSTALLATION Reverse the REMOVAL procedure Note the following points 1 Install Fuel tank Bolts Fuel Tank 14 Nm 1 4 ma kg 10 2 ft lb 2 Install Fuel tank bracket Bolts Fuel Tank Bracket 10 Nm 1 0 m kg 7 2 ft lb 3 Install Fuel pump Bolt Fuel Pump 8 Nm 0 8 m kg 5 6 ft lb 6 9 ...

Страница 236: ...Measure Fuel level Out of specification Adjust it by the folio ing adjustment steps 6 10 Fuel level measurement steps Place the motorcycle on the level place Connect the Fuel Level Gauge YM 013 to the carburetor 0 Place the Gauge vertically next to the fl chamber line Loosen the drain screw Warm up the engine then shut it off aft few minutes fvleasure the fuel level It should be wii the specified ...

Страница 237: ...the carburetor assembly Refer to REMOVAL section Remove the float valve seat and the needle valve inspect the valve seat and the needle valve If either is worn replace as a set If both are fine adjust the float height by bending the float tang 0 Recheck the fuel level 6 11 ...

Страница 238: ... Bearing Oil seal Spacer Meter clutch Collar Clutch retainer Wheel axle CHASSIS Load is the total weight of cargo rider passenger anc accessories 1 1 lo 70 R17 53H r 1 WEAR LIMIT B i 1 0 mm 0 04 in i I 1RIM SIZE i MT3 00 X 17 I D RIM RUNOUT LIMIT 7 l ...

Страница 239: ...e the front wheel by placing a suitablt stand under the engine 6 Remove Axle Wheel Front speedometer gear unit NOTE Do not squeeze the brake lever while the wheel i off the motorcycle INSPECTION 1 Inspect Tire Tire tread shows crosswise lines minimun tread depth Cracks Repalce Minimum Tire Tread Depth 1 0 mm 0 04 in Tread depth Side wall Wear indicator 2 Inspect Front axle Bends Replace Roll the a...

Страница 240: ...cident resulting in motor cycle damage and possible operator injury After a tire repair or replacement be sure to torque tighten the valve stem locknut to specification Valve stem Locknut 1 5 Nm 0 15 rn kg 1 1 ft lb I 5 Inspect Wheel bearings Bearings allow play in the wheel hub or wheel turns roughly Repalce Wheel bearing replacement steps Clean the outside of the wheel hub Remove the bearing usi...

Страница 241: ...e disc Wear Over specified limit f Replace Maximum Deflection Front and Rear 0 5 mm 0 02 in Minimum Disc Thickness Front 3 5 mm 0 14 in INSTALLATION When installing the front wheel reverse t removal procedure Note the following points 1 Lublicate Bearings 0 Oil seals M Lithium Soap Base Grease 2 Install speedometer gear unit Be sure that the two projections inside 1 wheel hub mesh with the two slo...

Страница 242: ...t Speedometer cable Front Axle 58 Nm 5 8 rn kg 42 ft lb Pinch Bolt Front Axle 20 Nm 2 0 rn kg 14 ftslb Bolts Brake Caliper 35 Nm 3 5 m kg 25 ft lb Make sure that the brake hoses are routed prop erly Brake hose Brake hose holder STATIC WHEEL BALANCE ADJUSTMENT NOTE After replacing the tire and or rim wheel balancer should be adjusted Adjust the wheel balance with brake disk installed 1 Remove Balan...

Страница 243: ...ntil these marks come to the same spot f This spot is the heavy spot X 4 Adjust Wheel balance Adjusting steps Install a balancing weight 0 on the spoke exactly opposite to the heavy spot X NOTE Start with the smallest weight Turn the wheel so that the heavy spot is 90 I up Check that the heavy spot is at rest there If not try another weight until the wheel is balanced 5 Check Wheel balance Checkin...

Страница 244: ...EL Collar Oil seal COB earing Spacer Clutch hub Collar Cotter pin T ension bar Brake hose holder I A TIRE SIZE 140 60R 18 64H _ 1 O mm 0 04 in 4 RIM RUNOUT LIMIT RADIAL D 2 0 mm 0 08 in LATERAL 2 0 mm 0 08 in 28 Nm 2 8 m kg ...

Страница 245: ... a suitabk stand under the swing arm 3 Remove Brake caliper NOTE Do not depress the brake pedal while the calipe is off the disc 4 Loosen Lock nut Adjuster 5 Remove Cotter pin Axle nut Axle Rear wheel INSPECTION 1 Inspect aTire Rear axle Wheel Wheel bearings Brake disc Refer to the FRONT WHEEL INSPEC TION 2 Measure Wheel runout Refer to the FRONT WHEEL INSPE TION 7 8 ...

Страница 246: ... MENT section in the CHAPTER 3 3 Tighten Nut Rear axle Brake caliper Nut Rear Axle 107 Nm 10 7 me kg 77 ft lb Bolts Brake Caliper 35 Nm 3 5 rn kg 25 ft lb Do not loosen the axle nut after torque tighten ing STATIC WHEEL BALANCE ADJUSTMENT NOTE After replacing the tire and or rim wheel balance should be adjusted Adjust the wheel balance with brake disc and wheel hub installed 1 Adjust Wheel balance...

Страница 247: ... Brake caliper g Fad spring rston Piston seal Dust seal 0 Brake pad Brake disc The arrow mark on the pad spring must pointing the disc rotating direction BRAKE FLUID TYPE A DOT 4 If DOT 4 is not available iI 2 Nm 0 2 m kg 1 4ft lb I 3 can be used B BRAKE PAD WEAR LIMIT 0 5 mm 0 02 in BRAKE DISC WEAR LIMIT 3 5 mm 0 14 in 120 Nrn 2 0 m kg 14 ft lb 7 10 ...

Страница 248: ... cylinder kit Brake hose Brake pedal Union bolt 0 Copper washet Brake caliper Piston Piston seal Dust seal Brake pad Pad spring Brake disc BRAKE FLUID TYPE If DOT 4 is not available lONm l Om kg 7 2ft lb IEl USENEWONEI pNm 0 6 m 1 kg 4 3 A 1 DI U S E NEW O N E R e p l a c e a s s e t J I h 35 Nm 3 5 m kg 25 ft lb 7 11 ...

Страница 249: ...BRAKE PAD REPLACEMENT NOTE It is not necessary fO disarremble the brake caliper and brake tlore to replace the brake pads ...

Страница 250: ...FRONT AND REAR BRAKE piqzq ...

Страница 251: ...FRONT AND REAR BRAKE 8 Inspect Brake fl d level refer to the BRAKE FLUID INSPEC TICIN SeCtlo I the CHAPTER 3 ...

Страница 252: ...FRONT AND REAR BRAKE CHAS if31 Caliper Bleed screw 6 Nrn 0 6 m 4 3 18Nrn 1 8rn L 13ft b ...

Страница 253: ... the brake system of its brake fluid Front Brake 1 Remove 0 Cover 0 Retaining clips 0 Retaining pins Pad spring Refer to the BRAKE PAD REPLACE MENT section 2 Remove Brake hose Place the open hose end into a container and pump the old fluid out carefully 3 Remove Caliper body 4 Remove Pistons Dust seals 0 Piston seals 0 ...

Страница 254: ...t the piston Cover the piston with a rag Use care so that piston does not cause injury as it is expelled from the cylinder Rear Brake 1 Remove Brake hose Place the open hose end into a container and pump the old fluid out carefully 2 Remove Retaining bolts Brake pads Pad spring Refer to the BRAKE PAD REPLACE MENT section 3 Remove Piston Piston seal Dust seal 7 17 ...

Страница 255: ...he piston Cover the piston with a rag Use care so that piston does not cause injury as it is expelled from the cylinder MASTER CYLINDER DISASSEMBLY NOTE Before disassembling the front or rear brake master cylinders drain the brake system of the brake fluid Front Brake 1 Remove Brake lever Brake switch 2 Remove Union bolt Copper washer Brake hose 7 18 ...

Страница 256: ...racket Master cylinder bracket 0 Master cylinder 8 Dust boot Circlip Master cylinder kit Rear Brake 1 Remove Cotter pin Plain washer Shaft Union bolt Copper washer Bolt Master cylinder Master cylinder Adjusting rod aMaster cylinder kit INSPECTION AND REPAIR 1 Inspect Caliper piston Rust Wear Replace Caliper cylinder body Wear Scratches Replace 7 19 ...

Страница 257: ...mit 0 5 mm 0 02 in NOTE Replace the pads as a set if either is found to be worn to the wear limit 3 Inspect Brake hose Cracks Damage Replace 4 Inspect Master cylinder body Scratches Wear Replace NOTE Clean all passages with new brake fluid 5 Inspect Master cylinder kit Scratches Wear Replace Front brake a Rear brake 7 20 ...

Страница 258: ...led Brake Fluid DOT 4 If DOT 4 is not available I 3 can be used Replace the piston seals whenever a caliper is disassembled Front Brake 1 Install 0 Piston seals Dust seals Pistons 2 Install Brake pad Pad spring Retaining bolt 0 Retaining trip Refer to the BRAKE PAD REPLACE MENT section 3 Install Brake caliper Bolts Brake Caliper 35 Nm 3 5 m kg 25 ft lb 7 21 ...

Страница 259: ...Nm 0 9 me kg 6 5 ft lb I 6 Install Brake hose Copper washers Union bolts Union Bolts 26 Nm 2 6 rn kg 19 ft lb f Master cylinder Brake caliper When installing the brake hose to the caliper lightly touch the brake pipe with the projec tion on the caliper Always use new copper washers 7 Install Brake switch Brake lever Spring NOTE Apply lithium soap base grease to pivot shaft of brake lever 7 22 ...

Страница 260: ...e causing leakage and poor brake performance Refill with the same type of brake fluid mixing fluids may result in a harmful chemical reaction and lead to poor performance Be careful that water does not enter the master cylinder when refilling Water will significantly lower the boiling point of the fluid and may result in vapor lock 9 Install Rubber seal Master cylinder cap Screws Master Cylinder C...

Страница 261: ...e Replenish Refer to the BRAKE FLUID INSPEC TION section in the CHAPTER 3 Rear Brake 1 Install 0 Piston seal 0 Dust seal 0 Piston 2 Install Brake caliper Bolts Brake Caliper 35 Nm 3 5 m kg 25 ft lb 3 Install Brake pad Pad spring Retaining bolt Refer to the BRAKE PAD REPLACE MENT section 7 24 ...

Страница 262: ...nder Shaft Plain washer 0 Cotter pin 0 Bolt Master Cylinder 20 Nm 2 0 m kg 14 ft lb I Always use new cotter pin 5 Install Reservoir tank 6 Install Master cylinder assembly b l Bolts Master Cylinder Assembly 35 Nm 3 5 m kg 25 ft lb I 7 Install Pin 0 Plain washer Cotter pin B Always use new cotter pin 7 25 ...

Страница 263: ...cylinder Brake caliper A CAUT1QN When installing the brake hose lightly touch the brake pipe with the prejections I o n the caliper and master cylinder Always use new copper washers 9 Fill Brake fluid A CAUTION Brake fluid may erode painted surfaces or plastic parts Always clean up spilled fluid immediately 7 26 ...

Страница 264: ...ion and lead to poor performance Be careful that water does not enter the master cylinder when refilling Water will significantly lower the boiling point of the fluid and may result in vapor lock IO Install Diaphragm aBush Reservoir tank cap 11 Air bleed Brake system Refer to the AIR BLEEDING section in the CHAPTER 3 12 Inspect Brake fluid level Fluid level is under LOWER level line Repleriish Ref...

Страница 265: ...ing Oil seal I Seal spacer Guide bushing Outer tube Gasket Drain screw Gasket A FORK OIL EACH CAPACITY I3 4 4 4 cm3 15 6 imp oz 15 0 US oz OIL LEVEL 92 mm 3 62 in C From top of inner fork tube Fully compression without spring D G R A D E Fork oil 10WT or equivalent 123Nm 2 0 i h 0 I 7 20 Nm 2 0 m kg 14 ft lb E FORK SPRING FREE LENGTH 408 mm 16 1 in 7 28 ...

Страница 266: ...e front wheel by placing a suitable stand under the engine 2 Remove Front wheel Refer to the FRONT WHEEL REMO VAL section 3 Remove Front brake caliper Front fender Bolts Brake hose clamp 4 Loosen Bolts Handlebar bosses 5 Remove Handlebar Right Handlebar bosses Left and right I with handlebar Left 6 Loosen Cap bolts ...

Страница 267: ...ch bolts 8 Remove Front fork DISASSEMBLY 1 Remove Cap bolt Collar 0 Spring seat Fork spring Drain the fork oil 2 Remove Dust seal 0 Retaining clip Use a thin flat screwdriver and be careful not to scratch the inner fork tube 3 Remove Bolt Damper rod Use the Damper Rod Holder and T Handle to lock the damper rod 7 30 ...

Страница 268: ...refully with drawing the inner tube NOTE Excessive force will damage the oil seal and or the bushes Damaged oil seal and bushing must be replaced mAvoid bottoming the inner tube in the outer tube during the above procedure as the oil lock piece will be damaged 6 Remove Oil seal SeaI spacer Guide bushing Oil lock piece INSPECTION 1 Inspect Inner tube Scratches Bends f Replace Do not attempt to stra...

Страница 269: ...ck piece O ring Cap bolt Damage Replace ASSEMBLY Before assembling clean and inspect all parts and replace when necessary NOTE In front fork assembly be sure to use following new parts Do not reuse them Slide bushing Guide bushing 0Oil seal Dust seal 1 Install Rebound spring Damper rod Allow the rod to slide slowly down the tube until the it protrudes from the bottom Oil lock piece Fit oil lock pi...

Страница 270: ... Handle to lock the damper rod Bolt Damper Rod 40 Nm 4 0 m kg 29 ft lb Apply LOCTITE 3 Install Guide bushing New Into the outer tube 0Seal spacer On the top of guide bushing 0 0Oil seal Use the Fork Seal Driver Weight Adopter and Retaining clip Dust seal 4 Fill Front fork 7 33 ...

Страница 271: ...fully compressed without spring Inner tube Fork oil 5 Install Fork spring With the smaller pitch side up 0 Spring seat 0 Collar Cap bolt Temporarily tighten the cap bolt 23 Nm 2 3 m kg 17 ft lb INSTALLATION Reverse the removal procedure Note the following point 1 Install Front fork Temporary tighten the pinch bolts NOTE Hold the inner tube with its top 44 mm 1 7 in above the top of the handlebar c...

Страница 272: ... Bolts Handlebar Boss 23 Nm 2 3 m kg 17 ft lb I 4 Install Front fender Bolt Front Fender 7 Nm 0 7 m kg 5 1 ft lb I 5 Install Front wheel Refer to the F R O N T W H E E L IN STALLATION section Front Axle 58 Nm 5 8 me kg 42 ft lb Bolts Brake Caliper 35 Nm 3 5 rn kg 25 ft lb Pinch Bolt Front Fork 20 Nm 2 0 rn kg 14 ft lb Make sure that the brake hoses are routed properly 7 35 ...

Страница 273: ...uide tube 8 Locknut Handlebar Right Adjuster Handlebar boss Right Clutch cable Handlebar boss Left Throttle cable 1 Handlebar Left Throttle cable 2 Grip rubber I Starter cable 0 Handlebar grip end Starter lever assembly 23 Nm 2 3 m kg 17 ft lb i 0 4 25 Nm 2 5 m kg 18 ft lb 7 36 ...

Страница 274: ...ut Handle crown Lock washer Ring nut Upper Washer Ring nut Lower Bearing cover Bearing Upper Bearing Lower Steering stem 1 IlONm 11 m ks BOft lb 1 26 Nm 2 6 m kg 19 ft lb IST 52 Nm 5 2 m kg 37 ft lb 2ND A LOOSEN IT COMPLETELY 3RD 3 Nm 0 3 m kg 2 2 ft lb 7 37 ...

Страница 275: ... there is no danger of it falling over 1 Elevate the front wheel by placing a suitable stand under the engine 2 Remove Front wheel Refer to the FRONT WHEEL RE MOVAL section 3 Remove Bracket Master cylinder 4 Remove Handlebar grip end Right 5 Remove Handlebar switch Right ...

Страница 276: ...er 9 Remove Handlebar Right Handlebar bosses Left and right with handlebar Left 10 Loosen Pinch bolt Handlebar crown 11 Remove Lower cowlings Left and right Center cowlings Left and right R e f e r t o t h e COWLING REMOVAL A N D I N S T A L L A T I O N REMOVAL section in the CHAPTER 3 12 Remove Front forks Left and right Refer to the F R O N T F O R K R E MOVAL section 7 39 ...

Страница 277: ...14 Remove Handlebar crown 15 Remove Lock washer Ring nut Upper Use Ring Nut Wrench Ring Nut Wrench P N Y U 33975 16 Remove Washer Ring nut Lower Bearing cover Support the steering shaft so that it may not fall down 17 Remove Steering stem Bearing Upper Bearing Lower ...

Страница 278: ...cement steps Remove the bearing races using long rod and the hammer as shown Remove the bearing race on the steering stem using the floor chisel and the ham mer as shown install the new dust seal and races NOTE Always replace bearings and races as a set 3 Inspect Handlebars Bents Damage Replace 4 Inspect Handlebar bosses Cracks Damage Replace 7 41 ...

Страница 279: ...ing nut Lower 3 Tighten Ring nuts Lower Upper Ring nuts tightening steps NOTE Set the Torque Wrench to the Ring Nut Wrench so that they form a right angle Install the ring nut Lower NOTE The tapered side of ring nut must face down ward Tighten the ring nut using the Ring Nut Wrench Ring Nut Wrench P N Y U 33975 Ring Nut 0 Initial Tightening 52 Nm 5 2 ma kg 37 ft lb LOOSEN THE RING NUT COMPLETE LY ...

Страница 280: ...align the slots of both ring nuts If not aligned hold the lower ring nut a n d tighten the other until they are aligned Install the lock washer 8 NOTE Make sure the lock washer tab is placed in the slots Install the handle crown and tighten the steering stem nut to specification Nut Steering Stem 110 Nm 11 0 m kg 80 ft lb 4 Install Brake hose joint Brake Brake Hose Joint 10 Nm 1 0 m kg 7 2 ft lb I...

Страница 281: ...eft Handlebar grip end Left Handlebar Left installation steps Install the lever holder with the punched mark on the handlebar aligning with the slit in the lever holder Bolt Lever Holder 10 Nm 1 0 rn kg 7 2 ft lb Install the handlebar switch Left Apply align coat of an adhesive for rubber to the handlebar end as shown 20 mm 0 8 in Fit the handlebar grip fully over the handle bar end Leave the hand...

Страница 282: ...r end 12 Install Front brake master cylinder NOTE Install the master cylinder with the punched mark on the handlebar aligning with the master cylinder end 0 Bolts Master Cylinder Bracket 9 Nm 0 9 m kg 6 5 ft lb I 13 Install Handlebar grip end Right Provide a clearance of 1 mm 0 04 in between the handlebar grip and the handlebar grip end Otherwise the grip may not move Handlebar Grip End 25 Nm 2 5 ...

Страница 283: ...HEEL INSTA LLATION section P Wheel Axle 58 Nm 5 8 m kg 42 ft lb Bolt Brake Caliper 35 Nm 3 5 m kg 25 ft lb Pinch Bolt Front Fork 20 Nm 2 0 m kg 14 ft lb 16 Install Clutch cable NOTE Apply a light coat of lithium soap base grease onto the clutch cable end 17 Adjust Clutch cable free play Refer to the CLUTCH ADJUSTMENT section in the CHAPTER 3 7 46 ...

Страница 284: ...REAR SHOCK ABSORBER AND SWINGARM REAR SHOCK ABSORBER AND SWINGARM Rear Shock Absorber Shock absorber Collar Washer Collar Oil seal Bearing ...

Страница 285: ...Collar Pivot shaft Relay arm NOTE Coat the bearings bushings thrust covers oil seals and collars with a liberal amount of light weight lithiun soap base grease before installing After installing thoroughly wipe off excess grease 7 40 NmgO m kg 29 ft lb h Tx p 40 Nm 4 0 m kg 29 ft lb 1 SIDE PLAY AT END OF SWING ARM 1 O mm 0 04 in 7 48 ...

Страница 286: ...or other high heat This may cause the unit to explode due to excessive gas pressure 3 Do not deform or damage the cylinder in any way Cylinder damage will result in poor damping performance DISPOSAL NOTES Shock absorber disposal steps Gas pressure must be released before dispos ing the shock absorber To do so drill a 2 3 mm 0 08 0 12 in hole through the cylinder wall at a point 25 30 mm 1 0 1 2 in...

Страница 287: ... REMOVAL AND INSTALLATION REMOVAL section in the CHAPTER 3 Swingarm Securely support the motorcycle so there is no danger of it falling down 3 Remove Bolt Arms Bottom 4 Remove Bolt Swingarm Bolt Rear shock absorber Bottom Relay arm 5 Remove Bolt Rear shock absorber Top Rear shock absorber 7 50 ...

Страница 288: ...rber 2 Remove Chain case 3 Check Swingarm Side play Side play Replace the bearings and collar Move the swingarm from side to side There should be no noticeable side play Side Play At End of Swingarm 1 0 mm 0 04 in 4 Check Swingarm Vertical movement Tightness Binding Rough spots Replace the bearings Move the swingarm up and down ...

Страница 289: ...ER AND SWINGARM 6 Remove Guard seal 7 Remove Tension bar 8 Remove Arms Left and right 9 Remove Thrust covers aThrust washer Bush INSPECTION Rear shock absorber 1 Inspect Rear shock absorber Oil leaks Damage Replace 7 52 ...

Страница 290: ...gs in a SOlVent 2 Inspect Bearings Race Rollers Pitting Damage Replace Trust washers Trust covers Damage Replace Collar Pivot shaft Damage Replace 3 Inspect Arm Left Arm Right Relay arm Damage Replace Bearings Pitting Damge Replace 0Oil seals Collars Damage f Replace 7 53 ...

Страница 291: ...rease Swingarm 1 Install Guard seal Tension bar Screw Guard Seal 8 Nm 0 8 m kg 5 8 ft lb t Bolt Tension Bar I 15 Nm 1 5 m kg 11 ft lb 2 Install Arms Left and right Bolt Arm 40 Nm 4 0 m kg 29 ft lb I 3 Install Swing arm Pivot Shaft Swingarm 90 Nm 9 0 m kg 65 ft lb Rear Shock Absorber 1 Install Rear shock absorber Rear Shock Absorber Upper 40 Nm 4 0 rn kg 29 ft lb 7 54 ...

Страница 292: ...rms Left and right Relay Arm Arms 40 Nm 4 0 m s kg 29 ft lb 4 Install Rear wheel Refer to the REAR WHEEL INSTAL LATION section Nut Rear Axle 107 Nm 10 7 rn kg 77 ft lb Bolts Brake Caliper 35 Nm 3 5 rn kg 25 ft lb 5 Adjust Drive chain slack R e f e r t o t h e D R I V E C H A I N S L A C K ADJUSTMENT section in the CHAPTER Drive Chain Slack 10 20 mm 0 4 0 8 in 55 ...

Страница 293: ... washer Drive sprocket R e f e r t o t h e E N G I N E REMOVAL section in the CHAPTER 4 3 Remove Rear wheel Swingarm o Drive chain Refer to the R E A R W H E E L R E MOVAL and REAR SHOCK ABSORBER AND SWINGARM REMOVAL 4 Remove Driven sprocket INSPECTION AND CLEANING 1 Measure Drive chain wear Length of 10 links Over specified limit Replace the drive chain drive sprocket and driven sprocket as a set...

Страница 294: ...CAWTIUM Do not use steam cleaning high pressure hashes and certain solvent of O ring damage may occur 4 Inspect Drive sprocket More than l 4 teeth wear f Replace sprocket OCorrect Roller Sprocket 5 Inspect Drive sprocket Bent teeth f Replace sprocket Slip off INSTALLATION Reverse the removal procedure Note the following points 1 Install Driven sprocket Nuts Driven Sprocket 32 Nm 3 2 mm kg 23 ft lb...

Страница 295: ...Install Drive sprocket Lock washer New Nut Drive sprocket Nut Drive Sprocket 70 Nm 7 0 ma kg 50 ft lb 5 Install Crankcase cover Left Shift arm 6 Adjust Drive chain slack Refer to the D R I V E C H A I N S L A C K ADJUSTMENT section in the CHAPTER Drive Chain Slack 10 20 mm 0 4 0 8 in A CAWlON Too small chain slack will overload the engine and other vital parts keep the slack within the specified l...

Страница 296: ...CIRCUIT DIAGRAM wELEC ELECTRICAL FZR400WSUC CIRCUIT DIAGRAM q B I L 6 B Ch B B IL A 8 l ...

Страница 297: ...ling unit TURN switch TURN indicator light Front position light Flasher light Left Rear flasher light Left Rear flasher light Right Front position light Flasher light Right Reed switch Horn HORN switch Tachometer Temp meter Therm0 unit Fuel pump relay I Fuel pump Fuse HEAD LIGHTS Dimmer switch Meter light HIGH BEAM indicator light Headlight Tail Brake light License light I EXUP control unit EXUP s...

Страница 298: ...RICAL COMPONENTS 1 Therm0 switch Th ermo unit Relay assembly Fuel pump relay H o r n Oil level switch Neutral switch Sidestand switch Sidestand relay EXUP control unit For California only j EXUP ServOmOtOr For California only 8 3 ...

Страница 299: ...L COMPONENTS ELEC m ELECTRICAL COMPONENTS 2 Wireharness Rear brake switch Diode block Fuse MAIN Main switch Ignition coil Plug cap Battery Starter relay Rectifier Regulator Digital ignitor unit I I 112V RAH B 4 ...

Страница 300: ...terminals in the switch component C 0 indicates the terminals between which there is a continuity of electricity i e a cl osed circuit at the respective switch positions In this chart R and Br and L W and L R are continuous with the ON switch position B and B W is continuous with the OFF switch position B and B W is continuous with the LOCK switch position B and B W and R and L R are continuous wi...

Страница 301: ...mple the continuity is as follows R and Br and L W and L R are continu ous with the ON switch position B and B W is continuous with the OFF switch position B and B W is continuous with the LOCK switch position B and B W and R and L R are continu ous with the P switch position Please note that there is no continuity an open circuit at all for the color combinations other than the above 4 Check the ...

Страница 302: ...here must be no continuity the tester indicat ing oo l at OFF LOCK or PI There is something wrong between R and Br if there is no continuity at the ON position or if there is some continuity either at the OFF or LOCK or P NOTE Check the switch for continuity several times 5 Next go on to checking of the continuity be tween B and B W L W and L R and R and L R at the respective switch posi tions as ...

Страница 303: ... bulb NOTE Bulbs of the and type uses a bulb holder Remove the bulb holder before removing the bulb itself Most of the bulb holders for this type can be removed by turning them counter clockwise Most of the bulbs of 0 and 0 type can be re moved from the bulb sockets by pushing and turning them counterclockwise Bulbs of the type can be removed from the bulb sockets by simply pulling them out Be sur...

Страница 304: ...ect ing the tester 1 lead to the terminal and the tester lead to the terminal Then check the continuity between the and terminals by connecting the tester lead still to the terminal and the tester 1lead to the terminal If the tester shows a in either case replace the bulb 3 Check the bulb socket by installing a proven bulb to it As in the checking of bulbs con nect the pocket tester leads to the r...

Страница 305: ...IGNITION SYSTEM ELECII IGNITION SYSTEM CIRCUIT DIAGRAM 8 11 ...

Страница 306: ...ring diagram NOTE For the color codes see page 8 2 Main switch Fuse MAIN Battery Fuse IGNITION ENGINE STOP switch Diode block Sidestand switch Sidestand relay Digital ignitor unit Ignition coil I and 4 cylinder Ignition coil 2 and 3 cylinder Pickup coil Spark plug Neutral switch 8 12 ...

Страница 307: ...es the control unit for the electric fuel pump a Pickup coil m Wave shape shaping circuit a Edge detection circuit DJ Latch circuit z Microprocessor Lj Free running counter G Comparison circuit La Register Tl Flip flop circuit JJ Driving circuit KJ Ignition coil 71 Digital ignitor unit OPERATION The following operations are digitally performed by signal from the pickup coil signal 1 Determing prop...

Страница 308: ... system NOTE Remove the following before troubleshooting 1 Seat 4 Top cover 2 Lower cowling 5 Air filter case 3 Center cowling 6 Crankcase cover Left Use the following special tools in this troubleshooting Dynamic Spark Tester P N Y M 34487 Pocket Tester P N YU 03112 1 Fuse MAIN Remove the fuse MAIN Connect the Pocket Tester fi x 1 to the fuse MAIN NON CONTINUITY Check the fuse MAIN for continuity...

Страница 309: ...8 mm 0 028 0 032 in aCORRECT 4 Ignition spark gap Disconnect the spark plug cap from spark plug Connect the Dynamic Spark Tester as shown 3 Spark plug cap 3 Spark plug Turn the main switch to ON Check the ignition spark gap BStart engine and increase spark gap until misfire occurs Minimum Spark Gap 6 0 mm 0 24 in I A INCORRECT I Repair or replace spark plug I MEETS SPECIFICATION 7 I Ignition syste...

Страница 310: ... F aMEETS SPECIFICATION 6 Ignition coil resistance Disconnect the ignition coil coupler from the wireharness Connect the Pocket Tester SL x 1 to the ignition coil Ignition coil Right Tester lead Red White Terminal Tester lead Gray Terminal Check the primary coil for specificated resistance Primary Coil Resistance 1 8 2 2n at 20 C 68 F OUT OF SPECIFICATION Replace spark plug cap Ignition coil Left ...

Страница 311: ... Secondary Coil Resistance c l 8 9 6 14 4 kR at 20 C 68 F Spark Plug Lead Spark plug a BOTH MEET SPECIFICATIONS 7 Main switch Disconnect the main switch coupler from the wire harness Check the switch component for the conti nuity between Red and Brown I Refer to the CHEKING OF SWITCHES section OUT OF SPECIFICATION I Replace ignition coil I INCORRECT I Replace main switch I CORRECT 8 17 ...

Страница 312: ... Red White and Red White Refer to the CHECKING OF SWITCHES section a CORRECT 9 Neutral switch Disconnect the neutral switch coupler from the wire harness Check the switch component for the conti nuity between Sky blue and Ground Refer to the CHECKING OF SWITCHES section INCORRECT I Replace handlebar switch Right I INCORRECT Replace neutral switch CORRECT 8 18 ...

Страница 313: ...RRECT Il Sidestand relay B Disconnect the sidestand relay coupler from the wire harness BConnect the Pocket Tester a x 1 and battery 12V voltage to the sidestand relay coupler terminals Tester Lead Red White Terminal Tester Lead f Black Terminal Battery Lead f Red White Terminal Battery Lead f Blue Yellow Terminal Check the relay for continuity INCORRECT Replace sidestand switch I NOCONTINUITY 1 R...

Страница 314: ...te Black Terminal Check the pickup coil for specificated resistance Pickup Coil Resistance 85 11551 at 20 C 68 F White Red White Black vMEET SPECIFICATION OUT OF SPECIFICATION lYKi7Yconnection I Replace pickup coil I POOR CONNECTION CORRECT Digital ignitor unit is faulty I Check the entire ignition system for con nections 4 1 1 Correct Refer to the WI RING DIAGRAM section I l l Replace the digital...

Страница 315: ...ELECTRIC STARTING SYSTEM ELECTRIC STARTING SYSTEM CIRCUIT DIAGRAM 8 21 ...

Страница 316: ...starting circuit in the wiring diagram NOTE For the color codes see page 8 2 Main switch START switch Starter motor Starter relay Fuse MAIN Battery Fuse IGNITION ENGINE STOP switch Diode block Clutch switch Sidestand switch Neutral switch Starting circuit cut off relay Relay assembly 8 22 ...

Страница 317: ...d I The starting circuit cut off relay prevents the starter from operating when neither of these conditions has been met In this instance the starting circuit cut off relay is open so current cannot reach the starter motor When one of both of the above conditions have been met however the starting circuit cut off relay is closed and the engine can be started by pressing the starter switch w WHEN T...

Страница 318: ...c starting system NOTE Remove the following before troubleshooting 1 Seat 3 Lower cowling 2 Seat cowling 4 Fuel tank Use the following special tool in this troubleshooting Pocket Tester P N YU 03112 1 Fuse MAIN Remove the fuse MAIN Connect the Pocket Tester s2 x 1 to the fuse MAIN Check the fuse MAIN for continuity l l NON CONTINUITY Replace fuse MAIN 1 CONTINUITY 2 Battery Check the battery condi...

Страница 319: ...on a OPERATIVE 5 Starting circuit cut off relay Disconnect the relay assembly coupler from the wire harness Connect the pocket tester a x 1 and battery 12V voltage to the relay assembly coupler terminals I I A wire for the jumper lead must have the equivalent capacity as that of the battery lead or more otherwise it may cause the jumper lead to be burned aThis check is likely to produce sparks so ...

Страница 320: ...TY Replace relay assembly Disconnect the main switch coupler and lead from the wire harness Check the switch component for the conti nuity between Red and Brown Refer to the CHECKING OF SWITCHES section vCORRECT 7 ENGINE STOP switch Disconnect the ENG I NE STOP switch coupler from the wire harness Check the switch component for the conti nuity between Red White and Red White Refer to the CHECKING ...

Страница 321: ...the conti nuity between Sky blue and Ground Refer to the CHECKING OF SWITCHES section a CORRECT 9 Sidestand switch B Disconnect the sidestand switch coupler from the wire harness Check the switch component for the conti nuity between Blue Yellow and Black 0 Refer to the CHECKING OF SWITCHES section INCORRECT I Replace neutral switch 1 INCORRECT vCORRECT 8 27 I Replace sidestand switch 1 ...

Страница 322: ...TART switch CORRECT Disconnect the START switch coupler from wire harness Check t h e START switch component for the continuity between Blue White and Black 0 I Refer to the CHECK ING OF SWITCHES section 12 Wiring connection I d INCORRECT Replace clutch switch INCORRECT Replace handlebar switch Right I CORRECT I POOR CONNECTION Check the entire ignition system for connec tions Refer to the WIRING ...

Страница 323: ...ELECTRIC STARTING SYSTEM a IDiode block is faulty Replace the diode block I 8 29 ...

Страница 324: ...ELECTRIC STARTING SYSTEM STARTER MOTOR Brush Armature Stator O ring 11 01 8 30 ...

Страница 325: ...Commutator Wear Limit 22 mm 0 87 in 3 Measure Mica undercut Out of specification Scrape the mica to proper value use a hacksaw blade can be ground to fit Mica Undercut 1 8 mm 0 07 in NOTE The mica insulation of the commutator must be undercut to ensure proper operation of commutator 4 Inspect Armature coil insulation continuity Defects s f Replace starter motor Armature coil inspecting steps Conne...

Страница 326: ...r 5 Measure Brush length Out of specification f Replace Brush Length Limit 5 0 mm 0 20 in 6 Measure Brush spring pressure Fatigue Out of specification Replace as a set Brush Spring Pressure 540 660 g 19 05 23 28 04 7 Inspect Bearing 0 Oil seal 00 rings Wear Damage Replace Installation 1 Install 0 Starter motor NOTE Align the match marks on the bracket with the match marks on the housing a 32 ...

Страница 327: ...CHARGING SYSTEM 1 CHARGING SYSTEM CIRCUIT DIAGRAM I R W1 tDm t 8 33 ...

Страница 328: ...CHARGING SYSTEM IELEC ii 1 Aforementioned circuit diagram show the charging circuit in the wiring diagram NOTE For the color codes see page 8 2 Rectifier Regulator AC generator Fuse MA IN Battery 8 34 ...

Страница 329: ...lwing 5 Lower cowling 3 Top cover Use the following special tools in this troubleshooting Inductive Tachometer P N Y U 08036 Pocket Tester P N YU 03112 1 Fuse MAIN NO CONTINUITY Remove the fuse MAIN Connect the Pocket Tester a x 1 to the fuse MAIN Check the fuse MAIN for continuity a CONTINUITY I Replace fuse MAIN 2 Battery Check the battery condition Refer to the BATTERY INSPECTION section in the...

Страница 330: ...to about 3 000 r min Check charging voltage rll m Charging Voltage 8 14 3 15 3V at 3 000 r min 1OUT OF SPECIFICATION 4 Stator coil resistance Disconnect the A C magneto coupler from the wire harness Connect the Pocket Tester R x 1 to the stator coil leads Stator Coil 1 Tester Lead White Lead Tester 1 Lead White Lead Stator Coil 2 Tester Lead White Lead Tester Lead White Lead MEETS SPECIFICATION v ...

Страница 331: ...tance Stator Coil Resistance White White 0 44 0 66R at 20 C 68 F White White 0 44 0 66R at 20 C 68 F OUT OF SPECIFICATION Replace stator coil I Check the entire charging system for con 1 Refer to the WIRING DIAGRAM section POOR q ZTlON I n CORRECT Replace rectifier regulator I 8 37 ...

Страница 332: ...ELECl m 1 LIGHTING SYSTEM LIGHTING SYSTEM CIRCUIT DIAGRAM I r 7 I 4 _r W B Ed L R 0 1 I I T L Br Ch Dg P t 8 39 ...

Страница 333: ...rcuit in the wiring diagram NOTE For the color codes see page 8 2 Main switch START switch Fuse MAIN Battery Front position light Left Front position light Right Fuse HEAD LIGHTS Dimmer switch Meter light HIGH BEAM indicator light Headlight Tail light License light B 40 ...

Страница 334: ...ing 1 Seat 3 Seat cowling 2 Upper cowling Use the following special tool in this troubleshooting Pocket Tester P N YU 03112 1 Fuse MAIN NO CONTINUITY Remove the fuse MAIN Connect the Pocket Tester R x 1 to the fuse MAIN aCheck the fuse MAIN for continuity l l CONTINUITY Replace fuse MAIN 2 Battery I INCORRECT Refer to the BATTERY INSPECTION section in the CHAPTER 3 Check the battery condition Spec...

Страница 335: ...Red and Blue Refer to the CHECKING OF SWITCHES section 4 LIGHTS Dimmer switch Disconnect the handlebar switch Left coupler from the wire harness Check the switch component for the conti nuity between Blue Black and Yellow 0 and Blue Black and Green Refer to the CHECKING OF SWITCHES section I INCORRECT Replace main switch I INCORRECT 1 Replace handlebar switch Left I 8 42 ...

Страница 336: ...s 0 Check the START switch component for the continuity between Red Yellow and Blue Black Refer to the CHECKING OF SWITCHES section INCORRECT I Replace handlebar switch Right I Refer to the WI RING DIAGRAM section Check condition of each circuit for lighting Refer to the LIGHTING SYSTEM CHECK 8 43 ...

Страница 337: ...socket Check the bulb and bulb socket for conti nuity NO CONTINUITY Refer to the CHECKING OF BULBS section l l Replace bulb and or bulb socket I vCONTINUITY 3 Voltage Connect the Pocket Tester DC20V to the LIGHTS Dimmer switch connector Tester I Lead Blue Black Terminal Tester 1 Lead Black Terminal MEETS SPECIFICATION Turn the main switch to ON bCheck for voltage 12V on the Blue Yellow at the LIGH...

Страница 338: ...t Tester Q x 1 to the fuse HEAD Check the fuse HEAD for continuity a CONTINUITY 2 Bulb and bulb socket Check the bulb and bulb socket for conti nuity Replace fuse HEAD NO CONTINUITY Refer to the CHECKING OF BULBS section r l Replace bulb and or bulb socket I CONTINUITY 3 Voltage Connect the Pocket Tester DC20V to the bulb socket connector Tester Lead Black White 0 Terminal Tester Lead f Black Term...

Страница 339: ... bulb and bulb socket for conti CONTINUITY Replace bulb and or bulb socket I I 2 Voltage the Pocket Tester DC20V to the bulb socket connector Tester I Lead Blue Lead Tester 1 Lead Black Lead L l BW 2 a c l ClXl CD I Turn the main switch to ON I Check for voltage 12V on the Blue lead at the bulb socket connector OUT OF SPECIFICATION Iirinq connection aMEETS SPECIFICATION 12V I Check the entire ligh...

Страница 340: ...tch to ON BTurn the LIGHTS switch to ON DCheck for voltage 12V on the Blue lead at the bulb socket connector n J MEETS SPECIFICATION 12V NO CONTINUITY Check the bulb and bulb socket for conti a Replace bulb and or bulb socket CONTINUITY OUT OF SPECIFICATION This circuit is good I 3 Wiring connection Check the entire lighting system for connections Refer to the WIRING DIAGRAM section 8 47 ...

Страница 341: ... 6 Terminal Tester Lead Black Terminal Turn the main switch to ON BTurn the LIGHTS switch to ON Check for voltage 12V on the Blue lead at the bulb socket connector n i NO CONTINUITY Replace bulb and or bulb socket I OUT OF SPECIFICATION MEETS SPECIFICATION 12V This circuit is good 8 47 3 Wiring connection Check the entire lighting system for connections Refer to the WIRING DIAGRAM section ...

Страница 342: ...SIGNAL SYSTEM 1 ELECl i i 1 SIGNAL SYSTEM CIRCUIT DIAGRAM ObJRIBrlLl N AZ Lu I II I I I I I Liwl RIW L W 0 1 L W 1I L W 1 Y L R 1 I II L B L r III IN I 1byiiqB a I I rch c Ll cm 8 49 ...

Страница 343: ...it I Fuse SIGNAL Front brake switch Rear brake switch NEUTRAL indicator light Neutral switch 01 L indicator light R esistor Oil level switch I Flasher relay Relay assembly 0 Cancelling unit Relay assembly TURN switch TURN indicator light Front flasher light Left Rear flasher light Left I Rear flasher light Right I Front flasher light Right Reed switch Horn HORN switch Tachometer Temp meter Th ermo...

Страница 344: ... Lower cowling 4 Air filter case Use the following special tool in this troubleshooting Pocket Tester P N YU 03112 1 Fuse MAIN NON CONTINIJITY Remove the fuse MAIN Connect the Pocket Tester fi x 1 to the fuse MAIN aCheck the fuse MAIN for continuity CONTINUITY L Replace fuse MAIN 1 2 Battery Check the battery condition Refer to the BATTERY INSPECTION section in the CHAPTER 3 I Specific Gravity 1 2...

Страница 345: ...en Red and Brown Refer to the CHECKING OF SWITCHES section I I CORRECT 4n iring c o n n e c t i o n Check the entire signal system for connec Refer to the WI RING DIAGRAM section aCORRECT Check condition of each circuit for signal system Refer to the SIGNAL SYSTEM CHECK section INCORRECT I Replace main switch I POOR CONNECTION 4 ICorrect I 8 52 ...

Страница 346: ...HECKING OF SWITCHES section P B OFF Free ON Push ckn 2 Voltace 11 a CORRECT Connect the Pocket Tester DC20V to the horn connector Tester Lead Brown Lead Tester Lead Frame Ground Turn the main switch to ON Check for voltage 12V on the Brown lead at the horn terminal I I INCORRECT I Replace handlebar switch Left I OUT OF SPECIFICATION Check the entire lighting system for connections I l l MEETS w SP...

Страница 347: ... 1 c HORN IS NOT SOUNDED 4 Voltage Connect the Pocket Tester DC20V to the horn at the Pink terminal Tester Lead Pink Lead Tester 1 Lead Frame Ground Turn the main switch to ON Check for voltage 12V on the Pink lead at the horn terminal HORN IS SOUNDED t II Horn is good OUT OF SPECIFICATION aMEETS SPECIFICATION 12V I 1 1 Replace horn I 1 Adjust or replace horn I 8 54 ...

Страница 348: ... the brake switch coupler from the wire harness Check the switch component for the conti nuity between Brown and Green Yellow or Brown and Yellow Refer to the CHECKING OF SWITCHES section a Front brake switch Rear brake switch Connect the Pocket Tester DC20V to the I Tester Lead Blue Lead Tester 1 Lead Black Lead I INCORRECT rReplace brake switch I 8 55 ...

Страница 349: ...ystem for connections Refer to the WIRING DlAGRAWl section 3 Flasher light and or TURN indicator light do not blink Check the bulb and bulb socket for conti a CONTINUITY 2 TURN switch Disconnect the handlebar switch coupler from the wire harness Check the switch component for the conti n u i t y b e t w e e n B r o w n W h i t e a n d C h o c o l a t e a n d B r o w n W h i t e and Dark green Refe...

Страница 350: ...e signal system for connections Refer to the WIRING DIAGRAM section 2 TURN switch Disconnect the handlebar switch coupler from the wire harness Check the switch component for the conti nuity between Brown White 0 a n d C h o c o l a t e a n d B r o w n W h i t e and Dark green Refer to the CHECK ING OF SWITCHES section 4 3 Flasher light and or TURN indicator light do not blink Check the bulb and b...

Страница 351: ...the flasher relay terminal n M E E T S 4 Voltage DConnect the pocket tester DC20V to the relay assembly connector Tester Lead Brown White Terminal Tester Lead Black Terminal 0SPECIFICATION 12V DTurn the main switch to ON BCheck for voltage 12V on the Brown White lead at the flasher relay terminal a MEETS SPECIFICATION 12V OUT OF SPECIFICATION Check the entire signal system for OUT OF SPECIFICATION...

Страница 352: ...Check for voltage 12V on the Chocolate lead or Dark green lead at the bulb socket connector _ I 11 MttlS SPECIFICATION 12V OUT OF SPECIFICATION 1 _ _ Check the entire srgnal system for I Refer to the WIRING DIAGRAM This circuit is good I sectron 4 Blinking Flasher light is not cancelled automatically 1 1 TURN switch I Disconnect the handlebar switch coupler from the wire harness Check the switch c...

Страница 353: ...ck the reed switch for specificated resis tance c l El Reed Switch Resistance About 752 White Green Ground Then return back OC2 or 52 when wheel is stopped INCORRECT Replace handlebar switch Left NOTE When measuring reed switch resistance lift front wheel and rotate the wheel by hand OUT OF SPECIFICATION I Replace speedometer assembly I MEETS SPECIFICATION POOR CONNECTION Refertothe WIRING DIAGRAM...

Страница 354: ...eutral switch Disconnect the neutral switch coupler from the wire harness Check the switch component for the conti nuity between Sky blue and Ground Refer to the CHECKING OF SWITCHES section v CORRECT I 3 Voltage Connect the pocket tester DC20V to the bulb socket connector Tester Lead Brown Terminal Tester Lead Black Terminal NO CONTINUITY Replace bulb and or bulb socket I INCORRECT I Replace neut...

Страница 355: ... light does not come on when push START switch 1 Bulb and bulb socket Check the bulb and bulb socket for conti nuity Refer to the CHECKING OF BULBS section a CONTINUITY 4 2 START switch Disconnect the START switch coupler from wire harness Check the STAR switch component for the continuity between Blue White and Black Refer to the CHECKING OF SWITCHES section NO CONTINUITY Replace bulb and or bulb...

Страница 356: ...ect the pocket tester K2 x 1 to the diode leads Tester Lead Blue White Lead Tester 1 Lead Green Lead Check the diode for continuity nCONTINUITY 4 Voltage Connect the pocket tester DC20V to the bulb socket connector Tester t Lead Brown Terminal Tester Lead Black Terminal NO CONTINUITY 8 62 ...

Страница 357: ... does not come on when oil tank is empty aCheck the bulb and bulb socket for conti Replace bulb and or bulb socket CONTINUITY 2 Resister aDisconnect the diode unit coupler from the wire harness Connect the pocket tester R x 1 to the diode leads Tester Lead Black Red Lead Tester 1 Lead Green Lead Check the resister for continuity NO CONTINUITY 1 Replace diode unit I QCONTINUITY 8 63 ...

Страница 358: ...ead Oil Level Switch Body Check the oil level switch for continuity Switch Good position condition Bad condition A Upright position X 0 x 0 Upside B down 0 x x 0 position 3 Continuity x No continuity GOOD CONDITION a 4 Voltage Connect the Pocket Te ter DC20V to the bulb socket connector Tester Lead Brown Terminal Tester Lead Black Terminal BAD CONDITION eplace oil level switch 8 64 ...

Страница 359: ...he WIRING DIAGRAM section 7 When engine is hot tempmeter does not move 1 Tempmeter Disconnect the therm0 unit lead Green Red Check that the tempmeter stays put at C Ground the lead to the frame with the jumper lead Turn the main switch to ON Check that the tempmeter hand moves up to H I INCORRECT ACAUTlUN As soon as the meter hand get in the Red zone turn the main switch to OFF to avoid damage to ...

Страница 360: ...bulated Therm0 meter Coolant Temoerature I Resistance 50 C 122 F 154s2 80 C 178 F 47 57fl 100 C 212 F 26 29 2 120 C 248 F wafter measuring the therm0 unit install the unit Handle the therm0 unit with special care Never subject it to strong or allow it to be dropped Should it be dropped it must be replaced ACAUTION Avoid overtightening 8 66 ...

Страница 361: ... to ON ICheck for voltage 12V on the Brown lead at the temperature gauge connector 6 Wiring connection OUT OF SPECIFICATION n MEETS eSPECIFICATION 12V Check the entire signal system for connec tions Refer to the WIRING DIAGRAM I Replace therm0 unit I OUT OF SPECIFICATION Check the entire signal system for lolnnprlionl POOR CONNECTION section I Correct aCORRECT Replace tempmeter I 8 67 ...

Страница 362: ...COOLING SYSTEM 1 ELECi ii 1 COOLING SYSTEM CIRCUIT DIAGRAM L Br LI R L D I G 8 69 ...

Страница 363: ...ING SYSTEM ELECII A forementioned circuit diagram shows the cooling circuit in the circuit diagram NOTE For the color codes see page 8 2 Main switch Fuse MAIN B attery Fuse FAN Thermo switch Fan motor 8 70 ...

Страница 364: ... Top cover 3 Air filter case Use the following special tool in this troubleshooting Pocket Tester P N YU 03112 1 Fuse MAIN FAN Remove the fuse MAIN and FAN Connect the Pocket Tester G x 1 to the fuse MAIN and FAN Check the fuse for continuity NO CONTINUITY Replace fuse MAIN and or FAN aCONTINUITY 2 Battery Check the battery condition Refer to the BATTERY INSPECTION section in the CHAPTER 3 INCORRE...

Страница 365: ... Lead Blue Terminal Battery Lead Black Terminal 1 _ Check the fan motor for operation aOPERATIVE 4 Fan motor Test 2 Disconnect the therm0 switch coupler Connect the terminal with the jumper lead as shown I l l OPERATIVE NO OPERATIVE Replace fan motor NO OPERATIVE I Check wiring connection s I a 72 ...

Страница 366: ...han 98 C 208 4 F X Test 1 2 Heat up tests Test 3 4 Cool down tests 3 Continuity X No continuity Handle the therm0 switch with special care Never subject it to strong shock or allow it to be dropped Should it be dropped it must be replaced Therm0 Switch 8 Nm 0 8 m kg 5 8 ft lb Three Bond Sealock 10 I A CAUTION After replacing the therm0 switch check the cooland level in the radiator and also check ...

Страница 367: ...olace therm0 switch I Check the entire cooling system for connec Refer to the WIRING DIAGRAM section Fan Motor Inspection The following problems may require repair or replacement of components Component Condition Fan motor Unsmooth operation Fan motor Excessive vibration Fan motor bracket Cracks Fan blades Cracks Securing bolts Looseness 8 74 ...

Страница 368: ...FUEL SYSTEM FUEL SYSTEM CIRCUIT DIAGRAM ...

Страница 369: ...orementioned circuit diagram shows the fuel circuit in the circuit diagram For the color codes see page 8 2 Main switch Fuse MAIN Battery Fuse IGNITION ENGINE STOP switch I Digital ignitor unit Fuel pump relay Fuel pump 8 76 ...

Страница 370: ...unit for the fuel pump The fuel pump starts and stops as indicated in the chart below To main fuse and battery Main switch ENGINE STOP switch Digital ignitor unit Fuel pump relay Fuel pump FUEL PUMP START Main Engine stop switch Engine turned on turned to ON For about 5 seconds when car After about 0 1 second buretor fuel level is low STOP Engine turned off After about 5 seconds a 77 ...

Страница 371: ... tank Use the following special tool in this troubleshooting Pocket Tester YU 03112 1 Fuse MAIN IGNITION NO CONTINUITY Remove the fuse MAIN and IGNITION Connect the Pocket Tester n x 1 to the fuse MAIN and IGNITION Check the fuse for continuity Replace fuse MAIN and or IGNI l l TION CONTINUITY Refer to the BATTERY INSPECTION section in the CHAPTER 3 Specific Gravity 1 280 at 20 C 68 F a CORRECT Re...

Страница 372: ...d Brown Refer to the CHECKING OF SWITCHES section a CORRECT 4 ENGINE STOP switch Disconnect the ENGINE STOP switch coupler from the wire harness Check the switch component for the conti nuity between Red White ij and Red White Refer to the CHECKING OF SW ITCH ES section a CORRECT INCORRECT 1 Replace main switch I INCORRECT I Replace handlebar switch Right I 8 79 ...

Страница 373: ...ester 1 Lead Red White Terminal Battery I Lead Red White Terminal Battery Lead Blue White Terminal Check the relay for continuity CONTINUITY 8 6 Fuel pump Disconnect the fuel pump coupler from the wire harness Connect the battery voltage as shown Battery I Lead f Blue Black Terminal Battery 1 Lead Black Terminal BCheck the fuel pump operation NO CONTINUITY Replace fuel pump relay NO OPERATIVE Repl...

Страница 374: ...FUEL SYSTEM 1 1 7 Wiring co nection 1 POOR CONNECTION Check the entire fuel system for connectlons Refer to the WI RING DIAGRAM section CORRECT Correct Replace digital ignitor unit 8 81 ...

Страница 375: ...rther to the end the cut off switch turns on and the solenoid coil pulls the plunger with the dia phragm forcing fuel into the fuel chamber NOTE When the main and ENGINE STOP switches are ON the fuel pump relay is activated for five 5 seconds at which time the fuel pump operates Cut off switch Spring Diaphragm Plunger Solenoid coil g E hamber Outlet I n l e t Inspection 1 Connect Battery 12V 2 Ins...

Страница 376: ...YAMAHA EXHAUST VARIABLE VALVE SYSTEM YAMAHA EXHAUST VARIABLE VALVE SYSTEM For California only CIRCUIT DIAGRAM I R W 4 I I I I R W L R WA I I I I II 8 83 ...

Страница 377: ...d A forementioned circuit diagram shows the cooling circuit in the circuit diagram NOTE For the color codes see page 8 2 Main switch Fuse MAIN Battery Fuse IGNITION ENGINE STOP switch Digital ignition unit EXUP control unit EXUP servomotor 8 P 8 84 ...

Страница 378: ...rocedure 2 Check 1 Fuse MAIN IGNITION 2 Battery 3 Main switch 4 ENGINE STOP switch 5 Wiring connection Entire EXUP system NOTE Remove the following parts before troubleshooting 1 Seat 3 Lower cowling Left 2 Seat cowling Use the following special tool in this troubleshooting Pocket Tester P N YU 03112 Procedure 1 1 Voltage Connect the pocket tester DC20V to the EXUP control unit connector Tester Le...

Страница 379: ... EXUP servomotor operation aNO OPERATIVE 3 EXUP servomotor operation Disconnect the EXUP servomotor coupler Connect the battery leads to the EXUP servomotor terminal Battery Positive Lead Black Red Lead Battery Negative Lead Black Yellow Lead This test should be performed within a few seconds to prevent further damage a OPERATIVE 3t OUT OF SPECIFICATION 4 I Go to the Procedure 2 I OPERATIVE 1 Seiz...

Страница 380: ... x 1 to the fuse MAIN and IGNITION Check the fuse for continuity J CONTINUITY Replace fuse MAIN and or IGNI TION 2 Battery INCORRECT Check the battery condition Refer to the BATTERY INSPECTION section in the CHAPTER 3 Specific Gravity 1 280 at 20 C 68 F CORRECT 3 Main switch Disconnect the main switch coupler and lead from the wireharness Check the switch component for the con tinuity between Red ...

Страница 381: ... coupler from the wire harness ICheck the switch component for the con tinuity between Red White and Red White Refer to the CHECKING OF SWITCHES section R W R W O F F I INCORRECT 1 Replace main switch I INCORRECT c Replace handlebar switch Right I tions Refer to the WIRING DIAGRAM Go to Procedure 1 8 88 ...

Страница 382: ...METER ASSEMBLY 1 METER ASSEMBLY Speedometer Tachometer Tempmeter Indicator lights unit Damper Meter bracket 0 Bulb Bulb socket leads Speedometer cable 16 Nm 0 6 m kg 4 3 ft lb 8 89 ...

Страница 383: ...fer to the COWLING REMOVAL AND INSTALLATION REMOVAL section in the CHAPTER 3 2 Disconnect Bulb socket coupler Speedometer cable 3 Remove Speedometer assembly 4 Remove Damper 5 Remove 0 Indicator light unit Meter bracket 6 Remove Bulb socket lead 8 90 ...

Страница 384: ...METER ASSEMBLY 1 3 W G INSTALLATION Reverse the REMOVAL procedure Note the following points 1 Install the meter lights and leads as shown B BN 2 Install the indicator lights as shown 8 91 ...

Страница 385: ...ty Clogged fuel filter Clogged fuel breather pipe Deteriorated fuel or fuel containing water or foreign material Fuel cock Clogged fuel hose o Deteriorated fuel fuel containing water or foreign material Clogged pilot jet Clogged pilot air passage Sucked in air Deformed float Groove worn needle valve Improperly sealed valve seat Improperly adjusted fuel level 0 Improperly set pilot jet Clogged star...

Страница 386: ...iter unit Faulty pickup coil Switches and wiring o Faulty main switch Faulty engine stop switch Broken or shorted wiring Faulty neutral switch Faulty starter motor switch Faulty sidestand switch o Faulty clutch switch Starter motor I Faulty starter motor Faulty starter relay Faulty circuit cut off relay Faulty starter clutch COMPRESSION SYSTEM Cylinder and cylinder head Loose spark plug Loose cyli...

Страница 387: ...roper valve timing Broken valve spring Seized crankshaft 0 Seized camshaft POOR IDLE SPEED PERFORMANCE POOR LE SPEED PERFORMANCE Carburetor Electrical system PROBABLE CAUSE o Improperly returned starter plunger 0 Loose pilot jet Clogged pilot air jet Improperly synchronized carburetors Improperly adjusted idle speed Throttle stop screw Improper throttle cable play o Flooded carburetor 0 Faulty bat...

Страница 388: ...e main jet Clogged air filter Faulty fuel pump 1 FAULTY GEAR SHIFTING 1 HARD SHIFTING Refer to Clutch dragging SHIFT PEDAL DOES NOT MOVE PROBABLE CAUSE i Improperly adjusted shift rod Shift shaft 7 Bent shift shaft Shift cam shift fork 7 Groove jammed with impurities Seized shift fork Bent shift fork guide bar T r a n s m i s s i o n L e p r io gear Incorrectly assembled transmission JUMP OUT GEAR...

Страница 389: ...oil level L Improper quality viscosity CLUTC DRAGGING Clutch 0 Warped pressure plate Unevenly tensioned clutch springs Match marks not aligned Bent push rod Loose push rod bent clutch boss nut Burnt primary driven gear bushing Bent clutch plate 0 Swollen friction plate Faulty cylinder kit cup Broken clutch cable Engine oil Cr IF 0 Improper qualrty viscosity 9 5 ...

Страница 390: ... fuel level Compression system Heavy carbon build up Engine Oil L ty Brake Dragging brake Cooling system Faulty water temperature meter Faulty thermo unit 0 Incorrect cooling water level Faulty thermostat Clogged or damaged radiator Faulty radiator cap Broken dowel pin tipped gear Faulty thermoswitch 0 Inoperative fan motor OVER COOLING LCooling system Faulty water temperature meter Faulty thermo ...

Страница 391: ... level FRONT FORK OIL LEAKAGE MALFUNCTION OIL LEAKAGE Bent damaged or rusty inner tube Damaged or cracked outer tube Damaged oil seal lip Improperly installed oil seal Improper oil level too much Loose hexagon bolt front fork bottom Broken cap bolt O ring Loose drain bolt Damaged drain bolt gasket MALFUNCTION Bent deformed or damaged inner tube Bent or deformed outer tube Damaged fork spring Worn ...

Страница 392: ... oil levels on both sides FRoNT FoRKs ll i forks 0 I Unevenly worn tires 0 Incorrect tire pressure Uneven tire pressures on both sides Loose bearing Bent or loose wheel axle Excessive wheel run out FRAME Twisted Damaged head pipe bearing race Improperly installed bearing race REAR ARM 1 vV a Iyng bushes DRIVE CHAIN Improperly adjusted chain 9 8 ...

Страница 393: ...in or light switch Bulb life expired BULB BURNT OUT Improper bulb Faulty battery Faulty rectifier regulator Improperly grounded Faulty switch main and light switch Bulb life expired FLASHER DOES NOT LIGHT I Improperly grounded Discharged battery Faulty flasher switch Faulty flasher relay a Broken wire harness loosely connected coupler Bulb burnt out FLASHER KEEPS ON s r Faulty yasher relay lnsuffr...

Страница 394: ...witch Improperly adjusted horn Faulty horn coil wire broken or having poor contacts Broken wire harness FAULTY EXUP For California only FAULTY EXUP E Ower Seized or damaged power valve valve 7 Carbon build up Control c a b l e c o I m p r o p e r l y a d j u s t e d c a b l e Seized or discontinuous cable Electrical parts Insufficient battery capacity 7 Improperly charged battery Faulty main switc...

Страница 395: ...J I II ...

Страница 396: ......

Страница 397: ...FOX Racing Shox Setup Manual MOTORCYCLE ...

Страница 398: ...shock Table of Contents FOX RACING SHOX History 3 General Information 3 Warranty 3 Valving Warranty 4 Optional Springs 4 Service 4 Methods of Payment 4 Replacement Parts 4 Methods of Shipping 4 Return Policy 4 International Orders 5 Disclaimer 5 Installation and Basic Set Up Instructions 5 Shock Length Adjustment Ride Height Adjustment If equipped 5 Setting SAG Spring Preload 5 Damping Adjustment ...

Страница 399: ...cations on the planet The countless lessons we ve learned from the many forms of racing and the numerous top racers we ve worked with the expertise we ve gained in 25 years of experience the tiny details of shock design and manufacture that we know are so important the unique shock designs and technology we ve developed All of this has been brought together to create one single product A FOX RACIN...

Страница 400: ...e service center nearest you We recommend that you have your shock serviced every two years for shocks used in normal conditions Follow this procedure to obtain service or repairs for your shock through FOX Racing Shox Contact FOX Racing Shox for return authorization number and shipping address 831 768 1100 Send shocks to FOX Racing Shox with shipping charges pre paid by sender Mark the Return Add...

Страница 401: ...ommendations 4 Set the static sag and rider sag See section below 5 Set the rebound damping See section below 6 Set the compression damping if equipped See section below Shock Length Adjustment Ride Height Adjustment If equipped On some FOX shocks it is possible to adjust the rear ride height of your bike by increasing or decreasing the length of your shock It is best to start out with your FOX sh...

Страница 402: ... the C wrench provided and adjust the preload adjuster nuts on top of the spring Tighten the nut onto the spring to decrease rider sag loosen the nut to increase rider sag Repeat steps 2 through 4 until the rider sag is in the desired range 5 Push down on the rear of your motorcycle a couple of times and let it settle with no rider on board Measure using the same points as before We will call this...

Страница 403: ...ob and has 8 settings with 1 being soft and 8 being hard The numbers line up with a notch on the reservoir Default compression damping setting 3 Tuning Instructions Now that you have the spring preload and shock length set correctly it is time to tune the shock to your liking It is vital that the spring preload be set correctly before any damping changes are made otherwise you will be starting fro...

Страница 404: ...ock Be sure to take note of the above warnings Here are a few examples of how changing the rear ride height can affect your motorcycle performance Symptom Problem Motorcycle is unstable at high speeds Rear Ride Height too high Poor grip from rear tire Rear Ride Height too high Unstable under heavy braking Rear Ride Height too high Motorcycle understeers on exit corners Rear Ride Height too low Dif...

Страница 405: ...ours of Dyno track and street testing to give you a shock that just needs to be fine tuned to suit your personal riding style using the external adjustments External adjustments can be made at any time and any place Go out and ride Focus on what the rear of the bike is doing and not on going 110 Sometimes you can feel it s not quite right for example but it may be hard to tell if the problem is to...

Страница 406: ...tions with deep rolling bumps Shock is packing down Too much damping keeps the wheel from extending enough before you hit the next bump Suspension gets harsh over medium or large rolling type bumps at high speed The first few bumps in the series don t feel bad but after that the suspension gets harsh and starts jumping around Wheel kicks up when hitting large rolling type bumps at high speeds Heav...

Страница 407: ...r Oil should not normally be visible on the shock absorber shaft Inspect the hose and hose fittings for damage or leakage Make sure that the hose is not abrading any part of the motorcycle Other Maintenance Considerations If riding in extreme conditions service shock more frequently Wash your shock with soap and water Keep away from high pressure washers ...

Страница 408: ......

Страница 409: ......

Страница 410: ......

Страница 411: ...1 7 N A Right 49 COV Y01 RHKT Config 3 0 49 CRB Y01 3 0 89 95 Tracksport 36 0941 83 95 36 0962 83 95 Air Filters K N Stg 1 71 YA4085 31 16 Brake Pads Front Stg 3 71 RC1824 98 64 1988 89 EBC 22 FA88HH 33 33 BMC Ferodo 22 FDB337 26 95 Race N A 1990 EBC 22 FA123HH 33 33 Street N A Ferodo 22 FDB666 26 95 Brake lines Goodridge D 1991 92 EBC 22 FA252HH 33 33 Front spiral wrap 98 2100 69 95 FZR400 RR Fer...

Страница 412: ...FZR400U A1 ...

Страница 413: ...TRAIGHT SCREW 6 8 90116 06437 00 BOLT STUD 8 9 90201 087K2 00 WASHER PLATE 12 10 90179 08530 00 NUT 12 11 NGK CR8E0 00 00 PLUG SPARK NGK R CR8E 4 12 1WG 11181 00 00 GASKET CYLINDER HEAD 1 1 13 1WG 11191 00 00 COVER CYLINDER HEAD 1 1 14 1WG 11193 00 00 GASKET HEAD COVER 1 1 15 90109 064F0 00 BOLT 8 16 90209 11262 00 WASHER 8 17 2GH 1111G 00 00 RUBBER MOUNT 1 8 CYLINDER HEAD Ref Part No Number Descr...

Страница 414: ...LINDER 1 2 93210 60737 00 O RING 4 3 99510 12016 00 PIN DOWEL 2 4 3TJ 11351 00 00 GASKET CYLINDER 1 5 90153 06045 00 SCREW HEXAGON 2 6 90430 06014 00 GASKET 2 CYLINDER Ref Part No Number Description Qty Remarks A3 FZR400U ...

Страница 415: ...TON 4 O S 1 0 4 ALT PART 5 1WG 11610 00 00 PISTON RING SET 4 UR STD 1WG 11610 20 00 PISTON RING SET 2ND O S 4 ALT PART 1WG 11610 40 00 PISTON RING SET 4TH O S 4 ALT PART 6 1WG 11633 01 00 PIN PISTON 4 7 93450 16068 00 CIRCLIP 8 8 1WG 11650 00 00 CONNECTING ROD ASSEMBLYASSY 4 9 1WG 11654 00 00 BOLT CONNECTING ROD 2 10 90179 07531 00 NUT 2 11 1WG 11656 00 00 PLANE BEARING CONNECTING ROD 8 UR BLUE 1W...

Страница 416: ...N BF04MA 1 6 94690 95021 00 MASTER LINK 1 7 1WG 12241 00 00 GUIDE STOPPER 2 1 8 99999 01903 00 TENSNRASSEMBLY CAM CLTCAM CHAIN 1 9 4BE 12213 00 00 GASKET TENSIONER CASE 1 10 91316 06025 00 BOLT 2 11 1WG 12251 00 00 DAMPER CHAIN 1 1 12 1WG 12252 00 00 DAMPER CHAIN 2 1 13 90109 065A8 00 BOLT 2 CAMSHAFT CHAIN Ref Part No Number Description Qty Remarks A5 FZR400U ...

Страница 417: ...UR 1HX 12168 60 00 PAD ADJUSTING 2 1 35 16 UR 1HX 12168 80 00 PAD ADJUSTING 2 1 40 16 UR 1HX 12168 A0 00 PAD ADJUSTING 2 1 45 16 UR 1HX 12168 F0 00 PAD ADJUSTING 2 1 50 16 UR 1HX 12168 H1 00 PAD ADJUSTING 2 1 55 16 UR 1HX 12168 K1 00 PAD ADJUSTING 2 1 60 16 UR 1HX 12168 M1 00 PAD ADJUSTING 2 1 65 16 UR 1HX 12168 R1 00 PAD ADJUSTING 2 1 70 16 UR 1HX 12168 U1 00 PAD ADJUSTING 2 1 75 16 UR 1HX 12168 ...

Страница 418: ...5 16 UR 1HX 12169 G0 00 PAD ADJUSTING 2 2 20 16 UR 1HX 12169 J0 00 PAD ADJUSTING 2 2 25 16 UR 1HX 12169 L0 00 PAD ADJUSTING 2 2 30 16 UR 1HX 12169 N0 00 PAD ADJUSTING 2 2 35 16 UR 1HX 12169 T0 00 PAD ADJUSTING 2 2 40 16 UR VALVE Ref Part No Number Description Qty Remarks A7 FZR400U ...

Страница 419: ... 1WG 12482 00 00 PIPE 2 1 14 1WG 12483 00 00 PIPE 3 1 15 93210 15566 00 O RING 2 16 91316 06012 00 BOLT SOCKET HEAD 2 17 1WG 12576 00 00 HOSE 1 1 18 1WG 12577 00 00 HOSE 2 1 19 46X 12410 00 00 THERMOSTAT ASSEMBLY 1 20 1WG 12417 00 00 HOUSING THERMOSTAT 1 21 1WG 12413 01 00 COVER THERMOSTAT 1 22 91316 06020 00 BOLT SOCKET HEAD 2 23 95826 06020 00 BOLT flange 95806 06020 00 1 24 1WG 12579 00 00 HOSE...

Страница 420: ...ASSEMBLY 4 13 46X 12498 00 00 PROTECTOR 1 14 98506 05010 00 SCREW PAN HEAD 15 92906 05100 00 WASHER SPRING 4 16 92906 05600 00 WASHER PLATE 4 17 90183 05024 00 NUT SPRING 4 18 90445 096E8 00 HOSE 1 19 90467 08003 00 CLIP 2 20 90338 20188 00 PLUG 1 21 90480 15483 00 GROMMET 2 22 90387 07390 00 COLLAR 1 23 90387 074W0 00 COLLAR 1 24 95816 06025 00 BOLT FLANGE 2 25 1WG 12578 00 00 HOSE 3 1 26 1WG 125...

Страница 421: ...30 93210 21190 00 O RING 1 31 91316 06012 00 BOLT SOCKET HEAD 1 32 90110 06142 00 BOLT HEXAGON SOCKET HEAD 1 RADIATOR HOSE Ref Part No Number Description Qty Remarks A10 FZR400U ...

Страница 422: ...1WG 13336 00 00 HOUSING ROTOR 1 8 97801 06020 00 SCREW PAN HEAD 1 9 99510 08012 00 PIN DOWEL 1 10 1WG 13329 00 00 GASKET PUMP COVER 1 11 90110 06130 00 BOLT HEXAGON SOCKET HEAD 3 12 1WG 13412 00 00 HOUSING STRAINER 1 13 4H7 13411 02 00 STRAINER OIL 1 14 3YX 13415 00 00 SEAL OIL STRAINER 1 15 90110 06099 00 BOLT HEX SKT HEADSOCKET HEAD 2 OIL PUMP Ref Part No Number Description Qty Remarks A11 FZR40...

Страница 423: ...13490 00 00 RELIEF VALVE ASSEMBLY 1 10 93210 10096 00 O RING 1 11 1WG 13417 00 00 COVER STRAINER 1 12 3HE 13414 10 00 GASKET STRAINER COVER 1 13 91316 06025 00 BOLT 14 14 99510 08016 00 PIN DOWEL 2 15 3VD 13455 00 00 PLUG 1 16 214 11198 01 00 GASKET 1 17 90465 10306 00 CLAMP 1 18 1WG 13161 00 00 PIPE DELIVERY 1 1 19 91316 06012 00 BOLT SOCKET HEAD 1 20 90401 10106 00 BOLT UNION 2 21 90430 10171 00...

Страница 424: ... CASE AIR CLEANER 2 1 11 1VJ 14462 00 00 SEAL 1 12 97780 50125 00 SCREW TAPPING 11 13 1WG 14451 00 00 ELEMENT AIR CLEANER 1 14 1WG 14412 00 00 CAP CLEANER CASE 1 1 15 5T0 14457 00 00 SEAL 1 16 1WG 14453 00 00 JOINT AIR CLNR 1 4 17 90460 56287 00 CLAMP HOSE 4 18 90445 11452 00 HOSE 1 19 90467 10008 00 CLIP 3 20 4X7 2149Y 00 00 FILTER ASSEMBLY 1 21 90445 115E8 00 HOSE 1 22 98580 05016 00 SCREW PAN H...

Страница 425: ...MAIN JET 1 13 1AE 14565 00 00 SCREW 1 14 256 14997 00 00 SEAL 2 15 1A8 14953 00 00 WASHER 1 16 1WG 14147 00 00 O RING 1 17 1AE 14237 00 00 GASKET 1 18 1AE 14261 00 00 HOLDER 1 19 1AE 14227 00 00 O RING 1 20 98580 05010 00 SCREW PAN HEAD 4 21 3H5 14933 00 00 SPRING DIAPHRAGM 1 22 3BF 14103 00 00 THROTTLE SCREW SET 1 23 1HX 1410A 00 00 STARTER SET 1 24 98511 04012 00 SCREW PAN HEAD 4 4 2 PCS FOR 2 2...

Страница 426: ...0K 10 00 STOP SCREW SET 3 34 98580 05010 00 SCREW PAN HEAD 16 35 1WG 14251 00 00 NIPPLE 2 36 36Y 14147 00 00 O RING 12 37 1AE 14197 00 00 PIPE 2 38 1FN 14918 00 00 RING 2 39 1HX 14197 00 00 PIPE 1 40 1HX 14251 00 00 NIPPLE 1 41 1HX 14148 00 00 PIPE 1 CARBURETOR Ref Part No Number Description Qty Remarks B3 FZR400U ...

Страница 427: ...90101 06576 00 BOLT 1 3 92906 06600 00 WASHER 1 4 90179 06500 00 NUT 8 5 3YF 14613 01 00 GASKET EXHAUST PIPE 4 6 95816 08020 00 BOLT FLANGE 1 7 90179 08639 00 NUT SPEC L SHAPE 30 1 EXHAUST Ref Part No Number Description Qty Remarks B4 FZR400U ...

Страница 428: ...05 08429 00 BOLT WASHER BASED 12 15 90201 087K3 00 WASHER PLATE 12 16 95816 06040 00 BOLT 10 17 95816 06050 00 BOLT FLANGE 5 18 95816 06070 00 BOLT FLANGE 3 19 95816 06080 00 BOLT FLANGE 1 20 95816 06090 00 BOLT FLANGE 2 21 95816 08070 00 BOLT FLANGE 1 22 90430 06166 00 GASKET 1 23 90465 10307 00 CLAMP 1 24 90465 10308 00 CLAMP 1 25 1WG 11165 00 00 PLATE BREATHER 1 26 98580 06012 00 SCREW PAN HEAD...

Страница 429: ...IP 2 31 90445 116E9 00 HOSE 1 32 90465 06289 00 CLAMP 1 33 90467 10038 00 CLIP 1 34 1WG 15381 00 00 PLATE BEARING COVER 1 35 91316 06012 00 BOLT SOCKET HEAD 2 CRANKCASE Ref Part No Number Description Qty Remarks B6 FZR400U ...

Страница 430: ... 3HE 15461 10 00 GASKET CRANKCASE COVER 2 1 13 99510 08016 00 PIN DOWEL 2 14 91311 06025 00 BOLT SOCKET HEAD 2 15 91311 06035 00 BOLT SOCKET HEAD 4 16 91311 06045 00 BOLT 1 17 1WG 15431 02 00 COVER CRANKCASE 3 1 18 1WG 15425 00 00 COVER GENERATOR 2 1 19 1WG 15326 00 00 DAMPER ENGINE MOUNT 2 1 20 98901 05008 00 SCREW BIND 4 21 3HE 15462 10 00 GASKET CRANKCASE COVER 3 1 22 99510 08016 00 PIN DOWEL 2...

Страница 431: ...G 15449 00 00 RING RUBBER 1 30 1JK 15486 00 00 GROMMET 2 31 90209 05279 00 WASHER 2 32 98580 05010 00 SCREW PAN HEAD 2 33 1WG 15455 00 00 GASKET 1 1 34 99510 08016 00 PIN DOWEL 2 35 91311 06025 00 BOLT SOCKET HEAD 3 36 91311 06035 00 BOLT SOCKET HEAD 2 CRANKCASE COVER Ref Part No Number Description Qty Remarks B8 FZR400U ...

Страница 432: ...00 BOLT HEX SKT HEAD 3 4 98580 05016 00 SCREW PAN HEAD 2 5 92990 05100 00 WASHER SPRING 2 6 92901 05600 00 WASHER PLATE 2 7 90280 03047 00 KEY WOODRUFF 1 8 90105 10430 00 BOLT WASHER BASED 1 9 90201 107K6 00 WASHER PLATE 1 GENERATOR Ref Part No Number Description Qty Remarks B9 FZR400U ...

Страница 433: ... 81815 00 00 CORD STARTER MOTOR 1 3 25G 81826 00 00 BOLT 1 4 1WG 81820 01 00 REAR BRACKET ASSEMBLY 1 5 5H0 81844 01 00 GASKET 2 6 5H0 81847 01 00 O RING 1 7 95023 06020 00 BOLT FLANGE 2 STARTING MOTOR Ref Part No Number Description Qty Remarks B10 FZR400U ...

Страница 434: ...15521 00 00 SHAFT 1 2 5 1WG 15570 00 00 STARTER CLUTCH ASSEMBLYASSY 1 6 1WG 15515 00 00 GEAR 3 1 7 90280 16053 00 KEY WOODRUFF 1 8 90201 107K6 00 WASHER PLATE 1 9 90105 10445 00 BOLT WASHER BASED 1 10 93306 20005 00 BEARING B6200 1 STARTER CLUTCH Ref Part No Number Description Qty Remarks B11 FZR400U ...

Страница 435: ...WASHER LOCK 1 12 90170 18221 00 NUT 1 13 93109 08058 00 OIL SEAL SD07 8 21 5 5 HS 1 14 1WG 16357 01 00 ROD PUSH 2 1 15 93505 16006 00 BALL 1 16 1WG 16340 01 00 PUSH LEVER ASSEMBLY 1 17 1WG 16304 00 00 BALL SCREW HOUSING ASSEMBLY 1 18 90113 08021 00 BOLT SET 1 19 90179 08179 00 NUT 1 20 90506 09232 00 SPRING TENSION 1 21 90157 05065 00 SCREW PAN HEAD 2 22 132 16346 00 00 HOOK SPRING 1 23 90387 212R...

Страница 436: ...4 1WG 17221 00 00 GEAR 2ND WHEEL 1 15 90209 27192 00 WASHER 1 16 93440 30077 00 CIRCLIP 1 17 1WG 17261 00 00 GEAR 6TH WHEEL 1 18 1WG 17231 00 00 GEAR 3RD WHEEL 1 19 3EN 17241 00 00 GEAR 4TH WHEEL 1 20 90209 22191 00 WASHER 1 21 93440 25084 00 CIRCLIP 1 22 1WG 17251 00 00 GEAR 5TH WHEEL 1 23 1WG 17211 00 00 GEAR 1ST WHEEL 1 24 90387 252R2 00 COLLAR 1 25 93102 35109 00 OIL SEAL SD 35 62 6 HS 1 26 3F...

Страница 437: ...30 93311 42045 00 BEARING 20NG3315NE 1 31 278 17424 01 00 CIRCLIP 1 1 32 278 17425 00 00 CIRCLIP 2 1 33 4G0 17433 01 00 NOZZLE 1 TRANSMISSION Ref Part No Number Description Qty Remarks C2 FZR400U ...

Страница 438: ...FT FORK GUIDE 2 1 8 1WG 18511 00 00 FORK SHIFT 1 1 9 1WG 18512 00 00 FORK SHIFT 2 1 10 1WG 18513 00 00 FORK SHIFT 3 1 11 1WG 18536 00 00 STOPPER SHIFT BAR 1 12 1HX 18127 00 00 STOPPER SCREW 1 13 90508 23707 00 SPRING TORSION 1 14 1WG 18562 00 00 PLATE STOPPER 2 1 15 36Y 18140 00 00 STOPPER LEVER ASSEMBLY 1 16 50W 21631 00 00 BOLT 1 1 17 95811 06016 00 BOLT FLANGE 95822 06016 2 SHIFT CAM FORK Ref P...

Страница 439: ...0 OIL SEAL SDO 12 18 4 1 2 6 3HE 18110 00 00 SHIFT PEDAL ASSEMBLY 1 7 132 18113 01 00 COVER SHIFT PEDAL 1 8 1WG 18112 01 00 ARM SHIFT 1 9 2H9 18154 00 00 COVER DUST 1 10 97011 06020 00 BOLT 1 11 1WG 18115 00 00 ROD SHIFT 1 12 90170 06228 00 NUT COUNTER CLOCKWISE 1 13 95380 06700 00 NUT 1 SHIFT SHAFT Ref Part No Number Description Qty Remarks C4 FZR400U ...

Страница 440: ...0500 4 14 91311 08025 00 BOLT SOCKET HEAD 4 15 95811 10080 00 BOLT FLANGE 2 16 91011 10295 00 BOLT FLANGE 1 17 91011 10165 00 BOLT FLANGE 1 18 1WG 21427 00 00 BRACKET REAR LWR 1 1 19 95303 12600 00 NUT 1 20 92990 12200 00 WASHER PLAIN 1 21 92901 12100 00 WASHER SPRING 1 22 95701 10500 00 NUT FLANGE 95702 10500 4 23 1WG 21459 00 00 SPACER 2 24 1WG 2142M 00 00 BRACKET RADIATOR 3 1 25 91012 06016 00 ...

Страница 441: ...2 06600 00 NUT FLANGE 2 37 1WG 2137W 00 00 SCOOP AIR 1 1 38 1WG 2137X 00 00 SCOOP AIR 2 1 39 1WG 2139U 00 00 DAMPER 2 2 40 90119 06093 00 BOLT WITH WASHER 2 41 90387 06681 00 COLLAR 1 42 1WG 2117M 00 00 COVER 2 4 43 1WG 2117N 00 00 COVER 3 2 44 1WG 2117U 00 00 COVER 6 1 45 1WG 2119G 00 00 EMBLEM 3 1 46 1WG 2119H 00 00 EMBLEM 4 1 FRAME Ref Part No Number Description Qty Remarks C6 FZR400U ...

Страница 442: ...LDER BRAKE HOSE 1 1 7 3FH 25876 00 00 HOLDER BRAKE HOSE 2 1 8 95023 06025 00 BOLT FLANGE 2 9 3BF 21611 00 00 FENDER REAR 1 10 90480 11391 00 GROMMET 1 11 91026 06012 00 BOLT FLANGE 1VJ 4 12 31A 14477 00 00 PLATE 4 13 4N0 28186 00 00 POUCH 1 14 4K5 2814E 10 00 HOOK 2 15 3BF W2162 00 00 MUD GUARD 1 16 116 82131 00 00 BAND BATTERY 1 17 1WG W2810 00 00 TOOL KIT 1 FENDER Ref Part No Number Description ...

Страница 443: ...MBLEM 1 14 14T 21773 00 00 GROMMET 1 15 1WG 21717 00 00 DAMPER 1UY 21747 00 00 2 16 90159 06033 00 SCREW WITH WASHER 2 17 90387 113R1 00 COLLAR 2 18 90110 06135 00 BOLT HEX SKT HEADSOCKET HEAD 2 19 90480 01401 00 GROMMET 4 20 1WG 2177G 00 00 BOX BATTERY 1 21 90480 22362 00 GROMMET 1 22 90480 14229 00 GROMMET 2 23 90387 07391 00 COLLAR 2 24 31A 14477 00 00 PLATE 2 25 90119 06097 00 BOLT WITH WASHER...

Страница 444: ...21874 00 00 GASKET 1 30 3GM 21816 00 00 PIPE 1 1 31 90159 06056 00 SCREW WITH WASHER 2 32 34X 21691 00 00 FLAP 1 33 3BF 21683 80 00 PLATE SPEC 1 SIDE COVER Ref Part No Number Description Qty Remarks C9 FZR400U ...

Страница 445: ... 00 SCREW WITH WASHER 2 14 46X 22141 00 00 SHAFT PIVOT 1 15 90201 14740 00 WASHER PLATE 1 16 90185 14070 00 NUT SELF LOCKING 1 17 1WG 2217A 00 00 ARM RELAY 1 18 93317 31701 00 BEARING 1 19 93317 21746 00 BEARING 2 20 93109 17048 00 OIL SEAL SDO 17 24 4 4 21 90387 102R4 00 COLLAR 1 22 90387 122R5 00 COLLAR 1 23 93399 99919 00 BEARING 1 24 93101 16131 00 OIL SEAL 2 25 90387 124L0 00 COLLAR 1 26 1WG ...

Страница 446: ...ATE 1 31 90201 101J1 00 WASHER PLATE 3 32 95611 10100 00 NUT U 4 33 2GH 25875 50 00 HOLDER BRKE HOSE 1 1 34 98580 06020 00 SCREW 1 35 92995 06100 00 WASHER SPRING 1 SWING ARM Ref Part No Number Description Qty Remarks C11 FZR400U ...

Страница 447: ... ABS ASSEMBLY REARASSEMBLY REAR 1 2 90387 124T2 00 COLLAR 1 3 90109 10554 00 BOLT 1 4 90201 101J1 00 WASHER PLATE 1 5 95601 10100 00 NUT U 95602 10100 00 1 REAR SHOCKS Ref Part No Number Description Qty Remarks C12 FZR400U ...

Страница 448: ... FORK 1 12 3R4 23173 L0 00 SPINDLE TAPER 1 13 1WG 23141 00 00 SPRING FRONT FORK 1 14 2K8 23158 L0 00 GASKET 1 15 3EN 23111 00 00 BOLT CAP 1 16 1FK 23142 00 00 SEAT SPRING UPPER 1 17 1W4 23114 L0 00 GASKET 1 18 3R4 23181 L0 00 BOLT HEX SCKT HEADSOCKET HEAD 1 19 1WG 23118 00 00 SPACER 1 20 1WG 23103 00 00 FRONT FORK ASSEMBLY R R H 1 21 1WG 23136 00 00 TUBE OUTER 2 1 22 122 23129 00 00 GASKET DRAIN P...

Страница 449: ...G FRONT FORK 1 33 2K8 23158 L0 00 GASKET 1 34 3EN 23111 00 00 BOLT CAP 1 35 1FK 23142 00 00 SEAT SPRING UPPER 1 36 1W4 23114 L0 00 GASKET 1 37 3R4 23181 L0 00 BOLT HEX SCKT HEADSOCKET HEAD 1 38 91311 08040 00 BOLT SOCKET HEAD 1 39 1WG 23118 00 00 SPACER 1 40 90201 08085 00 WASHER PLATE 1 41 1WG 23340 00 00 UNDER BRACKET COMP 1 42 2NX 23356 00 00 BOLT 2 2 43 93332 00001 00 BEARING 1 FRONT FORK Ref ...

Страница 450: ... 2 4 90202 26142 00 WASHER PLATE 1 5 26H 23418 01 00 WASHER SPECIAL 1 6 90176 22050 00 NUT CROWN 1 7 1WG 23435 00 00 CROWN HANDLE 1 8 91609 40210 00 PIN SPRING 2 9 91316 08030 00 BOLT SOCKET HEAD 2 10 1WG 2317E 00 00 STAY 1 STEERING Ref Part No Number Description Qty Remarks D3 FZR400U ...

Страница 451: ...00 00 DAMPER LOCATING 5 1 14 1WG 24602 00 00 CAP ASSEMBLY 1 15 1WG 24500 00 00 FUEL COCK ASSEMBLY 1 1 16 4X8 24534 00 00 SEAL COCK 1 17 4X8 24512 00 00 O RING 1 18 98580 03008 00 SCREW PAN HEAD 2 19 1WG 24524 00 00 LEVER COCK 1 20 98606 04016 00 SCREW OVAL HEAD 1 21 90202 05187 00 WASHER PLATE 2 22 90149 06011 00 SCREW 2 23 1FK 24560 00 00 FILTER ASSEMBLY 1 24 26H 24568 00 00 BAND FILTER 1 25 1WG ...

Страница 452: ...GE 2 42 1WG 24183 00 00 DAMPER LOCATING 3 2 43 90154 06040 00 SCREW BINDING 2 44 1WG 24184 00 00 DAMPER LOCATING 4 2 45 1WG 2414H 00 00 TRIM COVER PANEL 2 46 90387 112R6 00 COLLAR 2 47 90149 06246 00 SCREW SPEC L SHAPE 2 48 90480 18495 00 GROMMET 2 49 90387 112R6 00 COLLAR 2 50 90201 06697 00 WASHER PLATE 2 51 98511 06025 00 SCREW PAN HEAD 92501 06025 2 52 1WG 24614 00 00 PLATE CAP 1 53 90110 0613...

Страница 453: ...EADSOCKET HEAD 2 59 1WG 2414A 00 00 COVER FILLER 1 60 1WG 24622 00 00 WASHER RING 2 61 90560 03220 00 SPACER 1 62 90445 070F1 00 HOSE 1 63 1WG 13907 00 00 FUEL PUMP COMP 1 64 90445 126E7 00 HOSE 1 65 90460 12256 00 CLAMP HOSE 2 FUEL TANK Ref Part No Number Description Qty Remarks D6 FZR400U ...

Страница 454: ...3 00 00 DAMPER SEAT 1 8 95701 06500 00 NUT FLANGE 3 9 46X 24754 00 00 HOOK SEAT 1 10 4L0 24712 11 00 PLATE 2 11 47X 24739 00 00 BOLT SEAT FITTING 2 12 90468 10056 00 CLIP 2 13 2AX 24705 00 00 SEAT LOCK ASSEMBLY 1 14 95811 06010 00 BOLT FLANGE 2 15 26H 21308 00 00 HELMET HANGER ASSEMBLY 4R8 21308 00 1 16 90149 06154 00 SCREW 1 SEAT Ref Part No Number Description Qty Remarks D7 FZR400U ...

Страница 455: ... 93105 45017 00 OIL SEAL 1 8 94111 170T6 00 110 70 R17 BS 53HCY03A 1 BRIDGESTONE 9 93900 00030 00 VALVE RIM 1 TAIHEIYO 10 29L 25398 00 00 BALANCER WHEEL 10G 1 UR 29L 25398 10 00 BALANCER WHEEL 20G 1 UR 29L 25398 20 00 BALANCER WHEEL 30G 1 UR 11 1WG 25190 00 00 GEAR UNIT ASSEMBLY 1 12 42X 25181 00 00 AXLE WHEEL 1 13 90387 15550 00 COLLAR 1 FRONT WHEEL Ref Part No Number Description Qty Remarks D8 F...

Страница 456: ...LIP 2 10 1J3 W0048 00 00 BLEED SCREW KIT 1 11 51J 25836 00 00 COVER DUST 1 12 1WG 25810 11 00 CALIPER ASSEMBLY LEFT 1 13 31A W0057 00 00 PISTON ASSEMBLY CALIPER 2 14 31A W0047 00 00 CALIPER SEAL KIT 1 15 26H W0045 11 00 BRAKE PAD KIT 1 16 1WG 25919 00 00 SUPPORT PAD 1 17 3HE 25924 00 00 PIN PAD 2 18 3HE 25925 00 00 CLIP 2 19 1J3 W0048 00 00 BLEED SCREW KIT 1 20 51J 25836 00 00 COVER DUST 1 21 9010...

Страница 457: ...CH HUB 1 LOW GLOSS BLK 11 93306 20446 00 BEARING 1 12 93102 28022 00 OIL SEAL 1 13 90387 172J8 00 COLLAR 1 14 1HX 25455 20 00 SPROCKET DRIVN 55T 1 YAMAHA BLK 15 95601 08200 00 NUT U 6 16 90116 08498 00 BOLT STUD 6 17 94581 22130 00 CHAIN DID Y28HVS D I D 428HVS 130LE 1 18 1WG 25388 00 00 PULLER CHAIN 1 2 19 90101 08647 00 BOLT 2 20 95333 08600 00 NUT 6 21 1KT 22174 00 00 END 1 2 22 92901 08600 00 ...

Страница 458: ...91490 20020 00 PIN COTTER 2 30 3FH 25381 00 00 AXLE WHEEL 1 31 90201 177K7 00 WASHER PLATE 2 32 90387 172R7 00 COLLAR 1 33 90387 173L5 00 COLLAR 1 34 90171 16024 00 NUT CASTLE 1 35 91401 30030 00 PIN COTTER 1 REAR WHEEL Ref Part No Number Description Qty Remarks D11 FZR400U ...

Страница 459: ...CALIPER 1 5 51L W0047 11 00 CALIPER SEAL KIT 1 6 51L 25919 00 00 SUPPORT PAD 1 7 51L W0046 02 00 BRAKE PAD KIT 2 1 8 51L 25924 00 00 PIN PAD 2 9 51L W0048 00 00 BLEED SCREW KIT 2 10 1WG 25819 00 00 BRACKET CALIPER 1 11 90105 10638 00 BOLT WASHER BASED 2 REAR BRAKE CALIPER Ref Part No Number Description Qty Remarks D12 FZR400U ...

Страница 460: ... 1 1 12 3FH 26312 00 00 CABLE THROTTLE 2 1 13 5H0 26393 00 00 HOLDER 1 14 98506 05008 00 SCREW PAN HEAD 1 15 1WG 26335 00 00 CABLE CLUTCH 1 16 90179 08316 00 NUT 1 17 90123 08083 00 BOLT 1 18 1WG 26331 00 00 CABLE STARTER 1 1 19 1WG 83940 00 00 STARTER ASSEMBLY 1 20 1WG 83941 00 00 LEVER STARTER 1 21 1WG 28357 00 00 STAY 2 1 22 1WG 83942 00 00 COVER STARTER 1 23 98906 03006 00 SCREW BIND 2 24 9020...

Страница 461: ...R CYLINDER 1 7 91316 06025 00 BOLT 2 8 92906 06100 00 WASHER SPRING 2 9 4L0 25862 00 00 BOOT MASTER CYLINDER 1 10 3HE 25872 01 00 HOSE BRAKE 1 1 11 1WG 25873 01 00 HOSE BRAKE 2 2 12 1J7 25885 01 00 JOINT 1 13 91316 06025 00 BOLT 1 14 90401 10095 00 BOLT UNION 1 15 90401 10096 00 BOLT UNION 4 16 90201 10118 00 WASHER PLATE 11 17 90338 09012 00 PLUG 1 FRONT MASTER CYLINDER Ref Part No Number Descrip...

Страница 462: ...Y RASSEMBLY R 1 13 2GH 27413 00 00 COVER FOOTREST 1 14 90157 05079 00 SCREW PAN HEAD 2 15 90109 082A4 00 BOLT 1 16 46X 27442 01 00 BRACKET 2 1 17 46X 27443 01 00 BRACKET 3 1 18 90109 103A9 00 BOLT 2 19 90206 17084 00 WASHER WAVE 2 20 90110 08066 00 BOLT HEX SKT HEADSOCKET HEAD 4 21 1WG 27445 01 00 PLATE 1 1 22 1WG 27446 01 00 PLATE 2 1 23 1WG 27425 00 00 BRACKET FOOTREST 2 1 24 90149 06236 00 SCRE...

Страница 463: ...PIN CLEVIS 2 31 91490 20020 00 PIN COTTER 2 32 90387 064H8 00 COLLAR 2 33 1WG 2741L 00 00 BRACKET 4 1 34 1WG 2742L 00 00 BRACKET 5 1 35 1HX 27415 00 00 PLATE FOOTREST 2 36 95811 08035 00 BOLT FLANGE 95821 08035 4 STAND FOOTREST Ref Part No Number Description Qty Remarks E4 FZR400U ...

Страница 464: ...5303 08700 00 NUT 1 13 90240 08013 00 PIN CLEVIS 1 14 90201 08083 00 WASHER PLATE 1 15 91490 20020 00 PIN COTTER 1 16 31A 25894 01 00 TANK RESERVOIR 1 17 360 25854 00 00 DIAPHRAGM RESERVOIR 1 18 2GU 25855 00 00 BUSH DIAPHRAGM 1 19 2KF 25852 50 00 CAP RESERVOIR 1 20 90159 06056 00 SCREW WITH WASHER 1 21 31A 14477 00 00 PLATE 1 22 1WG 25895 00 00 HOSE RESERVOIR 1 23 90467 14057 00 CLIP 2 24 3BF 2587...

Страница 465: ... 1WG 28328 00 00 EMBLEM 1 15 1WG Y283V 00 GE PANEL ASSEMBLY 2 1 SILKY WHITE 16 90480 13398 00 GROMMET 2 17 90387 067K6 00 COLLAR 2 18 1WG 28338 00 00 EMBLEM 1 19 91316 06020 00 BOLT SOCKET HEAD 2 20 90201 062A8 00 WASHER PLATE 2 21 90110 06078 00 BOLT HEXAGON SOCKET 1 22 90110 05079 00 BOLT hexagon socket head 4 23 90202 05180 00 WASHER PLATE 4 24 90183 05024 00 NUT SPRING 4 25 1WG 2831U 00 00 STA...

Страница 466: ... 00 GRAPHIC 9 1 41 99234 00070 00 EMBLEM YAMAHA 1 FOR W 42 90480 13398 00 GROMMET 2 43 90387 067K6 00 COLLAR 2 44 1WG 28390 00 00 GRPHC SET COWLING 1 45 1WG Y283K 30 0X BODY FRONT LOWER 2 1 46 1WG 28394 00 00 GRAPHIC 4 1 47 1WG 28399 00 00 GRAPHIC 6 1 48 1WG 2839E 00 00 GRAPHIC 8 1 49 1WG 2839G 00 00 GRAPHIC 0 1 50 99234 00070 00 EMBLEM YAMAHA 1 FOR W 51 90480 13398 00 GROMMET 2 52 90387 067K6 00 ...

Страница 467: ...79 05523 00 NUT 2 58 1WG 2836A 00 00 BRACKET 1 2 59 1WG 2836E 00 00 BRACKET 2 1 60 91026 06010 00 BOLT 4 61 8K4 77374 00 00 DAMPER 2 2 62 99231 00025 00 EMBLEM 1 FOR FWR FAIRING COWLING Ref Part No Number Description Qty Remarks E8 FZR400U ...

Страница 468: ...NUT 6 10 98501 03012 00 SCREW PAN HEAD 3 11 92990 03100 00 WASHER SPRING 92901 03100 3 12 97780 30120 00 SCREW PANHEAD TAP 2 13 90159 03102 00 SCREW WITH WASHER 3 14 3FH 83520 00 00 SOCKET CORD ASSEMBLY 1 15 4G1 84744 00 00 BULB MTR 12V3 4W 4 16 1WG 83588 00 00 NUT PILOT LIGHT 1 17 3GM 83517 00 00 BULB 12V 1 7W 5 18 90480 14229 00 GROMMET 3 19 90201 06059 00 WASHER PLATE 3 20 95316 06600 00 NUT 3 ...

Страница 469: ...ASSEMBLY 2 7 97706 40616 00 SCREW TAPPING 4 8 2AX 84331 00 00 SCREW RIM ADJUSTING 2 9 2F9 84397 01 00 COVER SOCKET 2 10 51L 8431U 00 00 HOLDER 2 11 51L 84332 00 00 SPRING SCREW 4 12 3BF 84396 00 00 COVER 1 13 2F9 84375 00 00 SETTING PLATE BULB 2 14 1ML 84314 00 XX BULB 12V 35 35W 1FM 84314 H0 00 2 HALOGEN 15 46X 84397 01 00 COVER SOCKET 2 HEADLIGHT Ref Part No Number Description Qty Remarks E10 FZ...

Страница 470: ...84749 00 00 BODY LICENSE LIGHT 1 13 2AX 84741 00 00 BASE LICENSE LIGHT 1 14 3F9 84744 00 XX BULB METER 12V3 8W 2 15 3F9 84742 00 00 SEAT BASE 1 16 3F9 84757 00 00 COLLAR LCNSE BRKT 2 17 3F9 84553 00 00 DAMPER 2 18 90201 05031 00 WASHER PLATE 2 19 95701 05500 00 NUT FLANGE 2 20 1KH 84751 00 90 BRACKET LICENSE 1 21 90201 06067 00 WASHER PLATE 2 22 92906 06100 00 WASHER SPRING 2 23 95316 06700 00 NUT...

Страница 471: ...83365 00 00 CAP 2 11 2MA 28365 01 00 COVER 2 CLEAN WHITE 12 90183 04045 00 NUT SPRING 4 13 90480 35526 00 GROMMET 2 14 1UF 83330 00 00 REAR FLASHER LIGHT ASSEMBLY 1 1 15 51L 83342 01 00 LENS FLASHER 2 1 16 256 83311 70 XX BULB TS 12V27W 1 17 97706 40620 00 SCREW TAPPING 1 18 1UF 83340 00 00 FLASHER LIGHT ASSEMBLY 2 1 19 51L 83332 01 00 LENS FLASHER 1 20 256 83311 70 XX BULB TS 12V27W 1 21 97706 40...

Страница 472: ...12A Z3 A2 BATTERY ASSEMBLY GM12AZ 3A 2 2GV 82110 G0 00 1 12 1WG 82115 00 00 WIRE PLUS LEAD 1 13 3WP 82116 00 00 WIRE MINUS LEAD 46X 82116 00 1 14 90445 080F4 00 HOSE 1 15 1AE 82150 00 00 FUSE HOLDER ASSEMBLY 1 16 1AE 82151 00 00 FUSE 30A BL 2 17 1KT 82530 02 00 STOP SWITCH ASSEMBLY 1 18 3FH 82590 00 00 WIRE HARNESS ASSEMBLY 1 19 116 82151 00 00 FUSE 10A 4 20 4X7 82151 00 00 FUSE 2 21 47X 81960 A2 ...

Страница 473: ...25 3FH 82501 10 00 MAIN SWCH STRG LCKSTEERING LOCK 1 26 90149 06228 00 SCREW 2 ELECTRICAL 1 Ref Part No Number Description Qty Remarks F2 FZR400U ...

Страница 474: ...41 00 00 WIRE LEAD 1 9 25G 81950 01 00 RELAY ASSEMBLY 1 10 4U8 81950 02 00 RELAY ASSEMBLY 4U8 81950 00 1 FOR SIDE STAND 11 3FH 82566 00 00 SWITCH SIDE STAND 1 12 90152 05016 00 SCREW COUNTERSUNK 2 13 41R 83350 71 00 FLASHER RELAY ASSEMBLY 1 14 2KR 83371 00 00 HORN 1 15 97026 06010 00 BOLT 97006 06010 00 1 16 92906 06100 00 WASHER SPRING 1 17 11H 85110 01 00 REFLECTOR ASSEMBLY 2 18 95701 05500 00 N...

Страница 475: ... 06100 00 NUT U 1 13 97011 06025 00 BOLT 97001 06025 1 14 92906 06100 00 WASHER SPRING 1 15 90465 13169 00 CALMP 3 16 36Y 83922 00 00 LEVER R 1 17 90110 06074 00 BOLT HEXAGON SOCKET HEAD 1 18 95616 06100 00 NUT U 1 19 36Y 83913 01 00 COLLAR LEVER 1 1 20 90501 10312 00 SPRING COMPRESSION 1 21 90149 06153 00 SCREW SPEC L SHAPE 1 22 90170 06010 00 NUT 1 23 J45 82503 01 00 SWITCH ALARM 1 24 98506 0401...

Страница 476: ...FZR400U K1 ...

Страница 477: ...FZR400U K2 ...

Отзывы: