123
N O T E :
Any rhythm currently playing will
automatically be stopped when you call
up the Rhythm Sequence Program
function. Also, use of the Music Disk
Recorder function automatically cancels
Rhythm Sequence operations.
NOTE:
When you select one of the sequences
in this step, any editing done to that
sequence is instantly and automatically
saved. This means that if you select a
sequence that is already programmed,
any editing you do will permanently
change the sequence and the original
sequence cannot be recovered.
2
Rhythm Sequence Program
With the Rhythm Sequence Program function, you can connect
any of the Electone’s existing rhythms and the rhythms of your
own creation together to make complete rhythm compositions. You
can save four rhythm compositions to the Sequence buttons on the
panel for future recall.
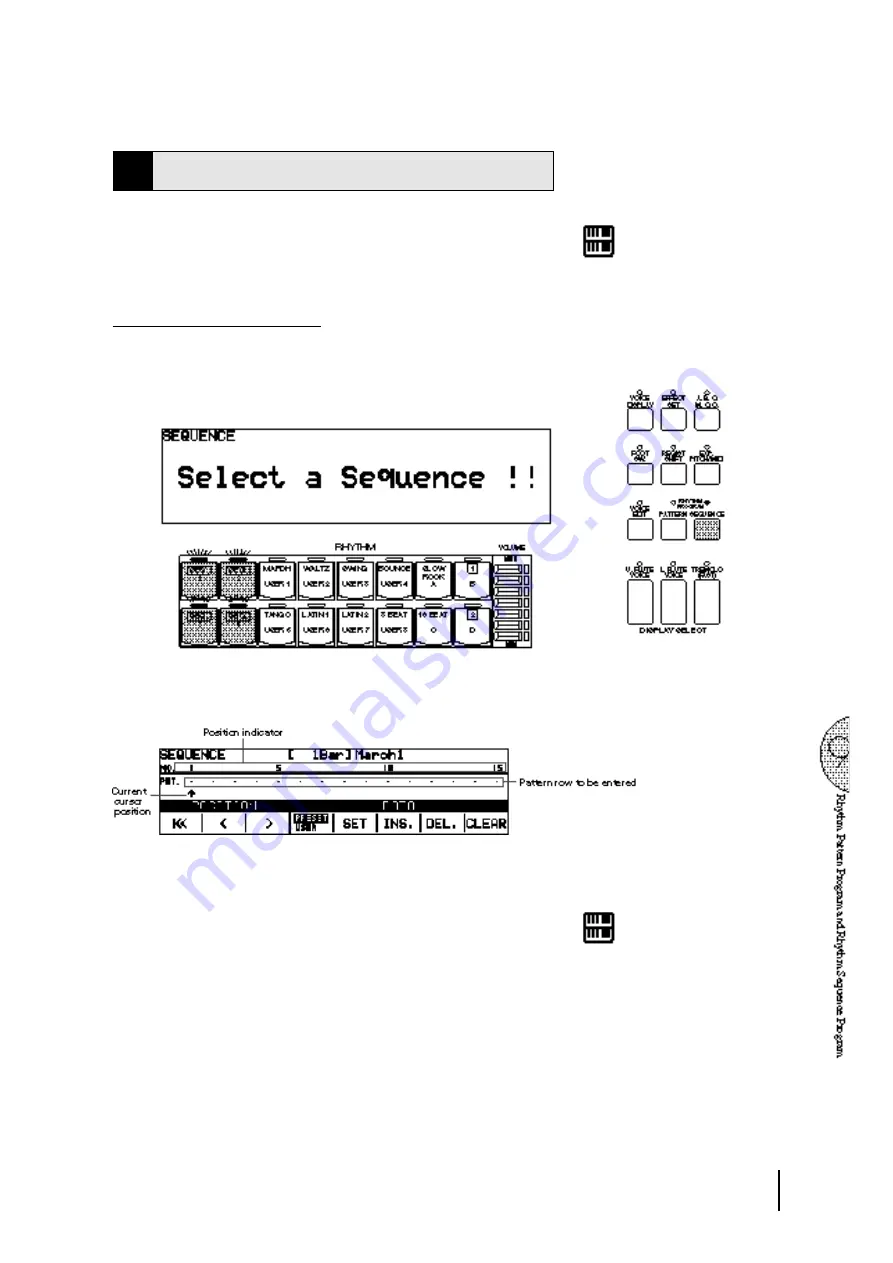
(1) Selecting a Sequence
1
Press the SEQUENCE button in the DISPLAY SELECT
section.
The LEDs of the numbered Sequence buttons in the Rhythm
section on the panel will flash and the following display will
prompt you to select a sequence number.
2
Press one of the Sequence buttons to call up the Rhythm
Sequence display.
In this display, different rhythms (both Preset rhythms and User
rhythms that you created with the Rhythm Pattern Program)
can be entered in sequence along the pattern row in the middle
of the display. Entered patterns are shown in boxes, while the
numbers in the row above indicate the position.
Up to three-character code inside each box indicates the type
and number of the rhythm. The preset rhythms of the Electone
are indicated by a two-digit number (i.e., [05] or [16]). User
patterns are indicated by the “U” prefix as well as a letter suffix
representing the type-A,B,C,D, and F (Fill In). Examples of
these include [U3C] and [U8F]. The preset patterns also may
have a letter suffix: “I” indicates Intro, “F” indicates Fill In, and
“E” indicates Ending (i.e., [01I], [20F], and [16E]).
Содержание Electone EL-87
Страница 1: ......
Страница 2: ......
Страница 3: ......
Страница 6: ...2 Panel Layout Front Panel ...
Страница 7: ...3 ...
Страница 8: ...4 LCD Display Select Others ...
Страница 19: ...15 4 Basic Operation ...
Страница 22: ...18 The Summary of the LCD Operation ...
Страница 24: ......
Страница 25: ......
Страница 32: ......
Страница 33: ......
Страница 64: ...60 Keyboard Percussion Percussion Assignments for the Lower Keyboard Percussion Assignments for the Pedalboard ...
Страница 106: ......
Страница 108: ......
Страница 110: ......
Страница 145: ......
Страница 146: ......
Страница 147: ......
Страница 149: ...145 145 ...
Страница 153: ...149 Specifications 149 ...
Страница 156: ......


