128
DPX-1000
DPX-1000
E-
7
English
INSTALLATION
■
Screen and pr
ojection distance
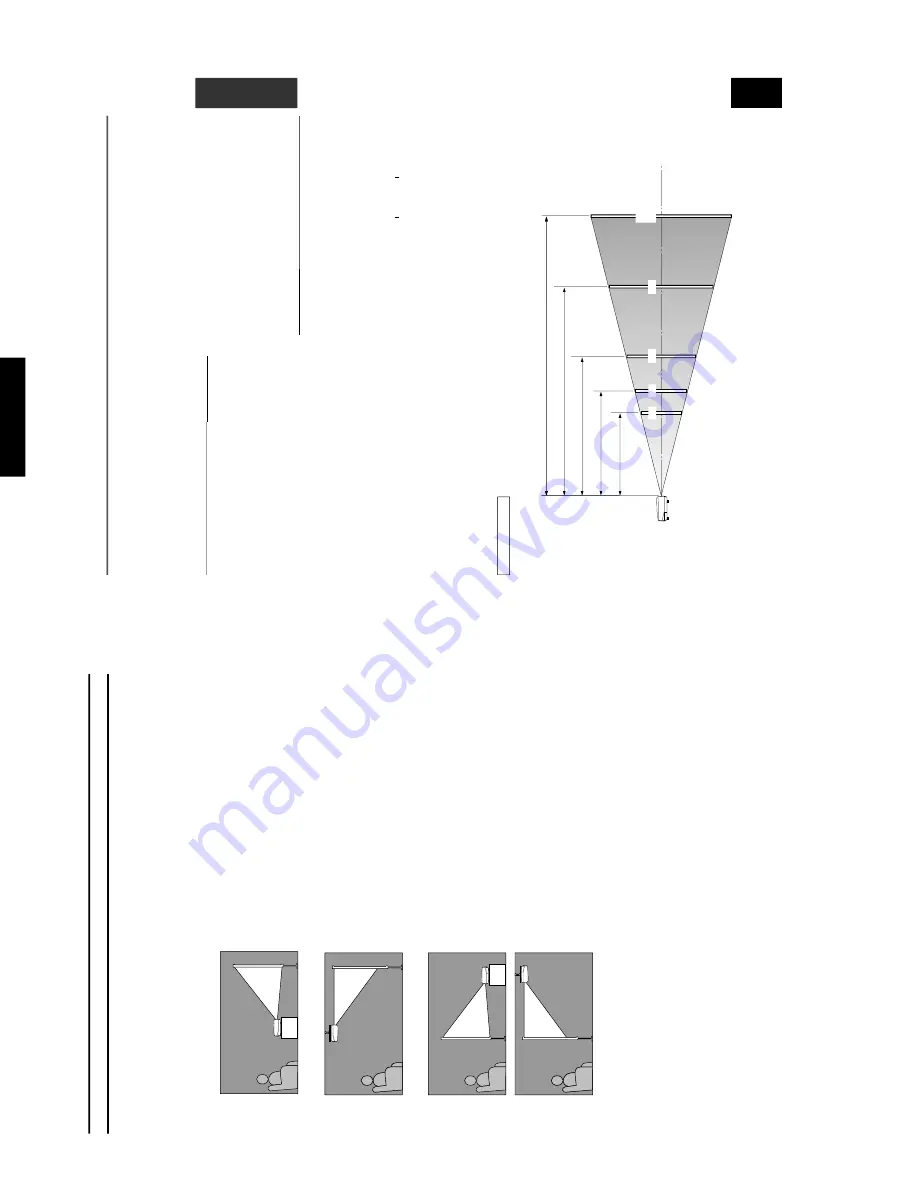
The ideal position for mounting the main unit (Projection distance [a]) depends on the size of the screen to be used (the lengt
h of a diagonal
line across the scr
een). It is possib
le to adjust the projection distance within a pr
eset r
ange from
W
ide to
T
ele using the z
o
o
m function.
Additionally
, it is possible to adjust the
V
. POS (V
ertical positioning) of the ima
g
e to better suit the scr
een. Use the infor
m
ation illustr
a
ted in
the f
igure belo
w to determine the best position for installation.
Installation
<When using a 16:9 screen>
Screen size
60
70
80
90
100
110
120
150
200
Wide (m) —
T
e
le (m)
1.8
—
2.88
2.1
—
3.36
2.4
—
3.84
2.7
—
4.32
3.0
—
4.8
3.3
—
5.28
3.6
—
5.76
4.5
—
7.2
6.0
—
9.6
<When using a 4:3 screen>
Since the DPX-1000 is equipped with a 16:9 element, the ideal
installation position f
or vie
wing imag
es with a 4:3 scr
een depends
on the size of the desired image projection.
1
When a standar
d 16:9 imag
e completely f
ills the width of the
scr
een (lea
ving b
lac
k line at the top and bottom of the scr
een)
2
When the standar
d 4:3 ima
g
e completely f
ills the screen
Screen siz
e
60
80
100
120
200
Wide —
T
e
le
(m),
(f
eet,
inc
hes)
1.65 m
—
2.64 m
5’5”
—
8
’8”
2.2 m
—
3.52 m
7’2”
—
11’7”
2.75 m
—
4.4 m
9’
—
14’5”
3.3 m
—
5.28 m
10’10”
—
17’4”
5.5 m
—
8.8 m
18’
—
28’10”
Pr
ojection distance
Wide —
T
e
le
(m),
(f
eet,
inc
hes)
2.2 m
—
3.52 m
7’3”
—
11’7”
2.9 m
—
4.64 m
9’6”
—
15’3”
3.65 m
—
5.84 m
12’
—
19’2”
4.4 m
—
7.04 m
14’5”
—
23’1”
7.3 m
—
11.68 m
23
’11”
—
38’4”
3
Projecting both 16:9 and 4:3 images
It is possible to use the z
oom function to mak
e use of the
scr
een ef
ficientl
y f
or both
1
and
2
abo
v
e.
The projection
distance in this case will be betw
een
W
ide in
2
and
T
ele in
1
.
Adjust the size of the projected image using the zoom so that
all imag
es f
ill the screen completely
. Ho
we
v
er
, please be a
w
ar
e
that adjustments to
V
. POS can cause the position of the imag
e
to slip.
3
60''
80''
100''
150''
200''
6.0 – 9.6 m
(19'8" – 31'6")
4.5 – 7.2 m
(14'9" – 23'7")
3.0 – 4.8 m
(9'10" – 15'9")
2.4 – 3.84 m
(7'10" – 12'7")
1.8 – 2.88 m
(5'11" – 9'5")
For a 16:9 screen
*These
are
theoretical
n
umerical
v
alues.
Please be a
ware that there ma
y be some discrepanc
y in comparison to actual v
alues.
Lens center line
Screen size
Pr
ojection distance [a]
12
(f
eet,
inc
hes)
5’11”
—
9’5”
6’10”
—
11’
7’10”
—
12’7”
8’10”
—
14’2”
9’10”
—
15’9”
10’10”
—
17’4”
11’10”
—
18’11”
14’9”
—
23’7”
19’8”
—
31’6”
Pr
ojection distance [a]
E-
6
Installation
■
Installation methods
There are four w
a
ys to install this unit:
on a table in front of the screen.
mounted on the ceiling in front of the screen.
on a table behind a semi translucent screen.
mounted on the ceiling behind a semi translucent screen.
Set the method y
ou use on the
4
<SETUP> section of the MENU described later
. (see pag
e 21.)
<Mounting on a tab
le>
Place the unit on a standar
d height ta
b
le to pr
oject and vie
w the imag
e
from in fr
ont of the screen.
The height fr
om the bottom of the unit to the
center of the lens is 12.4 cm (4
”-7/8).
<Mounting on the ceiling>
T
here are two kinds of brac
k
ets (lo
w ceiling and high ceiling,
sold
se
parately) a
v
ailab
le w
hic
h can be used to mount the unit on the ceiling
.
Consult y
our dealer for details on their use
, and ha
v
e installation done b
y
either your dealer or a r
e
putab
le contractor
.
T
he ima
g
e on the scr
een is v
er
tically re
v
er
sed compar
ed to tha
t of a ta
b
le
mounted installation. In this case, please set the installation type to
FR
ONT/CEILING in the
4
<SETUP> section of the men
u. (see pa
g
e
21.)
<Mounting the unit on a table or on the ceiling fr
om behind a semi translucent screen>
In this case, images are projected onto a semi translucent screen, and the
vie
wer watches it from the re
v
erse side.
T
he r
ela
tionship with the scr
een
and pr
ojection distance corresponds to that f
or front projection. F
or rear
pr
ojection,
set the installa
tion type to REAR/CEILING or REAR/T
ABLE
in the
4
<SETUP> section of the menu. (see page 21.)
■
DIRECTION FOR USE
Содержание DPX-1000
Страница 40: ...DPX 1000 DPX 1000 40 MEMO ...


