1. Installing the Software
4. In-depth information
on DME Units
3. Advanced Setup
(via Ethernet cables)
2. Basic Setup
(via USB cable)
Appendix: Detailed
DME-N Network Driver Settings
11
3-5.
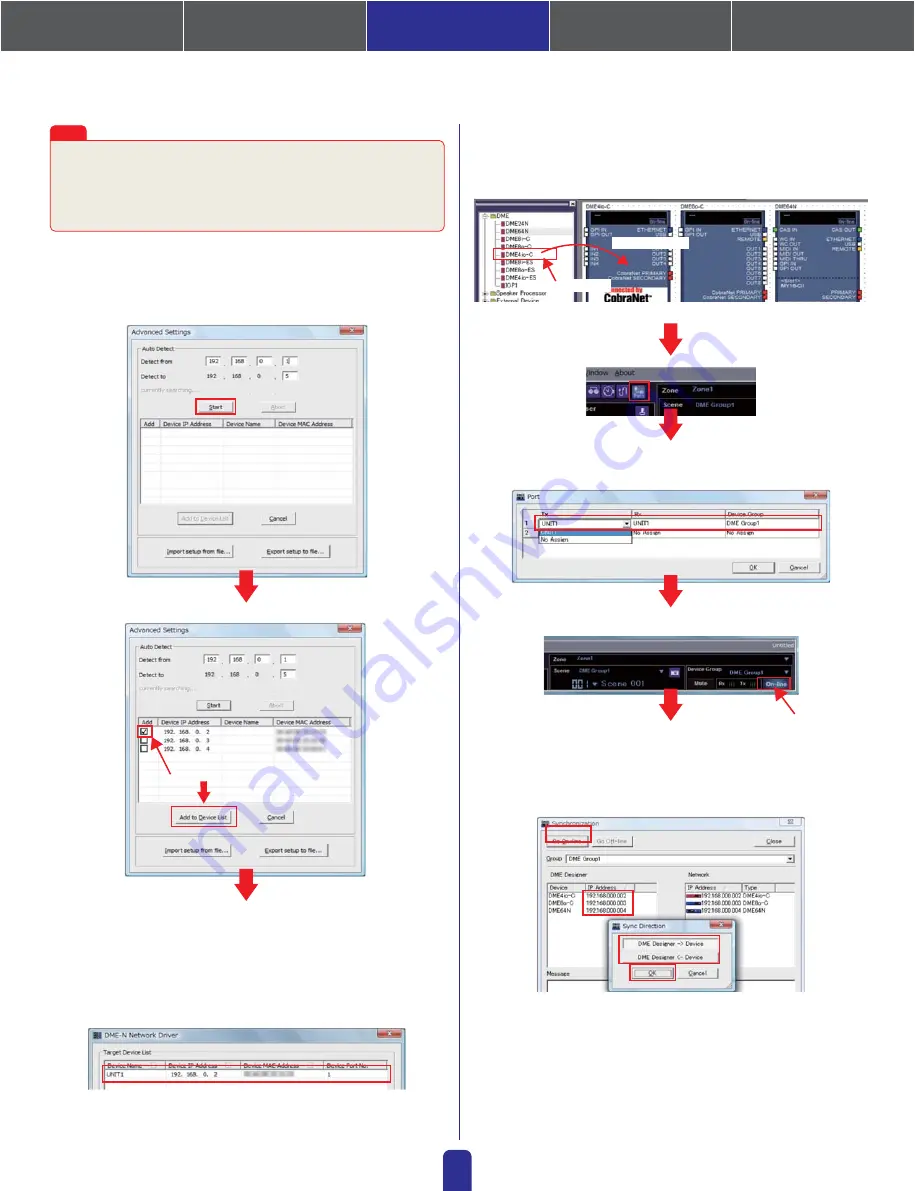
Connecting with DME Designer
Launch DME Designer and place each of the currently connected devices
in the configuration.
When all devices have been displayed as shown below, select [Save and Close] to
complete the procedure. Although the IP addresses for all connected DME units
will be shown, a checkmark should only be placed next to that for the master
device. When this IP address has been selected, click [Add to Device List].
* You can change the device name by, for example, entering "DME4io-C" into the
[UNIT1] field and then clicking the [Apply] button.
In the Port dialog box, ensure that settings are as shown below and then
click the [OK] button.
Next, click the [On-line] button from the Main Panel window
Click "Select IP Address", ensure that the IP addresses for all devices are
displayed, and then click the [Go On-Line] button.
When the Sync Direction window is displayed, ensure that [DME
Designer -> Device] is selected, and then click the [OK] button.
Click the
[Port] button.
Once a configuration has been setup, create at least one scene.
NOTE:
If multiple device groups have been set up, use the [Device Group] drop-down
menu to select the one to be synchronized.
In our example, the IP addresses of the first, second, and third devices
are 192.168.0.2, 192.168.0.3, and 192.168.0.4, respectively. Accord-
ingly, the last digit from [Detect from] should be set to 2 or lower, and
the last digit from [Detect to] should be set to 4 or higher. (Please note
that sorting may take a certain amount of time to complete if the search
range is too large.)
Note
Set the range of IP addresses to be sorted. Although the range in this case
is 192.168.0.2 to 192.168.0.4, we can select with the default settings.
Select using the checkbox, and then
Double-click
Drag and drop


