Controls and Functions
16
AUDIOGRAM 6 Owner’s Manual
7
COMP Control
Adjusts the amount of compression applied to the chan-
nel. As the knob is turned to the right, the interface
automatically raises the compression ratio while adjust-
ing the output gain accordingly. The result is smoother,
more even dynamics because louder signals are atten-
uated while the overall level is boosted.
Avoid setting the compression too high, as
the higher average output level that results
may lead to feedback.
8
MONO/STEREO Switch
This switch allows channels 1 and 2 to be used either
as separate mono channels or as a stereo pair. When
set to MONO (
), channels 1 and 2 function as inde-
pendent mono channels feeding both the L and R STE-
REO OUT jacks
3
. When set to STEREO (
), input
channels 1 and 2 function as a stereo pair: the channel
1 signal feeds the L STEREO OUT jack and the chan-
nel 2 signal feeds the R STEREO OUT jack.
9
PEAK Indicators
The PEAK indicators light when the channel signal
reaches or exceeds clipping level. Note that signal lev-
els as indicated by the PEAK indicators are affected by
both the GAIN and LEVEL controls.
If a PEAK indicator lights, adjust the GAIN
6
and
COMP
7
controls to lower the level so that the indica-
tor goes out.
0
LEVEL Controls
Adjusts the level of the channel signal. Use these con-
trols to adjust the balance between the various chan-
nels.
A
POWER Indicator
This indicator lights when power is applied to the
AUDIOGRAM interface via the USB cable (supplied)
that connects it to the computer.
B
P48V (CH1) Switch/Indicator
(only for channel 1)
This switch toggles phantom power on and off. If you
set the switch on (
), the AUDIOGRAM supplies
phantom power to channel 1 MIC/INST jack (XLR-type)
1
. Turn this switch on when using a phantom-powered
condenser microphone.
• Be sure to leave this switch off (
) if
you do not need phantom power.
• When turning the switch on, be sure that
only a condenser microphone is con-
nected to the channel 1 MIC/INST input
jack. Other devices may be damaged if
connected to phantom power. This precau-
tion does not apply to balanced dynamic
microphones or instruments with the
phone jack, however, as these will not be
affected by phantom power.
• To prevent damage to speakers, be sure to
turn off power amplifiers (or powered
speakers) before turning this switch on or
off. We also recommend that you set the
MASTER LEVEL control to the minimum
position. Neglect of these precautions may
result in large noise bursts that may dam-
age your equipment, your ears, or both.
C
Level Indicators
These indicators show signal levels prior to the MASTER
LEVEL control
E
. The SIGNAL LED lights when a signal
is present, and the PEAK LED lights when the signal
reaches or exceeds clipping level. Adjust the input chan-
nel LEVEL controls
0
so that the PEAK LEDs flash only
briefly on occasional high-level peaks or not at all.
D
DAW Control
Adjusts the level of the signal received from Cubase AI
sent to the AUDIOGRAM STEREO OUT jacks
3
.
E
MASTER LEVEL Control
Adjusts the signal level sent to the STEREO OUT jacks
3
. This allows you to adjust the overall volume without
changing the relative volume balance among the chan-
nels.
F
USB Connector
Connects the AUDIOGRAM interface to a USB port on
your computer via the supplied USB cable. In addition
to transferring audio data between the AUDIOGRAM
interface and the computer, the USB cable supplies
power from the computer to the AUDIOGRAM interface.
When connecting or disconnecting the USB
cable be sure to turn the DAW control and the
MASTER LEVEL control all the way down.
Yamaha recommends that you use a USB
cable with a length of 1.5 meter or less.
■
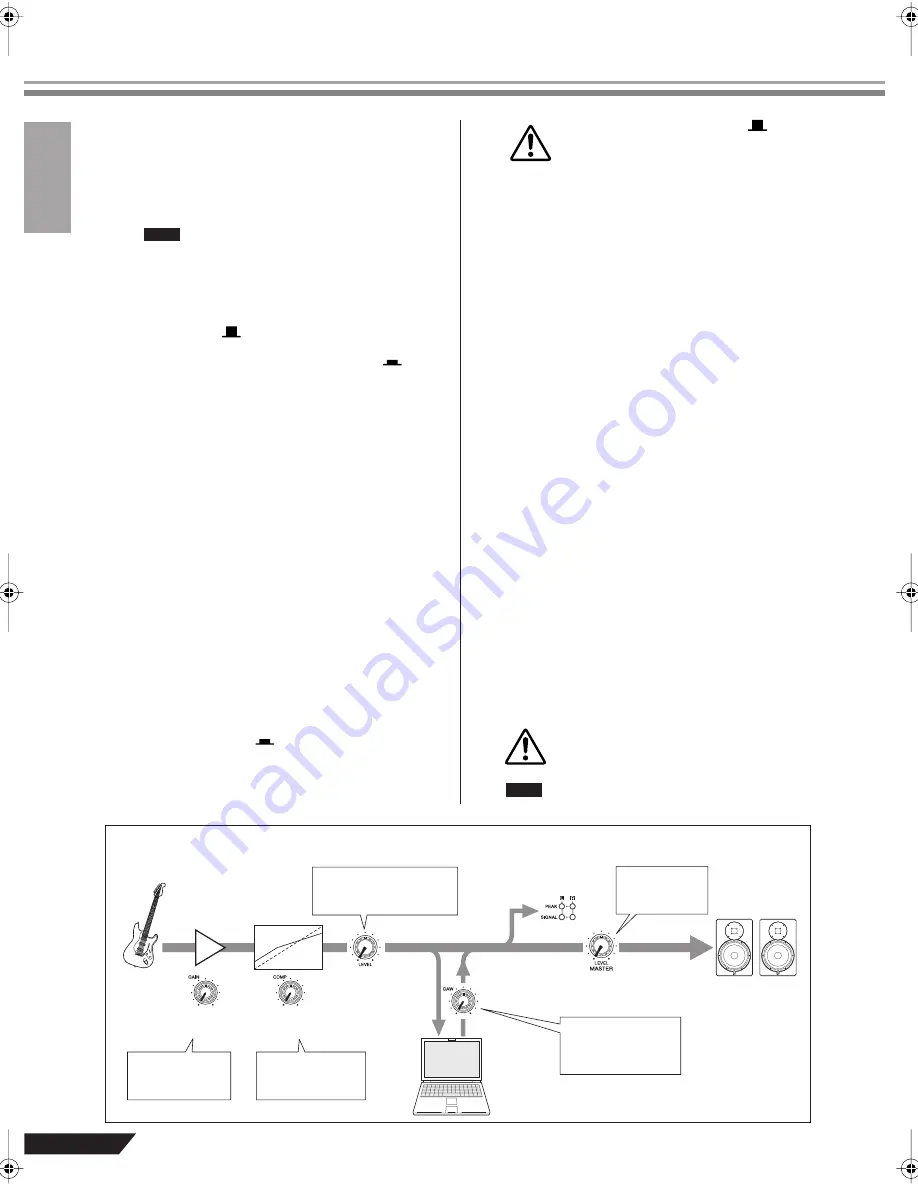
Input Signal Flow
NOTE
CAUTION
CAUTION
NOTE
Input
Output
Adjust for maxi-
mum level with
minimum noise.
Compress the sig-
nal for increased
subjective level.
Adjust the recording level
as well as the balance
between channels.
Adjusts the
monitor level.
Adjusts the playback
level from Cubase AI
(does not affect the
record level).
Record
Playback
E
MASTER
LEVEL control
D
DAW
control
0
LEVEL
controls
7
COMP
controls
6
GAIN
controls
C
Level
indicator
Cubase AI
audiogram6̲en.book Page 16 Wednesday, April 2, 2008 3:46 PM


