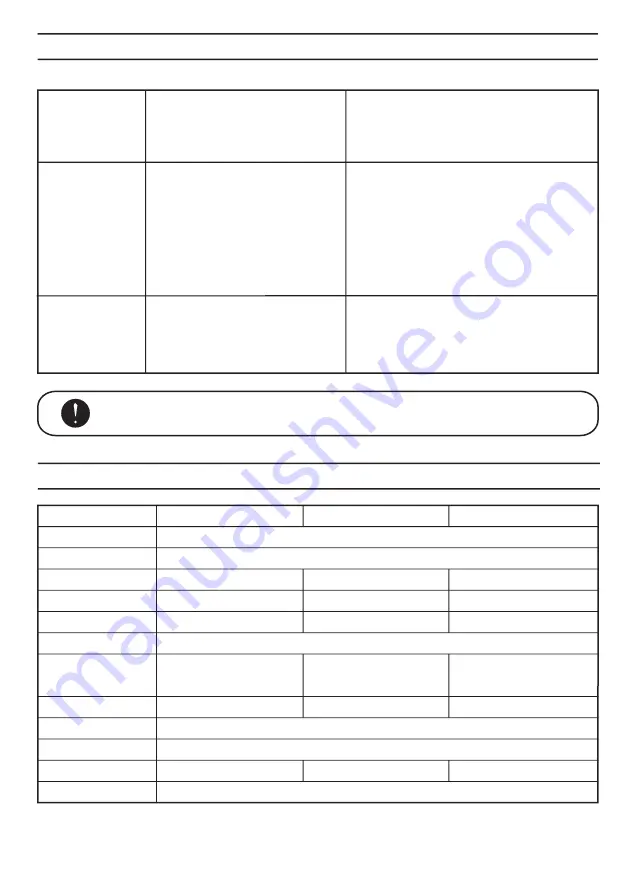
Yaesu LDX-60 Скачать руководство пользователя страница 14

13

104 

x

 140 

x

 215 

D


(mm)


164 

x

 157 

x

 231 

D


(mm)

  224 

x

 157 

x

 241 

D


(mm)

LDX-60

LDX-120

LDX-180

100VAC, 120VAC, 220-240VAC  50/60Hz

±5%

40 W

45 W

50 W

20~60 

(mm)

20~120 

(mm)

20~180 

(mm)

15~60 

(mm)

15~120 

(mm)

15~180 

(mm)

10~999mm

100mm/sec ~ 200mm/sec

Φ250

Φ200

Φ300

2.1kg

3.3kg

4.6kg

Trouble shooting

Please check the followings before contacting the supplier.

Machine doesn't run
even if turning the
switch on 

It remains unplug

The fuse has blown out

Please make sure that it is definitely plugged.

Please replace the new fuse. However, please
stop using the machine if the fuse has constantly 
blown out.

Auto mode doesn't
work

It is set as Manual mode

There is some substances on the sensor

Label doesn't pass through the sensor

The source of light is close to the sensor

Please select the mode.

please remove the substances.

Please place the sensor at the proper position.

Please make sure that the source of the light
doesn't reflect straight to the sensor.

Please note that it can't be used in the terms of

    use condition or what kind of label you use.

Label Setting Mode
differs from the one
as registered

Label setting value is just for your reference.
And it may differ from the one as display.
In addition, there may be slight differences in
the width of the label, Motor Speed Setting, 
and sensor angle.

If you still have any problems even though you check the detail as
mentioned above, please contact your distributer or our company.

Specification

Model No.

Power Supply

Range of Input Voltage

Power Consumption

Outer Dimension

Weight

Material

Adjustable Width
of Label Holder

Usable Width

Usable Length

Feed Speed

Maximum Roll Diameter

Accessories

(Possible to adjust 6 level of the speed)

Anti-Static ABS

Hexagonal Spanner for Adjustment

In some cases, it doesn't work well as depends on the label and shape even if it is within the above specification.

It is subject to change the specification without prior notice.

Содержание LDX-60

Страница 1: ...LDX 60 120 180 AUTO LABEL DISPENSER INSTRUCTION MANUAL O L S E C...

Страница 2: ...After that please keep this instruction in your file and use if necessary In addition this instruction is valuable to the certificate of warranty When repairing you need this certificate of warranty a...

Страница 3: ...Required Action A symbol within the circle or the description will indicate the required action Definition of Warning and Caution Symbols 3 Warning Caution The safety guidelines in this Instruction M...

Страница 4: ...ators or children to operate the machine Failure to observe this may result in injury Turn off the power switch and unplug the machine prior to replacing the blade unit or peforming any maintenance on...

Страница 5: ...over Label Holder Adjust Screw Label Holder Support Label Holder Remove Plate Front Panel Sensor Front Support Roller Rear Support Roller Lock Release Lever Set Knob Wing Adjust Dial Label Holder Lock...

Страница 6: ...core of label illusration 5 Insert the point of label into the inlet of Front Panel until it reaches to Feed Roller illsutrration 5 While holding the point of label inserted into the inlet of Front Pa...

Страница 7: ...sure that Backing Paper Release Bar rotates and works properly Make sure that label has been remove Make sure that label comes properly from machine Adjustment for sensor position Take the label remo...

Страница 8: ...The number from 0 to 9999 will be displayed Press Auto Manual Button longer time when resetting to the number of 0 Only one digit displays on the panel when resetting When taking one label on the sens...

Страница 9: ...ghting LED lights out When you take the label out feed next label automatically and stand by When you press the Start Button feed next label and stand by Auto Mode Manual Mode F Mode Motor Speed setti...

Страница 10: ...ode LED Lights Out Press Auto Manual BUTTON and LED will be lighting off Press START BUTTON and label will come out When label is on the sensor no additional label will come out Operation will stop au...

Страница 11: ...s clicking Please refer to Label Set on the page 6 Please refer to L Mode Label Setting Mode on the page 8 As depend on the terms of use please follow the instruction for each mode setting Press START...

Страница 12: ...n on the illustration 3 while pressing Tension Adjust Button Make sure that it will work properly after making a half turn of Tension Adjust Button Make an adjustment until label winds into Backing Pa...

Страница 13: ...any scratches on the lens of the sensor Removal of the label When removing the label stuck on the machine please remove the label as adhesive doesn t leave on the machine When removing the label stuc...

Страница 14: ...ion Please make sure that the source of the light doesn t reflect straight to the sensor Please note that it can t be used in the terms of use condition or what kind of label you use Label Setting Mod...

Страница 15: ...e machine shall be for a period of 180 days form the date of purchase Was not damaged while being installed Was operated in accordance with products s specifications instructions and any technical sup...

Страница 16: ...YAESU KEIKOGYO CO LTD 39 8 Senju Motomachi Adachi Ku Tokyo 120 0041 Japan Phone 81 3 3888 8751 Fax 81 3 3888 1592 URL http www yaesu1965 com 12F05...

Отзывы: