11
Other functions
As depends on the terms of use condition and what kind of label you use,
additional adjustments will be necessary as follows.
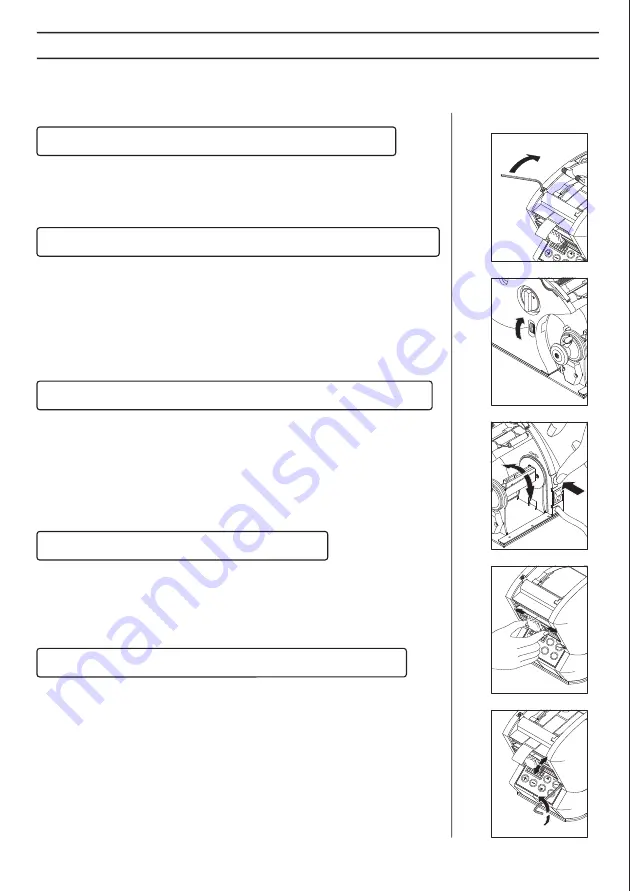
In the case that label (backing paper) setting slants (illustration 1)
■
Make some adjustments with Label Holder.
・
If label slants in left side, tighten the screw.
・
If label slants in right side, loosen the screw.
In the case that label doesn't remove well at Removal Plate (illustration 2)
■
Make some adjustments with Label Holder Tension Adjust Screw as shown
on illustration 2.
・
Make sure whether it will work properly after turning one screw
adjusutment.
・
Adjust the screw until label is removed definitely at Removal Plate.
・
If label is not removed properly even though screw adjustment is done
to the end, please don't use the machine and contact the supplier.
In the case that label is wound loose or label is not wound (illustration 3)
■
Turn Backing Paper Release Bar in the direction as shown on the
illustration 3 while pressing Tension Adjust Button.
・
Make sure that it will work properly after making a half turn of Tension
Adjust Button.
・
Make an adjustment until label winds into Backing Paper Release Bar.
Notice: Please don't turn counterclockwise as shown on the illustration 3.
In the case that label is not detected (illustration 4-5)
■
Move the sensor to the proper position by left and right as detects the
label.
■
Make some adjustment with Sensor Angle Adjust Screw to place in the
middle of the label that stops at Removal Plate.
In the case of checking the sensibility of the sensor (illustration 4-5)
Please follow the instructions for the correct use.
■
Turn the switch off after label stopping under the sensor.
■
Turn the switch on while pressing START BUTTON.
・
Release START BUTTON after the sound of the peep.
・
Display the number from 0 to 100.
・
The sensibility of the sensor will be better as much as the number
increased.
■
Place the best position for the sensor by moving to left and right and by
changing the angle.
■
Press START BUTTON longer time and revert to the mode as you use.
1
2
3
4
5
T
I
G
H
T
LOOSE
P
O
E
N


