background image

P11

da Vinci Color mini

Function Operation and Instructions 

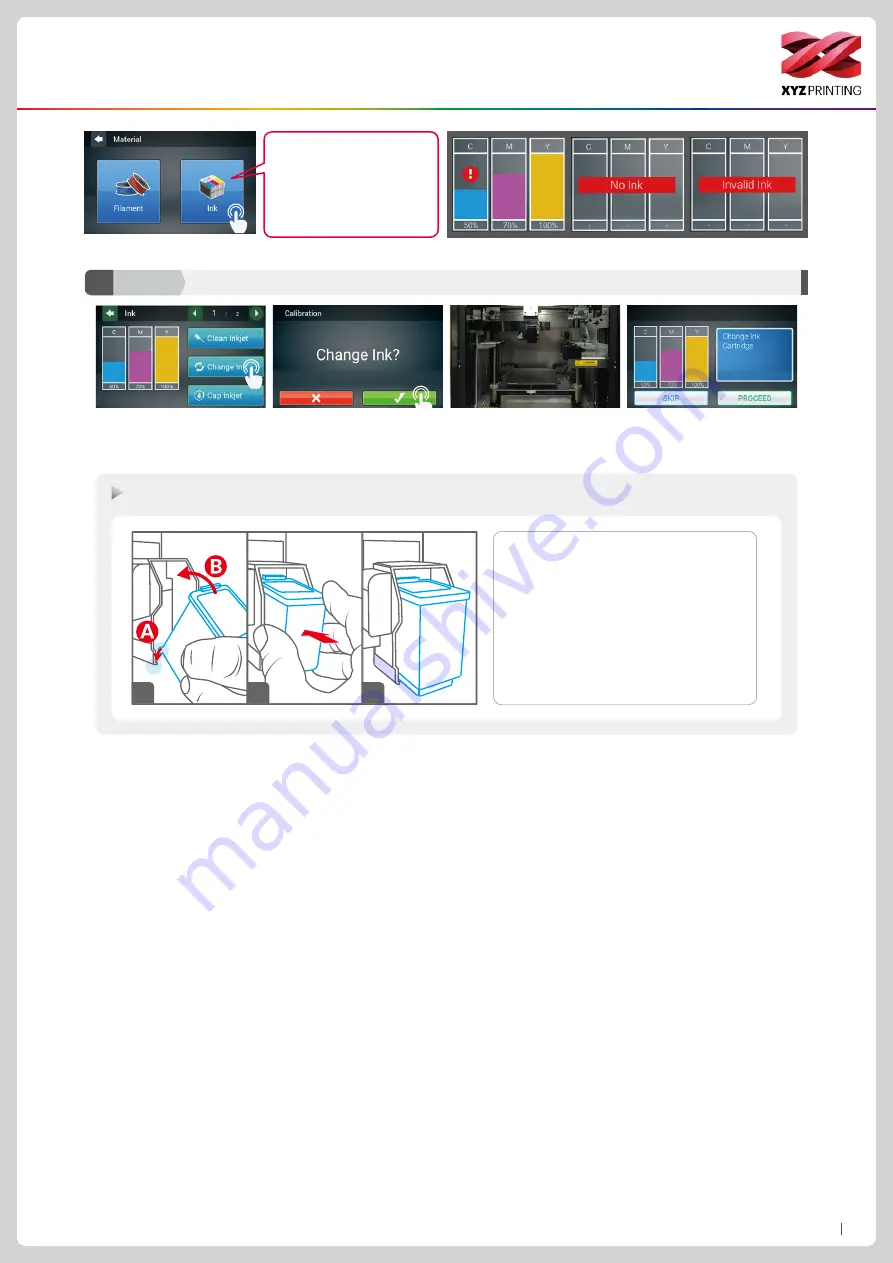
3.Wait until the cartridge moves 

to the center of the print bed, 

and then change the ink.

1. Tap Change Ink and tap to 

confirm.

4. Tap the PROCEED after you 

change.

2. Confirm the operation.

Change Ink

C1

Ink

Tap the ink, the screen will 

show the status of the ink, 

including "Ink Low", "No Ink", 

"Invalid Ink"

Cartridge Installation

1. Place the ink cartridge along the ink 

cartridge slot.

2. Snap the ink cartridge into the ink slot.
3. Check if the cartridge is placed 

properly,  ink  installation  is  complete.                           

Note: Be sure to turn off the power before 

replacing the ink cartridge. After the 

replacement is complete, please conduct 

inkjet calibration test.

1

2

3

Содержание da Vinci Color mini

Страница 1: ...account on http support xyzprinting com before able to download latest manual software for better user experience For more information on the Color mini please contact your local dealer or visit the...

Страница 2: ...not touch or block the operation of the parts Weak odors may be generated during the printing process We recommend working in a well ventilated and open area to ensure operational comfort Defect repa...

Страница 3: ...rior 1 Print head 4 USB Port 7 5 inch color touch panel 10 Power jack 2 Ink service station 5 Auto feeding module 8 USB Port WiFi dongle 11 Power switch 3 Print bed EZ removable rubber magnet 6 Filame...

Страница 4: ...s 13 Clear Tube 2 USB Drive 5 Power Adapter 8 Guide Tube 11 WiFi Dongle 3 3D Color inkjet PLA 6 USB Cable 9 PC Mylar x 2pcs 12 Pair Of Gloves Printing Printing technology 2D pattern Inkjet printing 3D...

Страница 5: ...shown in Illustration 1 Remove the PP belt 3 Remove the tape on the body 5 Remove the tape and foam from the rear print head installation position 6 Remove the foam on the ink service station 7 Remove...

Страница 6: ...ach the PC mylar and mask tape on the EZ removable rubber magnet 7 Confirm the rubber magnet is well placed on the print bed 4 Pass the guide tube going through the top Then insert the other end into...

Страница 7: ...s menu can be used to import files 3cp from a USB drive to the machine for printing without a com puter This includes the functions in Home Page 1 Settings of the Print Bed Print Head Filament and Ink...

Страница 8: ...e it will be automatically loaded 8 Check if the temperature of the print head goes up to its operating temperature Color PLA from XYZprinting after the filament is loaded Once the set temperature is...

Страница 9: ...rom the printer And peel off the printed object from the rubber magnet B1 Please avoid touch ing the led strip of the printer because the LED strip will be slight hot due to long hours of been light o...

Страница 10: ...he cartridge back to the printer before the next print Note 1 Prepare lens wiping cloth lens paper and the ink cartridge 2 Remove the cartridge cover 5 Check if the ink transferred to the lens wiping...

Страница 11: ...e Ink C1 Ink Tap the ink the screen will show the status of the ink including Ink Low No Ink Invalid Ink Cartridge Installation 1 Place the ink cartridge along the ink cartridge slot 2 Snap the ink ca...

Страница 12: ...A4 paper so it is flat no gap on the rubber magnet 3 Take out the EZ Removable Rubber Magnet Use tape to secure the A4 in the portrait direction on the front side of the rubber magnet 6 Put the rubber...

Страница 13: ...ed the filament 6 After the printing is completed take out the calibration card Caution Please ensure the EZ Removable Rubber Magnet had placed in the printbed 2 The adjustment position of X Axis and...

Страница 14: ...cations Once the measurement is complete the printer will automatically level the print bed Caution Please ensure the EZ Removable Rubber Magnet had placed in the printbed 2 Move the print head to the...

Страница 15: ...leaning function of the printer every 60 hours of print to clear residuals with nozzle cleaning wire or feeding path cleaning wire Filament should be unloaded from the extruder and remove the guide tu...

Страница 16: ...ion instructions and technical supports please visit the XYZprinting official website http www xyzprinting com Before turning on the printer and setting up the WiFi network please insert the WiFi dong...

Страница 17: ...traditional and simplified Chinese English Japanese German Italian Spanish and French The language setting can be changed by tapping Settings Languages in the main screen Change Language Setting The...

Страница 18: ...e http www xyzprinting com First time printing Transfer files to be printed via the computer software XYZprint Printing D1 1 A C C B Calibration Z offset Load Filament Change Ink Calibration Prepare t...

Страница 19: ...llation This equipment generates uses and can radiate radio frequency energy and if not installed and used in accordance with the instructions may cause harmful interference to radio communications Ho...

Отзывы: