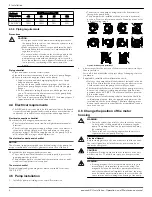
Xylem Bell & Gossett Ecocirc XL Скачать руководство пользователя страница 9

3

2

4

6

5

1

Figure 2: Change the position of the pump head

1.

Loosen the four hex-head screws (2) that fix the motor to the

pump housing (4) using the T-handle allen wrench described.

2.

Rotate the motor (1) in 90° steps to the desired position.

3.

In case of separation of the motor housing from the pump body

(4):
a)

avoid removing the rotating assembly from motor housing;

b)

pay attention to the magnetic hazard listed before.

A defective O-ring must be replaced. An O-ring is already availa-

ble inside the package as spare part.

4.

Properly align and tighten the four hex-head screws (2) that affix

the motor to the pump body (4) according to the torque table giv-

en below in a criss cross pattern.

Nominal HP

Screw size

Torque

1/12 & 1/6

M6

90 in-lb

1/2

M8

170 in-lb

1 & 2

M10

340 in-lb

CAUTION:

Check for the presence of leaks after reassembling the

pump.

4.7  Electrical installation

Precautions

WARNING:

• Make sure that all connections are performed by a quali-

fied electrician in accordance with all applicable codes,

ordinances and good practices. Failure to follow these

instructions could result in serious injury, death and/or

property damage.

• Before starting work on the unit, make sure that the unit

and the control panel are isolated from the power sup-

ply and cannot be energized.

Grounding (earthing)

WARNING:

Reduced risk of electric shock during operation of this pump

requires the provision of acceptable grounding.

Be sure the following are adhered to. Failure to follow these instruc-

tions could result in serious personal injury, death, and/or property

damage.

• If means of connection to the supply connection box (wiring com-

partment) is other than grounded metal conduit, ground the

pump back to service using a copper conductor at least the size of

the circuit conductors supplying the pump.

• Connect the ground wire to the green grounding terminal in the

wiring compartment.

The number of ON/OFF power cycles for the pump must be less than 3

times per hour and less than 20/24 hours. If more frequent start/stop

cycles are required, the use of a dedicated start/stop input is recom-

mended. See 

External start/stop

 (page 9).

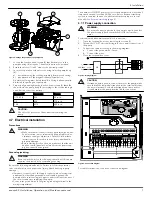
4.7.1  Power supply connection

WARNING:

Do not make any connection in the pump control box unless

the power supply has been switched off for at least 2 mi-

nutes.

For models with standard terminal block connection:
1.

Open the terminal box cover removing the screws (5).

2.

Thread the ½” NPT electrical fitting into the conduit connection of

the pump.

3.

Connect the cable according to the wiring diagram.
a.

Connect the ground wire, if used.

b.

Connect the wires.

4.

Close the terminal box cover.

1
2
3

L

N

115V

L

1

L

2

208-230V

CB

Figure 3: Wiring diagram

CAUTION:

If stranded wire is used to connect power to the pump, make

sure that all the individual strands enter the terminal block as

the wire is inserted. Peeled back strands can cause a short

circuit hazard at the pump terminal block connections.
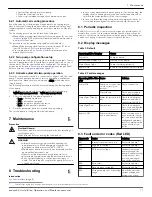
Start /

 Stop

20

19

18

17

16

15

14

13

12

11

10

9

8

7

6

5

4

3

2

1

C

N

L

NO 15V S+S- P+ P-

T+ T-

A

B

GND

A

B

GND

Figure 4: Connection diagram

For cable terminations, see above connection diagram.

4  Installation

ecocirc

®

 XL Installation, Operation, and Maintenance manual

7

Содержание Bell & Gossett Ecocirc XL

Страница 1: ...Installation Operation and Maintenance manual ecocirc XL...

Страница 2: ......

Страница 3: ...ection 7 4 7 2 I O connections 8 4 7 3 Connection assignment 8 5 System Description 8 5 1 User interface 8 5 1 1 User interface locking unlocking 8 5 2 Functions 8 5 2 1 Control mode 8 5 2 2 Night mod...

Страница 4: ...ults causes and remedies 12 9 Other Relevant Documentation or Manuals 12 9 1 Embedded Software and Driver Software License Agreement 12 10 Product warranty 13 Table of Contents 2 ecocirc XL Installati...

Страница 5: ...nvironmental emissions to the appropriate authorities CAUTION Radiation Hazard Do NOT send the product to Xylem if it has been exposed to nuclear radiation unless Xylem has been informed and ap propri...

Страница 6: ...se this pump to handle liquids containing abrasive solid or fibrous substances toxic or corrosive liquids potable liquids other than water or liquids not compatible with the pump construction material...

Страница 7: ...DANGER Do not use this unit in environments that may contain flam mable explosive or chemically aggressive gases or powders Guidelines Observe the following guidelines regarding the location of the p...

Страница 8: ...ect the pump against short circuit The pump has built in overload and thermal protection no addi tional overload protection is required The motor checklist Electrical supply and grounding wires must b...

Страница 9: ...ions could result in serious personal injury death and or property damage If means of connection to the supply connection box wiring com partment is other than grounded metal conduit ground the pump b...

Страница 10: ...ons The main functions of the pump and control modes are selectable through the pump user interface and the embedded I O Advanced functions or communication features can only be set via bus protocol o...

Страница 11: ...utomatical ly start working in constant pressure mode 7 The setpoint can be changed using the settings button 5 See User interface page 8 External temperature sensor setup The external temperature sen...

Страница 12: ...See User interface page 8 Press the operating mode button 1 The operating modes are cyclically changed by the pressed but ton mode mode mode mode mode mode 6 1 3 Change the set point See User interfa...

Страница 13: ...ice must be performed by skilled and qualified personnel only Observe accident prevention regulations in force Use suitable equipment and apply personal protection Risk of property damage serious pers...

Страница 14: ...rload The pump starts but the thermal protection is triggered after a short time Cause Remedy Incorrect wiring size or circuit break er rating not suitable for motor cur rent Check and replace the com...

Страница 15: ...oods sold for personal family or household purposes Seller warrants the goods purchased hereunder with the exception of membranes seals gaskets elastomer materials coatings and other wear parts or con...

Страница 16: ...farms In more than 150 countries we have strong long standing relationships with customers who know us for our powerful combination of leading product brands and applications expertise backed by a le...

Страница 17: ...Manual de instalaci n operaci n y mantenimiento ecocirc XL...

Страница 18: ......

Страница 19: ...fuente de alimentaci n 24 4 7 2 Conexiones I O 24 4 7 3 Asignaci n de conexiones 24 5 Descripci n del sistema 25 5 1 Interfaz de usuario 25 5 1 1 Bloqueo desbloqueo de la interfaz de usuario 25 5 2 Fu...

Страница 20: ...allas causas y soluciones 29 9 Otra documentaci n y manuales relevantes 30 9 1 Software y licencia de software de driver integrados 30 10 Garant a del producto 30 Tabla de contenidos 18 ecocirc XL Man...

Страница 21: ...anipule y elimine el l quido bombeado de acuerdo con las re glamentaciones ambientales aplicables Limpie todos los derrames de acuerdo con los procedimientos de seguridad y ambientales Denuncie todas...

Страница 22: ...ua caliente potable solo con los modelos de bombas de carca sa de bronce Sistemas de calefacci n de agua caliente Sistemas de refrigeraci n y agua fr a La bomba tambi n se puede utilizar para Sistemas...

Страница 23: ...manual Sensor de temperatura para m s detalles v ase la secci n 5 2 10 de este manual M dulo inal mbrico M dulo RS 485 4 Instalaci n Precauciones ADVERTENCIA Respete las reglamentaciones de prevenci n...

Страница 24: ...carga cerrado por m s de unos pocos segundos se deber instalar un circuito de derivaci n para evitar el sobrecalentamiento del agua que est dentro de la bomba Lista de verificaci n de tuber as los tub...

Страница 25: ...recibir tensi n PRECAUCI N Peligro de quemaduras Durante el funcionamiento se calen tar n varias superficies de la unidad Para evitar lesiones por quemaduras utilice guantes protectores contra el cal...

Страница 26: ...a 3 Diagrama de cableado PRECAUCI N Si se usan cables trenzados para conectar la corriente a la bomba aseg rese de que todos los hilos individuales ingre sen al bloque de terminales al insertar el cab...

Страница 27: ...la bomba se puede configurar a tra v s de la interfaz de usuario Vea la secci n 6 1 2 Cambiar el punto de ajuste Control de velocidad fija Max min Speed setpoint La bomba mantiene una veloci dad fija...

Страница 28: ...uraci n del sensor de temperatura externo La configuraci n del sensor de temperatura externo y de los modos de control relacionados se puede llevar a cabo solamente a trav s de RS 485 o una conexi n d...

Страница 29: ...n al esta do anterior NOTA El men de configuraci n de comunicaci n est disponible so lo en la pantalla y no a trav s del bus de comunicaci n 6 1 2 Cambiar el modo de control La bomba puede ser control...

Страница 30: ...te procedimiento se debe ejecutar durante la fase de arran que de la bomba 1 Entre en el submen de las bombas dobles cuando la pantalla muestre TWMA bomba maestra o TWSL bomba esclava 2 Seleccione la...

Страница 31: ...uidos Apague la bomba durante 5 minutos y luego vuelva a encenderla Si el problema persiste comun quese con el representante local de B G A02 Alta temperatura del l qui do Compruebe el valor de la tem...

Страница 32: ...ci n del aviso que los productos est n listos para ser enviados lo que ocurra prime ro a menos que se especifique un per odo mayor en la documenta ci n del producto la Garant a Con excepci n de lo req...

Страница 33: ...mal co rrosi n o ataque qu mico e da ado debido a condiciones anormales vibraci n falta de cebado correcto o funcionamiento sin flujo f da a do debido a una fuente de alimentaci n defectuosa o protecc...

Страница 34: ...casas edificios f bricas y granjas Mantenemos estrechas y duraderas relaciones en m s de 150 pa ses con clientes que nos conocen por nuestra s lida combinaci n de marcas de productos l der y la experi...

Страница 35: ...Guide d installation d utilisation et d entretien ecocirc XL...

Страница 36: ......

Страница 37: ...2 4 7 2 Connexions E S 42 4 7 3 Affection la connexion 42 5 Description du syst me 5 1 Interface utilisateur 42 5 1 1 Utilisation de l interface de verrouillage et d verrouillage 42 5 2 Fonctions 43 5...

Страница 38: ...causes et solutions 47 9 Autre document pertinent ou manuels 47 9 1 Convention de droit d utilisation de logiciel enfoui et pilote 47 10 Garantie du produit 48 Table des mati res 36 ecocirc XL Guide...

Страница 39: ...appropri e tous les d chets Traiter et jeter le liquide trait conform ment aux r glements en vigueur sur l environnement Nettoyer tous les d versements conform ment aux proc dures sur la s curit et l...

Страница 40: ...Syst mes solaires Applications g othermiques Utilisation inad quate DANGER Ne pas utiliser cette pompe pour manipuler les liquides in flammable ou explosifs AVERTISSEMENT Une utilisation impr vue de...

Страница 41: ...Pr cautions AVERTISSEMENT Respecter les r glements de pr vention d accident en vigueur Utiliser un quipement et une protection ad quates Toujours tenir compte des r gulations l gislation loca les et o...

Страница 42: ...e v rification de la canalisations Les tuyaux et les vannes doivent tre dimensionn s de mani re ad quate Les tuyaux ne doivent pas transmettre de force ni de couple sur la bride de la pompe S assurer...

Страница 43: ...m dicaux En plus le champ magn tique peut attirer les pi ces m talliques vers le rotor ce qui peut causer des blessu res et ou des dommages au roulement de la pompe 3 2 4 6 5 1 Figure 2 Modifier la p...

Страница 44: ...tion 4 2 pour acc der aux borniers 2 Raccorder les c bles appropri s conform ment au sch ma du bornier et aux exigences la section Affection la connexion pa ge indiqu es sous la section 4 7 3 3 Fermer...

Страница 45: ...e de l eau et ajuste auto matiquement la vitesse de la pompe La pompe revient au point de consigne d origine d s que le syst me red marre 5 2 3 Contr le p T Cette fonction ajuste le point de consigne...

Страница 46: ...m diatement en cas de panne de la pompe principale Op ration parall le automatique para Les deux pompes fonctionnent simultan ment au m me point de con signe La pompe principale d termine le comportem...

Страница 47: ...ffi chera pour indiquer le processus de d gazage REMARQUE Le syst me ne peut tre ventil par la pompe D marrer la pompe de l une des mani res suivantes Mettre la pompe sous tension Fermer le contact de...

Страница 48: ...obable Sous tension Pompe sous tension Tous les DEL et afficheur sous tension D marrage de la pompe T moin vert d tat La pompe fonctionne correctement Contr le distance activ La communication distance...

Страница 49: ...rant du moteur V rifier et remplacer les compo sants si n cessaire Protection de surcharge thermique caus e par une entr e excessive V rifier l tat de fonctionnement de la pompe Une phase manque dans...

Страница 50: ...r les membranes joints d tanch it s joints mat riaux en lasto m re rev tements et autres pi ces d usure ou articles consompti bles ces derniers n tant pas garantissables sauf indication contraire sur...

Страница 51: ......

Страница 52: ...ns immeubles usines et fermes Dans plus de 150 pays nous entretenons des relations fortes et durables avec des clients qui nous connaissent en raison de notre puissante combinaison de marques de produ...

Отзывы: