background image

EN

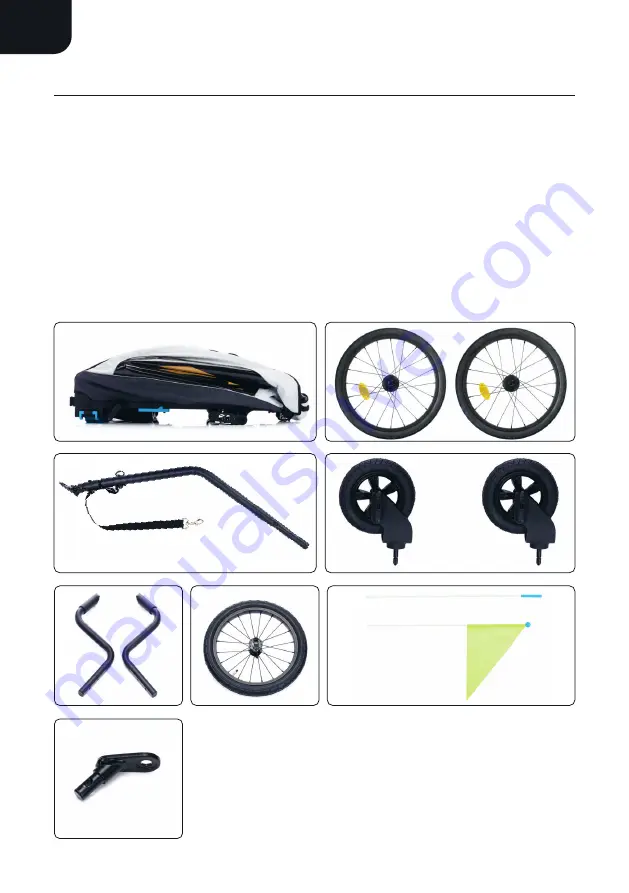
Components

A 1x frame

B 2x rear wheels with reflector

C 1x jogger wheel

D 2x wheel outrigger

E 2x buggy wheel

F 1x drawbar with axle coupling

H 1x axle coupling

G 1x safety pennant

A

F

D

H

C

G

B

E

Содержание Jimmy Lee

Страница 1: ...DE Bedienungsanleitung EN manual FR manuel DE Fahrradanhänger EN bike trailer FR remorque à vélo Art LU 0157 LU 0157 XXXLutz Römerstraße 39 4600 Wels www xxxlutz at ...

Страница 2: ...HSCHLAGEN AUFBEWAHREN Lesen Sie diese Anleitung sorgfältig durch bevor Sie das Produkt zusammenbauen und verwenden Der Zusammenbau darf nur von einem Erwachsenen durchgeführt werden Bewahren Sie diese Anleitung für zukünftiges Nachschlagen auf DE ...

Страница 3: ...s carefully before assembling and using the product The assembly may only be carried out by an adult Retain these instructions for future reference Lisez attentivement ces instructions avant d assembler et d utiliser le produit Le montage ne doit être effectué que par un adulte Conservez ces instructions pour toute référence ultérieure EN FR ...

Страница 4: ...Bestandteile A 1x Gestell B 2x Hinterräder mit Reflektor C 1x Joggerrad D 2x Radausleger E 2x Buggyrad F 1x Deichsel mit Achskupplung H 1x Achskupplung G 1x Sicherheitswimpel A F D H C G B E DE ...

Страница 5: ...rden 3 Verbinden Sie mit Hilfe der schwarzen Befestigungshaken den Rahmenteil an dem die Griffstage befestigt ist mit dem Gestell des Fahrradanhängers 4 Sichern Sie die schwarzen Befestigungshaken durch drehen der blauen Sicherungen bis diese einrasten 5 Die Teile sind richtig mit einander verbunden wenn die Verbindung wie in Bild 5 aussieht der Textil bezug gespannt ist und nichts mehr wackelt Hi...

Страница 6: ...ezug mit dem Rahmen verbindet 3 Zum Lösen der blauen Befestigungshaken drücken Sie die blauen Befestigungshaken nach unten bis diese frei sind 4 Drücken Sie den Rahmenteil an dem die Griffstange befestigt ist nach unten bis er sich aus der Ver ankerung löst Führen Sie diesen Teil unter dem Gestänge des Rahmens durch 5 Klappen Sie nun das Gestell zusammen 6 Das Gestell ist richtig zusammengeklappt ...

Страница 7: ... Sie die Schultergurte über die Schultern des Kindes Nun Stecken Sie die Enden der Gurte in das Gurtschloss Tipp Die Sicherheitsgurte können an die Körpergröße des Kindes angepasst werden 6 Stellen Sie die Sicherheitsgurte so ein dass das Kind von den Gurten sicher gehalten wird aber nicht so stramm dass die Sicherheitsgurte einschneiden Tipp Wenn sich eine flache Hand zwischen den Gurten und dem ...

Страница 8: ...t Lebens gefährlichen Verletzungen führen kann 2 Hinweis Der Fahrradanhänger verfügt über einen Radschutz Klappen Sie den Radschutz bei der Verwendung als Fahrradanhänger immer nach außen Der Radschutz schützt die Hinterräder vor Kollision HINWEIS Der Radschutz schütz die Räder vor Kollisionen mit Hindernissen ACHTUNG Die richtigen Reifen sind unerlässlich Verwenden Sie nur die mitgelieferten Reif...

Страница 9: ...tig Um die Festellbremse zu aktivieren ziehe den Bremshebel zu dir Die Feststellbremse kann durch drücken des silbernen Knopfes am Bremshebel fixiert werden Die Fixierung kann durch erneutes ziehen am Bremshebel wieder gelöst werden Warnung Ziehe nach dem Abstellen des Anhängers und beim Einsteigen und Aussteigen der Kinder immer die Feststellbremse an Prüfe durch leichtes Vorziehen und Zurückzieh...

Страница 10: ...ein lautes Klacken hören Hinweis Das Öffnen und Schließen der Klammer ist nicht leichtgängig und erfordert einen ge wissen Kraftaufwand Dies ist nötig um einen sicheren Halt der Klammer zu garantieren 3 Die Deichsel muss immer an der linken Seite des Fahrradanhängers montiert werden Die Deichsel darf nicht auf der rechten Seite montiert werden ACHTUNG Beide Stahlbolzen müssen immer mit der Klammer...

Страница 11: ...ung CLOSE gekennzeichnet Die Kraft die du aufwendest muss ab ca der Hälfte des Weges zunehmen Im letzten Bereich kurz vor der Endstellung sollte sich der Klemmhebel nur noch schwer bewegen lassen In der Endstellung muss der Hebel parallel zum Rahmen verlaufen und darf nicht abstehen 6 Prüfe ob der Schnellspanner wirklich fest geschlossen ist indem du versuchst den geschlossenen Schnellspanner um d...

Страница 12: ...1 1 2 3 DE ...

Страница 13: ...4 5 5 DE ...

Страница 14: ...den Ausfallenden verdrehen kann Fahren ohne Sicherungsscheiben kann zu Unfällen mit lebensgefährlichen Verletzungen führen 2 Setze die Achskupplung auf die Achse ohne die Sicherungsscheibe zu entfernen 3 Schraube die Achsmutter mit mindestens fünf vollen Drehungen auf das Gewinde der Vollachse Warnung Bei weniger als fünf vollen Drehungen ist keine ausreichende Klemmkraft des Hinterrads gewährleis...

Страница 15: ...2 3 4 DE ...

Страница 16: ...r linken Seite des Textilbezugs befindet 1 Stecke die Beiden Teile des Gestänges zusammen 2 Stecke den Sicherheitswimpel in den Stofftunnel am Textilbezug Warnung Wenn Sie den Fahrradanhänger als Fahrradanhänger nutzen muss der Sicherheitswimpel immer montiert sein Ohne Sicherheitswimpel könnte der Fahrradanhänger im Straßenverkehr leicht übersehen werden was zu Unfällen mit lebensgefährlichen Ver...

Страница 17: ...am Deichselkopf und schließen Sie den Sicherheitsbügel Achtung Vergewissern Sie sich durch Ziehen an der Deichsel ob die Verbindung sicher ist 4 Führen Sie das Sicherheitsband um das Rahmenrohr und hängen Sie den Karabiner in die Halterung an der Deichsel ein Achten Sie darauf dass sich das Sicherungsband nicht in den Speichen oder den Scheibenbremsen verfangen kann Warnung Vergewissere dich dass ...

Страница 18: ...Später wenn du mit der Montage vertraut bist reicht es für diese Arbeiten den Anhänger vorne leicht anzuheben 1 Heben Sie den Anhänger vorne an oder kippen Sie ihn nach hinten 2 Stecken Sie das Buggyrad in die Buggyradaufnahme bis zum Anschlag bis es hörbar und fühlbar einrastet 3 Zum Demontieren des Buggyrads drücken Sie den blauen Knopf und ziehen Sie das Buggyrad heraus Vorsicht Vergewissere di...

Страница 19: ...ie Löcher an der Seite des Fahrradanhängers und schließen Sie die Klammer Die Klammer ist sicher verschlossen sobald Sie ein lautes Klacken hören Hinweis Das Öffnen und Schließen der Klammer ist nicht leichtgängig und erfordert einen gewissen Kraftaufwand Dies ist nötig um einen sicheren Halt der Klammer zu garantieren 4 Setzte nun das Joggerrad in die Ausfallenden der Radausleger ein und schraube...

Страница 20: ...Anhänger vom Rad trennen Das Fahrrad sollte vor der Benutzung des Anhängers von einem qualifizierten Fahrradmechaniker einer Sicherheitsprüfung unterzogen werden Der Kindertransporter wird instabil wenn die vom Hersteller empfohlene Zuladung über schritten wird Benutzen Sie ihn nicht für Kinder die das zulässige Höchstgewicht überschreiten Stellen Sie vor der Verwendung sicher dass alle Verriegelu...

Страница 21: ...e diesen Kindertransporter nicht in der Nähe von offenem Feuer oder Flammen Verwendung und Pflege des Kindertransporters haben Auswirkungen auf seine Leistung und Sicherheit Es dürfen nur vom Hersteller Händler gelieferte oder empfohlene Ersatzteile verwendet werden Seien Sie sich bewusst dass ein angehängter Anhänger den Bremsweg des Fahrrads verlängert Pflegen und reinigen Sie den Anhänger regel...

Страница 22: ...EN Components A 1x frame B 2x rear wheels with reflector C 1x jogger wheel D 2x wheel outrigger E 2x buggy wheel F 1x drawbar with axle coupling H 1x axle coupling G 1x safety pennant A F D H C G B E ...

Страница 23: ...multaneously 3 Connect the frame part to which the handlebar is attached to the frame of the bicycle trailer using the black fastening hooks 4 Secure the black fastening hooks by turning the blue locks until they engage 5 The parts are correctly connected to each other when the connection looks like in picture 5 the textile cover is taut and nothing wobbles Note Secure the textile cover by folding...

Страница 24: ... that connects the textile cover to the frame 3 To release the blue fastening hooks press the blue fastening hooks down until they are free 4 Push the frame part to which the handle bar is attached downwards until it is released from the anchorage Pass this part under the frame linkage 5 Now fold the frame together 6 The frame is correctly folded when it looks like in picture 1 3 5 6 2 4 ...

Страница 25: ...ap straps Place the shoulder straps over the child s shoulders Now insert the ends of the straps into the buckle Tip The seat belts can be adjusted to the child s height 6 Adjust the seat belts so that the child is held securely by the belts but not so tight that the seat belts cut in Tip If a flat hand can be slid between the straps and the baby s body the straps are usually adjusted correctly Wa...

Страница 26: ... which can lead to accidents with life threatening injuries Note The bicycle trailer has a wheel guard Always fold the wheel guard outwards when using it as a bicycle trailer The wheel guard protects the rear wheels from collision NOTICE The wheel guard protects the wheels from collisions with obstacles ATTENTION The right tyres are essential Use only the tyres supplied and keep them properly main...

Страница 27: ...multaneously To activate the parking brake pull the brake lever towards you The parking brake can be fixed by pressing the silver button on the brake lever The parking brake can be released by pulling the brake lever again Warning Always apply the parking brake after parking the trailer and when getting in and out of the trailer with the children Check that the trailer cannot roll away by pulling ...

Страница 28: ...ely closed as soon as you hear a loud clack Note Opening and closing the clamp is not smooth and requires a certain amount of force This is necessary to guarantee a secure hold of the clamp 3 The drawbar must always be mounted on the left side of the bicycle trailer The drawbar must not be mounted on the right hand side ATTENTION Both steel bolts must always be locked with the clamp when the trail...

Страница 29: ... version The direction of movement of the clamping lever is often marked CLOSE The force you apply must increase from about half way In the last area shortly before the end position the clamping lever should be difficult to move In the end position the lever must be parallel to the frame and must not stick out 6 Check whether the quick release is really tightly closed by trying to turn the closed ...

Страница 30: ...EN 1 1 2 3 ...

Страница 31: ...EN 4 5 5 ...

Страница 32: ...el from twisting in the dropouts Riding without lock washers can lead to accidents with life threatening injuries 2 Place the axle coupling on the axle without removing the lock washer 3 Screw the axle nut onto the thread of the solid axle with at least five full turns Warning Less than five full turns will not ensure sufficient clamping force of the rear wheel which can lead to accidents with lif...

Страница 33: ...EN 2 3 4 ...

Страница 34: ...fabric cover 1 put the two parts of the frame together 2 put the safety pennant together 2 put the safety pennant into the fabric tunnel on the fabric cover Warning If you use the bicycle trailer as a bicycle trailer the safety pennant must always be fitted Without the safety pennant the bicycle trailer could easily be overlooked in road traffic which could lead to accidents with life threatening ...

Страница 35: ...pin back into the hole provided on the drawbar head and close the safety bar Caution Make sure that the connection is secure by pulling on the drawbar 4 Pass the safety strap around the frame tube and hook the carabiner into the holder on the drawbar Make sure that the safety strap does not get caught in the spokes or disc brakes Warning Make sure that the axle coupling is correctly fixed in the d...

Страница 36: ...ter when you are familiar with the assembly it is enough to lift the trailer slightly at the front for this work 1 lift the trailer at the front or tilt it backwards 2 insert the buggy wheel into the buggy wheel holder as far as it will go until you hear and feel it engage 3 to remove the buggy wheel press the blue button and pull the buggy wheel out Caution Make sure that the buggy wheel is corre...

Страница 37: ...To do this insert both steel bolts of the clamp into the holes on the side of the bicycle trailer and close the clamp The clamp is securely closed as soon as you hear a loud clack Note Opening and closing the clamp is not smooth and requires a certain amount of force This is necessary to guarantee a secure hold of the clamp 4 Now insert the jogger wheel into the dropouts of the wheel arms and tigh...

Страница 38: ...o exceed the maximum permissible weight Before use make sure that all locks are engaged Before each journey make sure that both wheels are securely engaged in the axle of the transporter The trailer is not suitable for children under 6 months Children must be at least 6 months old and able to sit upright independently If the transporter is used for cycling the child must be old enough to wear a he...

Страница 39: ...r recommended by the manufacturer dealer may be used Be aware that a hitched trailer increases the braking distance of the bicycle Maintain and clean the trailer regularly to keep it in good condition for a long time Check your trailer and accessories regularly for damage and signs of wear Check all metal components for possible breaks or cracks Do not use the trailer if any metal components are c...

Страница 40: ...nts A 1x cadre B 2x roue arrière avec réflecteur C 1x roue jogging D 2x bras de roue E 2x roue buggy F 1x timon avec accouplement d essieu H 1x accouplement d essieu G 1x fanion de sécurité A F D H C G B E FR ...

Страница 41: ...artie du cadre à laquelle le guidon est fixé au cadre de la remorque pour vélo à l aide des crochets de fixation noirs 4 Fixez les crochets de fixation noirs en tournant les verrous bleus jusqu à ce qu ils s enclenchent 5 Les pièces sont correctement connectées les unes aux autres lorsque la connexion ressemble à la photo 5 que la housse textile est tendue et que rien ne vacille Remarque Fixez la ...

Страница 42: ...sse textile au cadre 3 Pour libérer les crochets de fixation bleus appuyez sur les crochets de fixation bleus vers le bas jusqu à ce qu ils soient libres 4 Poussez vers le bas la partie du cadre à laquelle le guidon est fixé jusqu à ce qu il se détache de l ancrage Passez cette pièce sous la tringlerie du cadre 5 Repliez maintenant le cadre 6 Le cadre est correctement plié lorsqu il ressemble à l ...

Страница 43: ...bretelles et les ceintures sous abdominales Placez les bretelles sur les épaules de l enfant Insérez maintenant les extrémités des sangles dans la boucle Conseil Le harnais de sécurité peut être adapté à la taille de l enfant 6 Réglez le harnais de sécurité de manière à ce que l enfant soit bien maintenu par les sangles mais pas trop serré afin que le harnais de sécurité ne le compresse pas Consei...

Страница 44: ...ue La remorque pour vélo est équipée d une protection de roue Rabattez toujours la protection de roue vers l extérieur lorsque vous l utilisez comme remorque pour vélo La protection de roue protège les roues arrière contre les collisions REMARQUE La protection de roue protège les roues contre les collisions avec les obstacles ATTENTION Il est crucial d utiliser les bons pneus Utilisez uniquement l...

Страница 45: ...ent Pour activer le frein de stationnement tirez le levier de frein vers vous Vous pouvez fixer le frein de stationnement en appuyant sur le bouton argenté du levier de frein Vous pouvez relâcher le frein en tirant à nouveau le levier de frein Attention Serrez toujours le frein de stationnement après avoir garé la remorque et lorsque des enfants montent et descendent de la remorque Vérifiez que la...

Страница 46: ...endez un clic sonore Remarque Il n est pas facile d ouvrir et fermer l étrier cela nécessite une certaine force Ceci est nécessaire pour garantir une bonne tenue de l étrier 3 Le timon doit toujours être monté sur le côté gauche de la remorque pour vélo Le timon ne doit pas être monté sur le côté droit ATTENTION Les deux boulons en acier doivent tou jours être verrouillés avec l étrier lorsque la ...

Страница 47: ...ssance appliquée doit augmenter à la moitié du parcours environ Dans la dernière partie quelque peu avant la position finale le levier de serrage doit être difficile à déplacer En position finale le levier doit être parallèle au cadre et ne doit pas dépasser 6 Vérifiez si le serrage rapide est vraiment bien fermé en essayant de faire tourner le serrage rapide fermé autour de son propre axe Si vous...

Страница 48: ...1 1 2 3 FR ...

Страница 49: ...4 5 5 FR ...

Страница 50: ...émités de l essieu Conduire sans rondelles de sécurité peut entraîner des accidents accompagnés de blessures mortelles 2 Placez l accouplement d essieu sur l essieu sans retirer la rondelle de sécurité 3 Vissez l écrou de l axe sur le filetage de l essieu plein d au moins cinq tours complets Attention Si vous faites moins de cinq tours complets la force de serrage de la roue arrière ne sera pas su...

Страница 51: ...2 3 4 FR ...

Страница 52: ...e 1 Assemblez les deux parties de la tringlerie 2 Insérez le fanion de sécurité dans le tunnel en tissu de la housse textile Attention Le fanion de sécurité doit toujours être monté lorsque vous utilisez la remorque pour vélo comme une remorque pour vélo Sans fanion de sécurité la remorque pour vélo pourrait facilement passer inaperçue dans la circulation ce qui entraînerait des accidents pouvant ...

Страница 53: ...cet effet sur la tête de timon et refermez le clip de sécurité Attention Assurez vous que la connexion est sécurisée en tirant sur le timon 4 Faites passer la sangle de fixation autour du tube du cadre et accrochez le mousqueton dans le support du timon Veillez à ce que la sangle de fixation ne se prenne pas dans les rayons ou les freins à disque Attention Assurez vous que l accouplement de l essi...

Страница 54: ...isé avec le montage il suffira de soulever légèrement la remorque à l avant pour effectuer ce travail 1 Relevez l avant de la remorque ou inclinez la vers l arrière 2 Insérez la roue buggy dans le support de la roue buggy jusqu à ce que vous entendiez et sentiez qu elle s engage 3 Pour retirer la roue buggy appuyez sur le bouton bleu et tirez sur la roue buggy Attention Assurez vous que la roue bu...

Страница 55: ...s trous situés sur le côté de la remorque pour vélo et fermez l étrier L étrier est bien fermé dès que vous entendez un clic sonore Remarque Il n est pas facile d ouvrir et fermer l étrier cela nécessite une certaine force Ceci est nécessaire pour garantir une bonne tenue de l étrier 4 Insérez maintenant la roue jogging dans les extrémités de l essieu des bras de roue et serrez l écrou de l axe pu...

Страница 56: ...her de la roue Le vélo doit être contrôlé par un mécanicien qualifié avant d utiliser la remorque Le dispositif de transport d enfant deviendra instable si la charge recommandée par le fabricant est dépassée Ne l utilisez pas pour des enfants qui dépassent le poids maximum autorisé Assurez vous que tous les verrous sont engagés avant l utilisation Avant chaque trajet assurez vous que les deux roue...

Страница 57: ...u les loquets desserrés et remplacez les pièces endommagées ou manquantes Inspectez périodiquement le tissu pour vérifier qu il n y a pas de déchirures d endroits usés ou d autres signes de dommages Nettoyez régulièrement le porte enfant à l eau chaude et à l eau savonneuse douce N utilisez jamais de nettoyants ou de solvants agressifs Nettoyez les essieux des roues et lubrifiez toutes les pièces ...

Страница 58: ...8 2011 A2 2017 EN1888 1 2018 certified EN 15918 2011 A2 2017 EN1888 1 2018 certifié EK2 AK2 3 14 02 1 2015 zertifiziert EK2 AK2 3 14 02 1 2015 certified EK2 AK2 3 14 02 1 2015 certifié DE EN FR DE EN FR LU 0157 XXXLutz Römerstraße 39 4600 Wels www xxxlutz at ...

Отзывы: