SPECIFICATIONS / TROUBLESHOOTING
3
ASSEMBLY
INSTALLATION
4
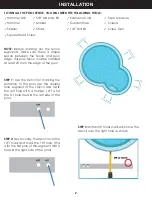
STEP 4:
Next, place the stencil over the and
mark the next hole. Repeat this step until
you get to the 5th part of the segment.
Mark the last hole for that segment.
STEP 5:
For the double hole on the
stencil, adjust it to be over the 5th
marked hole of the next segment
to the right. Repeat these steps
on both sides of the pool until you
reach the segment to be cut.


