XtremepowerUS 90121 Скачать руководство пользователя страница 2

SAFETY WARNINGS

Read all safety warnings and instructions. Failure to follow the warnings and instructions 

may result in injury and/or property damage. Save all warnings and instructions for 

future reference. 

The warning and safety instructions in this manual are not meant to cover all possible conditions and 

situations that may occur. Common sense, caution and care must be exercised when operating or 

cleaning tools and equipment. Always contact your dealer, distributor, service agent or manufacturer 

about problems or conditions you do not understand before operating the product. 

Check with local regulations for pool fence requirements. Knowing the pool fence regulations 

before you start designing will not only improve safety but it will also create a more functional and 

visually appealing outdoor space.

Confirm pool entrances are closed at all times. 

It is suggested to affix motion alarms to entrance gates as an extra layer of security.

1

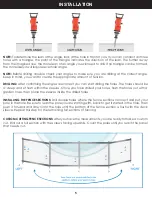
Every so often, inspect the fence for misalignment, loose screws and so on.

The Fence must block all entrances to the pool area.

Do not install the pool fence near tables, chairs, or structure that can be climbed on to get over 

the fence.

This pool fence should be located in a manner that prohibits permanent structures, equipment or 

other objects from being used to climb over the fence. 

WARNING: ADULT SUPERVISION IS REQUIRED WHEN CHILDREN ARE NEAR A POOL. A POOL FENCE IS NOT 

A FAIL-PROOF SUBSTITUTION FOR ADULT SUPERVISION.
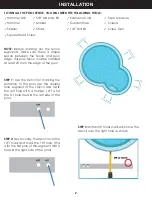
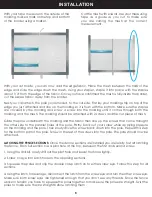
NOTE:

 Template provided is for informational purposes only. There are variations in measurements. 

Check and confirm measurements are correct before drilling. 
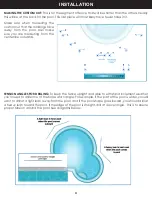
NOTE: 

Results may vary. Diagrams are for illustrative purposes only and are subject to change without 

notice. 

Содержание 90121

Страница 1: ...UAL KEEP THIS MANUAL FOR SAFETY WARNINGS PRECAUTIONS ASSEMBLY OPERATION INSPECTION MAINTENANCE AND CLEANING PROCEDURES WRITE THE PRODUCT S SERIAL NUMBER ON THE BACK OF THE MANUAL OR THE MONTH AND YEAR OF PURCHASE IF PRODUCT HAS NO SERIAL NUMBER FOR QUESTIONS PLEASE CALL CUSTOMER SERVICE 909 628 0880 ...

Страница 2: ...nal and visually appealing outdoor space Confirm pool entrances are closed at all times It is suggested to affix motion alarms to entrance gates as an extra layer of security 1 Every so often inspect the fence for misalignment loose screws and so on The Fence must block all entrances to the pool area Do not install the pool fence near tables chairs or structure that can be climbed on to get over t...

Страница 3: ...nd pool edge This pool fence must be installed at least 2ft from the edge of the pool STEP 1 Use the stencil for marking the entrance to the pool Use the double hole segment of the stencil and mark the left hole with a marker 1LFT is for the 1st pole toward the left side of the pool STEP 2 Next overlay the stencil over the 1LFT mark and mark the 1RT hole This is for the first pole of the segment t...

Страница 4: ... next hole Repeat this step until you get to the 5th part of the segment Mark the last hole for that segment STEP 5 For the double hole on the stencil adjust it to be over the 5th marked hole of the next segment to the right Repeat these steps on both sides of the pool until you reach the segment to be cut ...

Страница 5: ...ou ll need to drill some of the holes at an angle For example if the part of the pool is wider youwill want to drill at a light lean away from the pool and if the pool shape goes inward you should drill at a heavy lean toward the pool If the edge of the pool is straight drill at a level angle This is to ensure proper tension around the pool See diagrams below Make sure when measuring the custom cu...

Страница 6: ...ngles are correct you can start drilling the holes The holes should be 4 deep and sit flush within the sleeves Once you have drilled your holes flush the holes out with a garden hose then place the sleeves inside the drilled holes INSTALLING THE FENCE SECTIONS Drill double holes where the fence sections connect and put your pole in the hole Be sure to lean the pole you are starting with back to ge...

Страница 7: ...de the pole underneath the molding and the fabric then line up the screws that come throught the other side to the parallel holes of the pole Partly back out your screw while applying pressure on the molding and the pole Then slowly drive the screw back down into the pole Repeat this step for the bottom part of the pole Screw in the rest of the screws into the pole The pole should now be attached ...

Страница 8: ...MANUFACTURER AND OR DISTRIBUTOR EXPRESSLY STATES THAT ALL REPAIRS AND PARTS REPLACEMENTS SHOULD BE UNDERTAKEN BY CERTIFIED AND LICENSED TECHNICIANS AND NOT BY THE BUYER THE BUYER ASSUMES ALL RISK AND LIABILITY ARISING OUT OF HIS OR HER REPAIRS TO THE ORIGINAL PRODUCT OR REPLACEMENT PARTS THERETO OR ARISING OUT OF HIS OR HER INSTALLATION OF REPLACEMENT PARTS THERETO Record Product s Serial Number H...

Отзывы: