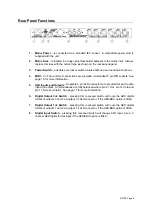
Front Panel Functions
1.
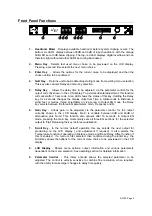
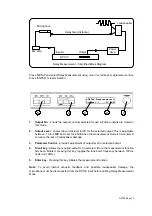
Headroom Meter
- Displays available headroom before system clipping occurs. The
bottom six LED's display between 30dB and 0dB of input headroom, with the orange
0dB LED set at 3dB below clipping. The top, red LED displays digital overflow and can
therefore light without all other LED's becoming illuminated.
2.
Menu Key
- Selects last used menu choice to be previewed on the LCD display.
Pressing a second time selects the next menu choice.
3.
Enter Key
- Allows the options for the current menu to be displayed and then the
chosen option to be confirmed.
4.
Quit Key
- Returns unit to basic default operating mode from existing menu selection.
This key also cancels Delay and Gain key selection.
5.
Delay Key
- Allows the delay time to be adjusted, via the parameter control, for the
output currently shown in the LCD display. To avoid accidental adjustment, this function
will cancel after 15 seconds. A red LED shows the status of this key. Holding the Delay
key for 2 seconds changes the display units from Time in milliseconds to Distance in
either feet or metres (menu selectable) or visa versa. In Output EQ mode, the Delay
key selects between the three EQ parameters: Gain, Frequency and Q.
6.
Gain Key
- Allows gain to be adjusted, via the parameter control, for the output
currently shown in the LCD display. 'Gain' is variable between 0dB and 40dB of
attenuation plus 'mute'. This function also cancels after 15 seconds. In Output EQ
mode, pressing the Gain key momentarily sets all three EQ sections for the selected
output to 'Flat'. Releasing the key restores equalisation.
7.
Scroll Key
- In the normal 'default' operation this key selects the next output for
previewing on the LCD display ( and adjustment if required). It also selects the
Temperature function if operating in Distance mode and Base Delay Offset function if
this is enabled. If a menu is first selected, then confirmed using the Enter key, the
Scroll key allows the options for the current menu choice to be previewed on the LCD
display.
8.
LCD Display
- Shows menu options, output information and various parameters
dependant on the menu selection. See operating section for detailed information.
9.
Parameter Control
- This rotary encoder allows the selected parameter to be
adjusted. The control is velocity sensitive to combine fine resolution, when required,
with the ability to make larger changes to delay time quickly.
1
2
3
4
5
6
7
8
9
DP100 Page 3
Содержание DP100
Страница 1: ......


