background image

  Wireless NVR System User Manual                                                                                                                     


9


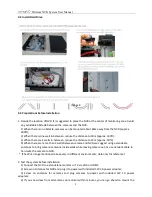
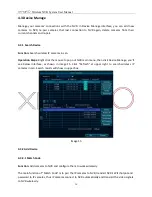
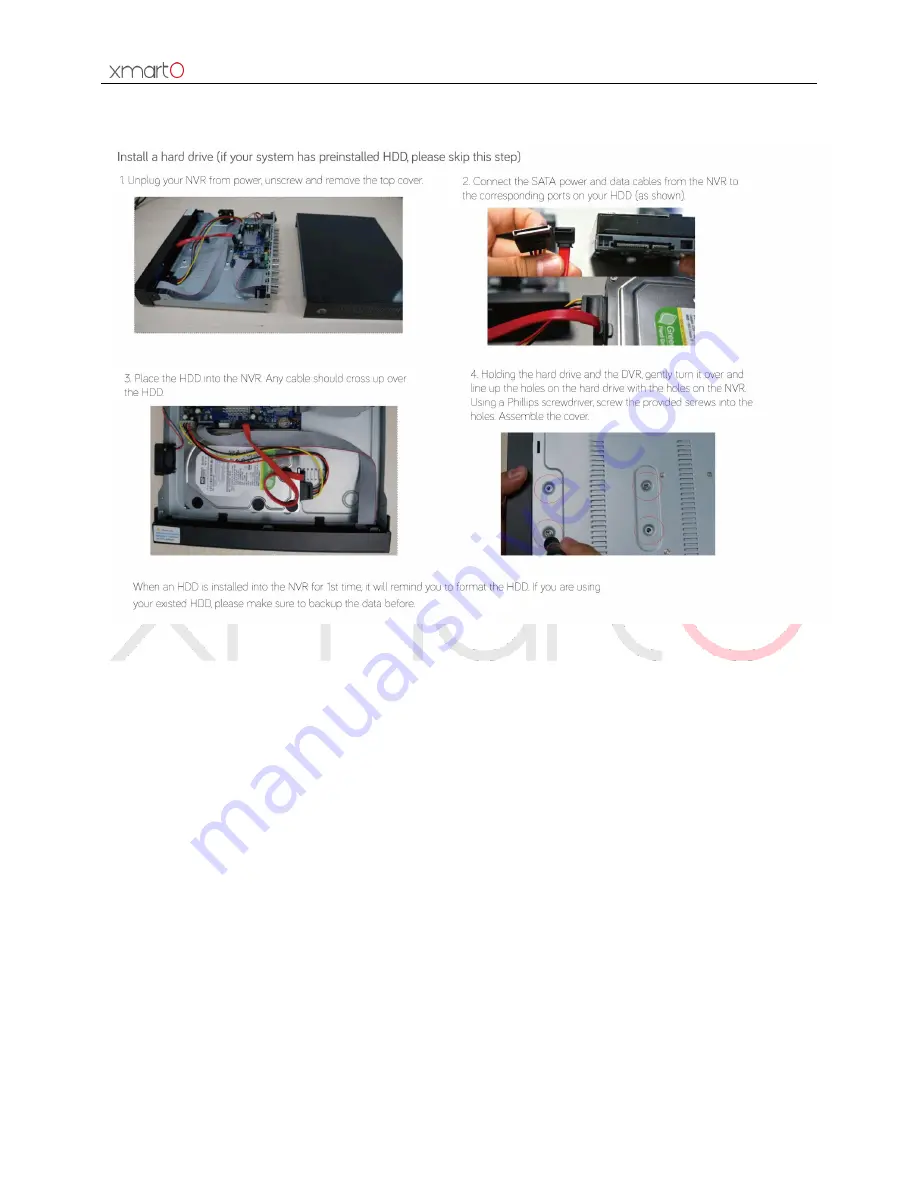
3.2 Install Hard Drive 


Image 4 

3.3 Preparations before Installation 

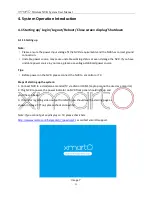
1. Decide the location of NVR. It is suggested to place the NVR at the center of monitoring area. Avoid 

any avoidable obstacle between the cameras and the NVR.   

    1) When there is no obstacle, cameras can be mounted about 60m away from the NVR (approx. 

200ft);   

    2) When there is one wall in between, reduce the distance to 30m (approx. 100ft);   
    3) When there are 2 walls in between, reduce the distance to 15m (approx. 50ft);   
    4) When there are more than 2 walls between camera and NVR, we suggest using extendable 

antennas to bring camera’s antenna inside walls 

while leaving camera out; or use network cable to 

hard wire the camera to NVR.     

  * (The Wi-Fi range mentioned above vary in different environments; data only for reference)     
 
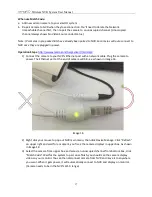
2. Test the system before installation.   

1) Connect the NVR to a standalone monitor or TV via VGA or HDMI; 
2) Screw on antennas for NVR and plug it to power with included 12V 3A power adapter;   
3)  Screw  on  antennas  for  cameras  and  plug  cameras  to  power  with  included  12V  1A  power 

adapters; 

4) If you see videos from all cameras on monitor within minutes, you can go ahead to mount the 

Содержание WNV14

Страница 1: ...Wireless NVR System User Manual 1 User Manual xmartO Wireless NVR System Ver 2 0...

Страница 2: ...ers reference We don t promise it s exactly the same with the products you purchase Detailed information is in accordance with the final products The accessories and parts mentioned in this manual are...

Страница 3: ...n 9 3 4 Camera Mounting Spots 10 3 5 Antenna Mounting Tips 10 4 System Operation Introduction 11 4 1 Starting up Login Logout Reboot Close screen display Shutdown 11 4 1 1 Starting up 11 4 1 2 Login 1...

Страница 4: ...Alarm 46 4 10 General setting 47 4 10 1 General setting 47 4 10 2 Time Setting 48 4 10 3 Screen setting 49 4 10 4 HDD Setting 50 4 11 System Admin 51 4 11 1 System Version 51 4 11 2 HDD Info 52 4 11...

Страница 5: ...xmarto com 1 Product Overview 1 1 Product Introduction The xmartO WNV series network video recorder is our new generation of NVR It supports wireless WiFi network video input real time live view video...

Страница 6: ...ability wireless auto pair setup wizard frequently used function menu plug and play Support IPC with ONVIF N1 protocol Network services supported P2P DHCP DDNS PPPoE E Mail FTP etc Multiple alarm trig...

Страница 7: ...is connected to the NVR this indicator will blink green 2 2 NVR Rear Panel Image 2 1 VGA VGA Video Output 2 HDMI HDMI Video Output 3 WAN Connect your NVR to router for Internet connection This port c...

Страница 8: ...roll Change contents 1 Change drop down box content 2 Switch channels under single view mode Right button Single click Exit 1 Exit the interface 2 Enter quick menu 2 4 Input Method Image 3 Name Button...

Страница 9: ...o other channels or all 2 6 Menu Introduction System Setting Menu General setting Record setting Network setting CH Setting System Admin NVR Main Menu Split screen Device Manage System setting Video P...

Страница 10: ...5m approx 50ft 4 When there are more than 2 walls between camera and NVR we suggest using extendable antennas to bring camera s antenna inside walls while leaving camera out or use network cable to ha...

Страница 11: ...m videos to NVR within 1 minute 3 If it does not display video on the NVR s screen the distance should be too long or there are too many obstacles Please move the cameras closer to the NVR 3 5 Antenna...

Страница 12: ...use voltage stabilized power source Tips Before power on the NVR please connect the NVR to a monitor or TV Steps of starting up the system 1 Connect NVR to a standalone monitor TV via VGA or HDMI Lap...

Страница 13: ...o the system Tips The password can be combined with numbers letters or The password length must be less than 10 4 1 3 Logout If you want to log out while using the system right click the mouse to pop...

Страница 14: ...t back 4 1 6 System Shutdown If you want to shut down the system please right click your mouse to pop out NVR main menu click Exit System and then click Shutdown System will release power and pop out...

Страница 15: ...ge 12 Allows users to connect the NVR to Internet for remote access Users can either check DHCP to allow NVR obtain IP address from router automatically or manually set the NVR s IP Address Gateway Su...

Страница 16: ...us Hard drive needs to be formatted to start recording To format the hard drive select it and click Format It will take some seconds to format the hard drive When hard drive is successfully formatted...

Страница 17: ...t click the mouse to pop out NVR main menu then click Device Manage you ll see below interface as shown in image 15 Click Refresh at upper right to search wireless IP cameras in Lan Search results wil...

Страница 18: ...your NVR s Ethernet port with a network cable Plug the camera to power The Ethernet port at the end of camera will blink as shown in image 16 Image 16 2 Right click your mouse to pop out NVR main men...

Страница 19: ...d One is different from Match Code Match Code configures the cameras to connect with NVR wirelessly while Add One configures the cameras to work wired with NVR When use Auto Add a If some of the camer...

Страница 20: ...Auto Add you ll then see all cameras are added to NVR and all of them are displaying video on monitor Image 19 Tips If you want the camera to work wirelessly use Match Code to add camera to NVR If yo...

Страница 21: ...e below interface as shown in image 21 Image 21 Tips Enable Multiple Network Segment system can search wireless IP cameras that are in different segment as NVR Enable Repeated Add system will allow us...

Страница 22: ...el from bottom box and click Delete The camera will be deleted from this channel and you shall no longer see the camera video on your monitor This channel will become unoccupied and show No Video Sour...

Страница 23: ...7 Repeater Function Setup Dream Liner feature to boost the wifi signal of xmartO system The xmartO Dream Liner technology uses cameras in middle as repeaters That way further cameras connect to close...

Страница 24: ...nal to this one For example click behind CH1 add CH2 to connect to CH1 CH1 and CH2 will lose connection for some seconds and connect back automatically Click Refresh to check if the Dream Line is succ...

Страница 25: ...mmand from NVR constantly Need more information about Dream Liner Check here http www xmarto com dreamliner 4 4 Channel Setting CH Setting 4 4 1 Encode Setting Function Set the IP Camera information i...

Страница 26: ...the camera name of each channel 4 Enable Status Display and Connection Status the system status and cameras connection status will be displayed on the monitor 5 Display setting allows users to decide...

Страница 27: ...e resolution bitrate frame rate and firmware version Operation Steps 1 Right click the mouse to pop out NVR main menu then click System setting CH Setting Channel Details you ll see below interface as...

Страница 28: ...panoramic camera Operation Steps Right click the mouse to pop out NVR main menu then click System setting CH Setting IP camera you ll see below interface as shown in image 30 Tips The mounting type o...

Страница 29: ...will get online Only when the NVR is online you can remote access your cameras Default NVR IP address 192 168 1 114 Operation Steps 1 Connect the NVR s WAN port to your router s LAN port with a networ...

Страница 30: ...ubnet Mask Gateway Set the Gateway MAC Address Set the MAC Address Avoid using same MAC Address in LAN Web Port Transmit video signal and other control signals default is 80 Port 80 is used for web PC...

Страница 31: ...our settings 4 Click Apply to save the settings and click OK to exit Tips Currently supports domain providers popdvr 3322 changeip no ip dyndns Please apply for your own DDNS from these providers befo...

Страница 32: ...le and click Test to check if it is set successfully if yes click Apply to save the settings and click OK to exit 4 4 4 E Mail Function Set up motion detection email alerts Operation Steps 1 Right cli...

Страница 33: ...email account Password Password of your sender email account Encryption Type Leave it blank in default if failed on test then change to SSL Sender Full email address of sender email account Sendee Ful...

Страница 34: ...nter the Username and Password provided by ISP 3 Click Apply to save the settings and click OK to exit Tips PPPoE Function for enable PPPoE allowing access internet via dail up for disable PPPoE 4 4 6...

Страница 35: ...Function This enables users to change settings of the NVR s Wi Fi hotspot and password and some other router related settings ESSID The default Wi Fi hotspot name of the NVR Password The default pass...

Страница 36: ...the same room you can try to change the WiFi chancel to avoid interference 4 5 PTZ Setting 4 5 1 PTZ Parameter Setting Prerequisites Before trying to control the speed dome or PTZ you need to make su...

Страница 37: ...y to Choose the channel you want to copy the settings and click Copy to to apply current channel s settings to other channels 4 5 2 PTZ Control Operations Operation Steps 1 Double click the channel yo...

Страница 38: ...rface set the Keep time 5 Click Add to finish setting this preset 6 Repeat above 2 5 steps to add other presets 7 Setup complete check Tour Start to modify the rotation speed accordingly as shown in i...

Страница 39: ...ord setup As shown in image 41 Image 41 Tips Recording Priority Alarm Recording Motion Detection Recording Manual Recording Time Scheduled Recording 4 6 2 Time scheduled Recording Function Time schedu...

Страница 40: ...eriod from 0 00 23 59 and keep the other schedules blank Different time periods will show in different color for easy differentiation You can combine the various recording modes on each channel As sho...

Страница 41: ...face as shown in image 45 b Select the channel you want to set as motion detection recording from the Channel drop down menu c Choose Motion under Detection and set the motion sensitivity d Choose the...

Страница 42: ...tion is detected For more information about Area Edit setting check here http www xmarto com helpcenter article 5 4 6 4 Alarm triggered Recording Sensor Recording Function Alarm triggered recording al...

Страница 43: ...ayback 4 7 1 Fast Playback Function Description Fast playback allows users to playback recent recorded videos quickly Operation Steps 1 Right click your NVR mouse to pop out NVR main menu then click V...

Страница 44: ...se to pop out NVR main menu then click Video Playback Search you ll see below interface as shown in image 48 Image 48 2 Select the Channel and Record mode 3 Set the Search time and click Search 4 Wait...

Страница 45: ...Frame Tips Playback can be controlled through the playback progress bar Supports 2x 4x 8x 16x speed playback You can playback videos of 4 channels simultaneously 4 8 Video Backup Function Backup the v...

Страница 46: ...ers can see the Channel Mode Begin time End time Duration and Size of the video To ensure successful backup of the videos please make sure that the USB flash disk have enough storage space and is form...

Страница 47: ...Higher Moderate Lower Lowest The higher the sensitivity the easier the moving object be detected There are four types of motion detection alarm Alarm Buzzer E Mail Notice FTP Upload If choose Alarm a...

Страница 48: ...type 4 Click Apply to save settings Tips Click Copy to to copy settings of current channel to other channel or all channels 4 10 General setting 4 10 1 General setting Function Basic settings and par...

Страница 49: ...lows you to change the place of where to display the Device ID Show Time on Screen Enable to display your NVR s time on screen Position allows you to change the place of where to display the NVR time...

Страница 50: ...Time Format Set your system s time display format Image 53 4 10 3 Screen setting Function Set the screen parameters Operation Steps Right click the mouse to pop out NVR main menu then click System set...

Страница 51: ...nel at a time and 4 means display 4 channels at a time VGA resolution should match with your screen resolution Default NVR resolution is 1280 x 1024 If your NVR outputs different resolution that your...

Страница 52: ...eo files when it is full When click Format system will pop up a dialog box reading All data files will be deleted after formatting click OK to confirm click OK to start formatting Auto delete old file...

Страница 53: ...your mouse to pop out NVR main menu then click System setting System Admin HDD info you ll see below interface as shown in image 57 Image 57 4 11 3 System Log Function Allow users to search and check...

Страница 54: ...ystem shutdown Configuration is changed Record log Alarm log Device warning and All 4 11 4 User Function Allow users to add delete and edit username and password Operation Steps Right click your mouse...

Страница 55: ...terface as shown in image 60 Image 60 2 Input the new user s Username and Password Check Super user if you want this user to have all permissions 3 Select the permissions you d like to authorize to th...

Страница 56: ...system management Split Screen Auto switch of single view and quad view Channel Adjust Adjust the image brightness color tone saturation and contrast Setup Guide Guide the user to make basic settings...

Страница 57: ...er You ll see below interface as shown on image 63 Image 63 2 Change this user s permissions 3 Click OK to save the settings Tips Administrator cannot be edited Set Password Operation Steps 1 Go to Us...

Страница 58: ...e system firmware version Operation Steps 1 Right click your mouse then click System setting System Admin System upgrade you ll see below interface as shown in image 66 2 Download NVR firmware copy th...

Страница 59: ...Resource and Wireless Module DO NOT unplug the system from power during upgrade or else system will be damaged 4 11 6 System Maintenance Function Allows uses to set the time of NVR auto maintenance Op...

Страница 60: ...factory default and click Apply 5 Click OK when confirmation message pops out Your NVR settings will be restored to factory default 4 11 8 IPC Maintenance Function Allows users to upgrade cameras fir...

Страница 61: ...y finish upgrading firmware 5 Local Remote Access 5 1 Brief Introduction This system supports remote viewing your cameras via smartphone and computer from anywhere in the world Tips Supports viewing y...

Страница 62: ...s IP address in your IE browser in format http youripaddress for example http 10 0 0 12 If the default WEB port 80 has been changed e g to 100 you ll need to add new port number when input IP address...

Страница 63: ...m from your office computer Step1 Open your Internet Explorer IE browser and visit www e seenet com as shown in image 72 Image 72 Step2 Input Cloud ID Username and Password and click Login You ll then...

Страница 64: ...some ActiveX settings in Internet Explorer This will need to be done on every computer you use to access the system Step1 Click Tools Internet Options Security Internet Custom Level Step 2 Scroll down...

Страница 65: ...stem on CMS only when the computer is in LAN network Step1 Download CMS and install it on your computer http www xmarto com downloads Step 2 Run CMS on your computer You ll be asked to select the netw...

Страница 66: ...ly CMS will search the device in LAN and add automatically If CMS fails to add the device automatically please follow below steps to add it manually Click Settings at the top navigation and click Add...

Страница 67: ...tem User Manual 66 Image 75 Image 76 You have two ways to add your NVR as a device to CMS a Add by IP address for local access only Enter NVR s IP address username password device name set the NVR cha...

Страница 68: ...ce if it is system keep it as default b Add by ESee ID for local and remote access Enter NVR s Device ID username password device name set the NVR channels and click Confirm ESee ID Your NVR s Device...

Страница 69: ...CMS will start connecting to your cameras Connect information will be displayed at the bottom Once cameras are connected you ll be able to see live video of the cameras As shown in image 77 If some ca...

Страница 70: ...allow you to view your cameras on any mobile devices with this same account Username Any letters or numbers or their combinations Min 3 Max 12 Password Set a password and remember it If you do not wa...

Страница 71: ...device like home camera Username The username of your NVR default username is admin If you ve set a new user for your NVR use the new username here Password Default password is empty means no passwor...

Страница 72: ...Wireless NVR System User Manual 71...

Отзывы: