background image

15

www.xerox.com/office/WC6015support

Fa

xin

g

co

pie

2

3

4

1

5

6

1

2

ABC

@:./

3

DEF

4

GHI

5

JKL

6

MNO

7

PQRS

8

TUV

9

WXYZ

CA

C

IT

DE

FR

ES

PT

EN

Select 

Fax to

Sélectionnez 

Fax vers

Selezionare 

Invia fax a

Fax senden an wählen
Seleccione 

Fax a

Selecione 

Enviar fax para

IT

DE

FR

ES

PT

EN

Select 

Keypad

Sélectionnez 

Pavé numérique

Selezionare 

Tastierina

Ziffernblock wählen
Seleccione 

Teclado

Selecione 

Teclado

IT

DE

FR

ES

PT

EN

Enter a Fax number, press 

OK

Entrez un numéro de fax, puis appuyez sur 

OK

Inserire il numero fax, quindi premere 

OK

Faxnummer eingeben und 

OK drücken

Introduzca un número de fax y pulse 

OK

Digite o número do fax e pressione 

OK

IT

DE

FR

ES

PT

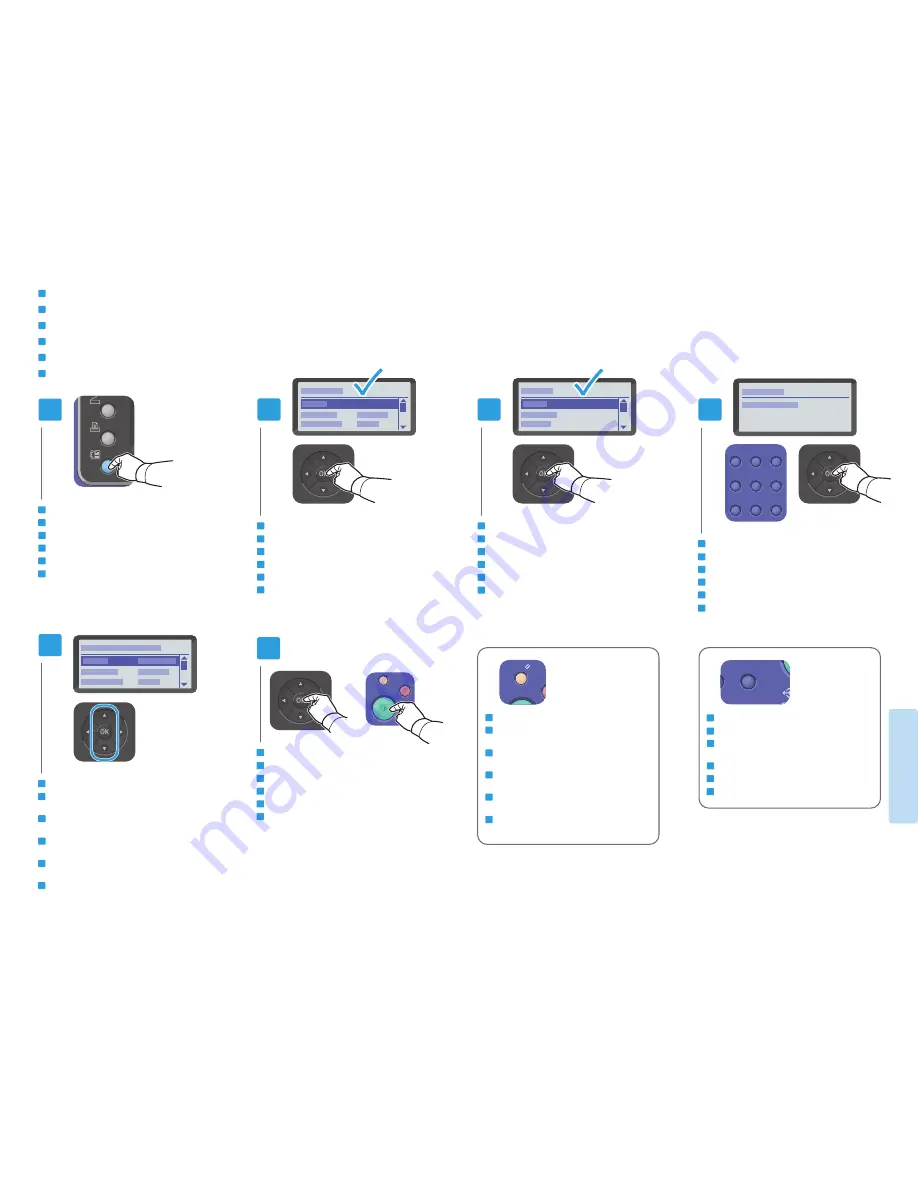
EN

Press the 

Fax button

Appuyez sur le bouton 

Fax

Premere il pulsante 

Fax

Taste 

Faxen drücken

Pulse el botón 

Fax

Pressione o botão 

Fax

IT

DE

FR

ES

PT

EN

Confirm Fax number, change other settings if desired
Confirmez le numéro de fax et modifiez les autres 

paramètres, le cas échéant
Confermare il numero fax e cambiare altre 

impostazioni, se necessario
Faxnummer bestätigen, ggf. andere Einstellungen 

ändern
Confirme el número de fax y cambie otras opciones si 

lo desea
Confirme o número do fax e altere outras 

configurações, se desejar

IT

DE

FR

ES

PT

EN

Press 

OK, then the Start button

Appuyez sur 

OK, puis sur Démarrer

Premere 

OK e poi il pulsante Avvio

Taste 

OK und dann Taste Start drücken

Pulse 

OK y luego pulse el botón Iniciar

Pressione 

OK e depois pressione o botão Iniciar

Basic Faxing

Télécopie de base

Nozioni di base sul fax

Einfaches Faxen

Envío de fax básico

Envio de fax básico

FR

IT

DE

ES

PT

EN

The 

Clear button clears characters.

Le bouton 

Effacer efface les caractères.

Il pulsante 

Cancella consente di cancellare 

caratteri.
Mit der Taste 

Löschen werden Zeichen gelöscht.

El botón 

Borrar borra caracteres.

O botão 

Limpar limpa os caracteres.

The 

Clear All button restores default settings.

Le bouton 

Tout effacer restaure les paramètres 

par défaut.
Il pulsante 

Cancella tutto ripristina le 

impostazioni predefinite.
Mit der Taste 

Alle löschen werden die 

Standardeinstellungen wiederhergestellt.
El botón 

Borrar todos restaura las opciones 

prefijadas.
O botão 

Limpar tudo restaura as configurações 

padrão.

EN

FR

IT

DE

ES

PT

IT

DE

FR

ES

PT

EN

Содержание WorkCentre 6015NI

Страница 1: ...Usu rio PT FR Pilotes d imprimante et utilitaires Manuels d utilisation et instructions Assistant de support en ligne Sp cifications de s curit dansleGuidedel utilisateur IT Driver e utilit della stam...

Страница 2: ...olamentos de papel FR IT DE ES PT EN Scanning from a computer using Windows 7 10 Num risation partir d un ordinateur ex cutant Windows 7 Scansione da un computer con Windows 7 Scannen von einem Comput...

Страница 3: ...nder des consommables contactez votre revendeur local ou visitez le site Web des consommables Xerox Per ordinare materiali di consumo contattare il rivenditore locale oppure visitare il sito Web per i...

Страница 4: ...d back through the menus Boutons fl ch s pour parcourir les menus vers le haut le bas l avant et l arri re Pulsanti freccia per scorrere verso l alto il basso nonch avanti e indietro nei menu Pfeiltas...

Страница 5: ...confirme ou selecione o tipo e tamanho adequados no painel de controle EN FR IT DE ES PT Select printing options in the Xerox print driver S lectionner les options d impression dans le pilote d impri...

Страница 6: ...primeiro EN FR IT DE ES PT EN FR IT DE ES PT Confirm or change size and type settings When printing select printing options in the print driver V rifiez ou modifiez les param tres de format et de type...

Страница 7: ...de copia Navegue nos menus para selecionar as op es de c pia EN FR IT DE ES PT See User Guide Copying Voir Guide de l utilisateur Copie Vedere Guida per l utente Copia Siehe Benutzerhandbuch Kopieren...

Страница 8: ...ione di scansione nella Guida per l utente ber eine USB Verbindung k nnen Scandateien vom Bedienfeld des Druckers aus an einen Computer gesendet werden Auch das Scannen von einem angeschlossenen Compu...

Страница 9: ...rrere con i pulsanti per selezionare la cartella o il server quindi premere OK Gew nschten Ordner oder Server ansteuern und OK dr cken Despl cese para seleccionar la carpeta o el servidor y luego puls...

Страница 10: ...Nova digitaliza o IT DE FR ES PT EN Click Preview and confirm or change settings Cliquez sur Aper u et confirmez ou modifiez les param tres Fare clic su Anteprima e confermare le impostazioni oppure...

Страница 11: ...onedenum risation Fare clic su Anteprima quindi selezionare l area di scansione Auf Vorschau klicken und Scanbereich ausw hlen Haga clic en Vista previa y seleccione el rea de escaneado Clique em Visu...

Страница 12: ...ure d images Avviare l applicazione Acquisizione Immagine Programm Digitale Bilder starten Inicie la aplicaci n Captura de Imagen Abra o aplicativo Captura de imagem IT DE FR ES PT EN Click Scan Cliqu...

Страница 13: ...s veces Role para Digitalizar para mem ria USB e pressione OK duas vezes IT DE FR ES PT EN Press the Start button Appuyez sur le bouton D marrer Premere il pulsante Avvio Taste Start dr cken Pulse el...

Страница 14: ...der Faxfunktion siehe Benutzerhandbuch Einrichtung der Faxfunktionen ES Puede introducir los n meros de fax manualmente o guardarlos en la libreta de direcciones Para configurar una libreta de direcci...

Страница 15: ...e necessario Faxnummer best tigen ggf andere Einstellungen ndern Confirme el n mero de fax y cambie otras opciones si lo desea Confirme o n mero do fax e altere outras configura es se desejar IT DE FR...

Страница 16: ...ascos de papel Atolamentos de papel FR IT DE ES PT EN EN FR IT DE ES PT See User Guide Troubleshooting Voir Guide de l utilisateur D pannage Vedere Guida per l utente Risoluzione dei problemi Siehe Be...

Отзывы: