background image

6 Setups 

144

User ID for Login

Specifies whether to make the user ID entry field case-sensitive on the login screen that 
is displayed when a user ID is authenticated by a remote server. 

NOTE: 

Once this setting is changed, all the registered information about users, as 

well as the mailboxes and job flow sheets linked to the users, are deleted. Before the 
deletion, a confirmation message is displayed.

Allow Guest User

Specifies whether to allow guest users to use the machine. When [On] is selected, set 
[Guest Passcode].

NOTE: 

[Allow Guest User] is displayed when [Login to Remote Accounts] is selected 

in [Login Type].

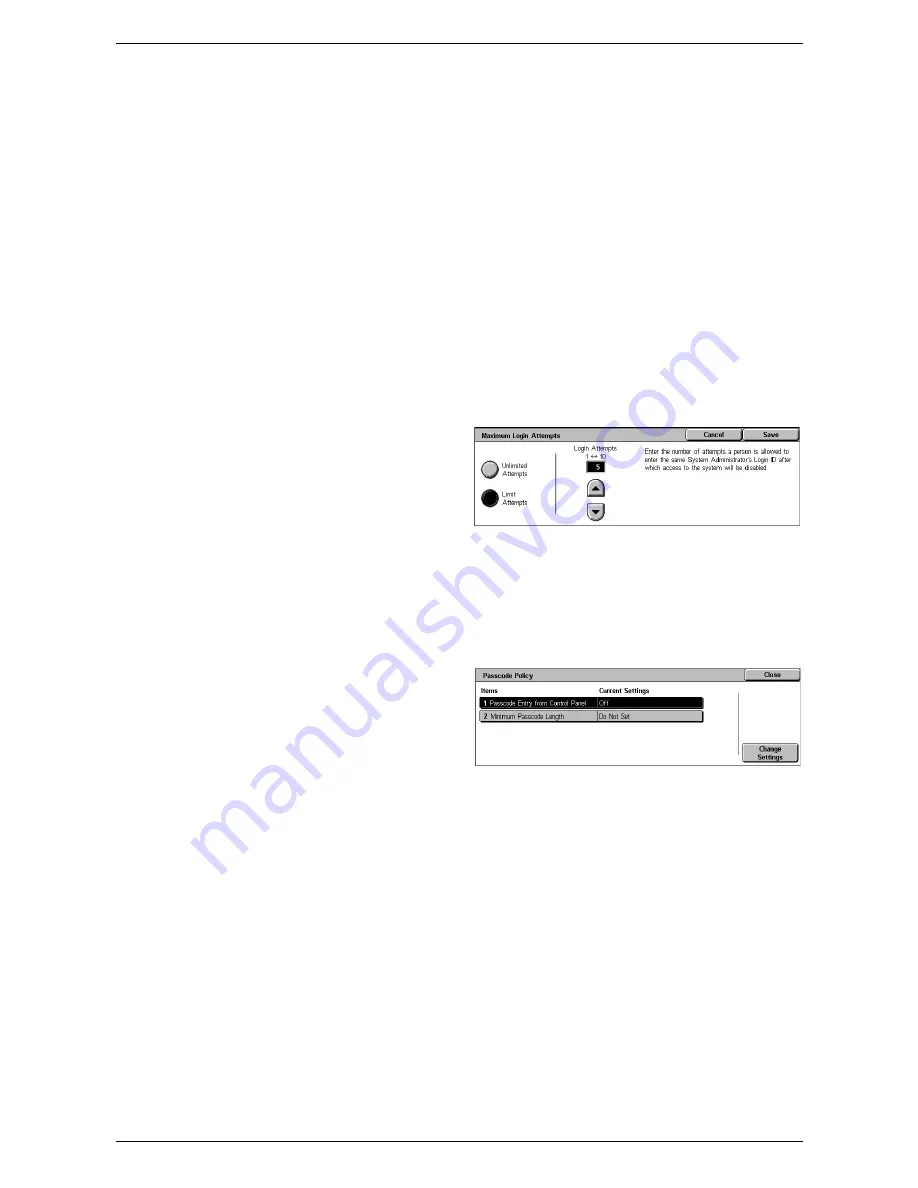
System Administrator Maximum Login Attempts

This feature allows you to deny access if the System Administrator ID, or a user ID that 
has the System Administrator privileges is mistyped a specified number of times.

1.

Select [System Administrator 
Maximum Login Attempts] in the 
[Features] menu.

2.

Select the required option. If you 
select [Limit Attempts], enter a 
value into the [Login Attempts] 
box using the arrow buttons.

3.

Select [Save].

Passcode Policy

This feature allows you to configure passcode policy settings.

1.

Select [Passcode Policy] in the 
[Features] menu.

2.

Select the required option, and 
configure the settings.

3.

Select [Close].

Passcode Entry from Control Panel

Specifies whether to prompt users to enter their passcode when they log in to the 
control panel. Regardless of this setting, passcode entry is always required for Remote 
Authentication.

Minimum Passcode Length 

Specifies whether to set the minimum number of digits allowed for a passcode. If you 
select [Set], enter a value in the range of 4 to 12.

Charge / Private Print Settings

This feature allows you to specify how to treat the print jobs that are received when the 
machine is in the Authentication mode.

Содержание WorkCentre 5230A

Страница 1: ...User Guide ME3612E4 1 System Administration Guide XE3022EN0 2...

Страница 2: ...rt Regulations An export of this product is strictly limited in accordance with Laws concerning Foreign Exchange and Foreign Trade of Japan and or the export control regulations of the United States Y...

Страница 3: ...Supported Paper Sizes 23 Supported Paper Types 26 3 Maintenance 29 Ordering Supplies 29 Cleaning the Machine 29 Control Panel and Touch Screen 29 Document Glass and Document Feeder Glass 29 Document F...

Страница 4: ...7 Fax Receiving Mode 58 Faults 58 Supplies 58 Billing Information 59 Billing Information 59 User Account Billing Information 59 Tools 60 System Settings 60 Setup 60 Accounting 61 Authentication Securi...

Страница 5: ...tings 105 Scan Defaults 105 Scan to PC Defaults 107 Original Size Defaults 107 Output Size Defaults 108 Reduce Enlarge Presets 108 Other Settings 109 Fax Service Settings 110 Screen Defaults 110 Fax D...

Страница 6: ...System Administrator Settings 140 System Administrator s Login ID 140 System Administrator s Passcode 140 Authentication 140 Login Type 141 Access Control 141 Create View User Accounts 142 Reset User...

Страница 7: ...Features 179 Support 230 8 Printer Environment Settings 233 Windows TCP IP 233 Quick Network Setup DHCP 233 Quick Network Setup Static IP 234 NetWare 236 Information Checklist 236 NetWare Environment...

Страница 8: ...nication Setup 278 Test Mail 280 10 Scanner Environment Settings 283 Scanning Overview 283 Scanning with the machine 283 Scanning Process 284 Scan to E mail Setup 284 Prerequisites for Scan to E mail...

Страница 9: ...Configuration 303 Test Server Fax Transmission 304 13 Security Encryption Digital Signature 305 Types of Encryption Digital Signature Services Available 305 Configuration of HTTPS SSL TLS Communicatio...

Страница 10: ...hentication Setup 339 Remote Authentication Setup 340 Configuring Remote Authentication for Kerberos Windows 2000 341 Configuring Remote Authentication for Kerberos Solaris 341 Configuring Remote Auth...

Страница 11: ...jour 382 CentreWare Internet Services 383 Scanning Services 384 E mail Services 386 Internet Intranet Connection 387 IPv6 Addresses 389 Fault Codes 390 Screen Messages 428 Xerox Welcome Center 429 16...

Страница 12: ...12...

Страница 13: ...lephone number for the local representative may have been provided when the product was installed For convenience and future reference please record the telephone number in the space below Welcome Cen...

Страница 14: ...original Xerox WorkCentre 5222 5225 5225A 5230 5230A is synonymous with the machine Orientation Orientation is used to mean the direction of images on the page When the image is upright the paper or o...

Страница 15: ...ed to indicate references to other sections and chapters For example For more information refer to Loading Paper on page 17 Job Status page 39 Warnings Warnings are statements that alert you to the po...

Страница 16: ...e network and security settings and how to replace consumables Quick Network Setup Guide This guide is intended for the System Administrator and provides TCP IP setup procedures Quick Use Guide This g...

Страница 17: ...e acceptable range of paper sizes and capacity for each tray refer to Paper Supply in the Appendix chapter on page 433 Preparing Paper for Loading Before loading paper into the paper trays fan the edg...

Страница 18: ...sizes even though the paper trays have no notches for these sizes 5 Close the paper tray NOTE Paper can be loaded either short edge feed or long edge feed 6 Set the machine to detect the paper size a...

Страница 19: ...aded 1 Load the paper neatly into Tray 5 Bypass making sure that the paper stock is in the center of the tray NOTE Do not load paper above the maximum fill line NOTE When making single double sided co...

Страница 20: ...Insert the projections on the bottom of the guide into the paper size holes on the tray 1 Insert the projection on the tray into the paper size hole on the guide 2 and then tighten the screw removed...

Страница 21: ...and then push the lever back into its position 3 NOTE Do not use the slot at the left of the 8 5 slot on the end guide 7 Open the end guide and place the paper stack tightly against the right edge of...

Страница 22: ...When an active tray runs out of paper during printing When the paper size of the selected tray differs from that detected upon document scanning When the selected tray is open upon paper feeding When...

Страница 23: ...rted Paper Sizes The following table lists the paper sizes supported by each paper tray output tray and the duplex module NOTE For the capacity of each tray refer to Appendix on page 431 Standard Size...

Страница 24: ...O LEF O 8K China 270 0 390 0 SEF O Postcard 100 0 148 0 LEF O Prepaid Postcard 200 0 148 0 SEF O 4 x 6 101 6 152 4 LEF O European 3 Chouyoukei 3 Envelope 120 0 235 0 LEF O Commercial 10 Envelope 104...

Страница 25: ...O O 7 25 10 5 184 2 266 7 SEF O O O O LEF O O O O O 8 5 11 215 9 279 4 SEF O O O O O LEF O O O O O 8 5 13 215 9 330 2 SEF O O O O O 8 5 14 215 9 355 6 SEF O O O O O 11 17 297 4 431 8 SEF O O O O O 16K...

Страница 26: ...Center Tray Left Side Tray Integrated Office Finisher Office Finisher LX Duplex Module Width 88 9 297 0 mm 3 6 11 9 88 9 297 0 mm 3 6 11 9 88 9 297 0 mm 3 6 11 9 210 0 297 0 mm 8 4 11 9 139 7 297 0 m...

Страница 27: ...Trays Duplex Module O Available blank Not available 1 Plain Reload refers to paper already printed on one side Labels O O O O Transparency O O O O Paper Type Weight g m2 Tray 1 Tray 2 Tray 3 4 Two Tra...

Страница 28: ...2 Paper and Other Media 28...

Страница 29: ...ne to help maintain high performance WARNING Do not use aerosol cleaners Aerosol cleaners can be explosive or flammable when used on electromechanical equipment Before cleaning this product unplug the...

Страница 30: ...nthly to prevent streaks appearing on the output and to prevent document feeder paper jams 1 Open the document feeder cover 2 Wipe the document feeder rollers while turning them with a soft cloth mois...

Страница 31: ...handle and remove the cartridge from the machine NOTE When replacing the drum cartridge make sure that the new cartridge is the correct one specified for the machine Inserting the New Drum Cartridge 1...

Страница 32: ...oner cartridge is a customer replaceable unit The touch screen will display a message when the cartridge needs to be replaced If toner spills onto your skin or clothing wash it off with soap and water...

Страница 33: ...new toner cartridge from the box Before removing the cartridge from the bag shake it from side to side to evenly distribute the toner inside 2 Insert the cartridge as shown in the illustration and sl...

Страница 34: ...sher 3 After removing the staple cartridge check the inside of the finisher for any remaining staples 4 Pinch both sides of the empty staple case with your fingers 1 and remove the staple case from th...

Страница 35: ...omatic stapler When the finisher runs out of staples a message appears on the touch screen When this message is displayed load a new staple case into the staple cartridge 1 Make sure that the machine...

Страница 36: ...front cover is not completely closed a message will appear and the machine will not operate Loading the Booklet Staples in the Office Finisher LX Optional If the optional Booklet Maker is installed a...

Страница 37: ...er LX contains a hole punch waste container When the hole punch waste container becomes full a message appears on the touch screen When the message is displayed empty the hole punch waste container Ma...

Страница 38: ...empty hole punch waste container all the way into the finisher 5 Close the front transport cover of the finisher NOTE If the center front transport cover of the finisher is not completely closed a me...

Страница 39: ...at the top of the list You can also check delete or print documents stored in the public mailbox polling box of the machine Use the scroll bar to switch between screens For more information on each bu...

Страница 40: ...lays the status of each job such as printing transferring and sending Pop up Menu Selecting an active job in the Active Jobs screen displays the pop up menu that allows you to delete the job release t...

Страница 41: ...bs in the machine You can select a job in the list to display detailed attributes for that job The contents of each screen may differ depending on the type or status of the job 1 Press the Job Status...

Страница 42: ...ttings Common Settings Reports Print Reports Button to Enabled For more information refer to Reports in the Setups chapter on page 72 Secure Print Jobs More This screen allows you to check print or de...

Страница 43: ...uditron Job without User ID Save in Charge Print Save in Private Charge Print Job without User ID Save in Charge Print 1 Select Charge Print on the Secure Print Jobs More screen 2 Select a billing use...

Страница 44: ...rint Jobs More screen NOTE If you log in to the machine with the System Administrator s ID a list of user login IDs is displayed on the screen Select the desired user ID from the list or enter it in G...

Страница 45: ...t whether or not to delete the document after printing NOTE Only the System Administrator can access the stored documents without entering the passcode Sample Set This feature allows you to print a sa...

Страница 46: ...een screens 3 Select the required option Refresh Refreshes the displayed information Delete Deletes a document selected in the list Print Prints a document selected in the list Public Mailbox This fea...

Страница 47: ...screens 3 Press the Start button on the control panel to resend the fax to the original recipient Alternatively select to delete the document or send the document to a different recipient Delete This...

Страница 48: ...information on how to select a recipient from the Address Book refer to the Fax chapter in the User Guide Starting Rate Displays the Starting Rate screen where you can select the G3 Auto or Forced 480...

Страница 49: ...tton on the control panel NOTE Press the Features or All Services button at any time to exit 2 Select the required option Machine Information This section describes how to view general information abo...

Страница 50: ...ess Displays the IP address of the machine NOTE If an IP Address is not displayed check the settings under Tools System Settings Connectivity Network Setup Protocol Settings Machine Configuration Disp...

Страница 51: ...nt documents For a list of parameters refer to PCL Emulation on page 437 1 Select PCL Emulation on the Print Mode screen 2 Enter a 3 digit parameter item number in the Item Number field 3 Select Chang...

Страница 52: ...write Hard Disk This feature displays the overwrite status of the hard disk NOTE This option is displayed when Authentication Security Settings Overwrite Hard Disk is enabled 1 Select Overwrite Hard D...

Страница 53: ...available for All Jobs Scan Fax Internet Fax Jobs Job Flow Auto File Transfer jobs and Printer Print from Mailbox Job Selecting the Include Child Jobs check box prints one child job related job per l...

Страница 54: ...for TIFF JPEG print mode TIFF JPEG Logical Printers List Lists the settings for up to 20 logical printers created in TIFF JPEG print mode PostScript Logical Printers List Lists the logical printers c...

Страница 55: ...he Scan Fax Reports feature are identical to those of Scan Reports 1 Select Fax Reports on the Print Reports screen 2 Select the required option 3 Select the Start button on the control panel Reports...

Страница 56: ...s Accounting Disabled Meter Report Print Jobs Displays the number of pages printed per user and by all users When Accounting Type is Local Accounting and Auditron Mode is enabled Auditron Report Print...

Страница 57: ...cuments received into a mailbox For more information refer to Mailbox Report on page 73 Broadcast Multi Poll Report Lists the results of multi poll transmissions For more information refer to Broadcas...

Страница 58: ...you to print a report of recent errors the date and time of the errors the error codes and the status of each error The status is either active or cleared NOTE Error History Report is displayed when S...

Страница 59: ...formation on the Billing Information screen Machine Serial Number Displays the serial number of the machine Current Meter Reading Total Impressions Displays the number of total copies and prints User...

Страница 60: ...e Authentication feature is enabled you may also be required to enter a passcode The default passcode is x admin To change the default user ID or passcode refer to System Administrator Settings on pag...

Страница 61: ...y each account For more information on the features available refer to Accounting on page 133 Authentication Security Settings This menu allows you to set up the authentication and security features F...

Страница 62: ...5 Machine Status 62...

Страница 63: ...Feature page 64 3 Exit the System Administration Mode page 64 1 Enter the System Administration Mode 1 Press the Log In Out button on the control panel 2 Enter the correct user ID using the numeric ke...

Страница 64: ...e Change Settings button Select the button to change settings or to enter information using the screen keyboard For information on how to use the keyboard refer to New Recipients in the Fax chapter of...

Страница 65: ...ttings page 84 Connectivity Network Setup page 90 Print Service Settings page 100 Scan Service Settings page 105 Fax Service Settings page 110 E mail Internet Fax Service Settings page 118 Mailbox Sto...

Страница 66: ...Month Time or Adjust by Month Week Day of Week Time and then specify the start and end dates of the Daylight Savings time to automatically adjust the current time when the Daylight Savings time starts...

Страница 67: ...which printing will be prohibited Power Saver Energy Saver Timers Specifies the time interval of inactivity before automatically switching the machine to Low Power Mode a second time interval of inac...

Страница 68: ...ine monitor which allows you to hear call and response signals when connecting to a destination Ringing Volume Specifies the volume level of the tone generated when a call is received Stored Programmi...

Страница 69: ...played on the All Services screen as Tools in the System Administration mode and as Setup in the general user mode Job Type on Job Status screen Specifies the job types to be displayed when you select...

Страница 70: ...pulled out and then closed Paper Size Specifies automatic detection of the paper size for Tray 1 to Tray 4 and Tray 6 using the tray guide levers If the guide levers in a paper tray are not in the co...

Страница 71: ...ray 5 Paper Size Defaults Specifies the default paper sizes to be displayed on the Tray 5 screen of the Paper Supply feature If you frequently use non standard size paper for copying assigning the pap...

Страница 72: ...background color Select High Speed to sample a portion of the document to detect the background color NOTE This function is available only for documents placed on the document glass NOTE When High Qu...

Страница 73: ...the list of documents where transmission was cancelled Mailbox Report Specifies whether to automatically print a Mailbox Report for fax jobs A Mailbox Report shows the accumulation of documents in the...

Страница 74: ...on and a Transmission Report Job Undelivered for a transmission failure Print when delivery fails Prints a Transmission Report Job Undelivered for a transmission failure NOTE When IPv4 IP Address is n...

Страница 75: ...n Finisher Adjustment Allows you to configure the punch and booklet functions of the Office Finisher LX Hole Punch Tool Displays the available hole punch tools Select the hole punch tool installed on...

Страница 76: ...he machine and initializes the security settings associated with the certificates Watermark This feature allows you to set the defaults for date and text information which can be added to the output a...

Страница 77: ...ol characters can be entered Other Settings This feature allows you to configure various other settings common to the main services such as copy fax and scan 1 Select Other Settings in the Features me...

Страница 78: ...ng Odd Page 2 Sided Specifies whether to add a blank page to a document that contains an odd number of pages so that the document prints as an even number of pages Paper Size Settings Specifies the pa...

Страница 79: ...O 1 O 1 O O 8 5 13 SEF Legal 215 9 330 2 O O O O O 8 5 14 SEF Legal 215 9 355 6 O O B4 SEF 257 0 364 0 O O O O 1 O O O 1 O 1 16K SEF 194 0 267 0 O 16K LEF 267 0 194 0 O O 1 O 1 8K SEF 267 0 388 0 O O...

Страница 80: ...he sizes listed on the following pages when recording media is loaded in Trays 1 2 Trays 3 and 4 Two Tray Module Trays 3 and 4 High Capacity Tandem Tray Envelope Tray or Tray 6 High Capacity Feeder NO...

Страница 81: ...O O 8 5 11 LEF Letter 279 4 215 9 O O O O O O O O O O 8 5 13 SEF Legal 215 9 330 2 O O O O O 8 5 14 SEF Legal 215 9 355 6 O O O O O B4 SEF 257 0 364 0 O O O O O 16K SEF 194 0 267 0 16K LEF 267 0 194 0...

Страница 82: ...gal 215 9 355 6 B4 SEF 257 0 364 0 16K SEF 194 0 267 0 16K LEF 267 0 194 0 8K SEF 267 0 388 0 A3 SEF 297 0 420 0 11 17 SEF 279 4 431 8 7 25 10 5 SEF Executive 184 2 266 7 7 25 10 5 LEF Executive 266 7...

Страница 83: ...then on to make it effective Note that all data corresponding to the encoding then will be initialized NOTE Encrypted data cannot be recovered if a problem occurs on the hard disk Encryption Key for...

Страница 84: ...efine the functions of the paper tray buttons and copy magnification buttons shown in Paper Supply on the Copy screen 1 Select Copy Tab in the Features menu 2 Change the required settings 3 Select Clo...

Страница 85: ...Darken Specifies the default for the Lighten Darken feature on the Image Quality screen Sharpness Specifies the default for the Sharpness feature on the Image Quality screen Background Suppression Spe...

Страница 86: ...achine configuration Copy Output Separator Tray Specifies the default for With Separators Paper Supply in the Copy Output feature on the Copy screen Output Destination Specifies the default output tra...

Страница 87: ...r Specifies the default starting number to use when page numbers are printed on copies Annotations Page Numbers Position Specifies the default for Page Numbers Position in the Annotations feature on t...

Страница 88: ...int is displayed You can predefine a processing method to be performed after the message has been displayed for a specified period If you select Delete Job the data will be discarded If you select Run...

Страница 89: ...document size buttons These are displayed when you use the Original Size feature on the Layout Adjustment screen If you predefine frequently used document sizes you can set the size of the original q...

Страница 90: ...r Environment Settings on page 233 NOTE The options available may vary with the usage environment Port Settings page 90 Protocol Settings page 92 Machine s E mail Address Host Name page 93 Proxy Serve...

Страница 91: ...ation protocol is in binary format Depending on the data the print job may be completed faster than Standard TBCP Select this option to switch the specific control codes when the communication protoco...

Страница 92: ...the port number SOAP Specifies whether to enable the SOAP port and specifies the port number to communicate with external applications WebDAV Specifies whether to enable the WebDAV port and specifies...

Страница 93: ...e IPv6 settings NOTE Select Enabled when the machine is connected to a network on which IPv6 stateless address autoconfiguration is disabled or when you want to set the static IPv6 address Manually Co...

Страница 94: ...elect Proxy Sever Settings in the Features menu 2 Change the required settings Use the scroll buttons to switch between screens 3 Select Close Use Proxy Server Specifies whether to enable the proxy se...

Страница 95: ...d for confirmation Outgoing Incoming E mail Settings This feature allows you to set the outgoing and incoming mail server settings 1 Select Outgoing Incoming E mail Settings in the Features menu 2 Cha...

Страница 96: ...ssword Enter a password of up to 36 characters and then re enter the password for confirmation This entry is required only when SMTP AUTH is selected on the E mail Send Authentication screen Domain Fi...

Страница 97: ...ings Specifies the SMB server settings SMB Server Setup Specifies the settings for the SMB server Select Domain Name or Domain Server Names Address SMB Server 1 to 5 Domain Name Specifies the domain n...

Страница 98: ...l when S MIME communication is enabled and to block an E mail with an incorrect signature validation Receive Untrusted Internet Fax Specifies whether to receive an untrusted Internet Fax Select No to...

Страница 99: ...g is valid when IKE Authentication Method is set to Authenticate by Digital Signature IPSec Communication Specifies whether to enable IPSec communications IKE SA Life Time Specifies the IKE SA lifetim...

Страница 100: ...ceiving protocol and the output tray for e mail printing 1 Select Other Settings in the Features menu 2 Change the required setting 3 Select Close E mail Receive Protocol Specifies the protocol for re...

Страница 101: ...he currently available memory will be displayed at the top of the screen with the following message Memory Available XXX MB Receiving Buffer LPD Specifies the input buffer memory capacity for the LPD...

Страница 102: ...you to change the input buffer memory capacity within the range of 64 1 024 KB in 32 KB increments using the scroll buttons or the numeric keypad Spool to Memory Specifies spooling to memory Allows yo...

Страница 103: ...between screens 3 Select Close Print Area Specifies the printable area Select Standard to crop a margin 4 1 mm 0 16 inch wide along all four edges of the paper Select Extended to crop a margin of 2 mm...

Страница 104: ...meter Banner Sheet Tray Specifies the tray for banner sheets PostScript Paper Supply Specifies whether to use the DMS Deferred Media Selection feature of PostScript or to select a paper tray PostScri...

Страница 105: ...Select Scan Defaults in the Features menu 2 Change the required settings Use the scroll buttons to switch between screens 3 Select Close Color Scanning WorkCentre 5225A 5230A Specifies the default fo...

Страница 106: ...nal Orientation Specifies the default for the Original Orientation feature on the Layout Adjustment screen Resolution Specifies the default for the Resolution feature on the Layout Adjustment screen M...

Страница 107: ...PC Defaults This feature allows you to configure or change the default settings for scanning and sending documents to specified destinations through the FTP or SMB protocol 1 Select Scan to PC Default...

Страница 108: ...ies standard document sizes in A B series Inch Size Specifies standard document sizes in Inch series Others Specifies other miscellaneous sizes Reduce Enlarge Presets This feature allows you to config...

Страница 109: ...ber in the range from 1 to 999 Saturation WorkCentre 5225A 5230A Specifies the saturation level for color scanning Background Suppression Level WorkCentre 5225A 5230A Specifies the background suppress...

Страница 110: ...when you select the Fax Internet Fax service Select from Fax Tab General Settings and Address Book Address Book Speed Dial Default Specifies the default address book entry number to display at the top...

Страница 111: ...ternet Fax machine supports the feature Starting Rate Specifies the default for the Starting Rate feature on the Fax Options and Internet Fax Options screens Delay Start Specific Time Specifies the de...

Страница 112: ...after once entering them or whether to enable or disable the group dialing feature itself This setting is effective when you select Enter Twice under Re enter Recipients and also when you select Ente...

Страница 113: ...on thereby reducing telephone charges Manual Send Receive Default Specifies the default for whether the Manual Receive or Manual Send button is to be selected when you use the On Hook feature Fax Rece...

Страница 114: ...s or the numeric keypad on the control panel Reduce 8 5 11 SEF Original to A4 SEF Specifies whether an 8 5 11 0 inches 216 279 mm size document is to be reduced to the A4 size when Reduce Enlarge in t...

Страница 115: ...E Before using this feature select Enabled in the Mailbox Selector Setup feature on the Fax Control screen Fax Received Line 1 Specifies whether incoming documents on this line are stored in a mailbox...

Страница 116: ...Size Specifies standard document sizes in A B series Use the scroll buttons to switch between screens Inch Size Specifies standard document sizes in Inch series Use the scroll buttons to switch betwe...

Страница 117: ...and space characters Dial Type Specifies tone or pulse dialing Line Type Specifies subscriber line PSTN or private branch exchange PBX line type Internet Fax Control This feature allows you to define...

Страница 118: ...e mail data will be discarded Transmission Header Fax Transfer Specifies whether to use the Transmission Header Text feature when you forward a received e mail to remote machines as a fax document Sel...

Страница 119: ...ification E mail Specifies whether to print error notification mails automatically when e mails are not delivered due to an error Response to Read Receipts Specifies whether to send the processing res...

Страница 120: ...er of e mails split for the job exceeds the specified value Allow Casual Users to Edit From Field Specifies whether unauthorized users have permission to edit the From field mail address in the Recipi...

Страница 121: ...m Settings and then select Mailbox Stored Document Settings in the Group menu Mailbox Service Settings This feature allows you to specify whether to discard documents once received from a client and w...

Страница 122: ...pses Enter the number of days to store documents in the range from 1 to 14 days and enter the time documents are to be deleted using the scroll buttons or the numeric keypad Stored Document Expiration...

Страница 123: ...Machine displays the job flow sheet list stored in the machine Selecting Pool Server displays the list stored in the pool server Fax Transfer Resolution WorkCentre 5225A 5230A Specifies the resolutio...

Страница 124: ...uired Target Operation option 7 Select Save 8 Change the required settings 9 Select Close NOTE By selecting Delete Mailbox you can delete all documents in the mailbox and all job flow sheets created t...

Страница 125: ...en linked with any job flow sheet Checking the Auto Start check box causes the linked job flow sheet to be automatically executed when a new document is saved in the mailbox Selecting Start causes the...

Страница 126: ...o the following types created on a remote application and stored on the machine created and stored on the machine and created on the machine and stored on a remote application Only the job flow sheets...

Страница 127: ...sheet NOTE The contents of this option are the same as Details on the Select Job Flow Sheet screen of a mailbox Search by Name Displays the Keyboard screen Enter the name of a job flow sheet to searc...

Страница 128: ...reen for registering fax destinations or changing the settings of registered destinations You can register up to 100 destinations Send as Internet Fax Displays the screen for registering Internet Fax...

Страница 129: ...ned on software the CSV file is automatically edited and the edited file cannot be used for the machine NOTE Address Numbers registered in the Address Book can be used as speed dial codes NOTE If a re...

Страница 130: ...then select a comment for a recipient and or a sender NOTE Unless registered beforehand comments cannot be selected For information on how to register comments refer to Add Fax Comment on page 133 Of...

Страница 131: ...With Panel selected the resolution level selected on the control panel is used Panel Maximum Image Size Select the maximum image size depending on recipient s paper size from among A3 B4 and A4 or am...

Страница 132: ...e Address Search Directory Service screen Business Address Enter the address of the recipient up to 60 characters NOTE This item can be renamed on the Address Search Directory Service screen S MIME Ce...

Страница 133: ...Fax Comment This feature allows you to register a comment to be used when attaching a cover note to a fax You can register up to 50 comments each comment can include up to 18 alphanumeric characters...

Страница 134: ...nd passcodes and to impose restrictions on the numbers of copied faxed printed and scanned pages for each user Up to 1 000 users can be registered NOTE Create View User Accounts is not displayed when...

Страница 135: ...n account limit to specify the maximum number of pages allowed to be processed by that account The maximum number can be entered within the range of 1 9 999 999 pages NOTE Account Limit cannot be sele...

Страница 136: ...ounts and clear all data tracked by the machine It also allows you to print an Auditron report for all services 1 Select Accounting and then select Reset User Accounts in the Group menu 2 Select the i...

Страница 137: ...to enable or disable the Accounting feature and to specify the types of jobs that require account administration NOTE The buttons displayed on the screen vary depending on the Login Type setting in A...

Страница 138: ...rpose Accounting Login Screen Settings This screen allows you to set the accounting login screen 1 Select Accounting and then select Accounting Login Screen Settings in the Group menu 2 Select the req...

Страница 139: ...ou to set the machine to automatically print reports showing the number of copy jobs processed for each user 1 Select Accounting and then select Copy Activity Report in the Group menu 2 Select the req...

Страница 140: ...cters 1 Select System Administrator Login ID in the Features menu 2 Select On 3 Touch Keyboard and then use the screen keyboard or the numeric keypad on the control panel to enter a new System Adminis...

Страница 141: ...ccess settings The Service Access settings override the Feature Access settings 1 Select Access Control in the Features menu 2 Select the required button and then change the settings as necessary 3 Se...

Страница 142: ...of Create View User Accounts Use the following procedure to create groups The machine displays the DEFAULT authorization group at the top of the group list Users registered on the machine belong to t...

Страница 143: ...User ID Displays a keyboard screen Enter an alternative name for the user ID which is to be displayed on the touch screen and in CentreWare Internet Services and is to be printed on reports The name c...

Страница 144: ...mistyped a specified number of times 1 Select System Administrator Maximum Login Attempts in the Features menu 2 Select the required option If you select Limit Attempts enter a value into the Login At...

Страница 145: ...pecifies how to treat the print jobs with a user ID or passcode authentication success Select from Print Job and Save in Private Charge Print Job Login Failure Available only when According to Print A...

Страница 146: ...s 1 Select Completed Jobs View in the Features menu 2 Select the required options 3 Select Save Access To Displayed when Require Login to View Jobs is selected Select All Jobs to allow every user to v...

Страница 147: ...3 Overwrites is selected overwriting is carried out with the method recommended by the National Security Agency NSA 3 Overwrites ensures higher security than 1 Overwrite The setting also overwrites te...

Страница 148: ...6 Setups 148...

Страница 149: ...ss page 152 Selecting Transport Protocols page 153 Screen Layout page 153 Services page 154 Status page 156 Jobs page 158 Print page 160 Scan page 162 Properties page 178 Support page 230 NOTE For tro...

Страница 150: ...a single browser session System Configuration To use CentreWare Internet Services you need to enable TCP IP on the machine CentreWare Internet Services Installation This section describes the settings...

Страница 151: ...settings Otherwise proceed to step 11 5 Select IPv4 IP Address and then Change Settings 6 Use the keypad on the screen to enter an IP address for the machine in the format xxx xxx xxx xxx When you ha...

Страница 152: ...enter http followed by the Internet address of the machine Then press the Enter key on the keyboard If you use the domain name to specify the machine use the following format http myhost example com I...

Страница 153: ...the left and right panel sizes by dragging the boundary between them Header Panel Displays the header for all pages The header includes the CentreWare Internet Services logo and the model of the machi...

Страница 154: ...Jobs page 158 Print page 160 Scan page 162 Properties page 178 Support page 230 Services The services supported by CentreWare Internet Services are subdivided into the following categories The categor...

Страница 155: ...Software Xerox Services Custom Services Accounting Xerox Standard Accounting Accounting Configuration Accounting Login Screen Settings Security Authentication Configuration User Details Setup Create A...

Страница 156: ...tatus tab 1 Click Status on the Header Panel on the home page 2 Click the required feature on the collapsible menu of the menu panel General This page displays the machine information IP address and s...

Страница 157: ...onsumables menu displays the status of the toner cartridge drum cartridge and other consumables The status indicates when to replace each consumable Consumables Toner Cartridge s Displays the status o...

Страница 158: ...nt Jobs to view the list of completed jobs or group parent jobs or click Error History to view the list of errors Active Jobs This page displays the list of active jobs being processed Job Name Displa...

Страница 159: ...Job Name Displays the name of a group parent job Owner Displays the name of the client user who sent the group parent job Status Displays the status of the group parent job The status includes Comple...

Страница 160: ...s displayed 2 Set the required options Job Submission Allows you to print documents stored in your computer Specify the following settings and click Start to submit the job Feature Description Printin...

Страница 161: ...scode for the user ID The passcode can be up to 12 digits Retype Passcode Re enter the passcode for verification Accounting Account Type Specify the account type to be used NOTE This item is displayed...

Страница 162: ...ge 2 Select Job Templates The New Distribution Template page is displayed 3 To add a new job template enter information for the template in Template Name Description Optional and Owner Optional and cl...

Страница 163: ...e description of the new job template This setting is optional Owner Optional Enter the owner of the new job template This setting is optional Add Displays the Distribution page where you can set up t...

Страница 164: ...epository from the list of file repositories set in Properties Network Scanning File Repository Setup Protocol Displays the filing protocol set in Properties Network Scanning File Repository Setup Hos...

Страница 165: ...5225A 5230A Allows you to specify whether to scan in color grayscale or black and white or have the color mode automatically detected by the machine Auto Detect Color Black White Grayscale 2 Sided Sca...

Страница 166: ...t Displays a page where you can edit the Advanced Settings settings Some of the following options may not be available depending on other settings Image Options Lighten Darken Allows you to adjust the...

Страница 167: ...he following options may not be available depending on other settings Original Orientation Allows you to specify the orientation of originals Upright Images Sideways Images Top to Left Original Size A...

Страница 168: ...mages per File XPS images One or More Images per File Searchable Text Select Image Only to create image data or Searchable to create searchable text data Image Only Searchable Language to Identify Sel...

Страница 169: ...mage data or Searchable to create searchable text data Image Only Searchable Language to Identify Select a language to create searchable text Text Compression PDF PDF A only Select whether to compress...

Страница 170: ...u can set the document processing settings for the selected mailbox Delete Deletes the selected mailbox Edit Displays the Edit Mailbox page which allows you to edit the selected mailbox Create Display...

Страница 171: ...retrieve one page of the selected document Page Number Enter the number of the page to be retrieved Retrieving Format Specify the file format to be used when retrieving the page Retrieve Select this b...

Страница 172: ...is only displayed when the mailbox has a linked job flow sheet Auto Start Job Flow Sheet Allows you to enable or disable the linked job flow sheet This is only displayed when the mailbox has a linked...

Страница 173: ...ox Mailbox Number Displays the number of the selected mailbox Mailbox Name Allows you to enter the name of the mailbox Mailbox Passcode Allows you to enter the passcode to the mailbox The password can...

Страница 174: ...Total Destinations Displays the number of destinations defined in the job flow sheet Sheet Type Displays the access type Personal or Shared of the job flow sheet This item is displayed only when the...

Страница 175: ...ions The dial code for the relay station must be a number between 0 and 99 Enter the dial codes for the relay broadcast destinations as follows When entering an individual code enter it between 0 and...

Страница 176: ...ltiple Pages per File TIFF File for Each Page PDF Images Multiple Pages per File Optimize PDF For Fast Web View PDF A XPS WorkCentre 5222 5225 5230 mTIFF Multiple Pages per File TIFF File for Each Pag...

Страница 177: ...r IP address of the transfer destination Shared Name Enter the volume name of the destination in which documents will be saved Save in Specify the directory in which to save documents Login Name If th...

Страница 178: ...one byte 1 Click Properties on the Main Panel on the home page 2 Select an item from the collapsible menu on the Menu Panel To open each folder click on its left side to expand and access the items be...

Страница 179: ...tton displays the Microsoft Networking page For details on the page refer to Microsoft Networking on page 194 LPD Clicking the Configure button displays the LPD page For details on the page refer to L...

Страница 180: ...ettings page For details on the page refer to Fax Settings on page 207 Fax Repository Setup Clicking the Configure button displays the Fax Repository Setup page For details on the page refer to Fax Re...

Страница 181: ...isplays information such as the memory capacity available printer languages and installed hardware software Memory Displays the size of the installed memory amount of memory used for each port protoco...

Страница 182: ...jobs must contain Memory Settings Allows you to change the settings for the free space available and the print page buffer size for USB EtherTalk SMB NetWare LPD IPP Port9100 and PostScript memory Fr...

Страница 183: ...024 KB in 32 KB increments PostScript Memory Enter the PostScript working memory between 16384 KB and 98304 KB in 256 KB increments Job Ticket Memory Enter the job ticket working memory between 256 KB...

Страница 184: ...ture Details Hides the details of the features in Create Clone File Install Clone File Click the Browse button to locate the configuration file to install and click the Install button to start the ins...

Страница 185: ...t whether the e mail is sent when billing meter reads are reported or if registration with the Xerox Communication Server is cancelled Supplies Data Sent Alerts Allows you to set up the automatic noti...

Страница 186: ...ter Assistant feature is enabled Supplies Assistant Displays whether the Supplies Assistant feature is enabled Meter Assistant Last Billing Meter Read Displays the last billing meter read reported to...

Страница 187: ...so configure the transport protocol to be used To enable the transport protocol select TCP IP and or NetBEUI LPD Select the check box to enable this port Port 9100 Select the check box to enable this...

Страница 188: ...communication protocol is in binary format TBCP Select this to switch between the specific control codes when the communication protocols involve both ASCII and binary formats RAW Select this when the...

Страница 189: ...r Mode Select this when using the machine server mode in bindery service Number of searches Enter the maximum number of searches TBCP Filter Select the check box to enable TBCP Filter when processing...

Страница 190: ...ill automatically be set via RARP DHCP Autonet The addresses will be automatically set by Autonet via DHCP IP Address Enter the IP address allocated to the machine in xxx xxx xxx xxx format Subnet Mas...

Страница 191: ...upon updates Dynamic DNS Registration IPv6 Specify whether to enable dynamic DNS server updates and or to overwrite DNS settings upon updates Generate Domain Search List Automatically Select whether...

Страница 192: ...n is active only when the Secure HTTP SSL feature is enabled Administrator Account Account Enabled Select to enable the System Administrator s account User Name Displays the user name of the System Ad...

Страница 193: ...wing settings IP Trap Destination Address IP Address Enter the IPv6 address of the SNMP agent that you are setting up to receive traps UDP Port Number Enter the UDP port number of the SNMP agent SNMP...

Страница 194: ...econds This is a display only item Workgroup Enter the name of the workgroup for the machine SMB Host Name Enter the SMB host name with up to 15 characters If a name of more than 16 characters is ente...

Страница 195: ...nary or EPS data disable this feature Connection Time Out Allows you to specify the connection time out period when transmission fails Maximum Number of Sessions Enter the maximum number of sessions P...

Страница 196: ...ne to access the SMTP Server to send automated emails Specify the SMTP server authentication method Login Name Specify the login name for SMTP authentication Password Specify the password for SMTP aut...

Страница 197: ...l return matches for the last name of the individual being searched Given Name will return matches for the first name of the individual being searched LDAP User Mappings Server Information IP Address...

Страница 198: ...to control access to the Accounting settings on the machine Custom Filters User ID Query Filter Specify the text string to be used when searching e mail addresses upon network authentication POP3 Set...

Страница 199: ...all protocols or to use a different proxy for each protocol Addresses to Bypass Proxy Server Specify addresses that bypass the proxy server HTTP Server Server Name Specify the HTTP server name Port N...

Страница 200: ...Allows you to configure the following Web DAV protocol settings Port Number Specify the Web DAV port number Connection Time Out Allows you to specify the connection time out period when transmission...

Страница 201: ...ical printer to use Memory Settings Select the logical printer to be used as the default when the machine is switched on Print Position of User Details Select whether or not to print user information...

Страница 202: ...ou to specify the font size between 4 00 and 50 00 points in 0 25 point increments Font Name Allows you to select the required font from the list of fonts available Symbol Set Allows you to select the...

Страница 203: ...d specify the font file to import Paper Supply Command Displays the numbers of the logical paper trays and physical paper trays specified via Paper Media Source Command TIFF JPEG Allows you to configu...

Страница 204: ...specify the Y between 25 and 100 Independent X Allows you to specify the X between 25 to 100 Up Down Adjustment Allows you to specify a value between 250 and 250 mm 9 8 9 8 inches to adjust the vertic...

Страница 205: ...ct an output tray to use to print incoming e mail Print Delivery Confirmation E mail Select whether and when to automatically print a delivery confirmation e mail Print Error Notification E mail Selec...

Страница 206: ...ail Recipients Specify whether to allow edit of the To CC and From fields Public Address Book Allows you to import or retrieve address information in CSV format When a new Address Book in CSV format i...

Страница 207: ...printed or printed only upon an error Public Address Book Allows you to import or retrieve address information in CSV format When a new Address Book in CSV format is imported all previous addresses ar...

Страница 208: ...tocol Share Enter the shared name This appears only when SMB is selected in Protocol Document Path Specify the path to the file repository using up to 128 characters Login Name Specify the login name...

Страница 209: ...on the machine s control panel Job Log Optional Information Specify whether user names and or domains are to be included with job logs File Repository Setup Allows you to view and modify the file rep...

Страница 210: ...the login name to use Password Specify the password for the login name Retype Password Re enter the password for verification Alternate File Destinations Allows you to manage alternate file destinati...

Страница 211: ...when NetWare is selected NDS Tree Specify the NDS tree This appears only when NetWare is selected Login Credentials to Access the Destination Select System to specify the login name and password on t...

Страница 212: ...chine s software Upgrades Upgrades Select whether to upgrade the machine software Manual Upgrade Allows you to manually upgrade the machine software Last Successful Upgrade Displays the current softwa...

Страница 213: ...Accounting Manage Accounting This page displays a list of registered users If registered users are listed over two or more pages use the Previous or Next button to move between pages The list can be s...

Страница 214: ...Group 00 Default Group The groups in the list are defined under Create Authorization Groups in the Security folder Access Rights Displays the group accounts linked to the user To change group account...

Страница 215: ...elect the Enable check box User Access Select users to link to the group account To link all the users click Select All Delete Account To delete a group account select the check box for the group acco...

Страница 216: ...pe is set to Network Accounting Accounting Required This item may not appear depending on your authentication and accounting settings Authentication System Displays the Authentication System page For...

Страница 217: ...s Specify the type of access control for copy jobs Fax Service Feature Access Specify the type of access control for sending faxes Scan Service Feature Access Specify the type of access control for sc...

Страница 218: ...red for Installed Services To require user authentication to access all services listed on this page select Lock All To not require user authentication select Unlock All Set access controls for the fo...

Страница 219: ...counting Login Screen Settings Accounting Login Screen Settings Alternative Name for User ID Enter an alternative name for User ID which is to be displayed in a login screen on the touch screen and in...

Страница 220: ...re processing print and direct fax jobs Guest User Select whether to allow non registered users to use the machine as guest users Guest Passcode Enter a guest passcode The password can be 4 to 12 digi...

Страница 221: ...entered Alternative Name for Account ID Enter a name you want to display on the machine s touch screen and CentreWare Internet Services or to print on reports instead of the account ID This name can...

Страница 222: ...to disable the Watermark feature during a user session when Allow User to Disable Active Settings is set to Enable Active Settings When Protection Code Is Detected Specifies what to do if a protection...

Страница 223: ...server IP Filtering The IP Filtering feature provides machine security by allowing you to register the IP addresses that are permitted to communicate with the machine IPv4 Filtering IP Filtering IP F...

Страница 224: ...s of the ports Add Displays the Add Unbounded Port page where you can add a new port Port Number Enter a port number Port Location Enter the location of the port Protocol Enter the protocol type Edit...

Страница 225: ...This button becomes active when SSL communication is enabled Click this button to display a page which allows you to enter the following items Password Enter the password to the certificate using up t...

Страница 226: ...cify the IKE SA lifetime IPSec SA Life Time Specify the IPSec lifetime DH Group Select a DH Group G2 ensures higher security than G1 PFS Select whether or not to enable the PFS Perfect Forward Securit...

Страница 227: ...items displayed on the page are as follows Use this certificate Click this button to use this certificate Delete Click this to delete the certificate Certificate Details Category Displays the categor...

Страница 228: ...communication This check box becomes active only when a certificate for S MIME communication is registered on the machine Verify Remote Server Certificate Select to verify the validity of server cert...

Страница 229: ...ther or not to always enable the Watermark feature for Mailbox Print jobs Job Status Default Completed Jobs View Completed Jobs View Specify whether or not to allow all users or only authenticated use...

Страница 230: ...A 5230A Restricted Operation Settings On Specify whether to set the maintenance passcode for the Service Representative Maintenance Passcode Specify a passcode for the Service Representative The passc...

Страница 231: ...Number Displays the telephone number of the customer support representative Services Phone Number Displays the telephone number of the service representative Supply Phone Number Displays the telephone...

Страница 232: ...7 CentreWare Internet Services 232...

Страница 233: ...Setup Using TCP IP 1 Confirm that an existing operational network utilizing TCP IP is available 2 Confirm that the Ethernet cable is plugged into the multifunction machine and into an operational Ethe...

Страница 234: ...ual Setup of the Network Using a Static IP Address NOTE On startup the WorkCentre multifunction machine defaults to DHCP to obtain its network configurations so DHCP must be turned off by manually ent...

Страница 235: ...n you have finished establishing TCP IP select Close on the Protocol Settings screen When IPv6 Mode or Dual Stack is selected in step 7 8 Set IPv6 Address Manual Configuration to Enabled 9 Select Manu...

Страница 236: ...em configuration The machine supports NetWare PServer mode in Bindery or NDS NetWare 3 x 4 x 5 x 6 x is required to support Bindery NetWare 4 11 or later is required to support NDS In the PServer mode...

Страница 237: ...ly uses the frame type which corresponds to the first response However if more than one protocol is running simultaneously on the same network the machine will use the same frame type as used by the N...

Страница 238: ...ion 3 Press the Machine Status button on the control panel and then select the Tools tab on the screen 4 Select System Settings in the menu at the left side of the screen 5 Select Connectivity Network...

Страница 239: ...re Setup Use PCONSOLE or NetWare Administrator NWADMIN to create a print queue print server and printer and assign the respective objects For information on how to use PCONSOLE or NWADMIN refer to the...

Страница 240: ...age 251 Solaris HP UX page 251 SunOS page 252 C Option page 253 Information Checklist Before installing the UNIX TCP IP features on the machine make sure that the following items are available or have...

Страница 241: ...hernet II Ethernet interface UNIX TCP IP Installation This section explains how to install the machine in a UNIX TCP IP environment Installation Procedure There are three stages Network Communication...

Страница 242: ...keypad on the screen to enter an IP address for the machine in the format xxx xxx xxx xxx When you have finished entering all values select Save 12 Select IPv4 Subnet Mask and then Change Settings 13...

Страница 243: ...p Solaris SunOS and HP UX workstations Refer to the relevant instructions below Solaris page 244 SunOS page 245 HP UX page 246 Print language mode logical printer A printer name for the logical printe...

Страница 244: ...arameter NOTE For details about C option refer to C Option on page 253 NOTE Lowercase characters can also be used for a printer name NOTE Up to 64 characters can be used for a printer name NOTE Output...

Страница 245: ...client name of the machine 2 lp is the local device name for the printer output For remote printers this parameter must be set to nothing NOTE The recommended remote queue name is lp 3 rm is the remo...

Страница 246: ...teps below to use the command window to manually enter command strings 1 Open a command window on the desktop From the command prompt enter the information below Remember that UNIX commands are case s...

Страница 247: ...ame must be set to lp to spool jobs to the machine 4 Enable Remote Printer on a BSD system by selecting the check box 5 Make sure that the Remote Cancel Model is set correctly 6 Make sure that the Rem...

Страница 248: ...ool mode In the non spool mode the client must be a Windows NT machine to use this option NOTE Some options which are not listed here e g m option and which are not processed by the workstation sendin...

Страница 249: ...delete print data is received the file will be deleted even if it is in the process of being printed Any unprinted data will be cancelled after the file has been deleted Example To delete the print da...

Страница 250: ...ter named fxPS enter the following command lpr PfxPS file1 To print three copies of file1 and three copies of file 2 to fxPS enter the following lpr PfxPS 3 file1 file2 To print a file named file1 to...

Страница 251: ...To delete the print data from printer fxPS for job number 351 enter the following command lprm PfxPS 351 Printer Status Solaris HP UX The lpstat command is used to inquire about the status of the mac...

Страница 252: ...cifies the printer name registered at etc printcap If this option is omitted the default printer lp will be used l This option displays information about the workstation which is sending the print ins...

Страница 253: ...ray specify either a paper size or a tray If the paper size is specified the machine automatically searches and selects the tray The following parameters can be specified Parameter Description INTRAY1...

Страница 254: ...ification may be invalid Selecting a paper output tray The following parameter can be specified Selecting a paper type The following parameters can be specified Specifying double sided printing The fo...

Страница 255: ...mm 11 7 16 5 inches paper and long edge binding A3T a3t Double sided printing on A3 297 420 mm 11 7 16 5 inches paper and short edge binding A4D a4d Double sided printing on A4 210 297 mm 8 3 11 7 in...

Страница 256: ...e parameters separate them with For example to print a file named file1 two sided on A4 210 297 mm 8 3 11 7 inches on printer fxPS enter the following command lpr PfxPS C DUP A4 file1 NOTE If a parame...

Страница 257: ...page 349 EtherTalk Environments System configuration As the machine supports EtherTalk protocol you can print from a Macintosh NOTE You will need the optional PostScript Kit to use EtherTalk for prin...

Страница 258: ...the configuration options for this protocol are only available from CentreWare Internet Services Refer to CentreWare Internet Services on page 149 Initially boot the EtherTalk port 1 Connect the machi...

Страница 259: ...up the machine to operate on a Microsoft network The following information is provided Information Checklist page 259 SMB Environments page 260 SMB Installation page 260 Installation Procedure page 26...

Страница 260: ...Internet Services For more information on how to make SMB settings refer to CentreWare Internet Services on page 149 Target computers The following computers support printing through SMB NOTE NetBEUI...

Страница 261: ...rol panel and then type the System Administrator login ID to enter the System Administration mode NOTE The passcode may also be required depending on the machine configuration 3 Press the Machine Stat...

Страница 262: ...149 14 When you have finished establishing TCP IP select Close on the Protocol Settings screen When IPv6 Mode or Dual Stack is selected in step 3 4 Set IPv6 Address Manual Configuration NOTE Select E...

Страница 263: ...on page 349 TCP IP LPD or Port9100 This section explains how to set up the machine to print from a Windows computer through LPD or Port9100 The following information is provided Information Checklist...

Страница 264: ...E Windows NT 4 0 does not support printing through Port9100 Target computers The following computers support printing through LPD or Port9100 NOTE The optional PostScript Kit is required when you prin...

Страница 265: ...nding on the machine configuration 3 Press the Machine Status button on the control panel and then select the Tools tab on the screen 4 Select System Settings in the menu at the left side of the scree...

Страница 266: ...ected to a network on which IPv6 stateless address autoconfiguration is disabled or when you want to set a static IPv6 address If you selected Enabled in step 3 proceed to step 4 Otherwise proceed to...

Страница 267: ...ains how to set up the machine in a USB port environment The following information is provided Information Checklist page 267 USB Port Environment page 268 USB Port Installation page 268 Installation...

Страница 268: ...to install the machine on a USB port USB Port Communication Setup This requires the machine to be set up for USB port printing Computer Setup This requires the computer to be configured to print to t...

Страница 269: ...USB cable is disconnected from the computer Then perform the following steps 1 Refer to the HTML document on the PCL Print Driver CD ROM or to the document provided with the optional PostScript Kit an...

Страница 270: ...to Problem Solving on page 349 IPP Environment System configuration The machine supports Internet Printing Protocol IPP As Windows 2000 Windows XP Windows Server 2003 Windows Me Windows Vista are inst...

Страница 271: ...communication parameters for the machine At the machine perform these steps NOTE Keep the SNMP port enabled while you use the machine on the TCP IP network NOTE Some of the configuration options for...

Страница 272: ...u have finished entering all values select Save 7 Select IPv4 Subnet Mask and then Change Settings 8 Using the same method as in step 6 enter a subnet mask 9 Select IPv4 Gateway Address and then Chang...

Страница 273: ...d map to the machine as a printer Refer to the HTML document on the PCL Print Driver CD ROM for additional information ipp needs to be entered at the end of the string in order for the printer to be d...

Страница 274: ...8 Printer Environment Settings 274...

Страница 275: ...are available Scan to E mail E mail Print E mail Notification Service Notify Job End by E mail Scan to E mail You can send the scanned documents as an e mail attachment to one or more e mail address d...

Страница 276: ...ternet service provider if you wish to acquire an E mail account through ISP If problems are encountered during machine setup refer to Problem Solving on page 349 Item By An existing operational netwo...

Страница 277: ...scribes how to enable the e mail feature Installation Procedure To use the e mail feature configure the following settings on the machine Network Communication Setup Use the touch screen to set the fo...

Страница 278: ...E mail E mail Notification Service Notify Job End by E mail E mail Notification Service 8 Select Port Status and then Change Settings 9 Select Enabled and then Save Next establish TCP IP 1 Select Con...

Страница 279: ...proceed to step 4 Otherwise proceed to step 10 4 Select Manually Configured IPv6 Address and then Change Settings 5 Use the keypad on the screen to enter an IP address for the machine in the format xx...

Страница 280: ...ings when sending or receiving E mail via SMTP SMTP Server Name IP Address If server name is used then DNS needs to be configured properly via CentreWare Internet Services SMTP Server Port Number E ma...

Страница 281: ...t you specified Then it will be sent as an e mail attachment E mail Print 1 Use your e mail software to create an e mail and then attach a TIFF PDF or JPEG document 2 Enter the e mail address of the r...

Страница 282: ...9 E mail Environment Settings 282...

Страница 283: ...vices provides a network solution for all scanning requirements Scanning features can be programmed and documents can then be scanned and transferred to a file server You can access those documents fr...

Страница 284: ...TCP IP is available 2 Confirm that DNS and the Domain Name have been correctly setup for the multifunction machine 3 Confirm that the following ports are enabled Scan to E mail Send E mail E mail Pri...

Страница 285: ...up the SMTP server configuration via CentreWare Internet Services 1 Click the Properties tab 2 Click the Connectivity folder and then the Protocol Settings folder 3 Click SMTP Server 4 Enter the SMTP...

Страница 286: ...The E mail address must match what the ISP s mail server is expecting ISP requires SMTP authentication to their e mail server Check with your ISP to determine if this is a requirement If so enable SMT...

Страница 287: ...xamples the port number is 8080 For IPv4 http xxx xxx xxx xxx 8080 For IPv6 http xxxx xxxx xxxx xxxx xxxx xxxx xxxx xxxx 8080 2 Create mailboxes 1 Click the Scan tab 2 Click the Mailboxes folder 3 Cli...

Страница 288: ...mputer Setup To retrieve scanned documents install the scan driver or activate CentreWare Internet Services For more information about the operating environment for the scan driver and the installatio...

Страница 289: ...d earlier Your scanned document is located in that repository NOTE If the authentication feature is enabled for the Network Scanning service a separate login screen appears when Network Scanning is se...

Страница 290: ...of the machine click Properties click Connectivity click Protocols and finally click LDAP For more information refer to CentreWare Internet Services chapter on page 149 Procedures for Scan to Home Se...

Страница 291: ...within the user s home directory by enabling Automatically Create Subdirectory and then specifying a general name in Subdirectory f If required set Append User Name to Path Automatically Create User...

Страница 292: ...the SMB protocol Directory structures repositories need to be created on the server to hold the scanned documents Prerequisites for Scan to PC Setup SMB 1 Confirm that an existing operational network...

Страница 293: ...the machine is as follows NOTE The configuration can also be performed using CentreWare Internet Services For details refer to CentreWare Internet Services on page 149 1 Enter the System Administrati...

Страница 294: ...ording to the selected mode configure the required protocol settings NOTE For details on the protocol settings refer to Protocol Settings on page 92 d Select Close until the Tools screen is displayed...

Страница 295: ...mits the data via a telephone line Some models do not support the Internet Fax service Some models require optional kits to use the Internet Fax service For details contact the Xerox Welcome Center In...

Страница 296: ...gs on the machine Network Communication Setup Use the touch screen to set the following ports to Enabled Receive E mail Send E mail Then set the IP address Finally set the other items required for the...

Страница 297: ...d then Save 10 On the Port Settings screen select Send E mail and then Change Settings 11 Select Port Status and then Change Settings 12 Select Enabled and then Save Next establish TCP IP 1 Select Con...

Страница 298: ...e Settings 5 Use the keypad on the screen to enter an IP address for the machine in the format xxxx xxxx xxxx xxxx xxxx xxxx xxxx xxxx Select Save 6 Select Manually Configured IPv6 Prefix and then Cha...

Страница 299: ...o 50 Other Settings E mail Receive Protocol Output Destination for E mail Security Settings S MIME Settings Device Certificate S MIME S MIME Communication Receive Untrusted E mail Receive Untrusted In...

Страница 300: ...Internet Fax 300 The document will be scanned and converted to TIFF format Then it will be sent as an e mail attachment Receiving When the machine receives an Internet Fax printing starts automatical...

Страница 301: ...s chapter you will be setting up a network connection to a Xerox certified third party fax server server running fax management software which will receive store and redirect incoming documents to the...

Страница 302: ...to be used for the Server Fax service 3 Enable the Server Fax service 4 Configure the Server Fax settings Test Server Fax Transmission Submit a Server Fax job to make sure that the Server Fax service...

Страница 303: ...er 2 In the URL field enter http followed by the Internet address of the machine Then press the Enter key on the keyboard NOTE If you use the IP address to specify the machine use one of the following...

Страница 304: ...lt port number FTP 21 or SMB 139 will be used NOTE The IP address must be in IPv4 format Share SMB only Document path Login name Password Retype password When SMTP is selected The SMTP server settings...

Страница 305: ...as stated under Configuration of HTTPS SSL TLS Communication Encryption on page 306 To manage digital certificates stored in the machine click Machine Digital Certificate Management in the Security fo...

Страница 306: ...ital Signature of Scanned Files PDF XPS Documents While no digital signatures are required to encrypt PDF and XPS documents these documents can be signed with imported PKCS12 digital signatures When d...

Страница 307: ...ith Mac OS X 10 2 or later This is because the operating system cannot recognize the character code UTF 8 of the certificate Use Netscape 7 in the above mentioned OS environments For information on im...

Страница 308: ...ital Certificates represent the Public Key of the machine to which you are sending and must be accepted in order to allow the encryption process to take place No settings are needed to use the SOAP or...

Страница 309: ...to import or select the file to be imported by clicking the Browse button d Click the Import button When a screen to enter a user name and passcode appears enter the System Administrator user ID and p...

Страница 310: ...l and the method to use if a signature is required Receive Untrusted Internet Fax Decide whether or not you wish to receive untrusted Internet Faxes Digital Signature Outgoing Internet Fax Decide whet...

Страница 311: ...Machine It is necessary to register a personal certificate of a sender s e mail address an intermediate certificate authority certificate of the personal certificate and a root certificate on the mach...

Страница 312: ...and then click OK NOTE The default System Administrator user ID and passcode are 11111 and x admin respectively 7 Refresh the web browser 8 Click on the left of Security to display the items in the fo...

Страница 313: ...he Digital Certificate resides on the machine managed as stated in Configuration of E mail Encryption Digital Signature on page 308 and MUST also have been imported and stored on the computer that is...

Страница 314: ...13 Security Encryption Digital Signature 314 10 Click Apply and enter the System Administrator user ID and passcode if prompted The default is 11111 and x admin...

Страница 315: ...9 Remote Authentication Setup page 340 Network Authentication Setup page 344 Xerox Secure Access Setup page 345 Overview of Authentication This section is an overview of the Authentication feature use...

Страница 316: ...ount Administrator Privileges These are users who are registered on the machine and assigned no System Administrator or Account Administrator privileges When a restricted service is used this type of...

Страница 317: ...on feature Restriction depends on which of the following two ways the machine is used Local Access Remote Access For more information on the restrictions to mailboxes and job flow sheets using the Aut...

Страница 318: ...saved to the machine or deleted depending on the selected setup option NOTE Direct Fax is not restricted when Login Type is set to Login to Remote Accounts in the System Administration mode For more i...

Страница 319: ...ilbox on the Setup screen The owner of this job flow sheet is set to the mailbox it was created from Any user who has access to the mailbox can use and change its settings This job flow sheet is avail...

Страница 320: ...opied and deleted from the mailbox where they were created The applicable users are all the users that can use the mailbox NOTE When job flow sheets not available for operation depending on changes ma...

Страница 321: ...TE If authenticated as a guest user in Remote Authentication you are treated as an unauthenticated user general user and cannot operate job flow sheets Copy O X O X O O O O Delete O X X X O O O O Sele...

Страница 322: ...this mailbox can only be operated by a System Administrator System Administrator Shared Mailbox The System Administrator Shared Mailbox is a mailbox created by a System Administrator When the Authent...

Страница 323: ...When the Authentication feature is not enabled When the Authentication feature is enabled When the Authentication Feature is Not Enabled The following table shows the relationship with the mailboxes f...

Страница 324: ...ntication feature refer to Login Type on page 141 When Login to Local Accounts is selected or when a user is authenticated as a user other than a guest user in Login to Remote Accounts NOTE If authent...

Страница 325: ...X O O X Job Flow Sheet Display X O O X Link X X O X Auto Run X O O X Manual Run X O O X Mailbox Operations System Administrator Generally Shared Shared by the System Administrator Personal Create X O...

Страница 326: ...on whether the Authentication feature is enabled The following explains the relationships available When the Authentication feature is not enabled When the Authentication feature is enabled NOTE When...

Страница 327: ...ilboxes O Relationship available X Relationship not available Mailbox Job Flow Unauthenticated Users General Users Generally Shared Shared by the System Administrator Personal Generally Shared X X X S...

Страница 328: ...rmation and account information pre registered on the machine Account Administration uses each counter created automatically for individual users Auditron reports are created in CSV format using Centr...

Страница 329: ...nformation on the setting methods refer to Create View User Accounts in the Setups chapter on page 134 Network Accounting When you are using Network Accounting with the machine user information is man...

Страница 330: ...e features and services that can be managed in Xerox Standard Accounting are as follows O Manageable X Not manageable Charge Print and Private Charge Print O O X X Scan O O O 3 X X Fax Internet Fax O...

Страница 331: ...nistration feature are as follows 1 Account information is not required for printing as print jobs are verified when received by the machine 2 Printing available only if Non account Print is enabled i...

Страница 332: ...ncoming faxes Receptions pages transmissions printed pages sheets Confidential Receive Receiving confidential documents No Incoming faxes Receptions pages transmissions Printing confidential documents...

Страница 333: ...r using the numeric keypad on the control panel or the On hook feature When using a speed dial code in which the billing information is not registered When a phone conversation took place including th...

Страница 334: ...unting Each device supports unique XSA User IDs and Group Accounts All user IDs must be assigned to one or more group accounts NOTE The XSA settings and account data are stored in the machine It is st...

Страница 335: ...nt ID s must be unique 4 Enter a name for the group account in the Account Name box for example Xerox A group name can be up to 32 alphanumeric characters Group Account names must be unique 5 Click Ap...

Страница 336: ...its 1 On the Properties tab of Internet Services expand the Accounting folder and then the Xerox Standard Accounting folder 2 Click Manage Accounting 3 Place a checkmark in the box for the required Us...

Страница 337: ...ollow any additional displayed prompts to save the XSA Report csv comma separated value file to your computer Enabling XSA in your Print Drivers Refer to the driver Help for the steps to follow to ena...

Страница 338: ...Clone File portion of the displayed dialog click Browse 6 Locate the dat clone file 7 Click Install NOTE It may be necessary for you to use your web browser to view the Xerox Standard Accounting set u...

Страница 339: ...s when the selection is available to use to authenticate to the system and access restricted services Preparations 1 Ensure the machine is fully functional on the network 2 Ensure that the TCP IP and...

Страница 340: ...server If this validation is successful the machine and any restricted services will be available for individual use Preparations 1 Ensure the machine is fully functional on the network 2 Ensure that...

Страница 341: ...e 341 Configuring Remote Authentication for SMB page 342 Configuring Remote Authentication for LDAP page 342 Configuring Remote Authentication for Kerberos Windows 2000 At your Workstation 1 Click the...

Страница 342: ...ur LDAP server documentation for the full range of information that can be entered into this LDAP dialog to fully support both e mail applications and authentication using your LDAP server The path to...

Страница 343: ...es Direct Authentication sets authentication with the LDAP server with the user name and password entered by the user Authentication of User Attributes sets authentication with the LDAP server to the...

Страница 344: ...e users without accounts to continue to print 8 From the Verify User Details drop down menu select either Yes or No keep logon records The Yes selection will verify user information When No keep logon...

Страница 345: ...fault setting dialogs are accessed by right mouse clicking on the printer s icon in the Printers window for Windows 2000 or in the Printers and Faxes window for Windows XP Select Properties from the d...

Страница 346: ...ty folder and then click Authentication Configuration The Authentication Configuration Step 1 of 2 page appears 4 Select Xerox Secure Access from the Login Type drop down list 5 Click Apply to reboot...

Страница 347: ...Next 6 When prompted enter the IP address of the machine 7 Enter a name for the print queue such as raw If you selected the Standard TCP IP port you can accept the default name provided by Windows Cli...

Страница 348: ...h as accounting details enter this information at the User Interface 3 The machine will confirm successful authentication allowing access to previously locked system features 4 When finished using sys...

Страница 349: ...essages and animated graphics and clear the fault in the order specified If the problem is not solved by following the screen messages and graphics refer to Common Problems on page 366 and apply the a...

Страница 350: ...move all the torn pieces making sure that none remain inside If a paper jam message is displayed again paper is probably jammed at another location Clear this by following the message on the display W...

Страница 351: ...Tray 6 HighCapacity Feeder Top Cover Tray 6 HighCapacity Feeder Front Cover Office Finisher LX Transport Cover F Office Finisher LX Front Cover Tray 3 Tray 4 High Capacity Tandem Tray Office Finisher...

Страница 352: ...r Jams in the Office Finisher LX Optional page 359 Media jams happen for a variety of reasons Check the guidelines below to reduce potential jams in the machine Use only recommended media Refer to Sup...

Страница 353: ...Bypass and then open Cover A while lifting up the release lever 2 If the jammed paper is inside the fuser unit rotate the green lever A1 in the direction of the arrow to feed the paper from the top o...

Страница 354: ...n lever and carefully remove the paper from the machine NOTE Be careful not to touch the fuser unit It may be hot 4 Close Cover A until it latches and then close Tray 5 Bypass Paper Jams in Cover B Fo...

Страница 355: ...e the jammed paper 3 Close Cover C until it latches Paper Jams in Cover E Follow the steps below to clear paper jams in Cover E 1 Open Tray 5 Bypass and then open Cover A while lifting up the release...

Страница 356: ...he jammed paper 3 Close the paper tray Paper Jams in the High Capacity Tandem Tray Optional Follow the steps below to clear paper jams in the High Capacity Tandem Tray In Tray 3 1 Pull out Tray 3 of t...

Страница 357: ...en the Duplex Module Cover D while lifting up the release lever 3 Remove the jammed paper inside the Duplex Module 4 Close the Duplex Module Cover D until it latches 5 Close Tray 5 Bypass Paper Jams i...

Страница 358: ...Tray 6 to the left of the machine 3 Remove the jammed paper 4 Gently put Tray 6 back into position Under the Top Cover of Tray 6 1 Open the top cover of Tray 6 2 Remove the jammed paper 3 Close the to...

Страница 359: ...If a paper jam message appears again or you cannot see the jammed paper inside the machine the Integrated Office Finisher must be removed to clear the jam For details on how to remove the Integrated...

Страница 360: ...X Transport Cover F 2 Remove the jammed paper 3 Close the Office Finisher LX Transport Cover F NOTE If a paper jam message appears again or you cannot see the jammed paper inside the machine the Offic...

Страница 361: ...eder Follow the steps below to clear document jams in the document feeder 1 Open the document feeder cover and then remove the jammed document If prompted on the touch screen turn the green wheel to f...

Страница 362: ...n staples are bent Contact your Xerox Welcome Center if the problem persists after you have tried the following solutions If staples are stapled on the copies in the manner shown in the figures below...

Страница 363: ...pped and then open the front cover on the Integrated Office Finisher 2 Take the staple cartridge out of the finisher 3 After removing the staple cartridge check the inside of the Integrated Office Fin...

Страница 364: ...Welcome Center Staple Jams in the Office Finisher LX Optional The following describes how to clear staple jams when the Office Finisher LX optional is installed 1 Make sure that the machine has stoppe...

Страница 365: ...move the jammed staple only 6 Pull down the front lever on the staple cartridge until it clicks into place 7 Hold the staple cartridge by the orange lever and return the cartridge to its original posi...

Страница 366: ...he Paper Supply selections Check that no paper trays are open If a tray is ajar the machine cannot sense its connection Open and close each paper tray and the High Capacity Tandem Tray If this does no...

Страница 367: ...tridge is new begin the job again Run the job using the document glass Check the quality of the document Use Edge Erase to remove lines and marks from the edges of the document Replace the drum cartri...

Страница 368: ...ker image quality setting on the touch screen Replace the drum cartridge Solid density variations Check the quality of the documents Select Lighten Darken on the touch screen Replace the drum cartridg...

Страница 369: ...s are locked into position against the paper Pages in the set are not stapled Check that the paper tray guides are locked into position against the paper Paper delivered to an output tray is not prope...

Страница 370: ...he computer 8 Call the local Xerox Welcome Center where a representative will assist in the diagnosis and solution of the problem SMB This section explains the troubleshooting procedures and restricti...

Страница 371: ...t The machine or other SMB machines cannot be found using the network computer icon Check the SMB Auto Master Mode setting If set to On change the setting to Off Cause Confirmation Method Action The m...

Страница 372: ...y All print data spooled in machine memory including the data currently being printed is deleted There is no print data on the machine when the machine is switched on However if the machine is switche...

Страница 373: ...d cancel processing Switch off the machine and then switch it on with the receiving buffer empty of print data NOTE Stopping printing or forced deleting of print data in the machine receiving buffer c...

Страница 374: ...send the print job to a print queue in which the user name or group name has been registered correctly Use NWADMIN or PCONSOLE to register a user name or group name of the job in the print queue Prin...

Страница 375: ...wing command on the file server console to set the IPX checksum to level 0 or level 1 Set Enable IPX Checksum x x 0 or 1 The NCP packet signature is set to an invalid level Use the Set command on the...

Страница 376: ...IP address remains set to 0 0 0 0 fixed IP address not specified or an address supply server DHCP server down When using IPX SPX start the NetWare server When using TCP IP set the fixed IP address or...

Страница 377: ...check the communication status Check the error The printer entry setting is not correctly defined on the client Check the printer entry setting on the client Check the etc printcap file of the client...

Страница 378: ...the print job does not match the print environment of the client print data sent from the client is in the binary notation Set the logical printer name to PSBIN to print a binary file in the PostScri...

Страница 379: ...the print data size exceeds the maximum size in multiple files reduce the number of files to be printed at one time A fault occurred during print processing Check the error message on the touch scree...

Страница 380: ...address and other parameters from a host running NIS When the machine is switched off The following actions take place when the machine is switched off When Receiving Buffer LPD is set to Spool to Me...

Страница 381: ...e machine off and on with the receiving buffer empty of print data NOTE Stopping printing or forced deleting of print data in the machine receiving buffer can be performed using the control panel For...

Страница 382: ...registered on the network and the client can access the machine using the new machine name If the machine is switched off and on again after the machine name is changed the machine attempts to start...

Страница 383: ...rint out the System Settings List to check if CentreWare Internet Services port is activated Activate the CentreWare Internet Services port Check if the Internet address is correctly entered Check the...

Страница 384: ...Method Action The machine and Windows clock settings do not match as specified by the SMB signature SMB transmission fails even with a correct user name and password Set the machine and Windows clock...

Страница 385: ...a network scan driver or Mailbox Viewer 3 When polling from another fax machine A scanned document is not transmitted when polling the machine from another fax machine Using TIFF files TIFF files cre...

Страница 386: ...Filtering and your domain is included in the list of rejected domain names Set Domain Filtering to Off Or remove your domain name from the list of rejected domain names Check if your SMTP or POP3 serv...

Страница 387: ...S server address is not set correctly Check the DNS server address The DNS server address cannot be resolved Set the DNS server for resolving addresses When using a proxy server Enter the DNS server a...

Страница 388: ...ns SSL usage restrictions User access restrictions including access privileges Content blocking Scheme restrictions for example HTTP disable Transfer data size restrictions Used method restrictions fo...

Страница 389: ...ws Vista via SMB NetWare does not support IPv6 communication Use IPv4 for NetWare Bonjour does not support IPv6 communication Use IPv4 for Bonjour Scanning When IPv6 is enabled and IPv4 is disabled on...

Страница 390: ...y 200 dpi for the resolution setting and scan again 003 754 003 755 An error occurred in the document scanner Reset the document and scan again 003 756 The document pages are blank Correctly load the...

Страница 391: ...231 012 232 012 233 012 234 012 243 012 246 012 247 012 249 012 259 012 260 012 263 012 264 012 265 012 266 012 268 012 269 012 280 012 282 012 283 012 284 012 285 012 291 012 293 012 295 012 295 012...

Страница 392: ...blem 016 401 The 802 1x authentication method selected on the machine is not supported by the authentication server Change the 802 1x authentication method on the control panel 016 402 A connection ti...

Страница 393: ...n XPS Viewer to submit a print job 016 515 The memory space for XPS data is not sufficient Change the print mode to a higher processing mode If the problem persists add memory If the problem still per...

Страница 394: ...ck if the machine is connected to the DNS server and if the Remote Download server is registered on the DNS server 016 537 A timeout error occurred upon connection to the Remote Download server Check...

Страница 395: ...2 The database for temporary users on Active Directory or Authentication Agent stores multiple entries with the same IC card information Modify the entries so that the temporary user information is no...

Страница 396: ...it after connection Change the file name or change the destination folder on the FTP server Or move or delete files from the destination folder 016 582 The machine failed to transfer data via FTP usin...

Страница 397: ...transfer data via FTP using the Scan to PC service because access to the NEXTNAME DAT file was not successful after connection to the FTP server When File Name Conflict is set to Rename New File chec...

Страница 398: ...ample Print feature is not available due to a malfunction of the hard disk Contact the Xerox Welcome Center 016 708 An annotation cannot be added due to insufficient hard disk space Delete unnecessary...

Страница 399: ...the lpr command but the HDD was defective Contact the Xerox Welcome Center PCL data was sent to the machine but the optional emulation kit was not installed on the machine 016 727 The Save to Mailbox...

Страница 400: ...le to print due to insufficient hard disk space Reduce the number of pages in print data for instance by dividing the print data or by printing one copy at a time when making multiple copies 016 749 T...

Страница 401: ...ress of the machine 016 769 The SMTP server does not support delivery confirmation DSN Send e mail without the DSN setting 016 770 The Direct Fax function is not available Check with the System Admini...

Страница 402: ...the saved data are not needed 016 787 The server IP address set to the job template is incorrect Specify the correct job template 016 788 Failed to retrieve the file from the web browser Take one of t...

Страница 403: ...tray etc Set the appropriate combination of print parameters and try again 018 501 The machine did not have a server certificate secret key when it was powered on and thus could not enable the SSL se...

Страница 404: ...ustom Services authentication error occurred Check the authentication settings 018 531 The scan job could not be executed Try again Contact the Xerox Welcome Center if the problem persists 018 532 The...

Страница 405: ...ommunication with the HTTP server Check if your computer is connected to the HTTP server 018 568 SSL access to the HTTP server failed Check if your computer is connected to the HTTP server Also check...

Страница 406: ...is connected to the NetWare server If the problem persists run DSREPAIR at the server console on the NetWare server 018 584 Communication with the NetWare server was interrupted Check if your computer...

Страница 407: ...he address book query Review the search conditions and search root entry then repeat the same operation Contact the network administrator if the problem persists 018 705 An LDAP server protocol error...

Страница 408: ...tus 018 719 An LDAP server protocol error occurred in the address book operation The server returned the RFC2251 specification protocol error 19 constraint violation during the address book query An a...

Страница 409: ...e operation Contact the network administrator if the problem persists 018 752 An LDAP server protocol error occurred in the address book operation The server returned the RFC2251 specification protoco...

Страница 410: ...ocol error 80 unknown error during the address book query Check the LDAP server status 018 781 An LDAP server protocol error occurred in the address book operation The machine could not connect to the...

Страница 411: ...ification protocol error 93 result not returned during the address book query Check the LDAP server status 018 794 An LDAP server protocol error occurred in the address book operation The server retur...

Страница 412: ...nge the auto stateless IPv6 address 1 of the machine or the address of the other device 027 443 The auto stateless IPv6 address 2 of the machine is duplicated on the network Change the auto stateless...

Страница 413: ...ne are set up properly for network communication Check if the network cables are plugged in securely Check the TCP IP settings Check the communication status of port 137 UDP port 138 UDP and port 139...

Страница 414: ...C service the suffix of the file name or folder name exceeded the limit on the SMB server Change the file name or destination folder on the SMB server Or move or delete the files from the destination...

Страница 415: ...cation has free space 027 529 During data transfer via SMB using the Scan to PC service an unexpected error has occurred on the SMB server or an unexpected internal error has occurred on the machine L...

Страница 416: ...SMB TCP IP is not activated Using CentreWare Internet Services open the Port Status page on the Properties tab and check that TCP IP for SMB is enabled 027 569 The SMB TCP IP port is not enabled Enab...

Страница 417: ...rtificate to e mail 027 712 The S MIME certificate for the received e mail has expired or is not trusted Ask the sender to send e mail with a valid certificate 027 713 The reception of the e mail was...

Страница 418: ...to insufficient disk space Delete unnecessary data from the disk 027 743 The settings on the job template server are incorrect Check the settings of the job template server 027 744 There is a problem...

Страница 419: ...for authentication 027 796 The e mail without an attachment was discarded The machine is configured to print only e mail attachments To also have the machine print the body text and header of e mail c...

Страница 420: ...ally resume the Auto Print job after the manual printing is done 033 731 The Auto Print processing for the received fax document was interrupted by a manual print operation No user action is required...

Страница 421: ...e destination machine may be set not to release its ID number This error code is also displayed when a polling request is rejected 034 508 034 509 034 510 A fax error occurred If sending a fax check t...

Страница 422: ...er and try again If a speed dial button was used check the correct number is registered with the button 034 728 An invalid number was specified Check the destination number and try again Contact the X...

Страница 423: ...Check if the destination machine has paper in paper trays the destination machine has no paper jam the destination machine has enough memory the destination machine supports G3 reception When using r...

Страница 424: ...ile the machine was dialing or sending data No user action is required 035 749 The machine dialed the fax number the specified number of time but the destination machine did not answer Check the telep...

Страница 425: ...error occurred in the Finisher Switch off the machine and then switch it on again Contact the Xerox Welcome Center if the problem persists 047 214 An error occurred in the Duplex Module Switch off the...

Страница 426: ...Tandem Tray was used Switch off the machine and then switch it on again Contact the Xerox Welcome Center if the problem persists 078 212 An error occurred in the High Capacity Feeder Switch off the m...

Страница 427: ...ry again If a user stops a confidential Fax or Internet Fax print job while the machine is printing the data of the job the machine will not staple the first print set Manually staple the first set in...

Страница 428: ...s not available for fax printing 134 210 134 211 A fax error occurred Switch off the machine and then switch it on again Contact the Xerox Welcome Center if the problem persists Code Description and R...

Страница 429: ...owing information the nature of the problem the serial number of the machine the fault code if any as well as the name and location of your company Follow the steps below to look up the serial number...

Страница 430: ...15 Problem Solving 430...

Страница 431: ...be made without prior notice For more information on the specifications contact your Xerox Representative Machine Specifications Machine Size Standard Configuration With the Document Feeder and Tray...

Страница 432: ...m 0 6 to 11 7 length Up to 432 mm 0 6 to 17 0 Auto Size Sensing Yes NOTE The standard sizes of documents that can be detected vary depending on the paper size table specified by the System Administrat...

Страница 433: ...o 105 g m2 for Tray 1 60 to 215 g m2 for Tray 2 Trays 3 4 Two Tray Module Paper Sizes For width 139 7 to 297 0 mm 5 5 to 11 8 For length 182 0 to 431 8 mm 7 2 to 17 2 Auto Size Sensing Yes Tray 5 Bypa...

Страница 434: ...EF 8 5 x 11 SEF 8 5 x 11 LEF 8 5 x 13 SEF 8 5 x 14 SEF 11 x 17 SEF 16K Taiwan SEF 16K Taiwan LEF 8K Taiwan SEF 16K China SEF 16K China LEF 8K China SEF Postcard LEF European 3 Chouyoukei 3 Envelope LE...

Страница 435: ...staple or 750 sheets For paper of 216 0 or less in length When not stapled 2000 sheets When stapled 100 sets or 1000 sheets 1 staple 75 sets or 750 sheets 2 staples Paper Sizes A4 SEF A4 LEF A3 SEF B...

Страница 436: ...600 600 dpi Resolution Conversion Available for sending and receiving smooth on receiving Image Compression JBIG MH MR MMR Long Page Scan Feature 600 mm 23 6 inches maximum length NOTE This feature i...

Страница 437: ...size is specified on the Paper Supply screen Auto Size 202 3 A3 4 A4 Default 5 A5 14 B4 15 B5 21 8 5 14 22 8 5 13 23 8 5 11 Default 24 11 17 25 Custom Sets the default paper size when the machine is s...

Страница 438: ...arigold 35 Arial 36 Arial Italic 37 Arial Bold 38 Arial Bold Italic 39 Times New 40 Times New Italic 41 Times New Bold 42 Times New Bold Italic 43 Symbol 44 Wingdings 45 Line Printer 46 Times Roman 47...

Страница 439: ...0 2400 Default 1000 Specifies the pitch size of a font The value of 100 represents the pitch size of 1 Form Line 211 5 128 Default 64 or 60 Specify the number of lines on a page The default value will...

Страница 440: ...int sets 2 Sided Print 402 0 Off Default 1 LEF Binding 2 SEF Binding Specifies which edge of paper is to be bound for double sided printing Print Mode 403 0 Standard Default 1 Fast 2 High Quality Sele...

Страница 441: ...ystem to the new software Click Install Software to install the software NOTE The Manual Upgrade link provides the ability to upgrade software manually after enabling with the Upgrades link Xerox Exte...

Страница 442: ...eshes and displays the Self Signed Certificate area d In the Self Signed Certificate area click Apply 6 Enable SSL a Click the Properties tab b Click the Security folder and then the SSL TLS Settings...

Страница 443: ...Xerox Extensible Interface Platform XEIP 443 c In the Protocols folder click TCP IP d In IP Mode ensure that TCP IP is configured f Click Apply EIP applications can now register to the machine...

Страница 444: ...16 Appendix 444...

Страница 445: ...Position 87 Annotations Edit Comment 1 to 8 89 Annotations Font Size 86 Annotations Page Numbers 87 Annotations Page Numbers Position 87 Annotations Position on Side 2 86 Annotations Starting Number...

Страница 446: ...ng 383 Properties 178 properties features 179 Scan 162 screen layout 153 services 154 Status 156 status of consumables 157 status of the trays 156 submitting jobs 160 Support 230 Test Access 152 Trans...

Страница 447: ...d handling 23 Documents Retrieved By Client 121 Domain Filtering 96 Domain Name 94 Drum cartridge 30 drum cartridge inserting 31 replacing 30 Duplex Module Cover D paper jams 357 E Edge Erase 106 Edge...

Страница 448: ...TPS settings 306 I IEEE 802 1x 100 IEEE 802 1x Settings 99 IKE Authentication Method 99 IKE SA Life Time 99 Image Enhancement 72 Image Quality Common Service Settings 72 Image Rotation 86 Image Rotati...

Страница 449: ...sword 100 Login Type Authentication 141 Login User Name 100 Long Edge Feed LEF 14 18 Low Toner Alert Tone 68 LPD 91 LPD Print Queue 104 M machine before using 13 cleaning 29 configuration 50 conventio...

Страница 450: ...Settings Connectivity Network Setup 100 Other Settings Print Service Settings 103 Other Settings Scan Service settings 109 Out of Paper Warning Tone 68 Outgoing Incoming E mail Settings Connectivity...

Страница 451: ...ntranet Connection 387 NetWare 374 Scanning Services 384 SMB 370 TCP IP 379 problem solving 349 procedures fault clearance 349 settings 63 Properties CentreWare Internet Services 178 Protocol Settings...

Страница 452: ...ault at Power On 69 Screen Defaults Fax Service Settings 110 screen messages 428 Screen Button Settings Common Service Settings 68 Search Time Out 97 Searchable Page Orientation 109 Searchable Text Co...

Страница 453: ...Administrator Settings 140 System Administrator s Login ID System Administrator Settings 140 System Administrator s Meter Copy Jobs System Administrator Settings 137 System Administrator s Passcode S...

Страница 454: ...entication 143 V Verify Remote Server Certificate 98 View Accounts Accounting 136 volume Audio Tones 67 W warnings 15 Watermark Background Contrast 77 WebDAV 92 Windows SMB 259 Computer Setup 263 Info...

Отзывы: