background image

JJaam

mss D

Duurriinngg A

Auuttoom

maattiicc 22--SSiiddeedd PPrriinnttiinngg

Probable Causes

Solutions

Using paper of the wrong size,
thickness, or type.

Use paper of the correct size, thickness, or type. For more
information, refer to

Supported Standard Paper Sizes for Automatic

2-Sided Printing

.

Paper is loaded in the wrong tray.

Ensure that paper is loaded into the correct tray. For more
information, refer to

Supported Paper

.

Tray is loaded with mixed paper.

Load the tray with only one type and size of paper.

C

Clleeaarriinngg FFiinniisshheerr JJaam

mss

C

Clleeaarriinngg PPaappeerr JJaam

mss iinn tthhee IInntteeggrraatteedd O

Offffiiccee FFiinniisshheerr

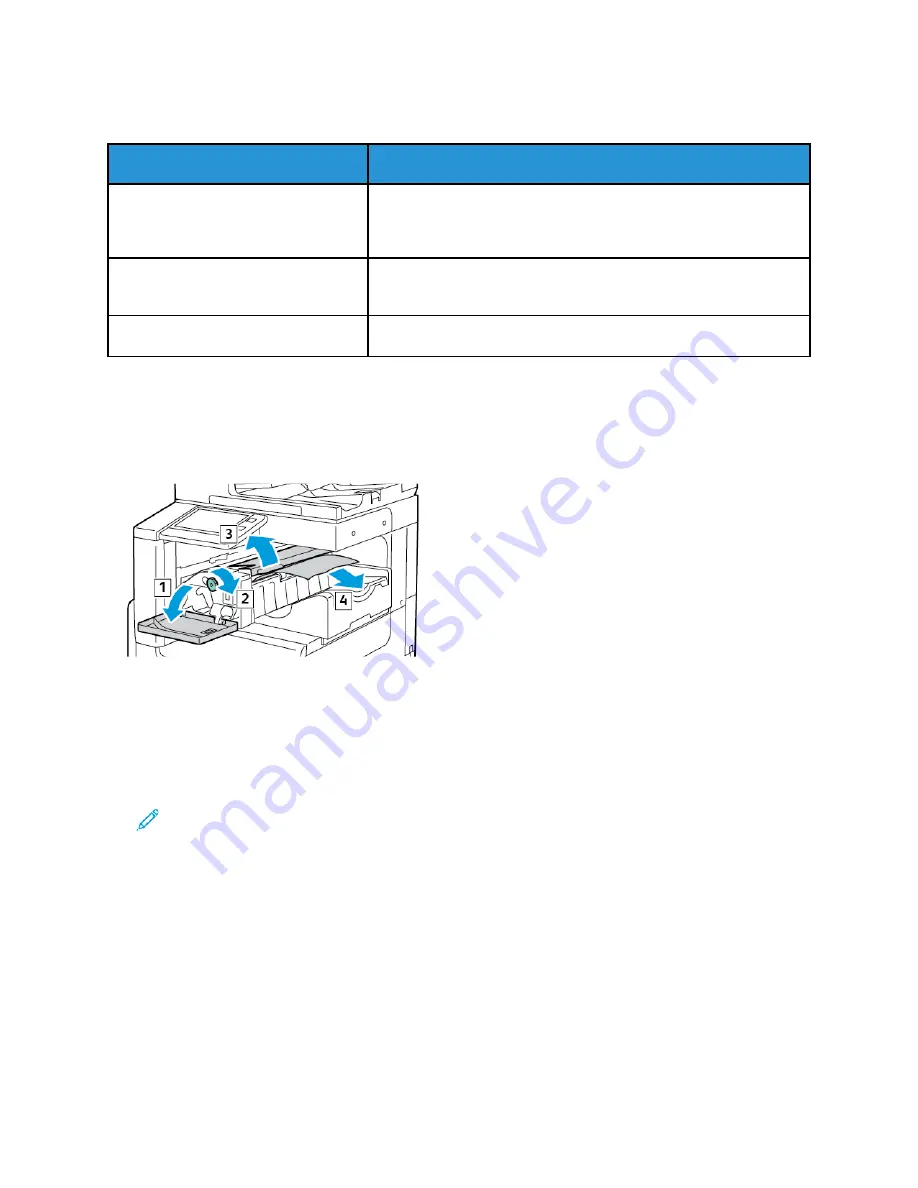
1. Locate the Integrated Office Finisher mounted beneath the control panel, then, open the finisher

front door.

2. Open the top cover.

3. Rotate the green knob in the direction shown.

4. To remove the jammed paper, pull it in the direction shown.

Note:

If the paper is torn, remove all torn pieces from the printer.

5. Close the top cover of the Integrated Office Finisher and finisher front door.

Xerox

®

VersaLink

®

C70XX Color Multifunction Printer

User Guide

239

Troubleshooting

Содержание VersaLink C70XX

Страница 1: ...Version 1 4 October 2019 702P05653 Xerox VersaLink C70XX Color Multifunction Printer User Guide ...

Страница 2: ...BM and AIX are registered trademarks of International Business Machines Corporation in the United States and or other countries McAfee ePolicy Orchestrator and McAfee ePO are trademarks or registered trademarks of McAfee Inc in the United States and other countries Microsoft Windows Vista Windows Windows Server and OneDrive are registered trademarks of Microsoft Corporation in the United States an...

Страница 3: ... Information 20 2 Getting Started 21 Parts of the Printer 22 Front View 22 Duplex Automatic Document Feeder 23 Internal Parts 25 Rear View 26 Configurations 27 Control Panel 28 Power Options 31 Powering On the Printer 31 Powering Off the Printer 32 Entering and Exiting Sleep Mode and Low Power Mode 32 Power Saver 32 Accessing the Printer 34 Logging In 34 Convenience Authentication 34 Smart Card 34...

Страница 4: ...er 53 Installing the Drivers and Utilities for Macintosh OS X 53 Installing Drivers and Utilities for UNIX and Linux 54 Installing the Printer as a Web Service on Devices 54 More Information 55 3 Customize and Personalize 57 Customize and Personalize Overview 58 Customizing or Personalizing the Home Screen 59 Hiding or Showing an App on the Home Screen 59 Rearranging Apps on the Home Screen 59 Cus...

Страница 5: ...mbedded Web Server 88 Copy 90 Copy Overview 90 Making a Copy 90 Copy Workflows 92 ID Card Copy 100 ID Card Copy Overview 100 Copying an ID Card 100 Email 101 Email Overview 101 Sending a Scanned Image in an Email 101 Previewing and Building Jobs 103 Scan To 105 Scan To Overview 105 Scanning to an Email Address 105 Scanning to a User Home Folder 106 Scanning to a USB Flash Drive 107 Scan to Desktop...

Страница 6: ...41 Managing Jobs 141 Printing Special Job Types 141 Printing Features 145 Selecting Paper Options for Printing 145 Printing on Both Sides of the Paper 145 Xerox Black and White 146 Print Quality 146 Image Options 146 Printing Multiple Pages to a Single Sheet 147 Printing Booklets 148 Using Special Pages 148 Printing Watermarks for Windows 150 Orientation 151 Advanced Tab 152 Using Custom Paper Siz...

Страница 7: ...e 191 General Precautions 192 Cleaning the Printer 193 Cleaning the Exterior 193 Cleaning the Interior 194 Supplies 199 Consumables 199 Routine Maintenance Items 199 Ordering Supplies 209 Toner Cartridges 210 Recycling Supplies 210 Adjustments and Maintenance Procedures 211 Color Registration 211 Color Calibration 212 Adjusting Paper Registration 213 Adjusting the Altitude 215 Managing the Printer...

Страница 8: ...ol Panel 257 Viewing Current Errors on the Control Panel 257 Using the Integrated Troubleshooting Tools 257 Online Support Assistant 257 More Information about Your Printer 258 A Specifications 259 Printer Configurations and Options 260 Available Configurations 260 Configurations 260 Features 261 Options and Upgrades 264 Physical Specifications 266 Weights and Dimensions 266 Total Space Requiremen...

Страница 9: ...ation 281 Eurasian Economic Community Certification 281 Germany 282 Turkey RoHS Regulation 282 Copy Regulations 283 United States 283 Canada 284 Other Countries 285 Fax Regulations 286 United States 286 Canada 287 European Union 288 New Zealand 289 South Africa 289 Safety Certification 290 Material Safety Data Sheets 291 C Recycling and Disposal 293 All Countries 294 North America 295 European Uni...

Страница 10: ...10 Xerox VersaLink C70XX Color Multifunction Printer User Guide Table of Contents ...

Страница 11: ...afety 13 Operational Safety 15 Maintenance Safety 17 Printer Symbols 18 Environmental Health and Safety Contact Information 20 Your printer and the recommended supplies have been designed and tested to meet strict safety requirements Attention to the following information ensures the continued safe operation of your Xerox printer ...

Страница 12: ...ation and certification and compliance with electromagnetic regulations and established environmental standards The safety and environment testing and performance of this product have been verified using Xerox materials only Note Unauthorized alterations which can include the addition of new functions or connection of external devices can affect the product certification For more information conta...

Страница 13: ...rd from the electrical outlet 3 Call an authorized service representative P Po ow we er r C Co or rd d Use the power cord supplied with your printer Plug the power cord directly into a properly grounded electrical outlet Ensure that each end of the cord is connected securely If you do not know if an outlet is grounded ask an electrician to check the outlet WARNING To avoid risk of fire or electric...

Страница 14: ...r O Of ff f If any of the following conditions occur power off the printer immediately and disconnect the power cord from the electrical outlet Contact an authorized Xerox service representative to correct the problem if The equipment emits unusual odors or makes unusual noises The power cable is damaged or frayed A wall panel circuit breaker fuse or other safety device has been tripped Liquid is ...

Страница 15: ...ot push or move the device with all the paper trays extended O Oz zo on ne e R Re elle ea as se e This printer produces ozone during normal operation The amount of ozone produced is dependent on copy volume Ozone is heavier than air and is not produced in amounts large enough to harm anyone Install the printer in a well ventilated room For more information in the United States and Canada go to www...

Страница 16: ...reach of children Never throw toner toner cartridges drum cartridges or waste cartridges into an open flame When handling cartridges for example toner and such avoid skin or eye contact Eye contact can cause irritation and inflammation Do not attempt to disassemble the cartridge which can increase the risk of skin or eye contact Caution Use of non Xerox supplies is not recommended The Xerox Warran...

Страница 17: ...ox supplies recycling programs go to www xerox com gwa WARNING Do not use aerosol cleaners Aerosol cleaners can cause explosions or fires when used on electromechanical equipment When installing the device in a hallway or similar restricted area additional space requirements can apply Ensure that you comply with all workspace safety regulations building codes and fire codes for your area Xerox Ver...

Страница 18: ...aution Caution Indicates a mandatory action to take in order to avoid damage to the property Caution To avoid damage to the property be careful not to spill toner when handling the waste cartridge Do not touch the part or area of the printer Do not expose the drum cartridges to direct sunlight Do not burn the toner cartridges Do not burn the waste cartridge Do not burn the drum cartridges 18 Xerox...

Страница 19: ... not use transparencies or overhead projector sheets Do not reload paper previously printed on or used Do not copy money revenue stamps or postage stamps For details about all the printer symbols that appear on your printer refer to the Printer Symbols guide at www xerox com office VLC70XXdocs Xerox VersaLink C70XX Color Multifunction Printer User Guide 19 Safety ...

Страница 20: ...supplies contact United States and Canada 1 800 ASK XEROX 1 800 275 9376 Europe EHS Europe xerox com For product safety information in the United States and Canada go to www xerox com environment For product safety information in Europe go to www xerox com environment_europe 20 Xerox VersaLink C70XX Color Multifunction Printer User Guide Safety ...

Страница 21: ...ting Started This chapter contains Parts of the Printer 22 Power Options 31 Accessing the Printer 34 Introduction to Apps 35 Information Pages 36 The Embedded Web Server 38 Installation and Setup 41 Connecting the Printer 42 Installing the Software 52 More Information 55 ...

Страница 22: ...ment Feeder Input Tray 3 Paper Output shown with and without the optional Center Top Tray 4 Front Door 5 Paper Trays Configurations vary from 1 to 4 trays 6 Bypass Tray 7 USB Port 8 Control Panel 22 Xerox VersaLink C70XX Color Multifunction Printer User Guide Getting Started ...

Страница 23: ... tiic c D Do oc cu um me en nt t F Fe ee ed de er r 1 Document Feeder Cover 2 Paper Guides 3 Duplex Automatic Document Feeder Input Tray 4 Document Output Tray Xerox VersaLink C70XX Color Multifunction Printer User Guide 23 Getting Started ...

Страница 24: ...er r G Gu uiid de elliin ne es s The Duplex Automatic Document Feeder accommodates the following original size documents Width 125 297 mm 4 9 11 7 in Length 85 431 mm 3 3 17 in Weight 38 128 g m Follow these guidelines when loading original documents into the duplex automatic document feeder Load original documents face up so that the top of the document enters the feeder first Place only loose sh...

Страница 25: ...n na all P Pa ar rt ts s 1 Transfer Roll 2 Fuser 3 IBT Belt Release 4 Toner Cartridges 5 Power Switch 6 Waste Cartridge 7 Drum Cartridges Xerox VersaLink C70XX Color Multifunction Printer User Guide 25 Getting Started ...

Страница 26: ... V Viie ew w 1 Power Connection 2 USB Host Port 3 USB Device Port 4 Wi Fi Connectivity Port 5 Ethernet Port 6 Foreign Device Interface 26 Xerox VersaLink C70XX Color Multifunction Printer User Guide Getting Started ...

Страница 27: ...d is available 2 Printer Additional Trays and Integrated Office Finisher 3 Printer Additional Trays and Office Finisher LX 4 Printer Additional Trays High Capacity Feeder and Office Finisher LX with Booklet Maker Xerox VersaLink C70XX Color Multifunction Printer User Guide 27 Getting Started ...

Страница 28: ...int copy and scan features Provides access to reference materials Provides access to Tools and Setup menus Prompts you to load paper replace supplies and clear jams Displays errors and warnings Provides the Power Wake button used for powering on or off the printer This button also supports the power saver modes and blinks to indicate the power status of the printer 28 Xerox VersaLink C70XX Color M...

Страница 29: ...n provides access to the Home menu for access to printer features such as copy scan and fax 4 NFC Area Optional Near Field Communication NFC is a technology that enables devices to communicate when they are within 10 cm 4 in of each other Use the NFC area to obtain a network interface or to establish a TCP IP connection between your device and the printer Note The indicator is visible when NFC is ...

Страница 30: ...s area To view the full notification touch the center of the banner After you have reviewed the information touch X to close 7 Pause Icon When a job is being scanned or processed a Pause icon appears in the notification banner area To pause the current job touch the Pause icon The job pauses with the option to resume or delete the job 30 Xerox VersaLink C70XX Color Multifunction Printer User Guide...

Страница 31: ... sleep mode Enter or exit low power mode The Power Wake button also flashes when the printer is in low power mode P Po ow we er riin ng g O On n t th he e P Pr riin nt te er r To power on the printer 1 To power on the printer open the front door and press the power switch to the On position 2 At the printer control panel press the Power Wake button Caution Do not unplug the power cord while the pr...

Страница 32: ... Lo ow w P Po ow we er r M Mo od de e After the printer is powered on but is in Sleep Mode or Low Power Mode The touch screen appears blank and unresponsive The printer exits Low Power mode or Sleep mode automatically when it receives data from a connected device To wake the printer manually press the Power Wake button P Po ow we er r S Sa av ve er r You can set the time the printer spends idle in...

Страница 33: ...mode to Low Power mode to reduce standby power consumption Sleep Timeout The printer shifts from Low Power mode to Sleep mode for a greater reduction in power consumption Xerox VersaLink C70XX Color Multifunction Printer User Guide 33 Getting Started ...

Страница 34: ...en Convenience Authorization is enabled users swipe a pre programmed identification card through a Proximity Card Reader at the control panel To use this method purchase and install a USB card reader and an authentication server that supports the Xerox Convenience Authentication API S Sm ma ar rt t C Ca ar rd d When a Common Access Card system is installed on your Xerox device access to the printe...

Страница 35: ...n Some Apps are installed as standard but hidden the first time you use the device When you log in the Apps configured for your personal account appear on the control panel You can download more Apps for your device from the Xerox App Gallery For more information refer to Xerox App Gallery Xerox VersaLink C70XX Color Multifunction Printer User Guide 35 Getting Started ...

Страница 36: ...l PostScript fonts that are available on the printer PCL Font List The PCL Font List provides a printout of all PCL fonts that are available on the printer Demonstration Print Demonstration Print provides a demonstration of the current print quality Startup Page The Startup Page provides basic printer configuration and network information Job History Report The printer retains information on previ...

Страница 37: ...tray information and more P Pr riin nt tiin ng g t th he e C Co on nf fiig gu ur ra at tiio on n R Re ep po or rt t 1 At the printer control panel press the Home button 2 Touch Device About Information Pages 3 Touch Configuration Report 4 To return to the Home screen press the Home button Xerox VersaLink C70XX Color Multifunction Printer User Guide 37 Getting Started ...

Страница 38: ...guration Report Note To view the TCP IP address on the control panel wait until the printer has been on for 2 minutes If the TCP IP address is 0 0 0 0 or begins with 169 it indicates a network connectivity issue However if Wi Fi is set as the primary Ethernet connection 0 0 0 0 is displayed as the IP address for the printer V Viie ew wiin ng g t th he e I IP P P Pr riin nt te er r A Ad dd dr re es...

Страница 39: ...70XXdocs D Do ow wn nllo oa ad diin ng g t th he e C Co on nf fiig gu ur ra at tiio on n R Re ep po or rt t f fr ro om m t th he e E Em mb be ed dd de ed d W We eb b S Se er rv ve er r From the Embedded Web Server you can download and save a copy of the Configuration Report to your computer hard drive Use Configuration Reports from multiple devices to compare software versions configurations and c...

Страница 40: ...l when you are connected remotely to the device click the Lock Device Control Panel option Note If a local user attempts to access the control panel while the device control panel is locked the control panel does not respond A message appears on the control panel confirming that the control panel is locked and the device is being controlled remotely 4 To enable remote access to the device control ...

Страница 41: ... to the Embedded Web Server For more information refer to the System Administrator Guide at www xerox com office VLC70XXdocs S Se elle ec ct tiin ng g a a L Lo oc ca at tiio on n f fo or r t th he e P Pr riin nt te er r 1 Select a dust free area with temperatures from 10 32 C 50 90 F and relative humidity 10 85 Note Sudden temperature fluctuations can affect print quality Rapid heating of a cold r...

Страница 42: ...can be used for one or more computers and supports many printers and systems simultaneously An Ethernet connection is typically faster than USB and allows you direct access to the settings of the printer using the Embedded Web Server Wireless Network If your environment includes a wireless router or wireless access point you can connect the printer to the network with a wireless connection A wirel...

Страница 43: ...ith a service set identifier SSID and any necessary credentials Note Wireless networking is available only on printers with the optional Wireless Network Adapter installed C Co on nf fiig gu ur riin ng g t th he e P Pr riin nt te er r f fo or r a a W Wiir re elle es ss s N Ne et tw wo or rk k Note Before you configure wireless network settings install the Xerox Wireless Network Adapter Kit If you ...

Страница 44: ...ons provided with the Wireless Network Adapter Caution Pulling on the adapter can cause damage Once the adapter is installed remove it only as needed and as directed in the Wireless Network Adapter removal instructions For details refer to Removing the Wireless Network Adapter 4 Configure the Wi Fi settings For details about configuring the Wi Fi settings refer to the System Administrator Guide at...

Страница 45: ...ution Do not unplug the power cord while the printer powers down 2 To release the Wireless Network Adapter from the connection panel on the side of the printer gently grasp the adapter and push the release lever to the side Carefully pull the adapter away from the printer Caution Do not use force to pull on the Wireless Network Adapter If the latch is released properly the adapter pulls out easily...

Страница 46: ...e button Note If the printer was installed previously in a wireless network environment it could retain setup and configuration information from that environment To prevent the printer from attempting to connect to the previous network reset the wireless settings For more information refer to the System Administrator Guide at www xerox com office VLC70XXdocs 46 Xerox VersaLink C70XX Color Multifun...

Страница 47: ...te If the required Wi Fi network is not listed or if the required network uses WPS configure the connection manually For details refer to step 6 b If needed to log in to the network type the password c To select a Wi Fi frequency band touch Wi Fi Band then select an option Note The Wi Fi frequency band is set to AUTO by default d Touch OK 6 To connect manually to a Wi Fi Network a Touch Manual Set...

Страница 48: ...e Wi Fi network connection module the primary network connection is set to Ethernet To configure the primary network at the control panel 1 At the printer control panel press the Home button 2 Log in as administrator For details refer to the System Administrator Guide at www xerox com office VLC70XXdocs 3 Touch Device Connectivity Primary Network 4 Select the appropriate network connection type fo...

Страница 49: ...er r S Se et tu up p Before installing the printer software verify that the printer is set up correctly Setup includes enabling the optional features and assigning an IP address for the Ethernet network connection The installation wizard starts automatically the first time the printer is powered on The installation wizard prompts the system administrator to configure the following settings Languag...

Страница 50: ...ur computer open a Web browser In the address field type the IP address of the printer then press Enter or Return Note If you do not know the IP address for your printer refer to Finding the IP Address of Your Printer 2 In the Embedded Web Server click Home Connectivity Note If this feature does not appear log in as a system administrator 3 For Mobile Printing click AirPrint 4 To enable AirPrint c...

Страница 51: ...Print click the Enable toggle button 5 Click OK 6 Restart the printer then wait 2 minutes for the printer to connect 7 Refresh your Web browser then for Mobile Printing click Google Cloud Print 8 Click Printer Registration 9 Click Register A printer registration page prints 10 To register the printer in your Web browser type the URL provided or use your mobile phone to scan the barcode After the p...

Страница 52: ...opriate drive on your computer If the installer does not start automatically navigate to the drive and double click the Setup exe installer file Note If the Software and Documentation disc is not available download the latest drivers from www xerox com office VLC70XXdrivers 2 Select your printer model 3 Click Install Drivers 4 Select Install Print Driver Install Scan Driver or Install Print and Sc...

Страница 53: ...r rs s a an nd d U Ut tiilliit tiie es s f fo or r M Ma ac ciin nt to os sh h O OS S X X 1 Insert the Software and Documentation disc into the appropriate drive on your computer Note The latest print drivers are also available for download from www xerox com office VLC7000drivers 2 Open Xerox Print Drivers 3 xx x dmg pkg as needed for your printer 3 To run Xerox Print Drivers 3 xx x dmg pkg double...

Страница 54: ...inters 2 To launch the Add Device Wizard click Add a Device 3 In the list of available devices select the one you want to use then click Next Note If the printer you want to use does not appear in the list click the Cancel button Add the WSD printer manually using the Add Printer Wizard 4 Click Close I In ns st ta alllliin ng g a a W WS SD D p pr riin nt te er r u us siin ng g t th he e A Ad dd d ...

Страница 55: ... printer including online technical support Online Support Assistant and print driver downloads www xerox com office VLC70XXsupport Information Pages Print from the control panel For details refer to Printing Information Pages Order supplies for your printer www xerox com office VLC70XXsupplies Local sales and Technical Customer Support www xerox com office worldcontacts Printer registration www x...

Страница 56: ...56 Xerox VersaLink C70XX Color Multifunction Printer User Guide Getting Started ...

Страница 57: ...tion Printer User Guide 57 3 Customize and Personalize This chapter contains Customize and Personalize Overview 58 Customizing or Personalizing the Home Screen 59 Customizing or Personalizing the Apps 60 Creating and Using 1 Touch Apps 63 ...

Страница 58: ... the device you can personalize the device to meet specific user needs You can configure your personal Home page to hide or show only the apps you use You can tailor each feature list to your job requirements You can specify default settings for each app and save settings for regular jobs You can create 1 Touch Apps to save and simplify lengthy or frequent workflows Once created 1 Touch Apps appea...

Страница 59: ...c Touch Done 4 To hide an installed app a For the app touch X b Touch Done 5 Verify that only the selected apps appear on the Home screen R Re ea ar rr ra an ng giin ng g A Ap pp ps s o on n t th he e H Ho om me e S Sc cr re ee en n 1 At the printer control panel press the Home button 2 Touch Customize 3 Touch and hold the required app 4 Drag the app to the new location 5 Release the app 6 Touch D...

Страница 60: ...ignify a feature is visible the Eye icon appears with no line across it 6 To reorder the menu features touch and drag the features into the appropriate order 7 To save the current configuration touch Done C Cu us st to om miiz ziin ng g o or r P Pe er rs so on na alliiz ziin ng g t th he e E En nt tr ry y S Sc cr re ee en n The Entry Screen appears when the Fax Email USB or Scan To Apps are select...

Страница 61: ...t feature D De elle et tiin ng g a a S Sa av ve ed d P Pr re es se et t To delete a saved preset 1 At the printer control panel press the Home button 2 Touch the app required 3 Scroll to the bottom then touch Customize 4 Touch Presets 5 Touch the Trash icon that corresponds with the preset that you want to delete 6 At the prompt touch Delete 7 Touch Done R Re em mo ov viin ng g A Ap pp p C Cu us s...

Страница 62: ...from your User Account To remove all personalizations from your User Account 1 At your computer open a Web browser In the address field type the IP address of the printer then press Enter or Return 2 In the Embedded Web Server click Log In then click on your user account If required enter your password and click Log In 3 To access your User Profile click on your User Account name shown in the top ...

Страница 63: ...job settings in the 1 Touch App For copy jobs you can change the copy quantity for each job Start Immediately Use this option to start the job without reviewing the settings 10 Touch Next 11 If you selected Review Before Start select the options for displaying instructions and settings Enter App Instructions Use this option to provide instructions for using the 1 Touch App When the 1 Touch App is ...

Страница 64: ...4 Touch the option required Personal My Home Screen Only Use this option to display the 1 Touch App on your Home screen only when you are logged in to your user account Public Public Home Screen Use this option to make the 1 Touch App accessible to all users 15 Touch Done D De elle et tiin ng g o or r H Hiid diin ng g a a 1 1 T To ou uc ch h A Ap pp p To delete or hide a 1 Touch App from the Home ...

Страница 65: ...ttings If the quantity is displayed for Copy jobs update the number of copies as required Touch Start If the Start Immediately option was selected during 1 Touch App setup the device starts automatically 6 To return to the Home screen press the Home button Xerox VersaLink C70XX Color Multifunction Printer User Guide 65 Customize and Personalize ...

Страница 66: ...66 Xerox VersaLink C70XX Color Multifunction Printer User Guide Customize and Personalize ...

Страница 67: ...ice There are standard apps already installed and displayed on the Homescreen There are also apps that are installed as standard but are hidden when your device is used for the first time For more information about customizing the Home screen and the apps features refer to Customize and Personalize A range of apps is available for download and installation from the Xerox App Gallery These include ...

Страница 68: ...erox App Gallery from the control panel the Xerox App Gallery software updates If you already have a Xerox App Gallery Account to log in to the software and initiate the software update refer to Logging in to the App Gallery for the First Time If you do not yet have a Xerox App Gallery Account to request an account refer to Creating an App Gallery Account for the First Login C Cr re ea at tiin ng ...

Страница 69: ...ware updates A Ac cc ce es ss siin ng g t th he e X Xe er ro ox x A Ap pp p G Ga alllle er ry y When you are logged in to the App Gallery you can browse available apps and install and update apps C Cr re ea at tiin ng g a a X Xe er ro ox x A Ap pp p G Ga alllle er ry y A Ac cc co ou un nt t With an App Gallery account you have direct access to all the available apps for your device An App Gallery ...

Страница 70: ... Confirm Password First and Last Name Company Name Country 9 Click OK After the account is created a confirmation message appears 10 At the printer control panel log in to your App Gallery Account L Lo og gg giin ng g iin nt to o y yo ou ur r X Xe er ro ox x A Ap pp p G Ga alllle er ry y A Ac cc co ou un nt t When you are logged in to the App Gallery you can browse available apps and install and u...

Страница 71: ...pp from the Xerox App Gallery 1 At the printer control panel press the Home button 2 Touch Xerox App Gallery The App Gallery opens Note You can browse the App Gallery and view app descriptions without being logged in To download or update apps you must be logged in to the App Gallery 3 Touch the Person icon a Enter your User Name using the touch screen keypad then touch Enter b Enter your Password...

Страница 72: ... Update Use this option to check for software updates and configure update settings Notifications Use the Notifications option to see details of current alerts or faults on the device A History button displays fault codes and the date that the fault occurred on the device Paper Trays Use the Paper Trays option to see the paper size type and color set for each paper tray and the tray capacity statu...

Страница 73: ...control panel You can customize the alerts that appear on the control panel and configure email alert notifications To check the supplies status and set up alerts using the Embedded Web Server refer to the System Administrator Guide at www xerox com office VLC70XXdocs C Ch he ec ck kiin ng g t th he e S Su up pp plliie es s S St ta at tu us s a at t t th he e C Co on nt tr ro oll P Pa an ne ell 1 ...

Страница 74: ...reset the counters A page is counted as one side of a sheet of paper For example a sheet of paper that is printed on two sides counts as two impressions To view the Billing and Usage Counters 1 At the printer control panel press the Home button 2 Touch Device Billing Usage 3 To view more details touch Usage Counters then select an option Impression Counters This option provides the number of impre...

Страница 75: ...rinter to factory defaults 1 At the printer control panel press the Home button 2 Touch Device Resets Reset to Factory Defaults 3 At the prompt touch Reset 4 When the process is complete the printer restarts automatically R Re em mo ot te e S Se er rv viic ce es s You can use the Remote Services option in the Embedded Web Server to send error and usage information to the Xerox support team to help...

Страница 76: ...tiin ng g A Ad dd dr re es ss s B Bo oo ok k C Co on nt ta ac ct ts s a at t t th he e C Co on nt tr ro oll P Pa an ne ell Adding Contacts in the Address Book at the Control Panel 1 At the printer control panel press the Home button 2 Touch Address Book 3 Touch the Plus icon then select Add Contact 4 To enter a name touch the Enter First Name Enter Last Name or Enter Company field then enter the i...

Страница 77: ...up Name then enter a name using the touch screen keypad Touch Enter 5 To add group members touch Add Member 6 To add a contact name from the Favorites or Contacts menu select a contact 7 To add more group members touch Add Member then select a contact 8 To mark the group as a favorite touch the Star icon 9 To save the group touch OK 10 To return to the Home screen press the Home button Editing or ...

Страница 78: ...icon 7 To save the contact click OK Editing or Deleting Contacts in the Address Book in the Embedded Web Server To edit or delete contacts 1 At your computer open a Web browser In the address field type the IP address of the printer then press Enter or Return 2 In the Embedded Web Server click Address Book 3 From the Address Book select a contact 4 To edit contact information perform the following...

Страница 79: ...ps for each member d To save the changes click OK 6 To remove the selected group from the Address Book click Delete At the prompt click Delete A Ad dv va an nc ce ed d S Se et tt tiin ng gs s The Advanced option provides more settings for importing and exporting contact details and managing contacts You can use the Advanced option to set up a directory service For details about the Advanced option...

Страница 80: ...make the contact a Global Favorite click the Global Favorite Star icon 4 To mark a contact as a Favorite for email fax or a scan to destination for each feature click the Star icon 5 To remove a contact marked as a Favorite for Global Favorite or the selected feature touch the Star icon The contact is removed from the Global Favorite list or the Favorite list for the selected feature 6 To save cha...

Страница 81: ...Apps Creating Personal Favorites To create a Personal Favorite 1 At the printer control panel press the Home button 2 Touch Login then enter a valid login name and password 3 Load the original documents 4 Touch the app required 5 Touch the address book icon then touch Contacts To add a recipient select a recipient from the list 6 Select the job settings For details about available features refer t...

Страница 82: ...ed original documents touch 2 Sided Scanning then select an option 8 Adjust the job settings as needed For details about available features refer to Apps Features 9 Touch Send or Scan 10 If you are scanning from the document glass when prompted do one of the following To complete the job and return to the app touch Done To scan another page load a new original document on the document glass then t...

Страница 83: ...Embedded Web Server click Log In then click on your user account If required enter your password and click Log In 3 To access your User Profile click on your User Account name shown in the top right corner then click My Profile All personalizations you have configured for your User Account are displayed 4 To remove all personalizations click Reset To confirm click Reset All the personalizations co...

Страница 84: ... more information refer to Printing Special Job Types P Pa au us siin ng g t th he e P Pr riin nt t J Jo ob b w wiit th h t th he e O Op pt tiio on n t to o D De elle et te e I It t 1 At the printer control panel press the Home button 2 Touch Jobs then touch the name of the print job 3 Do one of the following To pause the print job touch Pause To resume the print job touch Resume To delete the pri...

Страница 85: ...tically touch Resume To delete the print job touch Delete At the prompt touch Delete 5 To return to the Home screen press the Home button M Ma an na ag giin ng g S Sp pe ec ciia all J Jo ob b T Ty yp pe es s Special job types allow you to send a print job from your computer then print it from the printer control panel Select special job types in the print driver Printing Options tab under Job Type...

Страница 86: ...int driver For Windows click Printer Properties Depending on your application the title of the button varies For Macintosh in the Print window click Preview then select Xerox Features 3 For Job Type select Secure Print 4 Type the passcode confirm the passcode then click OK 5 Select any other required printing options For Windows click OK then click Print For Macintosh click Print Releasing a Secur...

Страница 87: ... a Personal Print Job 1 At the printer control panel press the Home button 2 Touch Jobs 3 To view Personal Print jobs touch Personal Secure Jobs 4 Touch your folder 5 If prompted for a passcode touch Skip Note When your folder contains Secure Print jobs and Personal Print jobs the passcode prompt appears 6 Select an option To print a Personal Print job touch the job To print all the jobs in the fo...

Страница 88: ...pies of the job 4 Select an option To print the remaining copies of the job touch Release To delete the remaining copies of the job touch Delete 5 To return to the Home screen press the Home button M Ma an na ag giin ng g J Jo ob bs s U Us siin ng g t th he e E Em mb be ed dd de ed d W We eb b S Se er rv ve er r You can view a list of active jobs and delete print jobs from the Active Jobs list in ...

Страница 89: ... Web browser In the address field type the IP address of the printer then press Enter or Return 2 In the Embedded Web Server click Home 3 In the Quick Links area click Submit File 4 Click the Submit field 5 In the selection window select a file to print then click Open 6 To print the document click Submit Xerox VersaLink C70XX Color Multifunction Printer User Guide 89 Xerox Apps ...

Страница 90: ... as Presets for future jobs The list of features can be customized and some features could be hidden from view when the app is installed To view all available features and to find out more about customizing the Copy App refer to Customize and Personalize For information about all the app features and available settings refer to Apps Features M Ma ak kiin ng g a a C Co op py y To make a copy 1 At t...

Страница 91: ...he document feeder with the top of the page entering the feeder first Adjust the paper guides so that they fit against the original documents 4 Touch Copy then enter the number of copies needed Note To amend the number of copies entered touch the X button then enter the required quantity 5 If scanning from 2 sided original documents touch 2 Sided then select an option 6 Adjust copy settings as nee...

Страница 92: ...equired number of pages per side 5 To change the Original Orientation touch Page Layout then touch More Select Portrait or Landscape Note The Original Orientation option is only available when the selected number of pages per slide is 2 4 or 8 6 To change the Image Order touch Page Layout then touch More Select one of the following options Right then Down This option prints the images across the p...

Страница 93: ...black before printing your copy To adjust the Color Balance 1 At the printer control panel press the Home button 2 Touch Copy 3 Touch Color Balance 4 To adjust the highlight midtone and shadow density levels by color touch the color that you want to adjust then move the sliders to increase or decrease the density levels 5 Touch OK Adjusting Saturation Adjusting the saturation makes the image color...

Страница 94: ...control panel press the Home button 2 Touch Copy 3 Touch Book Copying 4 Touch Mode then select the typical page reading order for the document if needed Off is the default setting 5 Touch Pages then select the pages that you want to copy Note Available options vary based on the Mode selection you have chosen 6 To reduce the amount of white space in copies near the binding touch Binding Edge Erase ...

Страница 95: ...ift move the slider Independent Sides This option allows you to position the images on Side 1 and Side 2 independently of each other Touch the appropriate fields To adjust the image shift move the slider 5 To specify the orientation of the original document touch Original Orientation then select an option 6 Touch OK C Cr re ea at tiin ng g a a B Bo oo ok klle et t The booklet feature reduces the o...

Страница 96: ...ggle button To adjust the number of sheets touch Plus icon or Minus icon as needed 11 Touch OK A Ad dd diin ng g a a F Fr ro on nt t C Co ov ve er r You can print the first page of your copy job on different paper such as colored or heavyweight paper The printer selects the special paper from a different tray The cover can be blank or printed Note This feature is only available if a hard drive is ...

Страница 97: ... other Touch the appropriate field To adjust the Edge Erase move the slider 5 To specify the orientation of the original document touch Original Orientation then select an option 6 Touch OK P Pr riin nt tiin ng g a a S Sa am mp plle e C Co op py y Sample Copy allows you to print a test copy of a job to inspect before printing multiple copies This feature is useful for complex or high volume jobs A...

Страница 98: ... entry then touch OK Note To create a prefix touch the edit icon for Not in Use Enter the required text then touch OK c To adjust which pages contain the selected annotation touch Apply To then select the required option d Touch OK 6 To insert the current date a Select the required page location then touch Date Stamp b Touch Format then select the required date format c To adjust which pages conta...

Страница 99: ...OK 8 To change the text formatting touch Format Style Adjust the settings as required then touch OK 9 Touch OK 10 If necessary to remove all entered annotations touch Delete All Note Not all annotations are available in all page locations Xerox VersaLink C70XX Color Multifunction Printer User Guide 99 Xerox Apps ...

Страница 100: ... For information about all the app features and available settings refer to Apps Features C Co op py yiin ng g a an n I ID D C Ca ar rd d To copy an ID card 1 At the printer control panel press the Home button 2 To clear previous app settings touch Reset 3 Lift the automatic document feeder then place the original document in the upper left corner of the document glass 4 Touch ID Card Copy 5 Adjus...

Страница 101: ...ngs as Presets for future jobs The list of features can be customized and some features could be hidden from view when the app is installed To view all available features and to find out more about customizing the Email App refer to Customizing or Personalizing the Feature List For information about all the app features and available settings refer to Apps Features S Se en nd diin ng g a a S Sc ca...

Страница 102: ...ocuments 4 Touch Email 5 Enter recipients To enter the email address manually into the To field type the address using the touch screen keypad Touch Enter To select a contact or group from the Address Book touch the Address Book icon Touch Favorites or Contacts then select a recipient If you have created Personal Favorites to select a Personal Favorite log in with your user credentials Touch the A...

Страница 103: ...If you are using Preview to build a job divide your job into segments of 50 or fewer pages After all the segments are scanned and previewed the job is processed and sent as a single job Note If the Preview option is hidden from view refer to Customize and Personalize 1 At the printer control panel press the Home button 2 To clear previous app settings touch Reset 3 Load your original documents Use...

Страница 104: ...the following To scan more original documents continue scanning your original documents using the same input area After scanning scroll to the end of the preview images then touch the Plus icon Continue this procedure until you have scanned all the original documents To process the job and send the scanned images touch Send To discard the job touch X then touch Delete and Close 10 To return to the...

Страница 105: ...idden from view To view all available features and to find out more about customizing the Scan To App refer to Customize and Personalize For information about all app features and available settings refer to Apps Features S Sc ca an nn niin ng g t to o a an n E Em ma aiill A Ad dd dr re es ss s Before you scan to an email address ensure that you configure the printer with the email server informat...

Страница 106: ...n to the Home screen press the Home button S Sc ca an nn niin ng g t to o a a U Us se er r H Ho om me e F Fo olld de er r Scan to Home allows you to scan documents that are saved to a home directory on an external server The home directory is distinct for each authenticated user The directory path is established through LDAP B Be ef fo or re e Y Yo ou u B Be eg giin n To scan to the home folder de...

Страница 107: ...Note If the device is in Power Saver mode press the Power Wake button Only USB Flash drives formatted to the typical FAT32 file system are supported To scan to a USB Flash drive 1 Load the original document on the document glass or in the duplex automatic document feeder 2 At the printer control panel press the Home button 3 Insert your USB Flash drive into the USB memory port on the front of the ...

Страница 108: ... the Software On your printer ensure that WSD is enabled Enable the feature or contact the system administrator To use the Scan to Desktop feature 1 Load the original document on the document glass or into the duplex automatic document feeder 2 At the printer control panel press the Home button 3 Touch Scan to Desktop 4 To select a destination touch the computer address 5 To begin the scan press S...

Страница 109: ...om the automatic document feeder a prompt does not appear 12 To return to the Home screen press the Home button S Sc ca an nn niin ng g t to o a a S Sh ha ar re ed d F Fo olld de er r o on n a a N Ne et tw wo or rk k C Co om mp pu ut te er r Before you can use the printer as a scanner on a network Create a shared folder on your computer hard drive Access the Embedded Web Server then create an addr...

Страница 110: ... the address field type the IP address of the printer then press Enter or Return Note If you do not know the IP address for your printer refer to Finding the IP Address of Your Printer 2 Click Address Book then click Add Contact 3 For Network SMB click the plus icon then enter the following information Nickname Enter the name that you want to appear in the Address Book Type Select the network conn...

Страница 111: ...e scanning from the document glass when prompted to finish touch Done or to scan another page touch Add Page Note If you are scanning a document from the automatic document feeder a prompt does not appear 11 To return to the Home screen press the Home button S Sc ca an nn niin ng g I Im ma ag ge es s iin nt to o a an n A Ap pp plliic ca at tiio on n o on n a a C Co on nn ne ec ct te ed d C Co om m...

Страница 112: ... feeder 2 On your computer select the Windows Fax and Scan application then click Run 3 Click New Scan 4 To choose the device click Change From the list select your device 5 In the New Scan window click the Profile list Depending on the type of documents that you are scanning choose an option For text based documents or documents containing line art choose Documents For documents containing graphi...

Страница 113: ...e paper guides so that they fit against the documents For jobs containing more than 50 original documents divide the documents into segments of 50 or fewer pages Load segment one into the duplex automatic document feeder Note If you are scanning multiple segments use the same input area for each segment Scan all segments using the document glass or scan all segments using the automatic document fe...

Страница 114: ...x connection and regulations The Fax Settings include optional features you can use to configure the printer for faxing Note Not all options listed are supported on all printers Some options apply only to a specific printer model configuration operating system or print driver type For details refer to the System Administrator Guide at www xerox com office VLC70XXdocs You can adjust settings for in...

Страница 115: ... fax number use the touch screen keypad then touch Enter Note To insert a pause as needed touch the Special Characters icon then touch Dial Pause To enter longer pauses touch Dial Pause multiple times To select a contact or group from the Address Book touch the Address Book icon Touch Favorites or Contacts then select a recipient If you have created Personal Favorites to select a Personal Favorite...

Страница 116: ...System Administrator Guide at www xerox com office VLC70XXdocs To specify the time to send your fax 1 At the printer control panel press the Home button 2 Touch Fax 3 To add a recipient fax number use the touch screen keypad or to add a contact from the Address Book touch the Address Book icon 4 Load original documents into the printer then adjust the settings as needed For details refer to Sendin...

Страница 117: ...ent 1 At the printer control panel press the Home button 2 Log in as Admin Note For information on logging in as a system administrator refer to the System Administrator Guide at www xerox com office VLC70XXdocs 3 Touch Device Apps Fax 4 Touch Cover Sheet Comments 5 Select a Not in Use comment 6 Enter up to 18 characters of text then touch OK 7 To return to the Home screen press the Home button F ...

Страница 118: ...hment then enter a filename 9 To change the file format for attachments touch the current format extension then select a new format Note The default file format is pdf 10 To save the settings touch OK 11 For the new settings to take effect press the Home button At the prompt touch Restart Now P Pr riin nt tiin ng g a a S Se ec cu ur re e F Fa ax x When the Fax Secure Receive option is enabled all ...

Страница 119: ...from the duplex automatic document feeder a prompt does not appear 7 To return to the Home screen press the Home button P Po olllliin ng g a a R Re em mo ot te e F Fa ax x M Ma ac ch hiin ne e Fax Polling allows the printer to retrieve a fax stored on another fax machine that supports fax polling Note This feature is hidden from view when the Fax App is installed for more information refer to Cust...

Страница 120: ...mes from the list or search for a contact using the search bar d To add the selected contacts to the Fax Recipients list click the Down Arrow e Click OK f To add more recipients repeat this procedure 7 To include a cover sheet click the Cover Sheet tab From the Cover Sheet Options list select Print a Cover Sheet Enter the details as needed then click OK 8 On the Options tab select the required opt...

Страница 121: ...glass for single pages or for paper that cannot be fed using the duplex automatic document feeder Lift the automatic document feeder then place the original document face down in the upper left corner of the document glass For single multiple or 2 sided pages use the duplex automatic document feeder Remove any staples and paper clips from the pages Insert the original documents face up in the auto...

Страница 122: ...nput area After scanning scroll to the end of the preview images then touch the Plus icon Continue this procedure until you have scanned all the original documents To process the job and send the scanned images touch Send To discard the job touch X then touch Delete and Close 10 To return to the Home screen press the Home button 122 Xerox VersaLink C70XX Color Multifunction Printer User Guide Xero...

Страница 123: ...system or print driver type For details refer to the System Administrator Guide at www xerox com office VLC70XXdocs You can adjust settings for individual server fax jobs save settings as Presets for future jobs and customize server fax features Some features are hidden from view when the app is installed To view all available features and to find out more about customizing the Server Fax App refe...

Страница 124: ...ouch Server Fax 5 Enter recipients To enter a recipient fax number use the touch screen keypad then touch Enter Note To insert a pause as needed touch the Special Characters icon then touch Dial Pause To enter longer pauses touch Dial Pause multiple times To select a contact or group from the Address Book touch the Address Book icon Touch Favorites or Contacts then select a recipient For details a...

Страница 125: ...ww xerox com office VLC70XXdocs To specify the time to send your server fax 1 At the printer control panel press the Home button 2 Touch Server Fax 3 To add a recipient fax number use the touch screen keypad To add a contact from the Address Book touch the Address Book icon 4 Load original documents into the printer then adjust the settings as needed For details refer to Sending a Server Fax 5 Tou...

Страница 126: ...e paper guides so that they fit against the documents For jobs containing more than 50 original documents divide the documents into segments of 50 or fewer pages Load segment one into the duplex automatic document feeder Note If you are scanning multiple segments use the same input area for each segment Scan all segments using the document glass or scan all segments using the automatic document fe...

Страница 127: ...ported 1 Insert the USB Flash drive into the USB memory port on the printer 2 At the USB Drive has been detected screen touch Print from USB Note If this feature does not appear enable the feature or contact the system administrator For more information see the System Administrator Guide at www xerox com office VLC70XXdocs 3 Add files using the Browse USB screen To print a group of print ready fil...

Страница 128: ...tor Guide at www xerox com office VLC70XXdocs 3 Add files using the Browse USB screen To print a group of print ready files for the USB drive or folder touch the Select All icon Verify that your files are selected To print a specific file browse to that file then touch the file name or icon 4 Touch OK 5 Confirm that the desired documents appear If the documents do not appear touch Add Documents se...

Страница 129: ...ppGallery P Pr riin nt tiin ng g w wiit th h t th he e P Pr riin nt tB By yX Xe er ro ox x A Ap pp p 1 Send an email with an attachment containing a supported file type to Print printbyxerox com First time users receive a response email with a user ID and password 2 At the Xerox device control panel press the Home button 3 Touch PrintByXerox 4 Enter your email address then touch Save 5 On the Ente...

Страница 130: ...130 Xerox VersaLink C70XX Color Multifunction Printer User Guide Xerox Apps ...

Страница 131: ...ersaLink C70XX Color Multifunction Printer User Guide 131 5 Printing This chapter contains Printing Overview 132 Selecting Printing Options 133 Print Jobs 141 Printing Features 145 Using Custom Paper Sizes 153 ...

Страница 132: ...elect the appropriate paper 2 Load paper in the appropriate tray At the printer control panel specify the paper size color and type 3 Access the print settings in your software application For most software applications press CTRL P for Windows or CMD P for Macintosh 4 Select your printer 5 To access the print driver settings for Windows select Printer Properties Print Options or Preferences For M...

Страница 133: ...oftware application are temporary The application and the computer do not save the settings after the application is closed P Pr riin nt t D Dr riiv ve er r H He ellp p Xerox print driver software Help information is available from the Printing Preferences window Click the Help button in the bottom left corner of the Printing Preferences window to see the Help Information about Printing Preference...

Страница 134: ...ation path to your list of printers 2 In the list of printers right click the icon for your printer then click Printing preferences 3 In the Printing Preferences window click a tab then select the options To save the settings click OK Note For more information about Windows print driver options click the Help button in the Printing Preferences window S Se elle ec ct tiin ng g P Pr riin nt tiin ng ...

Страница 135: ...e center of the printer Center Top Tray Use this option to select the upper output tray in the center of the printer Center Bottom Tray Use this option to select the lower output tray in the center of the printer Finisher Tray Use this option to select the output tray on the right side of the Office Finisher LX or the Office Finisher LX with Booklet Maker 4 To send the job to the printer click OK ...

Страница 136: ...Op pt tiio on ns s S Se elle ec ct tiin ng g P Pr riin nt tiin ng g O Op pt tiio on ns s f fo or r M Ma ac ciin nt to os sh h To use specific printing options change the settings before sending the job to the printer 1 With the document open in your application click File Print 2 Select your printer 3 In the Print Options menu select Xerox Features Note To see all printing options click Show Detai...

Страница 137: ...er from the Printers list 3 Select the required printing options from the lists in the Print dialog box Note To see all printing options click Show Details 4 Click Presets Save Current Settings as Preset 5 Type a name for the printing options To save the set of options in the Presets list click OK 6 To print using these options select the name from the Presets list U UN NI IX X a an nd d L Liin nu...

Страница 138: ...he Xerox Print Driver package a Open the package with your OS package manager b To install using a command line utility change to the directory where you downloaded the file To run the installer type the appropriate command line utility for your operating system For example Red Hat rpm U filename rpm Debian based Linux dpkg i filename deb AIX rpm U filename rpm HPUX filename depot gz Solaris pkgad...

Страница 139: ...e instructions that are included with the PPD file Adding the Printer 1 Verify that the CUPS Common UNIX Printing System daemon is running 2 Open a Web browser and type http localhost 631 admin then click Enter or Return 3 For User ID type root For password type the root password 4 Click Add Printer then follow the onscreen prompts to add the printer to the CUPS printer list Printing with CUPS Com...

Страница 140: ...ed d M Mo ob biille e D De ev viic ce e MOPRIA is a software feature that enables users to print from mobile devices without requiring a print driver You can use MOPRIA to print from your mobile device to MOPRIA enabled printers Note MOPRIA and all of its required protocols are enabled by default Ensure that you have the latest version of the MOPRIA Print Service installed on your mobile device Yo...

Страница 141: ...nt or delete a Saved Job To print a Saved Job refer to Printing a Saved Job Printing a Saved Job 1 In your software application access the print settings For most software applications press CTRL P for Windows or CMD P for Macintosh 2 Select your printer then open the print driver For Windows click Printer Properties Depending on your application the title of the button can vary For Macintosh in t...

Страница 142: ... 1 At the printer control panel press the Home button 2 Touch Jobs 3 To view Secure Print jobs touch Personal Secure Jobs 4 Touch your folder 5 Enter the passcode number then touch OK 6 Select an option To print a Secure Print job touch the job To print all the jobs in the folder touch Print All To delete a Secure Print job touch the Trash icon At the prompt touch Delete To delete all the jobs in ...

Страница 143: ...l Print job touch the job To print all the jobs in the folder touch Print All To delete all the jobs in the folder touch Delete All 7 To return to the Home screen press the Home button S Sa am mp plle e S Se et t The Sample Set job type prints one copy of a multiple copy print job before printing the remaining copies After reviewing the sample set you can either print the remaining copies or delet...

Страница 144: ...ny other required printing options For Windows click OK then click Print For Macintosh click Print Releasing a Sample Set 1 At the printer control panel press the Home button 2 To view available jobs touch Jobs 3 Touch the Sample Set job Note The Sample Set file description shows the job as Held for Future Printing and shows the number of remaining copies of the job 4 Select an option To print the...

Страница 145: ...page image Manually Scale scales the document by the amount entered in the percentage box below the preview image P Pr riin nt tiin ng g o on n B Bo ot th h S Siid de es s o of f t th he e P Pa ap pe er r P Pr riin nt tiin ng g a a 2 2 S Siid de ed d D Do oc cu um me en nt t If your printer supports Automatic 2 Sided Printing the options are specified in the print driver The print driver uses the ...

Страница 146: ... Pr riin nt t Q Qu ua alliit ty y PostScript print quality modes Standard print quality mode 1200 x 2400 dpi Enhanced print quality mode 1200 x 2400 dpi Photo Mode 1200 x 2400 dpi PCL print quality mode Standard print quality mode 600 x 600 dpi Note Enhanced and Photo Mode are not available with the PCL driver I Im ma ag ge e O Op pt tiio on ns s Image Options controls how the printer uses color t...

Страница 147: ...n use the Contrast feature to adjust the variation between light and dark areas of the print job Saturation Saturation allows you to adjust the color strength and the amount of gray in the color Color Cast Use Color Cast settings to adjust the amount of a selected color in the print job while preserving lightness The following options are available The Cyan to Red option allows you to adjust the c...

Страница 148: ...Page Layout tab Page Layout is on the Document Options tab For Macintosh in the Print window in Xerox Features Booklet Layout is on the Paper Output list When you print booklets using the Windows PostScript or Macintosh driver you can specify the gutter and creep Gutter Specifies the horizontal distance in points between the page images A point is 0 35 mm 1 72 in Creep Specifies how much the page ...

Страница 149: ... In ns se er rt t P Pa ag ge es s You can add blank or pre printed insert pages before page one of each document or after designated pages within a document Adding an insert after designated pages within a document separates sections or acts as a marker or placeholder Ensure that you specify the paper to use for the insert pages Insert Options provides the options to place an insert After Page X w...

Страница 150: ...e combinations of 2 sided printing with certain paper types and sizes can produce unexpected results P Pr riin nt tiin ng g W Wa at te er rm ma ar rk ks s f fo or r W Wiin nd do ow ws s A watermark is special purpose text that can be printed across one or more pages For example you can add a word like Copy Draft or Confidential as a watermark instead of stamping it on a document before distributio...

Страница 151: ...n the document 7 Click Pages then select the pages to print the watermark Print on All Pages This option prints the watermark on all pages of your document Print on Page 1 Only This option prints the watermark only on the first page of the document 8 If you select a picture as a watermark specify the lightness settings for the image 9 Click OK O Or riie en nt ta at tiio on n Orientation allows you...

Страница 152: ...his option prints the job identification on the first page of the document in the top left margin Print ID in Margins All Pages This option prints the job identification in the top left margin on every page of the document P Pr riin nt tiin ng g M Miir rr ro or r I Im ma ag ge es s If the PostScript driver is installed you can print pages as a mirror image Images mirror left to right when printed ...

Страница 153: ...o on n C Cu us st to om m S Siiz ze e P Pa ap pe er r f fr ro om m a a M Ma ac ciin nt to os sh h C Co om mp pu ut te er r 1 Load the custom size paper 2 In the application click File Print 3 From the Paper Size list select the custom paper size 4 Click Print D De ef fiin niin ng g C Cu us st to om m P Pa ap pe er r S Siiz ze es s To print custom paper sizes define the custom width and length of t...

Страница 154: ...ight and width of the new custom paper size 6 Click the arrow for the Non Printable Area field then select the printer from the list Or for User Defined margins set the top bottom right and left margins 7 To save the settings click OK D De ef fiin niin ng g a a C Cu us st to om m P Pa ap pe er r S Siiz ze e a at t t th he e C Co on nt tr ro oll P Pa an ne ell You can print custom size paper from a...

Страница 155: ...ink C70XX Color Multifunction Printer User Guide 155 6 Paper and Media This chapter contains Paper and Media Overview 156 Supported Paper 157 Paper Tray Settings 164 Loading Paper 168 Printing on Special Paper 180 ...

Страница 156: ...e Tandem Tray configuration Tray 2 is an adjustable paper tray similar to Tray 1 Trays 3 4 are high capacity trays that can hold A4 Letter and Executive size paper The Bypass Tray is designed for loading small amounts of special paper Note The optional Envelope Tray can replace Tray 1 Tray 6 is an optional external high capacity paper tray that can hold A4 Letter or Executive size paper The printe...

Страница 157: ...Use only paper envelopes Print envelopes 1 sided only P Pa ap pe er r T Th ha at t C Ca an n D Da am ma ag ge e Y Yo ou ur r P Pr riin nt te er r Some paper and other media types can cause poor output quality increased paper jams or damage your printer Do not use the following Rough or porous paper Inkjet paper Non laser glossy or coated paper Paper that has been photocopied Paper that has been fo...

Страница 158: ...ed Do not open sealed packages of paper until you are ready to load the paper into the printer Leave stored paper in the original packaging The paper wrapper protects the paper from moisture loss or gain Some special media is packaged inside resealable plastic bags Store the media inside the bag until you are ready to use it Keep unused media in the bag and reseal it for protection S Su up pp po o...

Страница 159: ...rhead Plain Plain Reloaded Pre Printed Recycled Custom 60 105 g m Lightweight Cardstock Lightweight Cardstock Reloaded Lightweight Glossy Cardstock Lightweight Glossy Cardstock Reloaded 106 169 g m Cardstock Cardstock Reloaded Glossy Cardstock Glossy Cardstock Reloaded 170 216 g m Labels Heavyweight Labels Envelopes Tray 6 Bond Hole Punched Letterhead 60 105 g m Xerox VersaLink C70XX Color Multifu...

Страница 160: ...ay European Standard Sizes North American Standard Sizes Trays 1 and 2 in all configurations Trays 3 and 4 in the 3 Tray module A5 148x210 mm 5 8x8 3in B5 176x250 mm 6 9 x 9 8 in A4 210x297 mm 8 3x11 7in B4 250 x 353mm 9 8 x 13 9 in A3 297 x 420mm 11 7 x 16 5in Statement 140x216mm 5 5x8 5 in Executive 184x267mm 7 25x10 5 in Letter 216x279mm 8 5x11 in US Folio 216 x 330 mm 8 5 x 13 in Legal 216x356...

Страница 161: ...54 mm 8 x 10 in Letter 216 x 279 mm 8 5 x 11 in US Folio 216 x 330 mm 8 5 x 13 in Legal 216 x 356 mm 8 5 x 14 in Tabloid 279 x 432 mm 11 x 17 in DL envelope 110x220mm 4 33x8 66in C6 envelope 114 x 162 mm 4 5x6 38in C5 envelope 162 x 229 mm 6 4x9in Envelope 152 x 228 mm 6 x 9 in Envelope 228 x 305 mm 9 x 12 in Monarch envelope 98 x 190 mm 3 9x7 5in No 9 envelope 98 x 225 mm 3 9 x 8 9 in No 10 envel...

Страница 162: ... x 8 5 in Executive 184 x 267 mm 7 25 x 10 5 in 8 x 10 203 x 254 mm 8 x 10 in Letter 216 x 279 mm 8 5 x 11 in 8 5 x 13 216 x 330 mm 8 5 x 13 in Legal 216 x 356 mm 8 5 x 14 in Ledger 432 x 279 mm 17 x 11 in Postcard 152 x 229 mm 6 x 9 in S Su up pp po or rt te ed d P Pa ap pe er r T Ty yp pe es s a an nd d W We eiig gh ht ts s f fo or r A Au ut to om ma at tiic c 2 2 S Siid de ed d P Pr riin nt tii...

Страница 163: ...x 182 mm 5 5 x 8 3 in Maximum 297 x 432 mm 11 7 x 17 in Bypass Tray Minimum 105 x 135 mm 4 25 x 5 3 in Maximum 297 x 432 mm 11 7 x 17 in Envelope Tray Minimum 148 x 98 mm 5 8 x 3 9 in Maximum 241 x 162 mm 9 5 x 6 4 in Note Trays 3 and 4 in the Tandem Tray Module and Tray 6 do not support custom paper sizes Xerox VersaLink C70XX Color Multifunction Printer User Guide 163 Paper and Media ...

Страница 164: ...es paper from the Priority 1 tray first If that tray is empty the printer uses paper from the Priority 2 tray 3 Touch OK 4 To return to the home screen press the Home button C Co on nf fiig gu ur riin ng g T Tr ra ay ys s 3 3 a an nd d 4 4 o of f t th he e T Ta an nd de em m T Tr ra ay y M Mo od du ulle e Trays 3 and 4 in the Tandem Tray Module are high capacity paper trays Configure Trays 3 and 4...

Страница 165: ...justments compare the paper size to the current Tray 6 configuration If the paper size matches the tray configuration no tray adjustment is needed 1 Remove the screw that holds the spacer plate at the back of the tray 2 To remove the spacer plate grasp the spacer plate and lift upward 3 Place the tabs at the bottom of the spacer plate into the slots in the bottom of Tray 6 that correspond with the...

Страница 166: ... tray into the matching hole in the plate 5 Install the screw to secure the spacer plate 6 Repeat these steps for the spacer plate at the front of Tray 6 7 On the top of the side gate locate the pin 166 Xerox VersaLink C70XX Color Multifunction Printer User Guide Paper and Media ...

Страница 167: ...8 Lift the pin then guide it to the desired paper size in the slot 9 Release the pin to lock the side gate into place Xerox VersaLink C70XX Color Multifunction Printer User Guide 167 Paper and Media ...

Страница 168: ...rm or change the media settings The tray guides automatically detect the size of paper that is loaded When trays are configured as Dedicated the control panel displays the media settings for the tray A warning message appears on the control panel when the wrong media is loaded or when the tray guides are set incorrectly Note Only the system administrator can change the media settings for a Dedicat...

Страница 169: ...rth and fan them then align the edges of the stack on a level surface This procedure separates any sheets that are stuck together and reduces the possibility of jams Note To avoid jams and misfeeds do not remove paper from its packaging until you are ready to use it Xerox VersaLink C70XX Color Multifunction Printer User Guide 169 Paper and Media ...

Страница 170: ...er with the holes to the left For short edge feed Insert letterhead and pre printed paper face up with the top edge to the left Load hole punched paper with the holes toward the front of the printer Note Do not load paper above the maximum fill line Overfilling the tray can cause paper jams 170 Xerox VersaLink C70XX Color Multifunction Printer User Guide Paper and Media ...

Страница 171: ... printer 8 To change the settings to match the paper loaded in the tray at the control panel select the correct options for paper size type and color 9 To confirm the settings touch OK To change the paper settings when the tray is set to Dedicated mode refer to Configuring Tray Settings Xerox VersaLink C70XX Color Multifunction Printer User Guide 171 Paper and Media ...

Страница 172: ... for the tray to lower and stop 2 Fan the edges of the paper before loading it into the paper trays This procedure separates any sheets of paper that are stuck together and reduces the possibility of paper jams Note To avoid paper jams and misfeeds do not remove paper from its packaging until necessary 3 Stack the paper against the left rear corner of the tray Insert letterhead and pre printed pap...

Страница 173: ...at the control panel select the correct options for paper type and color 6 To confirm the settings touch OK To change the paper settings when the tray is set to Dedicated mode refer to Configuring Tray Settings Xerox VersaLink C70XX Color Multifunction Printer User Guide 173 Paper and Media ...

Страница 174: ... small quantity jobs that use special media To load paper in the bypass tray 1 Open the bypass tray If the bypass tray is loaded with paper already remove any paper that is a different size or type 2 Pull out the extension tray for larger sizes 3 Move the width guides to the edges of the tray 174 Xerox VersaLink C70XX Color Multifunction Printer User Guide Paper and Media ...

Страница 175: ...vel surface This procedure separates any sheets that are stuck together and reduces the possibility of jams Note To avoid jams and misfeeds do not remove paper from its packaging until you are ready to use it Xerox VersaLink C70XX Color Multifunction Printer User Guide 175 Paper and Media ...

Страница 176: ...or 2 sided printing load letterhead or pre printed paper face up with the top edge toward the back Load hole punched paper with the holes to the left For short edge feed For 1 sided printing load letterhead or pre printed paper face down with the top edge to the right Load hole punched paper with the holes toward the front 176 Xerox VersaLink C70XX Color Multifunction Printer User Guide Paper and ...

Страница 177: ...um fill line on the width guides Overfilling the tray can cause the printer to jam 6 Adjust the width guides until they touch the edges of the paper 7 To change the settings to match the loaded paper at the control panel select the correct options for paper size type and color 8 To confirm the settings touch OK Xerox VersaLink C70XX Color Multifunction Printer User Guide 177 Paper and Media ...

Страница 178: ...t for the tray to lower and stop 3 The control panel displays the paper tray settings Ensure that you load the correct paper type into the tray Note Do not load custom size paper into Tray 6 4 Fan the edges of the paper before loading it into the paper trays This procedure separates any sheets of paper that are stuck together and reduces the possibility of paper jams Note To avoid paper jams and m...

Страница 179: ...top edge toward the back of the tray Place hole punched paper with the holes toward the left side of the tray Note Do not load paper above the maximum fill line Overfilling can cause paper jams 6 Close the side gate Close Tray 6 Xerox VersaLink C70XX Color Multifunction Printer User Guide 179 Paper and Media ...

Страница 180: ... on the quality and construction of the envelopes If you do not get the desired results try another envelope brand Maintain constant temperatures and relative humidity Store unused envelopes in their packaging to avoid excess moisture and dryness which can affect print quality and cause wrinkling Excessive moisture can cause the envelopes to seal before or during printing Remove air bubbles from t...

Страница 181: ... the bypass tray 2 Move the width guides to the edges of the tray Note If you do not load envelopes in the bypass tray right after they have been removed from the packaging they can bulge To avoid jams flatten the envelopes Xerox VersaLink C70XX Color Multifunction Printer User Guide 181 Paper and Media ...

Страница 182: ...f you are not prompted change the paper settings a At the printer control panel press the Home button b Touch Device Paper Trays c In the Paper Trays menu touch the bypass tray icon To select an envelope size touch the current size setting then select the required size To select an envelope color touch the current paper color then select an envelope color Note When you select an envelope size the ...

Страница 183: ... the flaps closed and flaps toward the left Adjust the paper guides so that they rest lightly against the edges of the envelopes Ensure that the maximum fill line is visible or that there are no more than 50 envelopes loaded in the tray For C5 envelopes with the flap on a short edge Load envelopes face down with the flap closed and flap toward the left Adjust the paper guides so that they rest lig...

Страница 184: ... labels Do not feed a sheet of labels through the printer more than once Do not use dry gum labels Print only on one side of the sheet of labels Use full sheet labels only Store unused labels flat in their original packaging Leave the label sheets inside the original packaging until ready to use Return any unused label sheets to the original packaging and reseal it Do not store labels in extremely...

Страница 185: ...d away from the backing sheet It could damage the printer L Lo oa ad diin ng g L La ab be ells s iin n T Tr ra ay ys s 1 1 4 4 1 Pull out the tray until it stops 2 Ensure that the paper guides are set in the correct position for the size labels you are loading 3 Remove any paper that is a different size or type 4 To move out the length or width paper guide release the guide lock then slide out the...

Страница 186: ... For short edge feed insert labels face up with the top edge to the left Note Do not load paper above the maximum fill line Overfilling the tray can cause paper jams 6 Adjust the length and width guides to fit the labels 186 Xerox VersaLink C70XX Color Multifunction Printer User Guide Paper and Media ...

Страница 187: ...t size for the tray Do not load custom size paper into Trays 3 or 4 To change the paper size in Trays 3 and 4 refer to Configuring Trays 3 and 4 of the Tandem Tray Module 2 To load labels in the tray insert labels face up with the top edge toward the back Stack the labels against the left rear corner of the tray as shown 3 Slide the tray back into the printer 4 At the control panel select the corr...

Страница 188: ... T Tr ra ay y 1 Open the bypass tray then for larger sizes of paper pull out the extension tray Remove any paper that is a different size or type 2 Move the width guides to the edges of the tray 188 Xerox VersaLink C70XX Color Multifunction Printer User Guide Paper and Media ...

Страница 189: ...aper jams 4 Adjust the width guides until they touch the edges of the paper 5 At the control panel select the correct paper size type and color Ensure that the paper type is set to Labels Note To change the paper settings when the tray is set to Dedicated mode refer to Configuring Tray Settings 6 To confirm the settings touch OK 7 To return to the Home screen press the Home button Xerox VersaLink ...

Страница 190: ... toward the back Stack the labels against the right side of the tray as shown Note Do not load paper above the maximum fill line Overfilling can cause paper jams 4 Close the tray door 5 At the control panel select the correct paper type and color Ensure that the paper type is set to Labels Note To change the paper settings when the tray is set to Dedicated mode refer to Configuring Tray Settings 6...

Страница 191: ...r Multifunction Printer User Guide 191 7 Maintenance This chapter contains General Precautions 192 Cleaning the Printer 193 Supplies 199 Adjustments and Maintenance Procedures 211 Managing the Printer 216 Moving the Printer 217 ...

Страница 192: ... the documentation supplied with your printer Caution When cleaning your printer do not use organic or strong chemical solvents or aerosol cleaners Do not pour fluids directly into any area Use supplies and cleaning materials only as directed in this documentation Do not place anything on top of the printer Do not leave the covers and doors open for any length of time especially in well lighted pl...

Страница 193: ...roblems Never use cleaning agents other than water or mild detergent C Clle ea an niin ng g t th he e S Sc ca an nn ne er r To ensure optimum print quality clean the document glass regularly Cleaning helps avoid output with streaks smears and other marks that transfer from the glass while scanning documents 1 Slightly dampen a soft lint free cloth with water 2 Remove any paper or other media from ...

Страница 194: ...nt free cloth moistened with water wipe the feed rollers until they are clean 3 Close the document feeder top cover C Clle ea an niin ng g t th he e I In nt te er riio or r Clean the interior of the printer regularly to prevent stains inside the printer that can deteriorate print quality Clean the printer interior whenever you replace a drum cartridge After clearing paper jams or replacing a toner...

Страница 195: ...s contact your Xerox representative C Clle ea an niin ng g t th he e P Pr riin nt th he ea ad d L Le en ns se es s The printer is constructed with four printhead lenses The printhead lenses require regular cleaning to maintain print quality Clean the printhead lens every time the associated drum cartridge is replaced or if print quality starts to degrade Caution Do not perform this procedure when ...

Страница 196: ...f the waste cartridge then pull it out d Place the removed waste cartridge on a level surface with the openings facing up Caution To avoid toner spills or malfunction do not lay the waste cartridge on its side 196 Xerox VersaLink C70XX Color Multifunction Printer User Guide Maintenance ...

Страница 197: ...4 Slowly push the cleaning rod into the printer until it stops then pull it out Repeat this action two more times 5 Return the cleaning rod to its original location 6 To insert the waste cartridge Xerox VersaLink C70XX Color Multifunction Printer User Guide 197 Maintenance ...

Страница 198: ...ste cartridge toward the printer until it clicks into place c To lock the waste cartridge rotate the waste cartridge lock lever 90 degrees clockwise 7 Close the printer front door 198 Xerox VersaLink C70XX Color Multifunction Printer User Guide Maintenance ...

Страница 199: ...and manufactured under strict quality controls by Xerox for specific use with this printer R Ro ou ut tiin ne e M Ma aiin nt te en na an nc ce e I It te em ms s Routine maintenance items are printer parts that have a limited life and require periodic replacement Replacements can be parts or kits Routine maintenance items are typically customer replaceable Note Each routine maintenance item include...

Страница 200: ... Drum Cartridge The drum cartridge has reached the end of its life Replace the drum cartridge with a new one R Re ep plla ac ciin ng g S St ta ap plle e C Ca ar rt tr riid dg ge es s If the printer has an optional finisher installed the control panel displays a message when a staple cartridge is empty and needs replacement Replacing Staples in the Integrated Office Finisher 1 Open the finisher fro...

Страница 201: ... the new staple pack into the staple cartridge then push the rear side into the cartridge 6 Grasp the new staple cartridge by the orange handle then insert the cartridge into the stapler until it clicks 7 Close the finisher front door Xerox VersaLink C70XX Color Multifunction Printer User Guide 201 Maintenance ...

Страница 202: ... stops 3 Push the stapler assembly to the right as shown 4 To remove the staple cartridge grasp the orange handle then pull it firmly toward you 5 Check inside the finisher for any loose staples and remove them 6 Pinch both sides of the staple pack and remove the staple pack from the cartridge 202 Xerox VersaLink C70XX Color Multifunction Printer User Guide Maintenance ...

Страница 203: ...ush the rear side into the cartridge 8 Grasp the staple cartridge by the orange handle then insert it into the stapler assembly Push the staple cartridge in until it clicks 9 Close the finisher front door Xerox VersaLink C70XX Color Multifunction Printer User Guide 203 Maintenance ...

Страница 204: ... Open the finisher side cover 2 If the staple cartridges are not visible grasp the vertical panels on each side of the opening and slide the staple cartridges to the center 3 Hold the tabs on both sides of the staple cartridge then pull the cartridge out of the finisher 204 Xerox VersaLink C70XX Color Multifunction Printer User Guide Maintenance ...

Страница 205: ...cartridge into the original position in the finisher Note The booklet maker uses two staple cartridges Booklet stapling requires that both staple cartridges contain staples 5 Repeat the procedure for the other staple cartridge 6 Close the finisher side cover Xerox VersaLink C70XX Color Multifunction Printer User Guide 205 Maintenance ...

Страница 206: ... stapler head 180 degrees counterclockwise 2 Grip the staple cartridge and pull it out of the stapler head 3 Unpack the new staple cartridge Remove any partial strips and any staple strips that are not flat 206 Xerox VersaLink C70XX Color Multifunction Printer User Guide Maintenance ...

Страница 207: ...ple cartridge in the stapler head The staple cartridge clicks into place 5 To close the stapler head rotate the stapler head 180 degrees clockwise Xerox VersaLink C70XX Color Multifunction Printer User Guide 207 Maintenance ...

Страница 208: ...essage appears on the printer control panel Caution Do not perform this procedure when the printer is copying or printing 1 Lift the finisher transport top cover then open the front transport cover 2 Pull out the hole punch waste container 3 Empty the container 208 Xerox VersaLink C70XX Color Multifunction Printer User Guide Maintenance ...

Страница 209: ...used by use of non Xerox supplies or the use of Xerox supplies not specified for this printer The Total Satisfaction Guarantee is available in the United States and Canada Coverage could vary outside these areas Please contact your Xerox representative for details S Su up pp plly y S St ta at tu us s I In nf fo or rm ma at tiio on n You can check the supplies status customize the alerts that appea...

Страница 210: ...spill a large volume of toner contact your local Xerox representative Never throw a toner cartridge into an open flame Remaining toner in the cartridge can catch fire and cause burn injuries or an explosion R Re ep plla ac ciin ng g a a T To on ne er r C Ca ar rt tr riid dg ge e A message appears on the control panel when a toner cartridge must be replaced Note Each toner cartridge includes instal...

Страница 211: ... source paper tray a Touch Paper Supply b Touch the desired tray 5 Using the chart printed in Verifying Paper Registration select the side for registration a For adjusting Side 1 touch Adjusted Side then touch Side 1 b For adjusting Side 2 touch Adjusted Side then touch Side 2 6 To adjust the registration touch Lead Side Registration a To adjust the side to side registration for Side Registration ...

Страница 212: ...libration touch Start Follow the onscreen instructions 7 When finished touch Close 8 To exit the menu touch X 9 To return to the Home screen press the Home button P Pe er rf fo or rm miin ng g a an n A Ad dv va an nc ce ed d C Co ollo or r C Ca alliib br ra at tiio on n 1 At the printer control panel press the Home button 2 Log in as administrator For details refer to the System Administrator Guid...

Страница 213: ...the System Administrator Guide at www xerox com office VLC70XXdocs 3 Touch Device Support Image Position 4 Select the source paper tray for the registration print a Touch Paper Supply b Touch the desired tray 5 If your printer has automatic 2 sided printing select the sides that you want to optimize To select a sample registration page for adjusting side 1 touch Adjusted Side then touch Side 1 To ...

Страница 214: ...w xerox com office VLC70XXdocs 3 Touch Device Support Image Position 4 To adjust registration select the source paper tray a Touch Paper Supply b Touch the desired tray 5 Using the chart printed in Verifying Paper Registration select the side for registration a For adjusting Side 1 touch Adjusted Side then touch Side 1 b For adjusting Side 2 touch Adjusted Side then touch Side 2 6 To adjust the re...

Страница 215: ...tu ud de e Use Adjust Altitude to adjust the altitude to match that of the location where the printer is installed If the altitude setting is incorrect it can cause print quality problems To adjust the altitude 1 At the printer control panel press the Home button 2 Touch Device Support Altitude Adjustment 3 Touch the altitude of the location of the printer then touch OK 4 To return to the Home scr...

Страница 216: ...ion refer to the System Administrator Guide at www xerox com office VLC70XXdocs To view the billing information for your printer 1 At the printer control panel press the Home button 2 Touch Device Billing Usage 3 To view more details touch Usage Counters then select an option 4 After viewing the usage readings to return to the Home screen press the Home button P Pr riin nt tiin ng g t th he e B Bi...

Страница 217: ...ner spillage When moving the printer over a long distance remove the drum cartridge and toner cartridge to prevent toner from spilling Caution Do not expose the drum cartridge to direct sunlight or strong indoor fluorescent lighting Do not touch or scratch the surface of the drum Caution Failure to repackage the printer properly for shipment can result in damage not covered by the Xerox Warranty S...

Страница 218: ...218 Xerox VersaLink C70XX Color Multifunction Printer User Guide Maintenance ...

Страница 219: ...70XX Color Multifunction Printer User Guide 219 8 Troubleshooting This chapter contains General Troubleshooting 220 Paper Jams 225 Print Quality Problems 248 Copy and Scan Problems 254 Fax Problems 255 Getting Help 257 ...

Страница 220: ...e into the outlet and check if it operates properly Try a different outlet The printer is connected to an outlet with a voltage or frequency that does not match the printer specifications Use a power source with the specifications listed in the Electrical Specifications Caution Plug the three wire cord with grounding prong directly into a grounded AC outlet P Pr riin nt te er r R Re es se et ts s ...

Страница 221: ...t paper in the appropriate tray At the printer control panel specify the correct paper size type and color The paper settings for the print job do not match any paper loaded in the paper trays at the printer From the print driver select a paper tray containing the correct paper A toner cartridge is empty Replace the empty toner cartridge No control panel indicators are lighted Power off the printe...

Страница 222: ...nfigured For more information refer to Connecting to a Wireless Network P Pr riin nt tiin ng g T Ta ak ke es s T To oo o L Lo on ng g Probable Causes Solutions The printer is set to a slower printing mode For example the printer is set to print on Heavyweight paper or Envelopes It takes more time to print on certain types of special paper Ensure that the paper type is set properly in the print dri...

Страница 223: ...e To have the print driver select the tray set the tray used as the paper source to Auto Selection Enabled A Au ut to om ma at tiic c 2 2 S Siid de ed d P Pr riin nt tiin ng g P Pr ro ob blle em ms s Probable Causes Solutions Unsupported or incorrect paper Ensure that you are using the correct paper Do not use transparencies envelopes labels or reloaded paper for automatic 2 sided printing For det...

Страница 224: ...on n h ha as s F Fo or rm me ed d I In ns siid de e t th he e P Pr riin nt te er r Moisture can condense inside a printer where the humidity is above 85 or when a cold printer is located in a warm room Condensation can form in a printer after it has been sitting in a cold room that is heated quickly Probable Causes Solutions The printer has been sitting in a cold room Allow the printer to operate ...

Страница 225: ...he printer immediately and wait 40 minutes for the fuser to cool Try to remove the jam after the printer has cooled If the error persists contact your Xerox representative Caution Do not attempt to clear any paper jams using tools or instruments This can permanently damage the printer The following illustration shows where paper jams can occur along the paper path Xerox VersaLink C70XX Color Multi...

Страница 226: ...nter is designed to function with minimal paper jams using Xerox supported paper Other paper types can cause jams If supported paper is jamming frequently in one area clean that area of the paper path The following can cause paper jams Selecting the incorrect paper type in the print driver Using damaged paper Using unsupported paper Loading paper incorrectly Overfilling the tray 226 Xerox VersaLin...

Страница 227: ...poor print quality misfeeds skewed prints and printer damage After loading paper in the trays at the control panel select the correct paper type and size Before printing select the correct paper type and size in the print driver Store paper in a dry location The following can cause paper jams Polyester coated paper that is designed especially for inkjet printers Paper that is folded wrinkled or ex...

Страница 228: ...ex Automatic Document Feeder areas 1 Lift the lever then open the top cover of the document feeder 2 If the original document is clear of the automatic document feeder entry pull it straight out in the direction shown 3 If the control panel message instructs you to open the inner cover lift the green tabbed lever to open the inner cover 228 Xerox VersaLink C70XX Color Multifunction Printer User Gu...

Страница 229: ... the document 8 Lower the feeder tray 9 If the original document is not wrinkled or torn then follow the instructions on the touch screen to load the document into the feeder again Note After clearing a paper jam from the Duplex Automatic Document Feeder reload the entire original document including the pages already scanned The printer automatically skips the scanned pages and scans the remaining...

Страница 230: ...rom the tray 4 If the paper is torn remove the tray completely and check inside the printer for torn pieces of paper 5 Reload the tray with undamaged paper then push the tray in until it stops 6 When paper trays are set to Fully Adjustable you are prompted to verify or change the paper settings To confirm the same paper size type or color touch OK To select a new paper size type or color touch the...

Страница 231: ...er feed entrance 5 When paper trays are set to Fully Adjustable you are prompted to verify or change the paper settings To confirm the same paper size type or color touch OK To select a new paper size type or color touch the current setting then select a new setting When finished touch OK 6 To return to the Home screen press the Home button C Clle ea ar riin ng g P Pa ap pe er r J Ja am ms s a at ...

Страница 232: ...aper 3 If paper is jammed at the exit to the output tray to remove it carefully pull it straight out in the direction shown Note Toner can adhere to the transfer roller This does not affect print quality 232 Xerox VersaLink C70XX Color Multifunction Printer User Guide Troubleshooting ...

Страница 233: ...own Note If the paper is torn remove all torn pieces from the printer 5 Close Door A and the Bypass Tray a To close Door A push the door up firmly until it clicks into place b Close the Bypass Tray Xerox VersaLink C70XX Color Multifunction Printer User Guide 233 Troubleshooting ...

Страница 234: ...ea Note If the paper is torn remove all torn pieces from the printer 3 For paper jammed in the upper position look inside the printer locate the jammed paper then remove it Note If the paper is inaccessible refer to Clearing Jams at Door A 234 Xerox VersaLink C70XX Color Multifunction Printer User Guide Troubleshooting ...

Страница 235: ... Open the Bypass Tray and Door A WARNING The area around the Fuser can be hot Use caution to avoid injury Caution Do not touch the transfer roller Touching the roller can reduce image quality a Open the Bypass Tray b Lift the release lever Xerox VersaLink C70XX Color Multifunction Printer User Guide 235 Troubleshooting ...

Страница 236: ...paper is torn remove all torn pieces from the printer 4 To close Door C push the door up firmly until it clicks into place 5 Close Door A and the Bypass Tray a To close Door A push the door up firmly until it clicks into place b Close the Bypass Tray 236 Xerox VersaLink C70XX Color Multifunction Printer User Guide Troubleshooting ...

Страница 237: ...lean lint free cloth moistened with water wipe the feed rollers until they are clean For details refer to Cleaning the Printer Tray is loaded with mixed paper Load the tray with only one type and size of paper P Pa ap pe er r M Miis sf fe ee ed ds s Probable Causes Solutions The paper is not correctly positioned in the tray Remove the misfed paper and reposition it properly in the tray Adjust the ...

Страница 238: ...pulled away from the backing sheet Envelopes are loaded incorrectly You can print envelopes from the Bypass Tray or Tray 1 For more information refer to Envelopes Envelopes are wrinkling The heat and pressure of the laser printing process can cause wrinkling Use supported envelopes For more information refer to Guidelines for Printing Envelopes Note When you load envelopes long edge feed ensure th...

Страница 239: ...h only one type and size of paper C Clle ea ar riin ng g F Fiin niis sh he er r J Ja am ms s C Clle ea ar riin ng g P Pa ap pe er r J Ja am ms s iin n t th he e I In nt te eg gr ra at te ed d O Of ff fiic ce e F Fiin niis sh he er r 1 Locate the Integrated Office Finisher mounted beneath the control panel then open the finisher front door 2 Open the top cover 3 Rotate the green knob in the directi...

Страница 240: ...asp the orange handle then pull it firmly toward you 3 Check inside the finisher for any loose staples and remove them 4 Pinch both sides of the staple pack and remove the staple pack from the cartridge 5 Remove any loose staple sheets 240 Xerox VersaLink C70XX Color Multifunction Printer User Guide Troubleshooting ...

Страница 241: ...idge then push the rear side into the cartridge 7 Grasp the staple cartridge by the orange handle then insert the cartridge into the stapler until it clicks 8 Close the finisher front door Xerox VersaLink C70XX Color Multifunction Printer User Guide 241 Troubleshooting ...

Страница 242: ...the Office Finisher LX Top Cover 1 Pull up the lever on the top cover 2 To open the top cover rotate it to the left 3 Remove the jammed paper Note If the paper is torn remove all torn pieces from the finisher 4 Close the top cover of the finisher 242 Xerox VersaLink C70XX Color Multifunction Printer User Guide Troubleshooting ...

Страница 243: ...jammed paper Note If the paper is torn remove all torn pieces from the finisher 3 Close the transport cover Clearing Staple Jams in the Office Finisher LX 1 Open the finisher front door 2 Reach into the finisher cabinet and pull the stapler toward you until it stops Xerox VersaLink C70XX Color Multifunction Printer User Guide 243 Troubleshooting ...

Страница 244: ...r any loose staples and remove them 6 Pinch both sides of the staple pack and remove the staple pack from the cartridge 7 Remove any loose staple strips from the staple pack 8 Insert the front side of the new staple pack into the staple cartridge then push the rear side into the cartridge 244 Xerox VersaLink C70XX Color Multifunction Printer User Guide Troubleshooting ...

Страница 245: ...let stapling requires that both staple cartridges contain staples A message appears on the control panel touch screen when the staple cartridge is empty Caution Do not perform this procedure when the printer is copying or printing 1 Open the finisher side cover 2 If the staple cartridges are not visible grasp the vertical panels on each side of the opening then slide the staple cartridges to the c...

Страница 246: ...es of the staple cartridge then reinsert the staple cartridge into the original position in the finisher Note The booklet maker uses two staple cartridges Booklet stapling requires that both staple cartridges contain staples 6 Repeat the procedure for the other staple cartridge 7 Close the finisher side cover 246 Xerox VersaLink C70XX Color Multifunction Printer User Guide Troubleshooting ...

Страница 247: ...nd reports a hole punch jam empty the hole punch waste container For details refer to Emptying the Hole Punch Container After you empty the hole punch waste container locate and remove any paper jams Xerox VersaLink C70XX Color Multifunction Printer User Guide 247 Troubleshooting ...

Страница 248: ...ality of the output of your printer For consistent and optimum print quality use paper designed for your printer and correctly set the Print Quality Mode and Color Adjustments Follow the guidelines in this section to maintain optimum print quality from your printer Temperature and humidity affect the quality of the printed output The range for optimal print quality is 15 28ºC 59 82ºF and 20 70 rel...

Страница 249: ...en the drum cartridge is nearing the end of life When the toner cartridge is empty or when the drum cartridge has reached end of life a second message appears The second message prompts you to replace the expired cartridge The printer stops printing until you install a new toner cartridge or drum cartridge Symptom Solutions The output is too light To check the toner level check the control panel u...

Страница 250: ... type and weight If not change the paper settings Verify that the printer is plugged into an outlet that is providing the correct voltage and power Review the electrical specification of the printer with an electrician if necessary For details refer to Electrical Specifications Random spots on the output or the image is blurry Ensure that the toner cartridge is installed correctly If you used a no...

Страница 251: ...nt paper type at the control panel in the application and in the print driver Replace the paper Ghosting appears in the printed output Verify that the paper is the correct size type and weight If not change the paper settings Change the Paper Type settings in the print driver In the print driver on the Printing Options tab select Paper then change the Other Type setting Replace the Drum Cartridge ...

Страница 252: ...s are wrinkled or creased when printed Check if the crease is within 30 mm 1 2 in of the four edges of the envelope If yes it is printing as expected Your printer is not faulty If not take the following actions Ensure that envelopes are loaded properly in the bypass tray For details refer to Loading Envelopes in the Bypass Tray Follow the guidelines for printing on envelopes For details refer to G...

Страница 253: ...gistration For details refer to Adjusting Paper Registration The printed surface of the paper is bumpy 1 Print a solid image over the entire surface of one sheet of paper 2 Load the printed sheet into the tray with the printed side face down 3 Print five blank pages to remove debris from the fuser rollers Xerox VersaLink C70XX Color Multifunction Printer User Guide 253 Troubleshooting ...

Страница 254: ...t glass There is debris on the document glass When scanning the debris creates a spot on the image Clean all glass surfaces with a lint free cloth dampened with water Image is too light or too dark Adjust the lighten darken setting Image quality is poor when scanning color original documents For best results select Black White output Colors are inaccurate Adjust color settings and confirm that the...

Страница 255: ... the document glass The text in the document is too light Adjust the resolution There is a problem with the telephone connection Verify that the telephone line is working then send the fax again There is a problem with the fax machine of the caller Make a copy to verify that your printer is operating correctly If the copy was printed correctly have the recipient verify the condition of the receivi...

Страница 256: ...The received fax size is reduced The paper supply in the printer does not match the document size sent Confirm the original size of the documents Documents could be reduced based on the available paper supply in the printer Faxes cannot be received automatically The printer is set to receive faxes manually Set the printer to automatic reception The memory is full Load paper if it is empty and then...

Страница 257: ...ts that you can print These reports include the Demonstration Print page and the Error History report that can assist you in troubleshooting certain problems The Demonstration Print page prints an image to show print quality You can use this page to troubleshoot print quality issues with the printer The Error History report prints information on the most recent printer errors For more information ...

Страница 258: ...e VLC70XXsupport M Mo or re e I In nf fo or rm ma at tiio on n a ab bo ou ut t Y Yo ou ur r P Pr riin nt te er r To obtain more information about your printer refer to More Information 258 Xerox VersaLink C70XX Color Multifunction Printer User Guide Troubleshooting ...

Страница 259: ...ifunction Printer User Guide 259 A Specifications This appendix contains Printer Configurations and Options 260 Physical Specifications 266 Environmental Specifications 272 Electrical Specifications 273 Performance Specifications 275 ...

Страница 260: ...B or network connectivity C Co on nf fiig gu ur ra at tiio on ns s 1 Base Model an optional second tray without stand is available 2 Printer Additional Trays and Integrated Office Finisher 3 Printer Additional Trays and Office Finisher LX 4 Printer Additional Trays High Capacity Feeder and Office Finisher LX with Booklet Maker 260 Xerox VersaLink C70XX Color Multifunction Printer User Guide Specif...

Страница 261: ... Print Speed for 2 Sided Black and White Letter A4 210 x 297 mm 8 5 x 11 in 30 ppm maximum Legal 16 x 356 mm 8 5 x 14 in 23 ppm maximum A3 297 x 420 mm 11 x 17 in 11 ppm maximum Print Speed for 2 Sided Color Letter A4 210 x 297 mm 8 5 x 11 in 30 ppm maximum Legal 216 x 356 mm 8 5 x 14 in 23 ppm maximum A3 297 x 420 mm 11 x 17 in 11 ppm maximum Print Resolution Standard Mode 600 x 600 dpi Enhanced ...

Страница 262: ...d 1000 sheets with one staple or 750 sheets with two staples for Letter A4 80 g m Booklet Maker Up to 40 booklets 2 15 sheets per booklet 80 g m Convenience Stapler 50 sheet stapling 5000 staples Maximum Print Size A3 297 x 410 mm 11 7 x 16 1 in 279 4 x 431 8 mm 11 x 17 in Maximum Print Area 4 mm from leading edge of paper 2 mm from side edge and trailing edge of paper Maximum Weight of Paper for ...

Страница 263: ... 279 4 x 431 8 mm 11 x 17 in Document Feeder Type Duplex Automatic Document Feeder Capacity 110 sheets Scan Resolution 600 x 600 dpi Maximum Scan Size Document Glass 332 x 437 mm 13 1 x 17 2 in Automatic Document Feeder 297 x 431 8 mm 11 7 x 17 in Scan Input Speed 1 Sided Up to 55 images per minute 2 Sided Up to 26 images per minute File Formats JPEG TIFF single page and multi page XPS single page...

Страница 264: ...i 801 11n and Wi Fi Direct with optional Wi Fi Kit concurrent wired and wireless connections supported NFC Tap to Pair Remote Access Embedded Web Server O Op pt tiio on ns s a an nd d U Up pg gr ra ad de es s Paper Trays Single Tray Module Single Tray Module with Stand 3 Tray Module Tandem Tray Module High Capacity Feeder Envelope Tray Output Devices Center Tray Integrated Office Finisher Office F...

Страница 265: ...t Kit Convenience Stapler including Work Surface Note The Single Tray Module is optional for the Base model only and does not include stand The Center Tray and Hard Disk Drive are optional for the Base Model only They are standard features for all other configurations Xerox VersaLink C70XX Color Multifunction Printer User Guide 265 Specifications ...

Страница 266: ...Width 59 0 cm 23 2 in Depth 67 1 cm 26 4 in Height 76 8 cm 30 2 in Weight 69 kg 152 lb Base Model with Single Tray and Stand Width 61 6 cm 24 2 in Depth 67 1 cm 26 4 in Height 111 9 cm 44 1 in Weight 92 3 kg 203 5 lb 266 Xerox VersaLink C70XX Color Multifunction Printer User Guide Specifications ...

Страница 267: ...eight 111 9 cm 44 1 in Weight 106 5 kg 234 8 lb Base Model with 3 Tray Module and Integrated Office Finisher Width 67 5 cm 26 6 in Depth 67 1 cm 26 4 in Height 111 9 cm 44 1 in Weight 108 5 kg 239 2 lb Xerox VersaLink C70XX Color Multifunction Printer User Guide 267 Specifications ...

Страница 268: ...111 9 cm 44 0 in Weight 124 5 kg 274 5 lb Base Model with Tandem Tray Module Office Finisher LX Booklet Maker and High Capacity Feeder Width 151 cm 59 5 in Depth 68 2 cm 26 9 in Height 111 9 cm 44 0 in Weight 172 7 kg 380 7 lb 268 Xerox VersaLink C70XX Color Multifunction Printer User Guide Specifications ...

Страница 269: ...nts for Base Model Width 108 6 cm 42 8 in Depth 156 7 cm 61 7 in Height 113 3 cm 44 6 in Clearance Requirements for Single Tray and Stand Width 111 5 cm 43 9 in Depth 166 6 cm 65 6 in Height 148 4 cm 58 4 in Xerox VersaLink C70XX Color Multifunction Printer User Guide 269 Specifications ...

Страница 270: ...th 111 5cm 43 9 in Depth 166 6 cm 65 6 in Height 148 4 cm 58 4 in Clearance Requirements for 3 Tray Module Office Finisher LX and Booklet Maker Width 169 2 cm 66 6 in Depth 166 6 cm 65 6 in Height 148 4 cm 58 4 in 270 Xerox VersaLink C70XX Color Multifunction Printer User Guide Specifications ...

Страница 271: ... Tandem Tray Module Office Finisher LX Booklet Maker and High Capacity Feeder Width 195 8 cm 77 0 in Depth 166 6 cm 65 6 in Height 148 4 cm 58 4 in Xerox VersaLink C70XX Color Multifunction Printer User Guide 271 Specifications ...

Страница 272: ...umidity Range 10 85 Optimal Humidity Range 20 70 relative humidity at 28 C 82 F Note Under extreme environmental conditions such as 10 C and 85 relative humidity printing defects can occur due to condensation inside the printer E Elle ev va at tiio on n For optimum performance use the printer at elevations below 2500 m 8200 ft 272 Xerox VersaLink C70XX Color Multifunction Printer User Guide Specif...

Страница 273: ...STAR Program Requirements for Imaging Equipment The ENERGY STAR and ENERGY STAR mark are registered United States trademarks The ENERGY STAR Imaging Equipment Program is a team effort between United States European Union and Japanese governments and the office equipment industry to promote energy efficient copiers printers fax multifunction printers personal computers and monitors Reducing product...

Страница 274: ...c cy yc clliin ng g S Su up pp plliie es s For more information on the Xerox supplies recycling program go to www xerox com gwa 274 Xerox VersaLink C70XX Color Multifunction Printer User Guide Specifications ...

Страница 275: ...nts slightly faster than A4 210 x 297 mm Larger paper sizes reduce print speeds Paper type and weights For faster printing use paper weights of 105g m or less Maximum Print Speeds Black and White Paper Weight A4 Letter A3 1 Sided Printing 2 Sided Printing 1 Sided Printing 2 Sided Printing Plain 30 ppm 30 ppm 17 ppm 11 ppm Heavyweight 1 106 169 g m 2 25 ppm 25 ppm 14 ppm 9 4 ppm Heavyweight 2 170 2...

Страница 276: ...nting 1 Sided Printing 2 Sided Printing Plain 30 ppm 30 ppm 17 ppm 11 ppm Heavyweight 1 106 169 g m 2 12 ppm 12 ppm 7 ppm 4 8 ppm Heavyweight 2 170 256 g m 2 12 ppm NA 7 ppm NA 276 Xerox VersaLink C70XX Color Multifunction Printer User Guide Specifications ...

Страница 277: ... C70XX Color Multifunction Printer User Guide 277 B Regulatory Information This appendix contains Basic Regulations 278 Copy Regulations 283 Fax Regulations 286 Safety Certification 290 Material Safety Data Sheets 291 ...

Страница 278: ...ed to enable you to reduce your electricity usage Power Saver modes are enabled on your device to reduce energy consumption After the last print the device transitions to Ready mode In this mode the device can print again immediately If the device is not used for a specified period the device transitions to Low Power mode then to Sleep mode In these modes to enable reduced power consumption only e...

Страница 279: ...equal to 45 ppm monochrome the duplex function has been auto enabled during the setup and driver installation Some Xerox models below these speed bands may also be enabled with 2 sided printing settings defaulted on at the time of install Continuing to use the duplex function will reduce the environmental impact of your work However should you require simplex 1 sided printing you may change the pr...

Страница 280: ...e receiver is connected Consult the dealer or an experienced radio TV technician for help Changes or modifications to this equipment not approved by Xerox can void the authority of the user to operate this equipment WARNING To ensure compliance with Part 15 and Part 18 of the FCC rules use shielded interface cables C Ca an na ad da a This Class A digital apparatus complies with Canadian ICES 003 C...

Страница 281: ...nterface cables E Eu ur ro op pe ea an n U Un niio on n L Lo ot t 4 4 I Im ma ag giin ng g E Eq qu uiip pm me en nt t A Ag gr re ee em me en nt t E En nv viir ro on nm me en nt ta all I In nf fo or rm ma at tiio on n E En nv viir ro on nm me en nt ta all I In nf fo or rm ma at tiio on n P Pr ro ov viid diin ng g E En nv viir ro on nm me en nt ta all S So ollu ut tiio on ns s a an nd d R Re ed du u...

Страница 282: ...Gerät ist nicht für die Benutzung im unmittelbaren Gesichtsfeld am Bildschirmarbeitsplatz vorgesehen Um störende Reflexionen am Bildschirmarbeitsplatz zu vermeiden darf dieses Produkt nicht im unmittelbaren Gesichtsfeld platziert werden L Lä är rm me em miis ss siio on n Maschinenlärminformations Verordnung 3 GPSGV Der höchste Schalldruckpegel beträgt 70 dB A oder weniger gemäß EN ISO 7779 I Im mp...

Страница 283: ...s may be done provided the reproduction of the document is performed for lawful purposes Postage Stamps canceled or uncanceled For philatelic purposes Postage Stamps may be photographed provided the reproduction is in black and white and is less than 75 or more than 150 of the linear dimensions of the original Postal Money Orders Bills Checks or Drafts of money drawn by or upon authorized officers...

Страница 284: ...e information about these provisions contact the Copyright Office Library of Congress Washington D C 20559 Ask for Circular R21 C Ca an na ad da a Parliament by stature has forbidden the reproduction of the following subjects under certain circumstances Penalties of fine or imprisonment may be imposed on those guilty of making such reproductions Current bank notes or current paper money Obligation...

Страница 285: ...o liability is assumed for its completeness or accuracy In case of doubt consult your solicitor O Ot th he er r C Co ou un nt tr riie es s Copying certain documents may be illegal in your country Penalties of fine or imprisonment may be imposed on those found guilty of making such reproductions Currency notes Bank notes and checks Bank and government bonds and securities Passports and identificati...

Страница 286: ...s adopted by the ACTA A compliant telephone cord and modular plug is provided with this product It connects to a compatible modular jack that is also compliant See installation instructions for details You can safely connect the printer to the following standard modular jack USOC RJ 11C using the compliant telephone line cord with modular plugs provided with the installation kit See installation i...

Страница 287: ...he state public utility commission public service commission or corporation commission for information Your office could have specially wired alarm equipment connected to the telephone line Make sure that the installation of this Xerox equipment does not disable your alarm equipment If you have questions about what could disable alarm equipment consult your Telephone Company or a qualified install...

Страница 288: ...echtenstein Slovenia Finland Lithuania Spain France Luxembourg Sweden Germany Malta United Kingdom If you have problems with your product contact your local Xerox representative This product can be configured to be compatible with other country networks Before reconnecting the device to a network in another country contact your Xerox representative for assistance Note Although this product can use...

Страница 289: ...ause a false answer condition If you encounter such problems do not contact the Telecom Faults Service 6 DTMF tones dialing is the preferred method because it is faster than pulse decadic dialing and is readily available on almost all New Zealand telephone exchanges WARNING No 111 or other calls can be made from this device during a mains power failure 7 This equipment may not provide for the effe...

Страница 290: ...nderwriters Laboratories Inc US Canada UL 60950 1 2nd Edition 2014 10 14 CAN CSA C22 2 No 60950 1 07 2nd Edition 2014 10 Underwriters Laboratories Inc Europe IEC 60950 1 2005 A1 2009 A2 2013 EN 60950 1 2006 A11 2009 A1 2010 A12 2011 A2 2013 290 Xerox VersaLink C70XX Color Multifunction Printer User Guide Regulatory Information ...

Страница 291: ... your printer go to North America www xerox com msds European Union www xerox com environment_europe For the Customer Support Center phone numbers go to www xerox com office worldcontacts Xerox VersaLink C70XX Color Multifunction Printer User Guide 291 Regulatory Information ...

Страница 292: ...292 Xerox VersaLink C70XX Color Multifunction Printer User Guide Regulatory Information ...

Страница 293: ...Xerox VersaLink C70XX Color Multifunction Printer User Guide 293 C Recycling and Disposal This appendix contains All Countries 294 North America 295 European Union 296 Other Countries 298 ...

Страница 294: ...y consistent with global regulations applicable at the time that the product was placed on the market For recycling and disposal information contact your local authorities Perchlorate Material This product may contain one or more Perchlorate containing devices such as batteries Special handling may apply For more information go to www dtsc ca gov hazardouswaste perchlorate 294 Xerox VersaLink C70X...

Страница 295: ...0 ASK XEROX to determine if this Xerox product is part of the program For more information about Xerox environmental programs visit www xerox com environment or for recycling and disposal information contact your local authorities Xerox VersaLink C70XX Color Multifunction Printer User Guide 295 Recycling and Disposal ...

Страница 296: ...electrical and electronic equipment subject to disposal must be managed within agreed procedures Prior to disposal please contact your local reseller or Xerox representative for end of life take back information C Co olllle ec ct tiio on n a an nd d D Diis sp po os sa all o of f E Eq qu uiip pm me en nt t a an nd d B Ba at tt te er riie es s These symbols on the products and or accompanying docume...

Страница 297: ...he European Union If you wish to discard these items please contact your local authorities or dealer and ask for the correct method of disposal B Ba at tt te er ry y S Sy ym mb bo oll N No ot te e This wheeled bin symbol may be used in combination with a chemical symbol This establishes compliance with the requirements set out by the Directive B Ba at tt te er ry y R Re em mo ov va all Batteries s...

Страница 298: ...Other Countries Please contact your local waste management authority to request disposal guidance 298 Xerox VersaLink C70XX Color Multifunction Printer User Guide Recycling and Disposal ...

Страница 299: ...Xerox VersaLink C70XX Color Multifunction Printer User Guide 299 D Apps Features ...

Страница 300: ...ge Enhancement options to select Background Suppression when you scan original documents on a colored sheet or to adjust the image contrast Color Balance If you have a color original document you can adjust the balance of the printing colors between cyan magenta yellow and black before printing your copy Color Effects If you have a color original document you can adjust the color of the copy using...

Страница 301: ... Paper Supply Use Paper Supply to specify the size type and color of the paper required or the Paper Tray to use If Auto is selected the printer chooses the paper tray based on the original document size and the selected settings Collated You can collate multi page copy jobs automatically For example when making three 1 Sided copies of a six page document the copies are printed in this order 1 2 3...

Страница 302: ...utput image or print lighter or darker Sharpness Use this option to sharpen the output image or print For best results sharpen text images and soften photos Original Orientation You can use the Original Orientation option to specify the layout of the original images The printer uses the information to determine if images require rotation to produce the required output Image Shift Image Shift allow...

Страница 303: ...mages using the Edge Erase feature You can specify the amount to erase on the right left top and bottom edges Original Size To ensure that you are scanning the correct area of the documents specify the original document size Book Copying You can use the Book Copying feature to copy books magazines or other bound documents Front Cover You can print the first page of your copy job on different paper...

Страница 304: ...ical order when folded Page Layout You can print the selected number of pages on one side of a sheet of paper Selecting multiple pages per sheet saves paper and provides a way to review the layout of a document Sample Copy Sample Copy allows you to print a test copy of a job to inspect before printing multiple copies This feature is useful for complex or high volume jobs After you print and inspec...

Страница 305: ...ic images appear Image resolution is measured in dots per inch dpi Contrast You can use the Contrast feature to adjust the variation between light and dark areas of the image Remove Blank Pages Remove Blank Pages configures the printer to ignore blank pages Book Scanning You can use the Book Scanning feature to scan books magazines or other bound documents Subject Use the Subject option to add a t...

Страница 306: ...m administrator can preset this option Message Use Message to enter information to accompany the email File Format Use the File Format option to specify the format of the saved image or to define a searchable image You can add a password to protect the image or choose to combine multiple images into a single file File Already Exists Use the File Already Exists option to define what action the devi...

Страница 307: ...equirements Cover Sheet You can use the Cover Sheet option to add an introduction page to the beginning of your fax You can add a short comment to the cover sheet as well as To and From details Transmission Header Text It is unlawful to send a message from a fax machine without the proper Transmission Header Text Ensure that the name and telephone number of the sender and the date and time of the ...

Страница 308: ... to identify urgent faxes Priority faxes are sent first Manual Send You can use the Manual Send feature to enable the fax modem speaker temporarily This feature is helpful to dial international numbers or to use phone systems that require you to wait for a specific audio tone Polling Polling allows you to retrieve faxes stored on other fax machines Apps Features ...

Страница 309: ......

Страница 310: ......

Отзывы: