09/2007
6-38
Phaser 8860/8860MFP Service Manual
Electrical Troubleshooting
Initial Issue
Diagnostics
System Resets Unexpectedly
1.
Check the main AC voltage. Connect the system directly to the wall outlet.
2.
Disconnect the network cable, if this corrects the problem go to Network Troubleshooting.
3.
If you are able to enter service diagnostics, view the fault history for any error codes that
may be causing the system to reboot. Troubleshoot any error codes reported.
4.
Turn the system Off and disconnect the document feeder. If the system powers On nor-
mally, replace the DADF (
REP 1.0.15
).
5.
Turn the system Off and disconnect the Scanner. If the system powers On normally,
replace the Scanner Assembly (
REP 1.0.11
).
6.
Replace the Electronics Module (
REP 5.0.5
).
System Reports Missing Maintenance Kit
1.
Check that Drum Maintenance Kit is properly installed.
2.
Reseat I/O Board connector (P/J860).
3.
Replace the Drum Maintenance Pivot Plate (
REP 2.0.16
).
System Report Missing Waste Tray
1.
Check that Waste Tray is properly installed.
2.
Reseat I/O Board connector (P/J110).
3.
Test the Waste Tray Detect Sensor. Replace if necessary (
REP 6.0.6
).
System Features Not Available
NOTE:
Before performing the following steps, check and reinstall scanner cables, if necessary.
Make a copy using the platen. If the copy is good, then make a 2-sided copy from the DADF. If
these checks are good, then the scanner and DADF are operational.
1.
Check that sufficient RAM is installed. 400 x 400 dpi and 600 x 600 dpi scan resolutions
are not enabled with less than 512 MB RAM.
2.
Examine print driver setup to ensure system driver setup doesn't override desired fea-
tures set via the Control Panel.
3.
Verify Configuration Card is properly oriented and fully inserted.
4.
Clean Configuration Card contacts with isopropyl alcohol, reinstall, and then retest.
5.
Exchange the Configuration Card for a known working card to test operation.
System Power Supply
The power supply is divided into two sections: the AC section used for heaters and the DC sec-
tion for control logic, Printhead drivers and motors.
Testing the power supply involves three steps:
1.
Checking for proper AC voltage.
2.
Inspecting the power supply fuses.
3.
Testing for a shorted motor or solenoid driver, which shuts down the power supply.
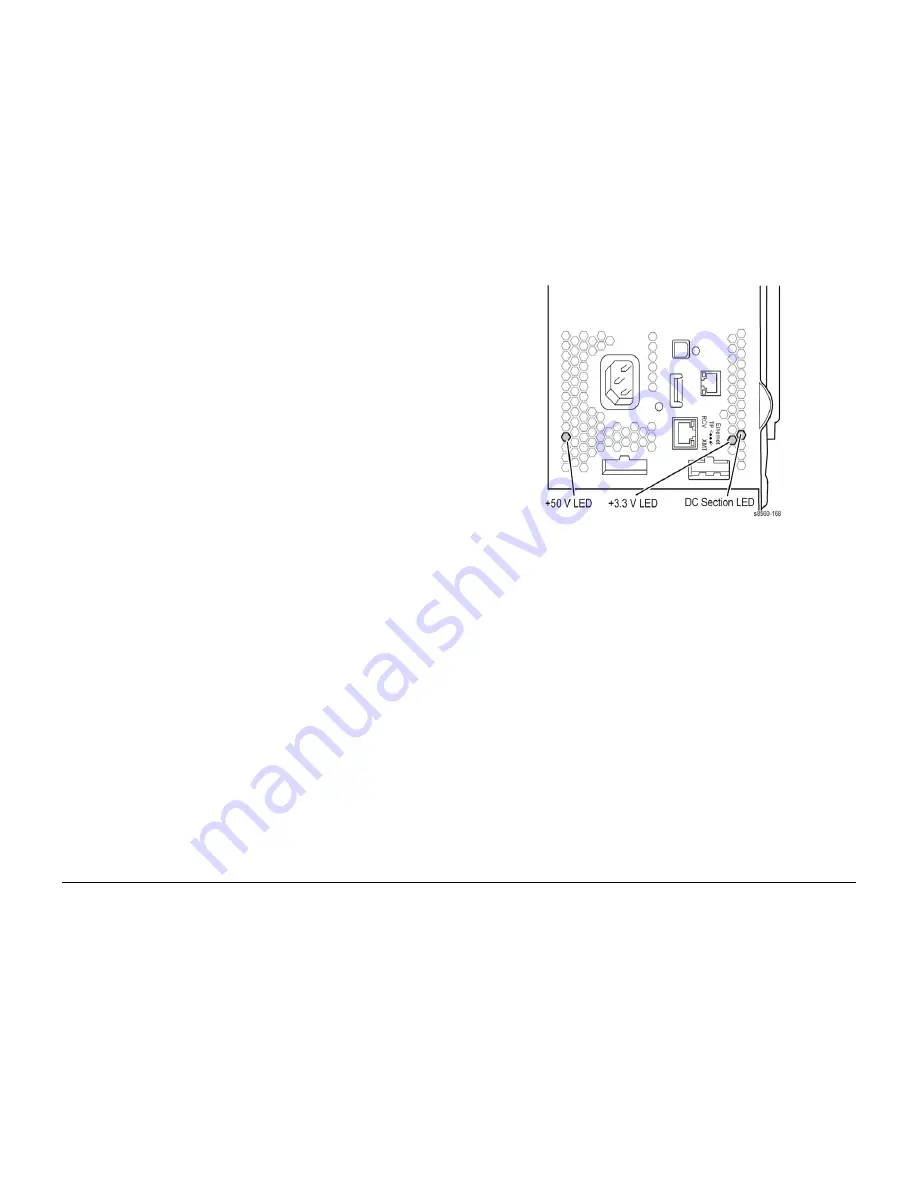
Figure 2 Power Supply Status LEDs
Measuring AC Voltages
AC line voltages are present on the power supply and possibly in the system, via the heaters,
while the system is plugged into an AC outlet. The power switch is detected by software and
proper shut down is followed by a power off signal to the power supply. The system may be
operating for a considerable time after the switch is turned off.
1.
Power off the system and try a different outlet.
2.
Turn off the system, wait for shutdown, and unplug it from the power outlet.
3.
AC Input: With a DMM set to measure AC voltages, measure the power being supplied to
the system; it should measure between 90 to 134 VAC (115 VAC nominal) or 180 to 254
VAC (220 VAC nominal).
4.
If a heater shorts, F2 or F3 opens. The power supply does NOT shut down; however, an
error code is displayed on the Control Panel.
Testing F2 and F3
The Drum and Preheater connect to F2. The Printhead and Ink Loader connect to F3.
1.
Turn the power switch off and wait for the system to shut down.
2.
Disconnect the power cord from the Electronics Module.
3.
Remove the Ink loader Assembly (
REP 2.0.1
).
4.
From the back of the system you will see one heater cable connector (J7) on the left
above the power switch and two (J4 and J5) under the ink loader.
5.
Place the Power Switch in the On position.
6.
Measure the resistance between the lowest pin on J7, and the lowest pin on the AC input
connector (J8). If the meter measures 0 ohms, F3 has not been damaged.
Содержание Phaser 8860
Страница 1: ...705P01205 September 2007 Phaser 8860 8860MFP Service Documentation...
Страница 4: ...09 2007 iv Phaser 8860 8860MFP Service Manual Initial Issue Introduction...
Страница 26: ...09 2007 xxvi Phaser 8860 8860MFP Service Manual System Specifications Initial Issue Introduction...
Страница 28: ...09 2007 1 2 Phaser 8860 8860MFP Service Manual Initial Issue Service Call Procedures...
Страница 34: ...09 2007 2 2 Phaser 8860 8860MFP Service Manual Initial Issue Error Messages and Codes...
Страница 92: ...09 2007 2 60 Phaser 8860 8860MFP Service Manual Jam Codes Initial Issue Error Messages and Codes...
Страница 94: ...09 2007 3 2 Phaser 8860 8860MFP Service Manual Initial Issue Image Quality...
Страница 126: ...09 2007 4 2 Phaser 8860 8860MFP Service Manual Initial Issue Repairs and Adjustments...
Страница 208: ...09 2007 5 2 Phaser 8860 8860MFP Service Manual Initial Issue Parts List...
Страница 222: ...09 2007 6 2 Phaser 8860 8860MFP Service Manual Initial Issue Diagnostics...
Страница 272: ...09 2007 6 52 Phaser 8860 8860MFP Service Manual Printhead Troubleshooting Checklist Printhead Initial Issue Diagnostics...
Страница 274: ...09 2007 7 2 Phaser 8860 8860MFP Service Manual Initial Issue Wiring Data...
Страница 294: ...09 2007 8 2 Phaser 8860 8860MFP Service Manual Initial Issue Theory of Operation...


