background image

Scanning from TWAIN and WIA

Xerox

®

 DocuMate

®

 4799

User’s Guide

7-110

When you scan, any settings you adjusted are automatically saved to the 

Last used settings

 preset.  These 

settings are not retained in a preset until you click 

Save

 in the main interface to save the settings to the current 

preset, or save them to a new preset using the 

Save as

 dialogue.  If you select a different preset from the 

Presets


list before scanning, the changes you made will be discarded.

Scan Regions

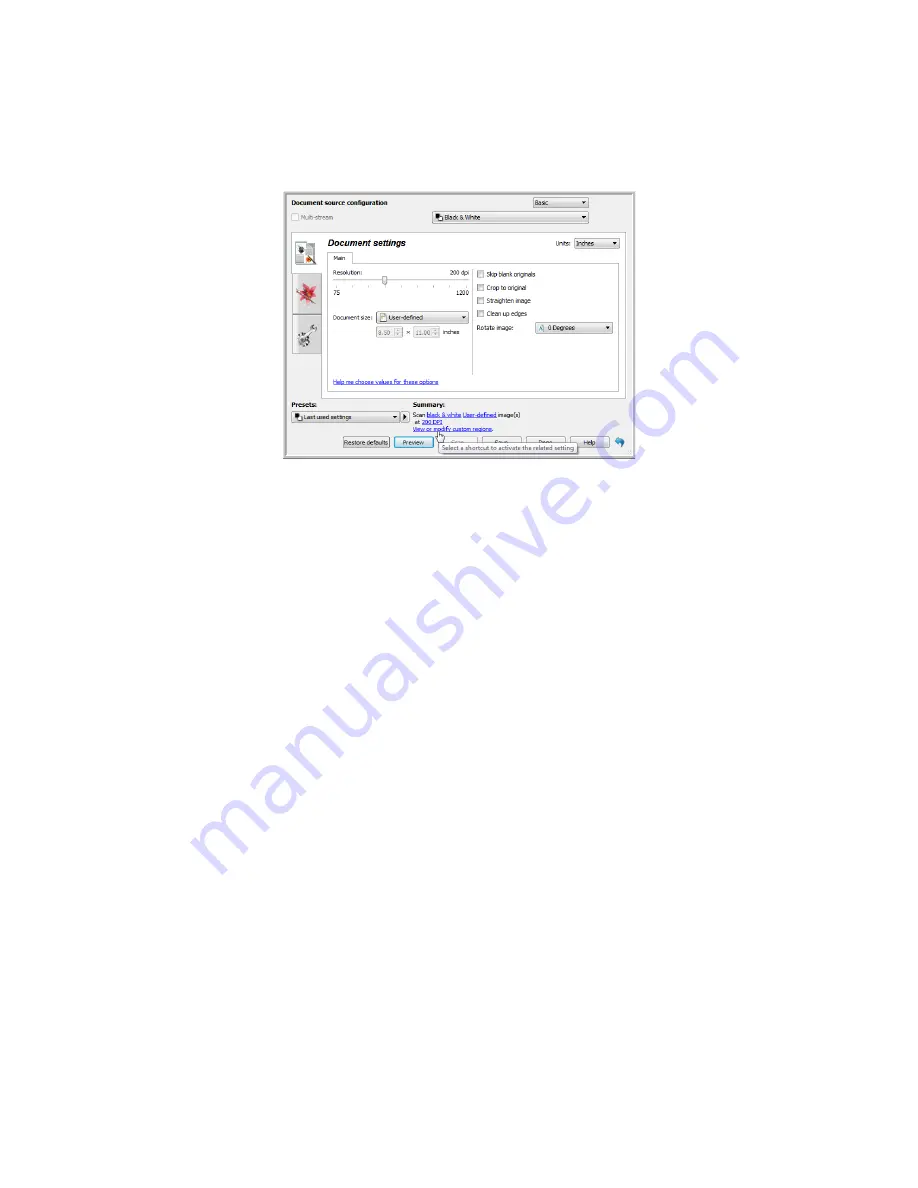
You can use the preview window to create custom scan regions for the scanner to use for scanning. For example, 
if you want to scan only a specific area of the image, you can move and resize a scan region to focus only on the 
area you want to scan. The final image will be only the size of the region you set.

Important

: do not change the page size for the scanned image after you create custom regions. When you have 

set a custom region in the preview window, the page size field will display “user defined” indicating you have 
specified one or more custom regions for scanning. Changing the page size after you create a custom region 
discards the custom regions and sets a single scan region to the size you selected in the page size list.

Creating custom scan regions:

1.

Select the preset you want to use for scanning.

2.

In the main interface click 

Preview

 to open the preview window.

If no previous custom scan regions have been created for the preset you selected, the preview window will 
have a single scan region that is the page size for the current preset. This region will be labeled number 1 and 
be displayed as an outline in the preview area.

3.

Place an item in the scanner and then click 

Get preview

.

4.

The scanner scans and displays a sample image.

Содержание DocuMate 4799

Страница 1: ...Xerox DocuMate 4799 OneTouch 4 6 April 2013 05 0818 100 User s Guide...

Страница 2: ...f Microsoft Corporation Windows is a trademark and SharePoint is a registered trademark of Microsoft Corporation ZyINDEX is a registered trademark of ZyLAB International Inc ZyINDEX toolkit portions C...

Страница 3: ...2 5 Documentation 2 6 The Xerox DocuMate 4799 Scanner 2 7 3 Scanner Setup 3 9 Unpack the Scanner 3 9 Install the Double Feed Prevention roller 3 10 Connect the Scanner Power Cord 3 12 4 Installation...

Страница 4: ...te Single Image Files 6 44 Image Formats 6 44 Text Formats 6 46 Configure Before Scan 6 47 To Scan Using Configure Before Scan 6 48 Open Scanned Document s 6 49 Transfer to Storage 6 50 Setting the Fo...

Страница 5: ...Hardware Properties 6 103 Device Settings 6 104 Driver Settings 6 104 7 Scanning from TWAIN and WIA 7 105 Accessing the Scanner Interface 7 105 Choosing TWAIN or WIA 7 105 Scanning 7 106 Locked Scann...

Страница 6: ...talling a Pre Imprinter 9 161 Installing a Post Imprinter 9 162 Installing an Ink Cartridge 9 163 Adjusting the Printing Position 9 164 User Utility 9 164 Main Screen Options 9 165 Scanner Error Codes...

Страница 7: ...n Union A 185 Other Regulations A 186 Copy Regulations A 186 United States A 186 Canada A 187 Other Countries A 188 B Compliance Information B 189 Product Recycling Disposal B 189 USA Canada B 189 Eur...

Страница 8: ...Xerox DocuMate 4799 User s Guide 8 Table of Contents...

Страница 9: ...ed and tested to meet strict safety requirements These include safety agency examination approval and compliance with established environmental standards To ensure the continued safe operation of your...

Страница 10: ...tlet shall be installed near the equipment and shall be easily accessible 3 Use the power cable that is supplied with your machine Do not use an extension cord or remove or modify the power cord plug...

Страница 11: ...unusual noises The power cable is damaged or frayed A wall panel circuit breaker fuse or other safety device has been tripped Liquid is spilled into the machine The machine is exposed to water Any par...

Страница 12: ...standards listed Environmental Health and Safety Contacts Contact Information For more information on Environment Health and Safety in relation to this Xerox product and supplies please contact the f...

Страница 13: ...f the box If items are missing or damaged contact the dealer where you purchased the scanner System Requirements Pentium 4 PC or AMD equivalent with A DVD ROM drive An available Universal Serial Bus U...

Страница 14: ...d the warranty card is provided for users in Russia and should be filled in as described on the card For all other users please dispose of this card in paper recycling The following soft copy document...

Страница 15: ...ition to create editable text files from the scanned documents Nuance PDF Converter user s guide contains detailed information on using the application to create and modify PDF files Kofax Virtual ReS...

Страница 16: ...f the documents being scanned Start Stop Press to start scanning Pressing the button while scanning is in progress stops the scan ADF cover release Pull to open the Automatic Document Feeder Paper gui...

Страница 17: ...materials in case you need them later 2 Always have at least two people carry the scanner lifting the scanner up from underneath 3 Use a desk or table that can support the weight of the scanner do no...

Страница 18: ...9 User s Guide 3 10 Install the Double Feed Prevention roller 1 Open the Pre Imprinter door 2 Release the retaining screw and then close the Pre Imprinter door 3 Pull on the scanner cover release and...

Страница 19: ...with the brackets in the roller compartment Make sure the groove on the right side of the roller bar is aligned so that it slides in place into the U shape of the bracket 6 The roller is properly in...

Страница 20: ...Close the scanner when you are finished Connect the Scanner Power Cord 1 Select the appropriate power cord for your country 2 Plug the power cord into the scanner and into a wall outlet Note Do not tu...

Страница 21: ...at you remove that scanner s driver program prior to installing your Xerox scanner You can remove these programs from the Windows Control Panel Please refer to the user manual provided with your other...

Страница 22: ...nd select the language to use Click OK The disc s Main menu window opens Note If the disc does not start check the following Make sure the disc drive s door is completely shut Make sure the disc was i...

Страница 23: ...User s Guide 4 15 4 On the Main menu select Install software 5 Leave the default selections and click Install Now 6 Click Install now Note The software provided with your scanner may differ slightly f...

Страница 24: ...ect I Agree then click Next If you choose not to accept the license agreement click Cancel Click Close on the Installation Interrupted window 3 The software will now be installed 4 Stop when you see t...

Страница 25: ...your computer s manual for USB port locations If the plug does not attach easily make sure that you are plugging it in correctly Do not force the plug into either connection 3 Turn on the scanner powe...

Страница 26: ...to close and exit the driver installer Installing the User Utility The User Utility is a software diagnostic and maintenance software that you can use for monitoring your scanner hardware 1 On the Xer...

Страница 27: ...lose the installation window 5 A shortcut icon for the User Utility will be on your Windows desktop and in the Windows Start All Programs menu Installing Visioneer One Touch The Visioneer One Touch so...

Страница 28: ...tools to print to PDF Kofax Virtual ReScan VRS Kofax VRS automatically enhances scanned documents from less than perfect originals It is an additional scanning interface that uses patented VRS Virtual...

Страница 29: ...e Microsoft Office formats available It also offers one click scanning to PDF the most advanced PDF search capabilities excellent graphics management document flattening and auto removal of sensitive...

Страница 30: ...register your scanner You will need an active internet connection to register your scanner If you do not have internet access you can contact our customer service department to register the scanner P...

Страница 31: ...credit cards identification cards overhead projector sheets film and cloth or metallic sheets Photographs or other coated paper as the coating can flake off during the scan process Documents with wet...

Страница 32: ...Thickness this option adjusts how close the rollers are to each other Tap this button to cycle through the options and select the option that matches the thickness of the paper you are scanning Selec...

Страница 33: ...page feeding and paper jams If the edges of the paper are curled or folded flatten them as much as possible Fan the edges of the paper to make sure none of the pages are stuck together 2 Adjust the pa...

Страница 34: ...h or one of the other scanning interfaces Scanning Interfaces If you selected the recommended installation then you have several different options to scan with your Xerox DocuMate 4799 scanner Each me...

Страница 35: ...ee Scan from the One Touch Button Panel on page 30 TWAIN and WIA Interface This option uses your scanner s TWAIN interface to scan Select scanning options before scanning put the document in the scann...

Страница 36: ...Loading Documents to Scan Xerox DocuMate 4799 User s Guide 5 28...

Страница 37: ...e Format The button names such as Email or Copy indicate the original factory settings for a button You can change any of these settings Please see Changing the Button Settings on page 31 for instruct...

Страница 38: ...d on the ISO 216 standard and the majority of the profiles will default to A4 Scan from the One Touch Button Panel Scanning from the button panel on your computer s screen works like pressing a button...

Страница 39: ...eft click on the arrow buttons on the right side of the panel to view the rest of the One Touch buttons The Detail View Left click on a Destination Application icon to start scanning Right click on a...

Страница 40: ...t in scanned images is automatically converted to word processing text 6 Select a file format in the Select format panel The formats are based on the type of Destination Application you select The ico...

Страница 41: ...es the window open so you can continue making additional changes Cancel closes the window without accepting any changes Selecting Options for One Touch Use the Options tab to configure how One Touch w...

Страница 42: ...ple Destinations on page 84 Instant delivery enables image transfer to the destination while scanning is in progress provided that Create Single Image Files is also selected If Create single image fil...

Страница 43: ...ays 04 DDD inserts the abbreviated 3 letter day Mon DDDD inserts the full name of the day Monday M inserts the numeric month without a zero added to single digit months 8 MM inserts the numeric month...

Страница 44: ...s are where you select the scanning resolution brightness mode color black white or grayscale and a number of other settings To see a selected scan configuration s settings click its icon Click the ic...

Страница 45: ...one of these additional settings tabs please refer to the appropriate section as listed below for instructions on configuring these destination specific options Use the Storage Options tab to choose t...

Страница 46: ...d image lighter or darker Contrast the difference between the lighter and darker portions of the image Increasing the contrast emphasizes the difference between the lighter and darker portions decreas...

Страница 47: ...s enabled and the option selected is When a blank page is detected the sensitivity level for Skip Blank Originals is the sensitivity level that will be used when both features are enabled Note that wh...

Страница 48: ...f a color This option is only available when the selected scan mode is Color Color hue the color your eyes see as reflected from the image This option is only available when the selected scan mode is...

Страница 49: ...ack side of the pages Click Add to add a line item to the area list in this window You can redact multiple areas from the scanned image click the Add button again to continue adding line items to the...

Страница 50: ...the preview field will show the gray version of the color you selected and that color will be in the final scanned image When scanning in Black White the preview field will display black or white depe...

Страница 51: ...estination Transfer to Storage all file formats are available as the files are saved directly to a folder without opening any application If the destination is an application such as Microsoft s Paint...

Страница 52: ...ormat icon BMP the bmp bitmap format is generally used when you want to do additional image processing such as photo touch up or color correction as very little image compression is used when creating...

Страница 53: ...ndow TIFF the tif tagged image file format format is another image type that is often used for photo editing When scanning in color it produces a file of similar quality and size to a BMP file However...

Страница 54: ...t selected the text portions of the document are automatically converted to editable text Select a text format for documents with text or numbers such as a business letter report or spreadsheet The te...

Страница 55: ...window Configure Before Scan You can set up the scanner so that when you press a button or click it on the Button Panel a different scanning interface opens before the scanning starts You can then us...

Страница 56: ...ace opens 3 Choose your scan settings such as the Picture Type of Color Grayscale or Black White Resolution in DPI and Page Size 4 Click the Scan button on the TWAIN Interface 5 The item is scanned Wh...

Страница 57: ...nd second will be sent to the Destination Application Choose this option if for instance you have been scanning a Black White document but you want to insert a color page into it Instead of having to...

Страница 58: ...s still sent to the other selected destination application s in One Touch Transfer to Storage With Transfer to Storage you can scan documents and save them in a folder in one step Supported file types...

Страница 59: ...ettings for this destination Storage layout All documents are in the root the scanned documents are saved in the root of the folder specified in the Storage location Documents are put into folders by...

Страница 60: ...h Link Properties storage location updated Any scan configurations that you have not previously updated with custom storage locations will also use this location For configuration used by a button whe...

Страница 61: ...er Setting Up Multiple Folders for Transfer to Storage 1 Using Microsoft Windows create the folders that you want to use for storing scanned items 2 Open the One Touch Properties window 3 Select Trans...

Страница 62: ...cted folder will now be set as the Storage location such as Business Receipts 11 Click OK The new configuration is now listed as a Transfer to Storage configuration 12 Repeat the process to create add...

Страница 63: ...the documents are stored in the two separate folders Burn to CD ROM If you have a CD burner attached to your computer you can scan directly from your scanner onto a CD This feature is available only o...

Страница 64: ...temporary location for CD files An information bubble will appear in the Windows notification area telling you that there are files waiting to be burned to CD 6 When you are ready to burn the files to...

Страница 65: ...a printer or fax as only uncompressed data can be send to these devices Destination type printers and Faxes are classified as Device Links To make them available in the destination list you must selec...

Страница 66: ...format and the device is printing in the Portrait mode or vice versa rotate the image to fit on the page Collate copies if you are printing more than one page collate the copies Enter the number of c...

Страница 67: ...dow When you create new configurations the default settings will also match what you have selected here If you modify the options in an individual configuration changing the options in this Link Prope...

Страница 68: ...ation you need to configure this link Alternatively have your site administrator or IT professional configure this link for you Setup and configuration of the SharePoint sites and user accounts are ou...

Страница 69: ...tion for your SharePoint site Protocol select which protocol you want to use to transfer the scan to the server SharePoint URL input the full URL path of the SharePoint site without the http s designa...

Страница 70: ...uration is done through the scan configuration you can set each configuration to scan to different SharePoint site folder filename format using different user credentials and so on This is the same pr...

Страница 71: ...r site administrator or IT professional configure this link for you Setup and configuration of the FTP server and user accounts are outside the scope of this document Supported file types all image an...

Страница 72: ...you want to use to transfer the scan to the server Host input the internet or intranet path of the server where you want to send the scanned documents you do not need ftp at the beginning For example...

Страница 73: ...ogs for and select FTP Link Agent from the list to display the transfer history for the FTP link only Double click on any of the line items to open the selected log file in the Log File Detail View If...

Страница 74: ...e if an OCR module or application is installed Please refer to Text Formats on page 46 to see a list of text file formats that are available when OCR is installed Destination type the SMTP destination...

Страница 75: ...essage through the SMTP server Email to input a valid recipient email address to receive the scanned document If it is not a valid address the transfer will fail Email from input the email address you...

Страница 76: ...e SMTP One Touch Link Properties window There are no global configuration properties for the SMTP destination application all configuration is done using the Scan Configuration Properties window as de...

Страница 77: ...Options tab in the One Touch Properties window The email application in the One Touch destination list is the default email program selected in the Internet Options of Internet Explorer Click on the e...

Страница 78: ...One Touch Text Editors Scanning to a text editing application such as Microsoft s Notepad or WordPad automatically converts the text in the scanned image into editable text using Optical Character Re...

Страница 79: ...etected or recognition fails and add other applications to One Touch Note that if you recently installed an application click the Refresh button to see if One Touch will automatically configure the li...

Страница 80: ...application button The Add Text Based Link dialog box opens 2 Click Browse to find the application you want to add to the list When you select the application using the Browse button Steps 1 and 2 on...

Страница 81: ...re done making changes in this window click the Add button to accept the changes and close the window 6 Click OK on the Link Properties window 7 Click Refresh on the One Touch Properties window and th...

Страница 82: ...ed as an Event Forward Link To make it available in the destination list you must select STI event forwarding on the Options tab in the One Touch Properties Window Please note that if you have turned...

Страница 83: ...When the Control Panel is in Category View Windows XP or Home View Windows Vista 7 and 8 the Scanners and Cameras group will be located under either of the following main groups Windows XP Printers a...

Страница 84: ...Image Link To make it available in the destination list you must select Image editors i e Paint on the Options tab in the One Touch Properties window If the image editing application you are using do...

Страница 85: ...when One Touch is installed cannot be deleted Color document handling click in the Color document handling settings boxes for the options you want These options will apply to all the applications in...

Страница 86: ...final scanned image has not been compressed Tagged Information File select this option if your application supports TIF image files The TIF file format supports multiple pages in a single file JPEG Co...

Страница 87: ...plication Any pictures in the scanned image are isolated from the text the text on the page is recognized and turned into editable text and the pictures are placed back into the document in the same f...

Страница 88: ...k the Add application button The Add Text Based Link dialog box opens 6 Click Browse to find the application you want to add to the list When you select the application using the Browse button Steps 1...

Страница 89: ...changes in this window click the Add button to accept the changes and close the window 10 Click OK on the Link Properties window 11 Click Refresh on the One Touch Properties window and the new applica...

Страница 90: ...eating or modifying All other configurations will retain their settings for this destination To configure a destination application for the Send to Application link 1 Click Browse to open the Windows...

Страница 91: ...page file so when scanning multiple images WordPad would need to launch only one time when this option is not selected If you scan to WordPad and this option is still selected then WordPad will open 1...

Страница 92: ...bled separately for each One Touch button 1 Open the One Touch Properties window and click on the Options tab 2 Select Enable scanning to multiple destinations then click back on the configuration tab...

Страница 93: ...e destination instructions as described in the previous section s for configuring destination specific options Click on OK when you are done making changes in this window 5 Select the file format you...

Страница 94: ...ties window 8 Load the document s in the scanner and start scanning with the button you set to scan to multiple destinations The scanner starts scanning and when finished the image is sent to each des...

Страница 95: ...on you want to modify Note that the options in this window are specific to each One Touch button 5 Click on the option Use job separator when scanning multiple pages 6 Select one of the two job separa...

Страница 96: ...l be sent as it is created The options on the Page Settings tab in the Scan Configuration Properties window will affect the job separation options as described below Skip blank originals The Sensitivi...

Страница 97: ...a text file format in the Select format panel For example if you want to edit your document in Microsoft s WordPad select that application then choose a file format such as TEXT or RTF 3 Click on OK t...

Страница 98: ...editable text As you select Destination Applications that are text applications the text format icon changes to match the file type of the application In some cases the Destination Application suppor...

Страница 99: ...ation is a Storage location Simple Text the txt file format Text with no formatting used by the standard Microsoft Notepad application Rich Text Format the rtf file format Text that retains formatting...

Страница 100: ...ments with harder to read text or lower quality graphics to get the best possible scan output image The Use MRC option is available for sPDF and PDF Selecting One Touch OmniPage OCR Options The softwa...

Страница 101: ...quality levels of the OCR processing 1 Choose the options you want from the OCR window Languages in Document click on the language s in list that correspond to the languages in the documents to be sc...

Страница 102: ...t You can create multiple user dictionaries See the section Creating Your Own Dictionaries on page 95 Click the menu arrow and select a user dictionary from the list If you select none as the user dic...

Страница 103: ...ry followed by a carriage return Make sure to spell the words correctly as they will be used for spellchecking Here is an example of what the text file might look like Xerox One Touch OmniPage wysiwyg...

Страница 104: ...ple of a user dictionary 8 Click Add New The Add New User Dictionary window opens 9 Click the drop down arrow for Files of type and choose Text Files txt 10 Select the file you just created for your u...

Страница 105: ...ts list of words can be edited To edit a user dictionary 1 On the Add New window select the dictionary to edit and click Edit The Edit User Dictionary window opens It lists the words currently in the...

Страница 106: ...ictionary list 6 To export a user dictionary so it can be used by another program select the dictionary on the User Dictionary Files list and click Export The Export User Dictionary window opens 7 Sel...

Страница 107: ...column with table choose this option if your document contains only one column of text and a table The table will be placed in a grid in the Destination Application you have selected You can later sp...

Страница 108: ...only available for documents scanned with the XLS format 2 Click OK or Apply These options will now apply to the OCR processing when you select any text format as the page format OneTouch with Visione...

Страница 109: ...to use for the new scan configuration The options are Do not use Acuity image processing scanning will not use the Acuity processing Default settings automatically selects the options your scanner can...

Страница 110: ...ption identifies these spots and removes them This option is only available when scanning in Black White Color dropout color dropout is the ability of your scanner to automatically remove a color from...

Страница 111: ...e 4799 User s Guide 6 103 Hardware Properties 1 Right click on the One Touch icon and choose Show Hardware from the pop up menu 2 The Hardware Properties dialog box opens and shows information about y...

Страница 112: ...Scanning and Configuring One Touch Xerox DocuMate 4799 User s Guide 6 104 Device Settings Please refer to Device Settings on page 150 Driver Settings Please refer to Driver Settings on page 151...

Страница 113: ...you get a message that the scanner is not in the PaperPort database follow the instruction on screen to run the Scanner Setup Wizard Nuance OmniPage Go to Tools then select Options Click on the Scann...

Страница 114: ...to your Windows documentation for WIA scanning instructions if you do not see the interface described below or if you have any questions regarding Windows scanning applications Scanning Some features...

Страница 115: ...e instructions for changing this setting are in the Driver Settings section of this guide If you are unable to change this setting the option may have been set by your system administrator Please cont...

Страница 116: ...or you to move or resize it If you move resize or add scan regions the main interface will display User defined for the page size Please refer to Scan Regions for instructions on creating resizing and...

Страница 117: ...mage If you select any of the document image adjustment options such as an option to automatically crop straighten or rotate an image it will not show in the sample image preview The preview window di...

Страница 118: ...the region you set Important do not change the page size for the scanned image after you create custom regions When you have set a custom region in the preview window the page size field will display...

Страница 119: ...mouse button down and then drag your mouse to create a scan region Release the mouse button when the area you want is within the rectangle If you want to create a region that overlaps another region h...

Страница 120: ...for each region set in the preview window The number of scan regions you can create is limited by the scanner model and installed modules For instance most scanners have only one region When you sele...

Страница 121: ...utline The cursor will change to a dual directional arrow Click on the line and drag the mouse to resize the region If you click on the top or bottom edge you can only resize the region up or down If...

Страница 122: ...click on the region that is in the way and select Temporarily send this region to the back to move that region behind the one that you want to move or resize This is a temporary change in the region o...

Страница 123: ...ther regions will have their number update automatically as appropriate Make this the last region select this option to set the region number to the last number in the processing order This option is...

Страница 124: ...e scans the document in bitonal where everything on the page is either black or white This setting is often used when scanning typed or written documents When there are not a lot of graphics or if the...

Страница 125: ...able Sides identical is in the source configuration list the color mode is not the only option that can be individually configured for each side Other options in the scanner interface such as resoluti...

Страница 126: ...d delete presets After presets have been added to the interface click the drop down menu and select an option from the list If you select the Last used settings preset then adjust the settings in the...

Страница 127: ...ner interface as needed 3 Click Save To rename a preset 1 Select the preset you want to rename in the preset list 2 Click the right pointing arrow button and select Rename 3 Type an new name for the p...

Страница 128: ...rrow and select Export from the list 2 Click on the browse button next to the Destination folder field to open a file browsing window 3 Browse to a location and select the folder where you want the pr...

Страница 129: ...presets The preset you selected will have a counting number added to the end of the preset name for example Custom preset name 2 The original preset name will remain unchanged Skip select this option...

Страница 130: ...Note the software will look for duplicate preset names If you see a notification indicating that a preset with the same name already exists select one of the options on screen to continue Overwrite se...

Страница 131: ...anced document handling options If you select an option in this panel that also appears on the Main panel when you return to the Main panel that option will be selected Scanner model panel this panel...

Страница 132: ...le Main Panel Options Some of the options in this panel may have advanced adjustment options on a different panel in this section When the Advanced configuration mode is selected an icon will appear n...

Страница 133: ...hs 150 200 dpi will create an image of similar quality to the original Higher resolution settings are generally used for creating an image that can be enlarged without losing image quality but take lo...

Страница 134: ...will be split across multiple images For example if you are scanning a document that is 22 inches long and the field is set to 11 inches the final scan will be split across 2 images Note that some of...

Страница 135: ...straight through the scanner Rotate Image Select an option in this list to have the final image rotated when scanning is complete Flip Back Side Select this option if you are scanning duplex pages th...

Страница 136: ...xample if you are scanning a batch of mixed documents such as cheques and statements you may want both sides of the cheques merged into one image but not the statements The Height threshold needs to b...

Страница 137: ...he paper guides to the width of the paper in the input tray so that the pages feed into the scanner as straight as possible Skewed pages may not crop properly Crop to length this option tells the scan...

Страница 138: ...an application It is only available if the application you are using can accept a compressed image file For instance if your scanning application is set to receive JPEG compressed images then the Com...

Страница 139: ...c waves are aimed at the document to detect multiple pages by the level at which the waves pass through the pages The accuracy of this sensor depends on paper thickness and whether or not creasing is...

Страница 140: ...hen retain an image of the sheet in the output scan Detect and exclude the scanner will detect the sheet and then discard the image of the sheet so that it is not included in the output scan The actio...

Страница 141: ...types of control sheets available on the scanner s installation disc for you to print and use The file is located in the user guides section for the scanner on the installation disc Print the sheets...

Страница 142: ...essing you want applied for the items being scanned Main panel this panel contains the most commonly used scan settings Some of the options in this panel may have adjustment options on the other panel...

Страница 143: ...ced adjustment options on a different panel in this section When the Advanced configuration mode is selected an icon will appear next to those features which have adjustment options on another tab Cli...

Страница 144: ...e contrast level to make the differences between the lightest and darkest part of the image more defined Color image brightness examples The examples below show the original image at the default setti...

Страница 145: ...ake the transition of colors in the image appear smoother Adjusting the contrast level is based on how you want the image to appear and there is no standard to adhere to Contrast works in conjunction...

Страница 146: ...o darken or lighten the image As you raise or lower the Gamma value the values at which Brightness and Contrast affect the image are changed It is recommended that you keep the default gamma value or...

Страница 147: ...nufacturer has any recommended settings Invert Image The Invert image option reverses the color of each pixel in the scanned image When scanning in black and white each pixel is reversed from black to...

Страница 148: ...ext such as business letters spreadsheets reports etc Threshold move the slider to the left or right to set the level of lightness or darkness for the scanner to leverage from For example if you are s...

Страница 149: ...the image is at normal size or enlarged you will be able to clearly see the dithering pattern as shown in the close up image Bayer dither scan Close up Mixed Content Options Text and Graphics If the...

Страница 150: ...color to be dropped out of an image To input a custom color using its RGB value select Custom in this list and then input the values for R G and B in their appropriate boxes where R G and B are number...

Страница 151: ...ese options When you have selected the automatic color mode you will also need to choose either Gray or Black White Ignore document color select this option to have the scanner ignore the color of the...

Страница 152: ...ections of 3x3 pixels and if there are more than 5 stray dots within a 3x3 area they are not considered a speckle Image Emphasis Select how much to emphasize image content when scanning printed items...

Страница 153: ...various types of items that can be scanned With this feature you may have to test scan a few times adjusting the Moir radius as needed until you obtain the best results for the type of paper in your s...

Страница 154: ...for it to detect and set the background as white in the image When Visioneer Acuity is installed we recommend you use Remove background if you want to have the background automatically removed without...

Страница 155: ...pencil notes appear black in the image You can set a value for black from 0 to 127 If you set this value to 127 you are telling the scanner that all pixels that are grey level 127 or lower darker shou...

Страница 156: ...atic image rotation option the first module s rotate option is used and the rotate setting in the second module is ignored so that the image is not rotated twice Scanner Configuration The scanner conf...

Страница 157: ...Utility helps you monitor the scanner status and maintenance information This button will be disabled if the Xerox User Utility is not installed You can install the User Utility from the installation...

Страница 158: ...select this option to stop being notified of the different version if you do not want to update the firmware Update click this button to update the scanner s firmware with the latest revision provided...

Страница 159: ...mpleted since the last time a part has been replaced Show maintenance reminders select this option be notified when it is time to clean or replace the rollers After cleaning or replacing the rollers c...

Страница 160: ...ransfer complete for this option to work Profile overrides capabilities some scanning applications have the option to adjust the scan settings and scan without opening this scanner interface The next...

Страница 161: ...User Guide for instructions on scanning the ISIS interface Open the QuickScan software to access the ISIS driver scanning options Please note that you may see the following warning message 1 Please di...

Страница 162: ...Scanning from ISIS Xerox DocuMate 4799 User s Guide 8 154...

Страница 163: ...ite The background color is important as it may affect the cropping quality of the scanned document Each scanning application is different so you should choose the color black or white based on the be...

Страница 164: ...ackground 5 Carefully close the scanner when you are finished Replacing the Rollers Frequent paper jams are a symptom of a worn roller assembly A worn roller can cause documents to feed in skewed at a...

Страница 165: ...oller count in the user utility as described on page 166 Warning keep all replaceable parts out of the reach of children These parts are small and pose a choking hazard Turn off the scanner power then...

Страница 166: ...wards you to access the rollers 2 Rotate each roller towards you until you see the plastic arm holding it in place 3 Pinch the plastic tab that locks the roller to the metal bar and pull the roller aw...

Страница 167: ...he rollers onto the bar The rollers will click when they are locked in place 7 Lift the roller cover up and carefully push it closed to lock it in place Make sure everything is aligned properly and th...

Страница 168: ...be repaired or reused 4 Take the new roller out of its packaging 5 Align the roller bar with the brackets in the roller compartment Make sure the groove on the right side of the roller bar is aligned...

Страница 169: ...de of the page before the image is captured and the printed text is then reflected in the scanned image If you have a post imprinter installed the text is printed on the back side of the page after th...

Страница 170: ...eft side line up with the slots in the scanner Gently press down on the imprinter unit until it clicks in place 4 Connect the cable to the connection port in the scanner 5 Close the pre imprinter door...

Страница 171: ...ots in the scanner Slide the imprinter unit down until it locks in place 5 Close the post imprinter door when you are finished Installing an Ink Cartridge 1 Turn off the scanner 2 Open the imprinter d...

Страница 172: ...Adjusting the Printing Position You set the horizontal start position by moving the ink carriage in the imprinter unit itself Move the ink carriage left or right and align the arrow tab to the approp...

Страница 173: ...rox from the programs list 4 Select User Utility to open the software If you are prompted to select a scanner make sure your scanner is selected then click on OK Main Screen Options This section brief...

Страница 174: ...tructions Caution Setting clicking this button opens a window for you to set when to receive a notice that it is time to clean the rollers Scanner Counter this section shows the number of pages scanne...

Страница 175: ...ner remove the pages then close the scanner Adjust the paper guides to the document width Restack the paper in the ADF and click Retry to continue If problem persists clean the rollers and paper senso...

Страница 176: ...um number between replacement The rollers should be replaced every 300 000 scans or as needed if cleaning the rollers does not improve paper feeding issues After replacing the rollers click on Clear C...

Страница 177: ...nd 60 4 Click OK to save the changes and close the Sleep Mode window Buzzer Setting 1 Open the scanner User Utility application 2 On the main window click on the Buzzer Setting button 3 When the Buzze...

Страница 178: ...Adjustment If your Shading Paper is not in like new condition please order a replacement at www xeroxscanners com in the Parts Accessories page for your scanner Change the front and back background re...

Страница 179: ...ets the adjustment for the white background plate The Now Adjusting message box will close automatically when the white background Shading Adjustment is complete 8 After the white background shading a...

Страница 180: ...ge quality 1 Open the scanner User Utility application 2 On the main window click on the User Shading button 3 Click on the Restore Default button 4 Click on OK to restore the factory default adjustme...

Страница 181: ...paper vigorously back and forth across the roller this will shred the roller cleaning paper and leave debris in the scanner Safety Precautions Warning The roller cleaning paper is moistened with Isopr...

Страница 182: ...e scanner 2 The following illustration shows where the rollers are located in the scanner Use a roller cleaning paper to clean all of the rollers indicated in the illustration Note Be careful when cle...

Страница 183: ...lication 2 From the main screen click on Clear Counter next to the field After Clean Roller 3 The clean roller count will now be reset to 0 4 Close the User Utility Cleaning the Scanner Glass and Back...

Страница 184: ...lean the glass plates if there is any sticky residue on the surface Cleaning the Paper Sensors The scanner has several sensors to detect the status of the paper when it is in the scanner You should cl...

Страница 185: ...move the brush tip from the Blower Brush and set it aside you will be using only the blower to clean the sensors Cleaning the ADF Sensors 1 Pull on the scanner cover release and lift the lid to open t...

Страница 186: ...ic Document Feeder use the following procedure to remove the paper from the scanner 1 Pull on the scanner cover release and lift the lid to open the scanner Do not attempt to remove a jammed page with...

Страница 187: ...needed If the original is crinkled torn dirty or smudge try scanning from the Kofax Virtual ReScan VRS software VRS is a powerful image enhancement application that you can use to filter this type of...

Страница 188: ...will open a new instance of that application If you want to have an image open in an application immediately limit your scan batch to less than 5 pages Alternatively you can set your destination to be...

Страница 189: ...porarily disable or suspend the automatic protection feature during scanning After scanning is complete and your file has been saved turn the auto protect feature back on You do not need to close the...

Страница 190: ...for your scanner at www xeroxscanners com Visioneer Acuity is a utility with advanced image processing options to instantly improve the visual clarity of anything you scan 1 In the list of installed p...

Страница 191: ...s 470 mm Depth 23 00 inches 580 mm Height 13 00 inches 330 mm Weight 55 pounds 25 kg Operating temperature 59 86 F 15 30 C without condensation Relative humidity 30 80 30 C without condensation Power...

Страница 192: ...and numbers when ordering replacements for your scanner Part Name Part Number Roller Exchange Kit Double Feed Prevention Roller Feed and Separation Rollers 70 0566 000 USB Cable 35 0113 000 Power Cor...

Страница 193: ...erence at his own expense WARNING In order to allow this equipment to operate in close proximity to Industrial Scientific and Medical ISM equipment the external radiation from ISM equipment may have t...

Страница 194: ...tain circumstances Penalties of fine or imprisonment may be imposed on those guilty of making such reproductions 1 Obligations or Securities of the United States Government such as Bonds and Obligatio...

Страница 195: ...rts Foreign Passports may be photographed 7 Immigration Papers 8 Draft Registration Cards 9 Selective Service Induction Papers that bear any of the following Registrant s information Exception U S Arm...

Страница 196: ...harged with the duty of making or issuing certified copies thereof where the reproduction falsely purports to be a certified copy thereof 9 Copyrighted material or trademarks of any manner or kind wit...

Страница 197: ...chlorate containing devices such as batteries Special handling may apply please see http www dtsc ca gov hazardouswaste perchlorate European Union RoHS and WEEE Compliance This product is compliant wi...

Страница 198: ...se governments and the office equipment industry to promote energy efficient copiers printers fax multifunction machine personal computers and monitors Reducing product energy consumption helps combat...

Страница 199: ...omponents 2 7 Compress transfers 7 129 Compression 7 130 Compression Options 7 129 computer specifications 2 5 Configure Before Scan 6 36 cancel 6 48 Contrast 6 38 7 136 7 137 Control sheet action 7 1...

Страница 200: ...l From Document 7 146 Instant Delivery 6 34 Interface 9 166 Internet Options 6 70 Invert Image 6 39 Invert image 7 139 ISIS Interface 8 153 J JPG Image quality and file size 6 45 6 46 JPG file format...

Страница 201: ...xt Format 6 91 Rotate image 7 127 RTF file format 6 32 6 89 rtf file format 6 91 S Saturation 6 40 Scan configuration 6 29 6 53 Edit or Delete 6 37 Lock or unlock 6 38 New 6 36 Scan Settings Tab 6 37...

Страница 202: ...ile format 6 44 Transfer to Storage 6 50 6 52 file formats 6 47 true page 6 100 TWAIN interface 6 48 6 49 TXT file format 6 32 6 89 U Update All Counter 9 166 Updates 4 22 USB cable 4 17 Use languages...

Страница 203: ......

Отзывы: