background image

Configuring the McAfee VirusScan

55

9.

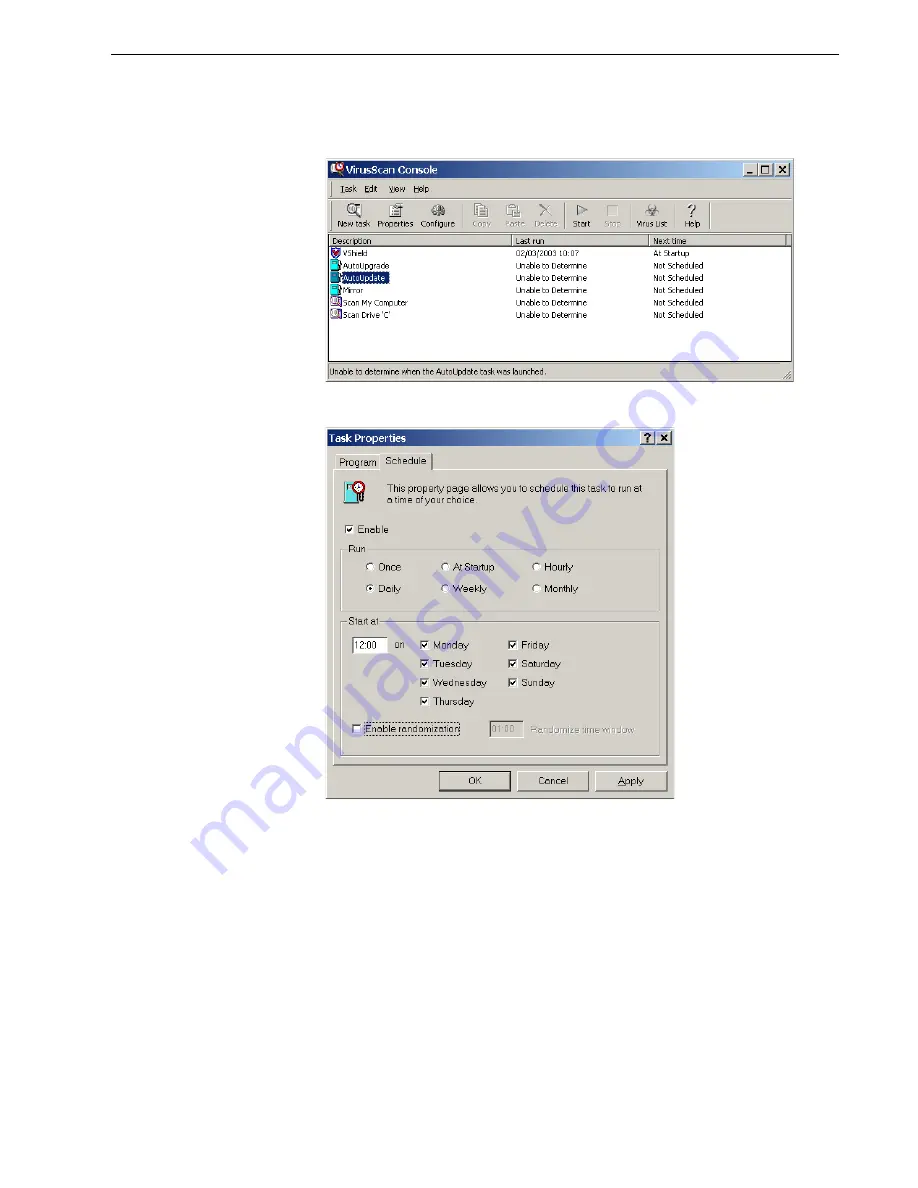
Open the VirusScan console by following the path, 

Programs > Network 

Associates > VirusScan Console

.

10.

In the VirusScan Console window, double-click 

AutoUpdate

.

In the Task Properties window, select the 

Schedule

 tab.

11.

Select the 

Enable

 check box and in the 

Run

 area select 

Daily

.

The 

Start at 

time chosen should be after printing hours, but before the Spire 

CXP8000 color server is turned off for the day.

12.

You have completed 

Configuring the McAfee VirusScan.

Содержание DocuColor 8000

Страница 1: ...www creo com Software Installation Guide English Spire CXP8000 Color Server for Xerox DocuColor 8000 Digital Press version 1 0 731 00293A EN ...

Страница 2: ... trademarks or registered trademarks of their respective owners No copying distribution publication modification or incorporation of this document in whole or part is permitted without the express written permission of Creo Inc In the event of any permitted copying distri bution publication modification or incorporation of this document no changes in or deletion of author attribution trademark leg...

Страница 3: ...e Creo Application Software 15 Disk Striping 15 Using the Configuration Wizard 24 Installing and Configuring Novell Client for Spire 37 Configuring the McAfee VirusScan 37 Enabling Unix Connectivity 37 Activating Windows XP 38 Backing Up the Creo System Partition 41 Performing a Test Print 41 Reinstalling the Software Preservation Installation 42 Appendix A Formatting the Image Disk 43 Appendix B ...

Страница 4: ...This page is intentionally left blank ...

Страница 5: ...he network or on an external device to prevent loss of data in case your system disk becomes corrupted Perform the backup and recovery procedure at any time that you want to back up and restore the Creo system partition and the job list database Windows XP activation is not required To reinstall the software configuration Perform either a complete overwrite of the entire system or only a system pa...

Страница 6: ...see Reinstallation in the following row Not required Reinstallation System Partition Overwrite Windows operating system is corrupt Unrecoverable system crash Complete Overwrite System disk replacement Upgrading the system disk Required Required Required Required Notes There are two reinstallation methods System Partition Overwrite which overwrites partition C should be performed when the Windows X...

Страница 7: ...lowing table outlines the Spire CXP8000 color server disk configuration Disk 0 C Windows XP Professional software Creo application D Spool files Shared files Output directory files APR high resolution files Backup folder Disk 1 Image storage Disk 2 Image storage Disk 3 Image storage ...

Страница 8: ...e software are described in detail in the following sections Backing Up the Creo System Partition You can back up the Creo system partition at any time When you backup your Creo system partition Norton Ghost copies the files on partition C to an image file on partition D 1 Turn on your computer 2 Place CD 1A Windows XP Fast Install in the DVD ROM drive 3 Restart the computer Attention Before perfo...

Страница 9: ...e 7 A message appears instructing you to remove the CD from the DVD ROM drive and restart the computer Remove the CD and press CTRL ALT DELETE to restart the computer You have completed Backing Up the Creo System Partition Backing Up the Job List Database If you back up the Creo software and configuration Backing Up the Creo System Partition on page 4 your job list database is also backed up If at...

Страница 10: ...6 Spire CXP8000 Color Server 1 0 Software Installation Guide 4 In the Scripts window double click Backup_Joblist bat 5 When the backup is complete the following message appears ...

Страница 11: ...t job list will be replaced with the old job list that was saved while backing up partition C 1 If required return the ghost file or files SYSPART File Name you moved to an external device to D Backup 2 If your Spire color server is on and the Spire workspace is open a Exit the workspace b Place CD 1A Windows XP Fast Install into the DVD ROM drive c On the Windows desktop follow the path Start Shu...

Страница 12: ...artition Yes No 6 If you press N No the following message appears Please remove the CD ROM and floppy from the drive and press CTRL ALT DELETE to reboot the computer a Backup the job list database see Backing Up the Job List Database on page 5 b Return to step 2 and repeat the procedure 7 If you press Y Yes the Norton Ghost window appears and the files on partition D are restored to partition C 8 ...

Страница 13: ...rent job list database with your original job list database 1 Turn on your computer 2 Exit the Spire application 3 On the Windows desktop double click My Computer and follow the path D Backup Scripts 4 In the Scripts window double click Restore_Joblist bat Note If you are already logged on your system and the Spire CXP8000 color server workspace is open exit the workspace and proceed to step 3 ...

Страница 14: ...XP8000 Color Server 1 0 Software Installation Guide The following message appears 5 Press Y to continue The following window appears 6 Press any key to continue You have completed Restoring the Job List Database ...

Страница 15: ...ostly unattended User interaction is needed only to insert CD 1B into the DVD ROM drive and for entering the OS license number and the computer hostname for restarting the computer when requested for inserting the final application CD and for the Configuration Wizard The reinstallation of the system requires three CDs Two CDs 1 CD 1A and 1B Windows XP Professional Fast Install One CD 2 CD 2 Spire ...

Страница 16: ...sh or system disk replacement For more information see Backing Up and Restoring the Software on page 4 Reinstall the operating system Windows XP Stripe the Disks Reinstall the Creo application Use the Configuration Wizard First Time Configuration if recovery fails or no backup is available DFE Configuration Recovery if backup is available Install virus protection software highly recommended Instal...

Страница 17: ...erver workspace is open a Exit the workspace b Place CD 1A Windows XP Fast Install into the DVD ROM drive c On the Windows desktop follow the path Start Shut Down Restart OK Wait until the PC DOS 7 1 Startup menu appears If your Spire color server is off a Press the Power On Off button on the front panel b As soon as power is applied place CD 1A Windows XP Fast Install into the DVD ROM drive Wait ...

Страница 18: ...rs type the 25 digit Product Key and click Next 6 In the Computer Name and Administrator Password screen type the name for the Spire CXP8000 color server for example Falcon_WinXP 7 Click Next The installation process continues 8 At the end of the installation the system restarts You are asked to insert the application software CD Proceed to Reinstalling the Creo Application Software Note If the No...

Страница 19: ...Click Finish to restart the computer Proceed to Disk Striping Disk Striping Once the Spire CXP8000 color server restarts the Wrong Disk Configuration message appears This message indicates that the disks need to be striped Initial Disk Striping Procedure 1 In the following message click OK The Note If a message appears requesting you to activate Windows XP ignore it until you have completed config...

Страница 20: ...are labelled Dynamic Perform the procedure Striping Dynamic Disks 2 If you have replaced a disk or low level formatted any disk low level format all the image disks a required procedure see Appendix B Formatting the External Device on page 45 the disks will all be labelled Unknown Perform the procedure Striping Unknown Disks on page 18 Striping Dynamic Disks 1 Position the mouse pointer in the are...

Страница 21: ...n Disks 3 Verify that the Foreign disk group 3 of 3 disks check box is selected and click OK The following window appears 4 Click OK The dynamic disks are striped as shown in the following window Foreign disks are any hard disks that were recognized as dynamic disks from a previous installation ...

Страница 22: ...rst Time on page 25 Striping Unknown Disks Perform the following procedures if you Have replaced an image disk low level format all disks Have low level formatted one image disk low level format all disks Initializing the Disks 1 Position the mouse pointer in the Disk 1 area right click and select Initialize Disk 2 In the Initialize Disk dialog box verify that the three image disk check boxes are ...

Страница 23: ...ceed to Converting the Disks to Dynamic Disks Converting the Disks to Dynamic Disks 1 Position the mouse pointer in the Disk 1 area right click and select Convert to Dynamic Disk 2 Check the Disk 1 2 and 3 check boxes 3 Click OK Attention Do not check Disk 0 This is the system disk and checking the Disk 0 check box will cause all information to be lost ...

Страница 24: ... Verify that the Computer Management window appears similar to the following illustration Creating a Striped Volume 1 Position the mouse pointer in the white area to the right of the first disk right click and select New Volume The Create New Volume Wizard appears ...

Страница 25: ...Reinstalling the Spire CXP8000 Color Server Software 21 2 Click Next 3 Select Striped Volume and click Next The following window appears 4 Select Disk 2 and click Add then select Disk 3 and click Add ...

Страница 26: ...e Installation Guide 5 Disks 1 2 and 3 are listed under Selected Click Next The following window appears 6 Select the Do not assign a drive letter or drive path option and click Next 7 Select the Do not format this volume option and click Next ...

Страница 27: ...ish Confirming the Disk Striping After you click Finish the following window appears 1 Confirm that the Computer Management window appears as illustrated in the previous window and verify that the drive letters have been removed 2 Close the Computer Management window 3 The Image Disks File System is not Formatted message appears Click OK ...

Страница 28: ...page 25 Using the Configuration Wizard The Spire CXP8000 color server Configuration Wizard automatically appears after the installation is complete It provides the following two options First time configuration when no backup is available or recovery fails DFE configuration recovery when a backup is available Follow the steps in the wizard to complete the relevant Spire CXP8000 color server config...

Страница 29: ...for the First Time The Spire CXP8000 color server Configuration Wizard automatically appears the first time you turn on the Spire CXP8000 color server Verify that the First Time Configuration option is selected and click Next Setting the Language Select the required interface language and click Next ...

Страница 30: ...ystem Administrator if the computer s name needs to be changed 1 Verify that the correct host name is displayed and click Next Otherwise click the Change button The System Properties dialog box appears 2 Click the Change button Note The Hostname is taken from the computer name you typed during the Windows XP Professional Fast Installation see Reinstalling the Operating System Windows XP on page 13...

Страница 31: ...hat changes will take effect only after restarting the computer 4 Click OK 5 In the System Properties dialog box click OK 6 Click Next to continue Setting the Date and Time Attention Do not change the Workgroup or Domain in the following step 3 unless instructed If you are changing the Domain Workgroup verify that you have the user name and password for the Domain Workgroup Note During the configu...

Страница 32: ...er 1 0 Software Installation Guide 1 Check that the Date and Time are set correctly and click Next Otherwise click Change 2 Set the Date and Time correctly 3 Select the Time Zone tab 4 Set the time zone and click OK 5 Click Next ...

Страница 33: ... Measurement Units Select the default measurement unit you require and click Next Configuring the IP Address 1 The Spire CXP8000 color server is set to DHCP server configuration Click Next to continue 2 If you would like to specify a specific IP address click the Change button ...

Страница 34: ...alog box 3 Select the Use the following IP address option and type the IP address Subnet mask and Default gateway in their corresponding boxes 4 Click OK 5 In the Local Area Connection Properties dialog box click OK 6 Click Next For more details on how to get the IP or DHCP also subnet mask and default gateway information refer to the Xerox Installation and Planning Guide ...

Страница 35: ... you to change the AppleTalk network zone that your Spire CXP8000 color server will appear in 1 Click the Change button The Local Area Connection Properties dialog box appears followed by the AppleTalk Protocol Properties dialog box Note This option only applies to networks that contain Macintosh computers ...

Страница 36: ...Color Server 1 0 Software Installation Guide 2 Open the This system will appear in zone list 3 Select the required zone from the list 4 Click OK 5 In the Local Area Connection Properties dialog box click OK 6 Click Next ...

Страница 37: ...guration is complete the View Configuration window appears 1 Click Close The following window appears 2 Click Finish to complete the First time setup When the backup is complete the following message appears 3 Click OK After a few minutes the Spire CXP8000 color server workspace appears on your screen ...

Страница 38: ...onfirm the new password and click OK To change the user password 1 Press CTRL ALT DELETE 2 In the Windows Security window click Change Password 3 Type the old and new password confirm the new password and click OK 4 If you have a Novell network running IPX protocol proceed to Appendix C Installing and Configuring Novell Client for Spire on page 47 Restoring the Configuration If a backup is availab...

Страница 39: ...t configuration or if you want to use a different configuration file than the default choose Select Configuration and click Browse 4 Locate the required configuration file and then click OK 5 Click the Start Recovery button 6 By default no categories are selected Select the categories you want to restore Note When restoring the configuration all the custom tables sets will be added to the system f...

Страница 40: ...ware Installation Guide 7 Click OK The following message appears 8 Click Yes After the recovery is complete the following confirmation message appears 9 Click OK 10 Click Next in Step 2 Recovery window The View Configuration window appears ...

Страница 41: ...user password see Changing the Administrator Name and User Password Optional on page 34 Installing and Configuring Novell Client for Spire If you want to install and configure the Novell Client for the Spire color server see Appendix C Installing and Configuring Novell Client for Spire on page 47 Configuring the McAfee VirusScan If you want to configure the McAfee VirusScan see Appendix D Configur...

Страница 42: ...a message appears requesting you to activate Windows XP you have 30 days to do so from the date you receive the message However we recommend that you perform the activation procedure as soon as the message is received Activating Windows XP via the Internet 1 On the Windows desktop click Start Activate Windows The Let s activate Windows wizard appears 2 Select the Yes let s activate Windows over th...

Страница 43: ...ter select the No I don t want to register now let s just activate windows option If you do want to register your copy of Windows XP select the Yes I want to register and activate Windows at the same time option 5 Click Next The Collecting registration data screen appears 6 If you selected Yes in step 4 type the required information and click Next If you do not want to register click Skip ...

Страница 44: ...vated your copy of Windows XP 8 Click OK to quit the Let s activate Windows wizard Activating Windows XP by Phone 1 On the Windows desktop click Start Activate Windows The Let s activate Windows wizard appears 2 Select the Yes I want to telephone a customer service representative to activate Windows option ...

Страница 45: ... Activate Windows by phone screen 5 Repeat steps 3 to 8 of the previous Internet procedure to complete the activation process Backing Up the Creo System Partition To back up the Creo system partition see Backing Up the Creo System Partition on page 4 Performing a Test Print To perform a test print see Appendix E Performing a Test Print on page 57 ...

Страница 46: ...not preserve the current job list on partition C For this you must use the backup and restore option see Backing Up and Restoring the Software on page 4 To reinstall the Software Preservation Installation follow the flowchart described in Reinstalling the Software Complete Overwrite on page 12 Make sure that CD ROM 1A is in the DVD ROM drive then from the PC DOS Start Up menu select the Creo Softw...

Страница 47: ...ktop follow the path Start CXP8000 CXP8000 Tools Format Image Disks The following message appears 2 Close all open windows if required and click OK The following message appears Important Formatting erases all data stored in the Storage folder It is recommended to back up your data if possible to an external device ...

Страница 48: ...44 Spire CXP8000 Color Server 1 0 Software Installation Guide 3 Click OK 4 Click OK 5 Click OK 6 To enable the changes to take effect restart your computer ...

Страница 49: ... that the device has not been formatted 1 On the Windows desk top select My Computer and right click New Volume F 2 From the menu select Format The Format New Volume F window appears 3 Select the Format options you require and click Start 4 After the formatting is complete click OK 5 Click Close The Formatting Complete message appears 6 Click OK and then click Close ...

Страница 50: ... CXP8000 Color Server 1 0 Software Installation Guide The Computer Management window appears similar to the following example You have completed all the procedures and are ready to use your external SCSI device ...

Страница 51: ...rint on page 57 Installing Novell Client for Spire 1 Close the Spire workspace and the Spire application 2 Close all other applications 3 On the Windows desktop click Start and follow the path CXP8000 CXP8000 Tools Novell Client Installation The following window appears Further information about configuring the connection between the Spire CXP8000 color server and a Novell NDS server in a Novell w...

Страница 52: ...ll 5 Click Reboot 6 You have completed Installing Novell Client for Spire Proceed to Configuring Novell Client for Spire Configuring Novell Client for Spire 1 After the system reboots the Novell Setup window appears 2 Type the Tree Name If you do not know the name click Browse ...

Страница 53: ... Tree Name The Tree Name appears in the Novell Setup window 4 Type the Context Name If you do not know the name click Browse 5 Double click the appropriate Context Name The Context Name appears in the Novell Setup window 6 Click OK The Spire workspace appears 7 You have completed Installing Novell Client for Spire ...

Страница 54: ...e the Spire workspace and the Spire application 2 Close all other applications 3 Right click My Network Places and select Properties 4 Right click Local Area Connection and select Properties 5 Clear the Novell for Client for Windows check box 6 Make sure that Novell for Client for Windows is selected and click the Uninstall button 7 Click Yes twice The Spire CXP8000 color server reboots You have c...

Страница 55: ...sScan perform the following configuration procedures 1 Right click the VShield icon in the Windows Taskbar and follow the path Properties System Scan Important Running the McAfee VirusScan could slow down the process time and effect the overall performance of the Spire CXP8000 color server Note It is recommended to close all applications before installing and configuring the McAfee VirusScan ...

Страница 56: ...52 Spire CXP8000 Color Server 1 0 Software Installation Guide The following window appears 2 Clear the Outbound files check box and select the Exclusion tab The following window appears ...

Страница 57: ...Configuring the McAfee VirusScan 53 3 Click the Add button 4 Type D Output in the File or folder to exclude area and click OK The following window appears ...

Страница 58: ... The following window appears 6 In the Possible actions area clear the Delete File Move File and Exclude File check boxes 7 In the When a virus is found area open the Prompt for user action list and select Clean infected files 8 Click Apply OK and close the System Scan Properties window ...

Страница 59: ...VirusScan Console window double click AutoUpdate In the Task Properties window select the Schedule tab 11 Select the Enable check box and in the Run area select Daily The Start at time chosen should be after printing hours but before the Spire CXP8000 color server is turned off for the day 12 You have completed Configuring the McAfee VirusScan ...

Страница 60: ...This page is intentionally left blank ...

Страница 61: ...or locate the ATF_tab PS at D Sample_files Color_files ATF US Letter or Tabloid ATF_tab PS 3 Double click on the file to add it to the list for importing 4 Select Virtual Printer ProcessPrint 5 Click Submit The file is processed printed and sent to the Storage Folder Note If the job is not printed or is waiting in the print queue check that the finishing device is set properly in the Job Parameter...

Страница 62: ...This page is intentionally left blank ...

Отзывы: