background image

T

O O L S

M

O D E

D

O C U

C

O L O R

2 0 6 0 / 2 0 4 5 S

Y S T E M

A

D M I N I S T R A T I O N

G

U I D E

T

O

OL

S

M

OD

E

1–13

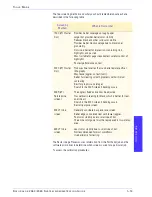
The five screening methods and what you should remember about each are 
described in the following table.

The Raster Image Processor uses information from the PostScript job and the 
software print driver to determine which screen is used for a particular job. 

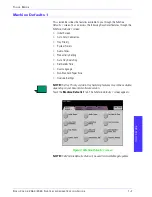
To access the calibration procedures:

Screening

Method

What to Remember

150C (LPI Cluster 
Dot)

Provides better coverage on rough paper
Larger dot provides better color stability
Reduces black and other solid color mottle
Provides better black coverage due to black toner 
granularity
Dot size is better for impressions containing tints, 
highlights, and pastels
Most suitable for pages requirement careful control of 
highlights
Poorest performance on text

200C (LPI Cluster 
Dot)

Produces fine rosettes that can better emulate offset 
lithography.
May leave jaggies on text (fonts)
Better for creating smooth gradients with minimum 
contouring
Best for graphics and images
Switch to the 200R screen if banding occurs

200R (LPI 
Rotated Line 
screen)

The angle is fixed and cannot be adjusted
Has vertical screening for black, which is better for text 
and line art.
Switch to the 200C screen if banding occurs.
Best all-purpose screen.

300 LPI Line 
screen

Generally considered a special use screen.
Better edges on colored text with fewer jaggies.
Poor color stability due to small size of dot.
The entire color gamut must be reproduced in two-micron 
area.

600 LPI Line 
screen

Least color stability due to small size of dot.
Not recommended for most workflows.
Used primarily for testing.

Содержание DocuColor 2045

Страница 1: ...DocuColor 2045 2060 System Administration Guide...

Страница 2: ...s templates icons screen displays looks etc Xerox The Document Company the digital X and all Xerox product names and product numbers mentioned in this publication are registered trademarks of Xerox Co...

Страница 3: ...ional Safety ix Ozone Safety x Notices Radio Frequency Emissions xi FCC in the USA xi In Canada xi Safety Extra Low Voltage Approval xii Certifications in Europe xiii It s Illegal in the USA xiv It s...

Страница 4: ...1 28 Auto Resume Print 1 29 Auto Resume Stop 1 30 Auto Resume Hold 1 31 Auditron Mode Off 1 32 Job Complete 1 33 Job Program Incomplete 1 34 Audio Tones 1 35 Productivity Setting 1 37 Auto Tray Switc...

Страница 5: ...e 1 75 Paper Supply 1 76 Edge Center Erase 1 77 Turning Edge Erase Off 1 77 Border Erase 1 78 Edge Center Erase 1 79 Color Shift 1 80 Output 1 81 Without a Finishing Device 1 81 Using a High Capacity...

Страница 6: ...itialization 2 4 Create Modify User Accounts 2 6 Creating a User Account 2 7 Modifying a User Account 2 9 Changing the Tools Mode Password 2 10 Creating a Password for the Auditron Mode 2 11 Review Us...

Страница 7: ...supplied with this equipment Plug the power cord directly into a correctly grounded electrical outlet Do not use an extension cord If you do not know whether or not an outlet is grounded consult a qu...

Страница 8: ...e machine and disconnect the power cord from the electrical outlet Call an authorized Xerox service representative to correct the problem The machine emits unusual noises or odors The power cord is da...

Страница 9: ...hazardous exposure to laser radiation This equipment complies with international safety standards With specific regard to laser safety the equipment complies with performance standards for laser produ...

Страница 10: ...he press and could create a dangerous condition Use the supplies and cleaning materials only as directed in this manual Keep all of these materials out of the reach of children Do not remove the cover...

Страница 11: ...and servicing Place the machine on a level solid surface not on a thick pile carpet that has adequate strength to support the weight of the machine Do not attempt to move the machine A leveling device...

Страница 12: ...dependent on print volume Providing the correct environmental parameters as specified in the Xerox installation procedures ensures that concentration levels meet safe limits If you need additional inf...

Страница 13: ...led and used in accordance with the instruction manual may cause harmful interference to radio communications Operation of this equipment in a residential area is likely to cause harmful interference...

Страница 14: ...ional safety regulations All system ports meet the Safety Extra Low Voltage SELV circuits for connection to customer owned devices and networks Additions of customer owned or third party accessories t...

Страница 15: ...this equipment not specifically approved by Xerox Europe may void the user s authority to operate the equipment Shielded cables must be used with this equipment to maintain compliance with the EMC Di...

Страница 16: ...otes Federal Reserve Notes Fractional Notes Certificates of Deposit Paper Money Bonds and Obligations of certain agencies of the government such as FHA etc Bonds U S Savings Bonds may be photographed...

Страница 17: ...ular R21 5 Certificates of Citizenship or Naturalization Foreign Naturalization Certificates may be photographed 6 Passports Foreign Passports may be photographed 7 Immigration Papers 8 Draft Registra...

Страница 18: ...rands seals wrappers or designs used by or on behalf of the Government of Canada or of a province the government of a state other than Canada or a department board Commission or agency established by...

Страница 19: ...ENERGY STAR is a US registered trademark The ENERGY STAR program is a team effort between the Environmental Protection Agency and the office equipment industry to promote energy efficient personal com...

Страница 20: ...Choice program in 1988 to help consumers identify environmentally responsible products and services Copier printer digital press and fax products must meet energy efficiency and emissions criteria and...

Страница 21: ...y Symbols CAUTION This symbol alerts you to an action that may cause damage to hardware or software or result in the loss of data WARNING Warnings alert you to an action that may cause bodily injury W...

Страница 22: ...s helpful but not essential to complete a procedure or task Writing Style Conventions Bold type indicates the name of a button to press or touch Underlining is used to emphasize a word or term Italic...

Страница 23: ...on the language to display on the Touch Screen special paper sizes that can be used in certain Paper Trays timers audio tone controls default settings for scanner features image quality settings and...

Страница 24: ...security reasons only asterisks are displayed on the screen 3 Touch the Enter button on the screen The Pathway Options screen appears as shown in Figure 1 NOTE It is recommended that you change the To...

Страница 25: ...OR 2060 2045 SYSTEM ADMINISTRATION GUIDE TO OL S M OD E 1 3 Figure 2 Machine Defaults 1 screen NOTE The Machine Defaults 3 tab will be used for AssetManager updates 5 Touch the Exit Tools button to ex...

Страница 26: ...s 1 and Feature Defaults 2 screens The Feature Defaults 2 screen is accessed by touching the More tab The procedures used to change settings for the options shown on the screens are described in detai...

Страница 27: ...Figure 3 Machine Defaults 1 screen NOTE The Machine Defaults 3 tab will be used for AssetManager updates The Machine Defaults 2 screen is illustrated in the following figure Figure 4 Machine Defaults...

Страница 28: ...2045 SYSTEM ADMINISTRATION GUIDE 1 6 Figure 5 Feature Defaults 1 screen The Feature Defaults 2 screen is illustrated in the following figure Figure 6 Feature Defaults 2 screen NOTE The Service Call fe...

Страница 29: ...l Screen Auto Color Calibration Tray Priority System Timers Audio Tones Productivity Setting Auto Tray Switching Set Date Time Dual Language Non Standard Paper Size Oversize Settings NOTE The Tray Pri...

Страница 30: ...e default screen when the DocuColor is powered on You can choose from three screens Features Job Status Machine Status NOTE The Basic Features screen is the factory default setting 1 Touch the Initial...

Страница 31: ...Added Features Image Quality and More screens If you leave the setting at the Features screen the screen shown below appears when the machine is powered on This screen displays the Basic Features tab...

Страница 32: ...hine Status screen the following screen appears when the machine is powered on The appearance of your Machine Status screen depends on the accessories you have connected Figure 11 Machine Status scree...

Страница 33: ...nt jobs only The DocuColor 2060 2045 has a number of monitoring sensors as well as feedback and control mechanisms that are designed to enhance overall calibration stability Image quality is also auto...

Страница 34: ...in color science and calibration procedures before attempting to use the options available on these screens What to know about screening The digital press with scanner uses an advanced proprietary sc...

Страница 35: ...uitable for pages requirement careful control of highlights Poorest performance on text 200C LPI Cluster Dot Produces fine rosettes that can better emulate offset lithography May leave jaggies on text...

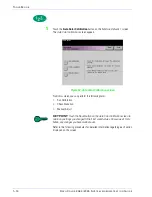
Страница 36: ...ation screen From this screen you can perform the following tasks Run Calibration Check Gradation Manual Adjust KEY POINT Touch the Reset button on the Auto Color Calibration screen to return any sett...

Страница 37: ...ner Density Patches that print out The digital press then compares those readings to the factory set target values and makes the necessary adjustments to bring the values within the target range NOTE...

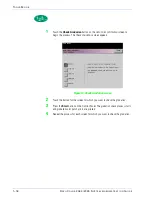
Страница 38: ...this option only if you have noticed a problem with halftone screening Touch the 600 PG button to calibrate the 600 Line screen Use this option only if you have noticed a problem with the gray scale o...

Страница 39: ...Manual Adjust feature It is recommended that you begin your calibration by calibrating the 300 PG screen first This is the basic line screen that is used and all other line screens are calibrated aga...

Страница 40: ...cess The Check Gradation screen appears Figure 14 Check Gradation screen 2 Touch the button for the screen for which you want to check the gradation 3 Press the Start button on the Control Panel The g...

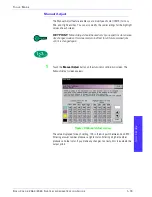
Страница 41: ...by an expert in color science Any changes made on this screen remain in effect for all future scanned jobs until it is changed again 1 Touch the Manual Adjust button on the Auto Color Calibration scre...

Страница 42: ...above the arrow buttons KEY POINT You should not adjust the value more than 5 counts at a time 4 Touch the Enter button on the screen 5 Repeat steps 2 3 and 4 to enter other new values 6 Press the Sta...

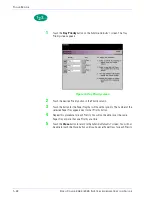
Страница 43: ...paper tray contains the same size and weight paper the digital press feeds paper from the paper tray set at Priority 1 If there is no paper in the Priority 1 paper tray the Priority 2 paper tray is a...

Страница 44: ...ity column 3 Touch the button for the Paper Tray that will have that priority The number of the selected Paper Tray appears next to that Priority button 4 Repeat this procedure for each Priority You w...

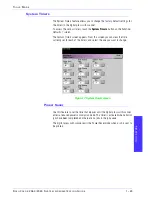
Страница 45: ...n The System Timers screen appears From this screen you can view the time currently set for each of the timers and select the one you want to change Figure 17 System Timers screen Power Saver Use this...

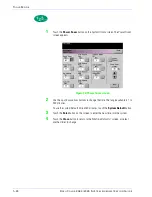
Страница 46: ...wer Saver screen 2 Use the up or down arrow buttons to change the time The range available is 1 to 240 minutes To use the system default time of 60 minutes touch the System Default button 3 Touch the...

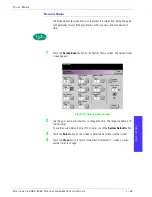
Страница 47: ...he Screen Saver button on the System Timers screen The Screen Saver screen appears Figure 19 Screen Saver screen 2 Use the up or down arrow buttons to change the time The range available is 10 to 60 m...

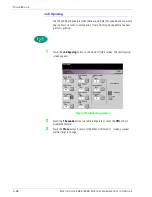
Страница 48: ...prints from a finishing device before the next job starts printing 1 Touch the Job Spacing button on the System Timers screen The Job Spacing screen appears Figure 20 Job Spacing screen 2 Touch the 7...

Страница 49: ...k will queue but will not print while the Tools Mode is active 1 Touch the Tools Off button on the System Timers screen The Tools Off screen appears Figure 21 Tools Off screen 2 Use the up or down arr...

Страница 50: ...Control Panel has been pressed 1 Touch the Auto Resume Scan button on the System Timers screen The Auto Resume Scan screen appears Figure 22 Auto Resume Scan screen 2 Use the up or down arrow buttons...

Страница 51: ...ton on the Control Panel has been pressed 1 Touch the Auto Resume Print button on the System Timers screen The Auto Resume Print screen appears Figure 23 Auto Resume Print screen 2 Use the up or down...

Страница 52: ...sume Stop button on the System Timers screen The Auto Resume Stop screen appears Figure 24 Auto Resume Stop screen 2 Use the up or down arrow buttons to change the time The range available is 1 to 10...

Страница 53: ...1 Touch the Auto Resume Hold button on the System Timers screen The Auto Resume Hold screen appears Figure 25 Auto Resume Hold screen 2 Use the up or down arrow buttons to change the time The range a...

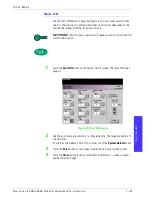
Страница 54: ...e Auditron Mode Off button on the System Timers screen The Auditron Mode Off screen appears Figure 26 Auditron Mode Off screen 2 Use the up or down arrow buttons to change the time The range available...

Страница 55: ...Panel the machine automatically restore thes default settings after the amount of time set in the Job Complete screen 1 Touch the Job Complete button on the System Timers screen The Job Complete scre...

Страница 56: ...user activity has occurred for the amount of time selected 1 Touch the Job Program Incomplete button on the System Timers screen The Job Program Incomplete screen appears Figure 28 Job Program Incompl...

Страница 57: ...nes can be deactivated or set to Soft Normal or Loud The factory default setting is Normal 1 Touch the Audio Tones button on the Machine Defaults 1 screen The Audio Tones screen appears Figure 29 Audi...

Страница 58: ...uch the button for the desired volume setting for each tone To deactivate a tone touch the Off button for that tone 3 Touch the Reset button to restore the factory default setting for the three tones...

Страница 59: ...table Selection What this Selection Does Auto Selects a Fuser temperature based on the paper weight selected in the paper tray improving average power consumption but slower operation while waiting fo...

Страница 60: ...Productivity Setting screen appears Figure 30 Productivity Setting screen 2 Select the button for the type of paper you use most frequently in the digital press with scanner or select Auto to use the...

Страница 61: ...rox Service Representative using the correct version of software Default Setting What the Default Does Auto Tray Switching Allows the digital press to automatically select another paper tray containin...

Страница 62: ...or Disable button for the Auto Paper Selection option 4 To instruct the digital press to bypass one or more of the paper trays touch the desired Paper Tray button in the Inhibited Tray column To desel...

Страница 63: ...ize button on the Machine Defaults 1 screen The Transparency Size screen appears Figure 32 Transparency Size screen 2 Select one of the sizes displayed for the default transparency size 3 Touch the Cl...

Страница 64: ...he Set Date Time button on the Machine Defaults 1 screen The Set Date and Time screen appears with the Set Date button selected and options for setting the date displayed on the right Figure 33 Set Da...

Страница 65: ...Options for setting the time appear in the Set Time screen Figure 34 Set Date Time screen with Set Time button selected 3 Touch the 12 Hour Clock or the 24 Hour Clock button 4 Use the up or down arro...

Страница 66: ...the Touch Screen When your DocuColor 2060 2045 was installed your Xerox service representative loaded onto your system your choice of two languages that you can choose from to be displayed on the Tou...

Страница 67: ...TO OL S M OD E 1 45 After exiting the Tools Mode you can switch the Touch Screen to the other language by pressing the Dual Language button on the Control Panel 3 Touch the Close button to return to t...

Страница 68: ...tray to select the paper weight being used 1 Touch the Non Standard Size Paper button on the Machine Defaults 1 screen The Non Standard Paper Size screen appears Figure 36 Non Standard Paper Size scr...

Страница 69: ...ing the tray and the paper size on this screen 1 Touch the Oversize Settings button on the Machine Defaults 1 screen The Oversize Settings screen appears Figure 37 Oversize Settings screen 2 Touch the...

Страница 70: ...or features through the Machine Defaults 2 screen Paper Registration Adjustment 100 Adjust Special Tray Additional Originals Stored Program Access Auto Recognition Reduce Enlarge Presets Photo Reprodu...

Страница 71: ...istration feature that you can also use to adjust the position of the image on the paper Refer to the documentation that came with your RIP Use the following procedure to adjust for side one side two...

Страница 72: ...gistration Adjustment button on the Machine Defaults 2 screen The Paper Registration Adjustment screen appears Figure 40 Paper Registration Adjustment screen Paper Feeding Direction in the Tray Misali...

Страница 73: ...Side 2 button to adjust the registration KEY POINT Use the Oversize Paper Offset button only for papers larger than long edge feed 8 5x11 inch or A4 paper Refer to Step 8 if using this option 6 On th...

Страница 74: ...that the Lead Edge Registration adjustment is the feeding edge or Y direction The Side Edge Registration adjustment is the front to back or X direction KEY POINT If the reference point on side two is...

Страница 75: ...4 button to adjust the position of the paper as it feeds Refer to the following table for the adjustments made for each Offset Level Paper Size Level 1 Level 2 Level 3 Level 4 310mm 10 0mm 10 0mm 10 0...

Страница 76: ...0 1 Touch the 100 Adjust button on the Machine Defaults 2 screen The 100 Adjust screen appears Figure 43 100 Adjust screen 2 Use the up or down arrow buttons to set the desired percentage for the x v...

Страница 77: ...on Covers Inserts Transparency Dividers and Booklet Creation please see the DocuColor 2060 2045 Digital Color Press Operator Manual 1 Touch the Special Tray button on the Machine Defaults 2 screen Th...

Страница 78: ...itional Originals The job contains too many pages to be placed on the document handler at one time The job contains documents that must be programmed separately for any of the following reasons The in...

Страница 79: ...her you want users to be able to store and recall jobs or to just recall jobs 1 Touch the Stored Program Access button on the Machine Defaults 2 screen The Stored Program Access screen appears Figure...

Страница 80: ...Photo Level 5 Use this setting when scanned originals contain more Photo than Text Level 3 Use this setting when scanned originals contain equal amounts of Text and Photo Level 1 Use this setting whe...

Страница 81: ...h the Auto Recognition button on the Machine Defaults 2 screen The Auto Recognition screen appears Figure 47 Auto Recognition screen 2 Touch the Text Photo or Black White Color button Auto Photo Text...

Страница 82: ...SYSTEM ADMINISTRATION GUIDE 1 60 Figure 49 Black White Color screen 3 Touch the button for the desired level on the popup screen The available levels are 1 to 5 4 Touch the Close button to return to...

Страница 83: ...arge feature The percentage can be changed to one of the available fixed magnifications or you can change the variable preset percentage to whatever percentage between 25 and 400 you desire 1 Touch th...

Страница 84: ...n from the above screen 3 If you select the Variable preset use the up or down arrow buttons shown on the popup screen on the next page to enter the desired percent value The available range is 25 to...

Страница 85: ...l that represents the type of image that is most frequently scanned Optimize Photo adjusts for a more defined halftone effect and a less defined text effect Optimize Text adjusts for a less defined ha...

Страница 86: ...and Yellow The table below lists the factory default settings for each color They are organized according to the order in which the buttons appear on the Color Adjust Registration screen Color No C M...

Страница 87: ...s 2 screen The Color Adjust Registration screen appears Figure 54 Color Adjust Registration screen 2 Touch the desired color button to display the default setting 3 Use the up or down arrow buttons to...

Страница 88: ...ge APS Tray Select Auto R E Confirm Settings confirm the settings you have chosen Auto R E You are prompted to confirm the rotation if Auto is selected under Reduce Enlarge on the Basic Features scree...

Страница 89: ...DMINISTRATION GUIDE TO OL S M OD E 1 67 1 Touch the Auto Rotation button on the Machine Defaults 2 screen The Auto Rotation screen appears Figure 55 Auto Rotation screen with APS Auto R E screen butto...

Страница 90: ...R E screen button selected See the screen below for the Auto Rotation screen with APS Tray Select Auto R E selected Figure 56 APS Tray Select Auto R E screen 4 Touch the On or Off button in the lower...

Страница 91: ...t job 1 Touch the Maximum Scan to Print Quantity button on the Machine Defaults 2 screen The Maximum Scan to Print Quantity screen appears Figure 57 Maximum Scan to Print Quantity screen 2 Use the num...

Страница 92: ...at generated during the fusing processes The DocuColor 2060 2045 is equipped with an automatic curl control system that uses the variables listed above to determine the amount of pressure needed at di...

Страница 93: ...o the Recommended Materials List for the recommended settings for grades of paper Variability from one lot of paper to another may require selecting a different Decurler setting Paper Weights Tray 1 T...

Страница 94: ...wish to use for a job Make the correct paper weight selections on the tray for the paper being used and run a few test prints If there is too much curl proceed to step 2 2 On the Machine Defaults 2 s...

Страница 95: ...ading NOTE Your configuration may not show Tray 4 If the optional Paper Tray 4 is connected a button for Tray 4 is displayed under Paper Trays You may select from any of the displayed paper weights 64...

Страница 96: ...s 1 screen You can access the following DocuColor features through the Feature Defaults 1 screen Color Mode Paper Supply Edge Center Erase Color Shift Output 2 Sided Output Original Type Chroma Reduce...

Страница 97: ...Yellow Cyan and Magenta or Black Selecting Auto enables the digital press to determine the color mode to use based on its scan of the original document 1 Touch the More tab in the Tools Mode screen 2...

Страница 98: ...rs only if you have this optional accessory connected to your digital press 1 Touch the More tab in the Tools Mode screen 2 Touch the Feature Defaults 1 tab 3 Touch the Paper Supply button The Paper S...

Страница 99: ...turn off Edge Erase When you are making 2 sided copies Edge Erase is applied to both sides of the output Turning Off Edge Erase 1 Touch the More tab in the Tools Mode screen 2 Touch the Feature Defaul...

Страница 100: ...nning process 1 Touch the More tab in the Tools Mode screen 2 Touch the Feature Defaults 1 tab 3 Touch the Edge Center Erase button The Edge Center Erase screen appears 4 Touch the Border Erase button...

Страница 101: ...erased from the Center of the document This is useful for erasing the shadows that appear when you are scanning two facing pages of a bound document for example 1 Touch the More tab in the Tools Mode...

Страница 102: ...on If you select a shift toward blue the red colors shift toward the magenta hue the blue colors toward the cyan hue and the green colors toward the yellow hue The upper bar shifts toward the right Th...

Страница 103: ...Capacity Stacker or a High Capacity Stacker Stapler connected to your digital press you can select which output tray to send your prints to and whether or not to separate your printed sets You may ch...

Страница 104: ...screen The Output screen opens Figure 67 Output screen with HCS 2 Touch the Auto Face Up or Face Down button 3 Touch the Collate or Uncollate button 4 To send output to the Stacker Tray touch the Stac...

Страница 105: ...er Tray touch the Stacker Tray button on the popup screen To send output to the Top Tray touch the Top Tray button 7 If you selected Stacker Tray touch the Offset button to have the printer automatica...

Страница 106: ...GUIDE 1 84 Using a High Capacity Stacker Stapler 1 Touch the Output button on the Feature Defaults 1 screen The Output screen appears Figure 69 Output screen with HCSS 2 Touch the Auto Face Up or Face...

Страница 107: ...selected 5 To send output to the Main Tray touch the Main Tray button on the popup screen To send output to the Top Tray touch the Top Tray button 6 If you selected Main Tray touch the Offset button t...

Страница 108: ...tings for the orientation of the original scanned images and or output Portrait Head to Head Head to Toe Landscape Head to Head Head to Toe Default Selection Result 1 to 1 Sided All single sided scann...

Страница 109: ...Defaults 1 screen The 2 Sided Output screen appears Figure 71 2 Sided Output screen with 1 2 Sided selected 2 Touch the 1 to 1 1 to 2 2 to 2 or 2 to 1 button The following screens show the 2 Sided Out...

Страница 110: ...hen select 1 to 2 output Either the Head to Head button or the Head to Toe button to select the orientation of the images on the copies 2 to 2 output Either the Head to Head button or the Head to Toe...

Страница 111: ...allows you to select a default of Photo Halftone or Xerographic Copy all with text as the original type used in scan to print jobs Text Select this setting when most original documents consist of word...

Страница 112: ...hen to Select Photograph Select this option when most original documents will be photographs or extremely fine halftones Halftone Select this option when most original documents will be images that ar...

Страница 113: ...se the Auto Photo Text or Photo original type specify the default for the kind of photograph or picture originals you will be copying Touch either the Photograph Halftone or Xerographic Copy button to...

Страница 114: ...is the relative chromaticity or colorfulness of a color The amount of saturation differentiates a color from a gray that has the same value 1 Touch the Chroma button on the Feature Defaults 1 screen T...

Страница 115: ...select 100 the digital press duplicates the output print at the same size as the original document If you select Auto the digital press determines the reduction or enlargement percentage to use based...

Страница 116: ...efault Preset Variable percent settings on this screen access the Machine Defaults 2 Reduce Enlarge Presets screen in Tools Mode 1 Touch the Reduce Enlarge button on the Feature Defaults 1 screen The...

Страница 117: ...ft If you select this option you may shift the original image for both Side 1 and Side 2 Left to Right using the horizontal arrow buttons or Top to Bottom using the vertical arrow buttons The availabl...

Страница 118: ...ft screen 2 Touch the button for the desired image shift option Settings for the image shift option you selected appear on the right side of the screen 3 Do one of the following If you selected Margin...

Страница 119: ...ill have the system use the same amount of shift selected for Side 1 Figure 79 Image Shift screen with Margin Shift and Left Right buttons selected Figure 80 Image Shift screen with Margin Shift and T...

Страница 120: ...hift selected If you selected the Corner Shift button select Side 1 or Side 2 Then use the eight different arrow buttons to shift your original image Repeat for the other side if required Figure 82 Im...

Страница 121: ...dently in any combination KEY POINT Remember that adjusting the density of any of the process colors affects the complementary colors that use that color 1 Touch the Color Balance button on the Featur...

Страница 122: ...he lightness or darkness based on its scan of the original document 1 Touch the Lighten Darken button on the Feature Defaults 1 screen The Lighten Darken screen appears Figure 84 Lighten Darken screen...

Страница 123: ...EM ADMINISTRATION GUIDE TO OL S M OD E 1 101 Feature Defaults 2 Access the Feature Defaults 2 screen by touching the More tab on the Machine Defaults1 Machine Defaults 2 or Feature Defaults 1 screen F...

Страница 124: ...line art or graphics that have crisp lines Use the soft levels to decrease the amount of edge definition to scan photographs or any other documents for which softer less focused output prints are desi...

Страница 125: ...o Change the Tools Mode password Establish a separate password for access to the Auditron Mode View the number of prints sent through the RIP Establish individual accounts for users making scanned pri...

Страница 126: ...iduals with a scan to print password The Authentication feature allows you to enable or disable the Auditron Mode The following two options are available Auditron On Turns Auditron Mode on for the sca...

Страница 127: ...RO N 2 3 1 Touch the Authentication button on the Auditron Administration screen The Authentication screen appears Figure 2 Authentication screen 2 Touch the Auditron On or Auditron Off button 3 Touch...

Страница 128: ...color limits a password and copy volume limits General Accounts contain copy volume information only They are not individualized The Initialization screen allows you to reset information in User Accou...

Страница 129: ...the Initialize Auditron button A confirmation screen asks if you are sure you want to initialize the Auditron Responding with a Yes enters your changes into the system and deletes all established acco...

Страница 130: ...each account or review existing account privileges You are also able to change the default password for entering the Tools Pathway and to create a new password for the Auditron Mode if so desired Acco...

Страница 131: ...en The last setting that you changed is returned to its previous value 1 Touch the Create Modify User Accounts button on the Auditron Administration screen The Create Modify User Accounts screen appea...

Страница 132: ...r Black Only button Touch the Enter button in the center of the screen to enter your settings into the system 7 To set the level of access for the individual using the account touch the Access Rights...

Страница 133: ...Use the Control Panel keypad to enter the account number for this User Account 3 Touch the Enter button on the bottom left side of the screen The information for this User Account will appear 4 Revie...

Страница 134: ...nistration screen The Create Modify User Accounts screen appears Figure 5 Create Modify User Accounts screen Account 1 is displayed on the next screen with the default password of five 1s 11111 2 Touc...

Страница 135: ...in Figure 5 appears 2 Touch the Next Open Account button The number 2 is displayed in the Account Number field You can use any open account number for the Auditron Pathway password by touching the Ne...

Страница 136: ...e Access Rights screen appears Figure 6 Access Rights screen 6 Touch the Auditron Administrator Access button 7 Touch the Close button 8 Touch the Enter button on the Create Modify User Accounts scree...

Страница 137: ...verify scan volumes for the Billing Count When you enter an account number this screen displays the User Password Account Limit and Output Color settings Meter A Meter B Meter C and Meter D show the...

Страница 138: ...t you want to review 3 Touch the Enter button The data for that individual User Account is displayed 4 Use the Next Active Account Number or Previous Account Number button to review additional account...

Страница 139: ...lling Count The meters show volumes for the following types Meter A Color Copies Meter B Black White Copies Meter C Large size Color Copies Meter D Total Copies A B To reset these meters to zero touch...

Страница 140: ...o review the next open account Touch the Next Active Account or Previous Account button to review additional general accounts Touch the Enter button to enter your settings into the system 2 To return...

Страница 141: ...ed to your DocuColor 2060 2045 The meters show volumes for the following copy types Meter A Color Prints Meter B Black White Prints Meter C Large size Color Prints Meter D Total Prints A B To reset th...

Страница 142: ...py types Meter A Color Copies Meter B Black White Copies Meter C Large size Color Copies Meter D Total Copies A B 1 Touch the Review Service Prints Account on the Auditron Administration screen The Re...

Страница 143: ......

Страница 144: ...701P36798 March 2001 Xerox Corporation Global Knowledge and Language Services 780 Salt Road Webster New York 14580...

Отзывы: