background image

2 Product Overview

30

Product Overview

2

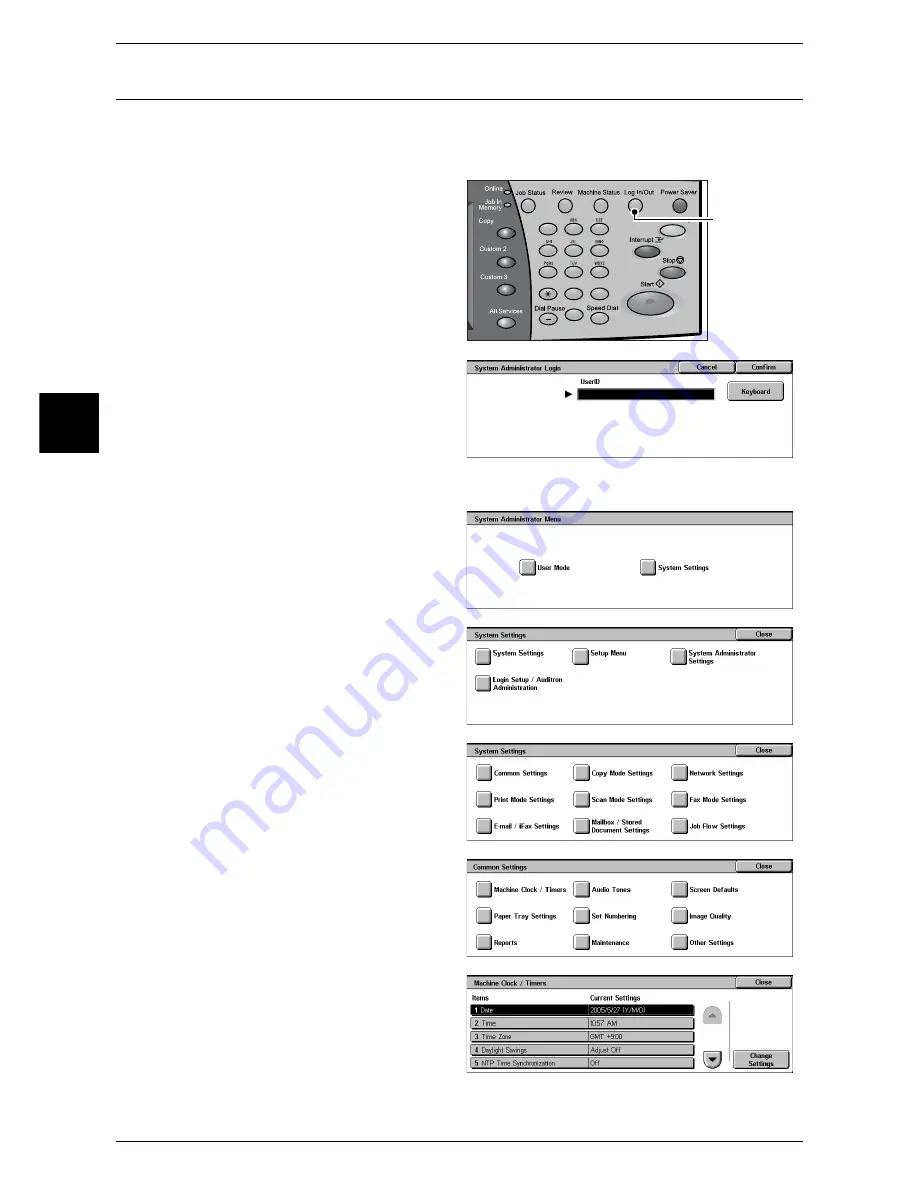
Customizing of the Control Panel

You can customize items displayed on the screen when turning the machine on or 

canceling the power saver mode, items displayed on the screen after auto clear, the 

<Custom> buttons, and items on the [All Services] screen.

1

Press the <Log In/Out> button. 

2

Enter the user ID with the numeric 
keypad, and select [Confirm] 

Note

The default user ID is "11111". 
When using the authentication 
feature, a password may be 
required. The default 
password is "x-admin".

3

Select [System Settings].

4

Select [System Settings].

5

Select [Common Settings].

6

Select [Screen Defaults].

7

Select the item to be set

.

1

2

3

4

5

6

7

8

9

0

#

C

<Log in/Out> button

Содержание apeosport 350 I

Страница 1: ...ApeosPort 550 I 450 I 350 I DocuCentre 550 I 450 I Network Administrator Guide...

Страница 2: ...tered trademarks of Xerox Corporation All Xerox and Fuji Xerox product names are either registered trademarks or trademarks of Xerox Corporation and Fuji Xerox Co Ltd DocuWorks and CentreWare are trad...

Страница 3: ...4 Powering Off 24 Interface Cables 26 Using the Parallel Interface 26 Using the USB Interface 26 Using the Ethernet Interface 27 Control Panel 28 Customizing of the Control Panel 30 Internal Fonts 34...

Страница 4: ...dure 54 Installation Overview 54 Configuration on the Machine 54 Configuration on the Computer 55 8 Installation When Using Internet Printing Protocol IPP 57 Preparations 58 Installation Procedure 58...

Страница 5: ...d Setting TCP IP 94 Configuring E mail Environment 95 12 Using Scan Service 99 Scan Service Overview 100 Configuration of E mail 101 Preparations 101 Installation Overview 101 Enabling Port and Settin...

Страница 6: ...23 Configuring the E mail Environment 124 Testing iFax 128 14 Communication Security 129 Communication Security Service Overview 130 Configuration of HTTP Communication Encryption 131 Installation Ove...

Страница 7: ...Table of Contents 5 CentreWare Internet Services 149 Troubleshooting 149 Scanner Features 151 Notes and Restrictions 151 E Mail Features 152 Troubleshooting 152 Index 153...

Страница 8: ......

Страница 9: ...1 Before Using the Machine This chapter describes how to use this guide z Preface 8 z Using This Guide 9...

Страница 10: ...After reading this guide be sure to keep it handy for quick reference It will be useful in case you forget how to perform operations or if a problem occurs with the machine Refer to the User Guide for...

Страница 11: ...is guide Aimed toward network administrators as a guide to setting up the network environment Quick Reference Guide Introduces the basic operations of the machine as well as daily management and maint...

Страница 12: ...g NetWare Describes how to install the machine to a NetWare network 7 Installation When Using Microsoft Network SMB Describes how to install the machine to a Microsoft Networks SMB 8 Installation When...

Страница 13: ...ages and input text Refers to folders files applications button or menu names displayed in the touch screen as well as the names of menus commands windows or dialog boxes displayed on the computer scr...

Страница 14: ......

Страница 15: ...component features and tools switching on and off of the machine cable connections and the operation of the touch screen z Machine Components 14 z Overview of Features 18 z Tools 22 z Power On Off 24...

Страница 16: ...tput tray Printed or copied documents are delivered with the printed side facing down Note When the exit 2 tray is installed with the machine the tray is referred to as center tray lower otherwise ref...

Страница 17: ...16 Punch scrap container Collects scraps from the puncher 17 Staple cartridge Staples are stored 18 Booklet tray C Booklet Finisher only Receives documents when folding is selected in Booklet Creatio...

Страница 18: ...sher 26 Finisher top cover button Pressed to open the upper cover of the finisher when clearing paper jams 27 Finisher tray Stapled documents are delivered 28 Front cover Opened to clear staple jams o...

Страница 19: ...on Automatically turns the power off when detecting current leakage No Name on the machine cover Name on the touch screen Function 37 TEL Used to connect an external telephone Note Do not use this int...

Страница 20: ...panel Using as a Local Printer When using as a local printer the machine can be connected by the following methods z Parallel Used to connect the machine with a computer using a parallel interface cab...

Страница 21: ...t Services CentreWare Internet Services provides services such as displaying the status of the machine and jobs and altering configurations using a web browser in a TCP IP environment For setting as a...

Страница 22: ...vice optional is required to create job templates and set a forward destination Note This feature is only available for ApeosPort 550 I 450 I 350 I Scan to FTP SMB When the machine is connected to a n...

Страница 23: ...can be sent to the machine from computers Received e mail will automatically be printed Note This feature is only available for ApeosPort 550 I 450 I 350 I Mail Notice When the machine is configured...

Страница 24: ...ystem settings and port settings for each network that are otherwise operated on the touch screen on the machine CentreWare Utilities CentreWare utilities is included in the CentreWare Utilities CD RO...

Страница 25: ...Not configurable Item Control Panel CentreWare Internet Services CentreWare Utilities CentreWare EasyAdmin Enabling a port O O U LPD only U Setting an IP address O O O O change only Configuring the e...

Страница 26: ...ing On The procedure for turning on the power is as follows 1 Press the power switch to the position to turn the power on Note The Please wait message indicates that the machine is warming up The mach...

Страница 27: ...is performed internally on the machine for a while after the power switch is turned off Therefore do not unplug the power cord from the power outlet immediately after turning the power switch off Note...

Страница 28: ...the machine s parallel interface connector and fasten it with the clips on either side of the connector 3 Connect the other end of the interface cable to a computer 4 Switch on the machine 5 Restart...

Страница 29: ...ASE T This section describes the installation procedure for the Ethernet interface 1 Confirm that the machine is off 2 Connect a network cable to the Ethernet interface connector Note Prepare a networ...

Страница 30: ...of copy fax and scan features whose settings have changed from the defaults You can also check the destination information for sending faxes and e mail In this manual this button is indicated as the R...

Страница 31: ...Dial button 16 C Clear button Press this button if you have entered the wrong numerical value with the numeric keypad In this manual this button is indicated as the C button 17 Dial Pause button Used...

Страница 32: ...om buttons and items on the All Services screen 1 Press the Log In Out button 2 Enter the user ID with the numeric keypad and select Confirm Note The default user ID is 11111 When using the authentica...

Страница 33: ...Screen and All Services 1 Select Screen after Auto Clear and select Change Settings 2 Select Last Selection Screen or All Services Customizing the All Services Screen You can customize the types of f...

Страница 34: ...e selected button position will remain empty Assigning Features to Custom Buttons Features can be assigned to the Copy Custom 2 and Custom 3 buttons By assigning features to the Custom buttons you can...

Страница 35: ...n for the following features on the All Services screen z Copy z Fax Internet Fax z E mail z Scan to Mailbox z Network Scanning z Scan to FTP SMB For information on how to change the settings refer to...

Страница 36: ...mond Halbfett Garamond Kursiv Halbfett Default Courier Courier Italic Courier Bold Courier Bold Italic Letter Gothic Letter Gothic Italic Letter Gothic Bold Albertus Medium Albertus Extra Bold Clarend...

Страница 37: ...nts 35 Product Overview 2 KO PCL5 Muyngio Gothic R Gothic Graphic Kungso Saemmul KS Muyngio Gothic R Gothic Graphic Kungso Saemmul T Myungio T Gothic TR Gothic T Graphic T Kungso T Saemmul TC PCL5 ESC...

Страница 38: ......

Страница 39: ...3 Installation When Using Parallel Port This chapter describes how to install the machine when using the parallel interface z Preparations 38 z Installation Procedure 38...

Страница 40: ...following describes the configuration procedure to use a parallel interface on the machine Note The configuration can also be performed using CentreWare Internet Services For information on how to us...

Страница 41: ...eset itself This signal is only valid when Print Mode is ESC P or HP GL 2 mode Note Adobe Communication Protocol can be configured when the PostScript 3 Kit optional is installed Do not need to change...

Страница 42: ......

Страница 43: ...4 Installation When Using USB Port This chapter describes how to install the machine when using a USB interface z Preparations 42 z Installation Procedure 42...

Страница 44: ...g describes the configuration procedure to use a USB interface on the machine Note The configuration can also be performed using CentreWare Internet Services For information on how to use CentreWare I...

Страница 45: ...Script 3 Kit optional is installed 4 Select Close repeatedly until the System Settings screen is displayed 5 Select Exit 6 After the machine is restarted print out a settings list to confirm that the...

Страница 46: ......

Страница 47: ...5 Installation When Using TCP IP LPD Port 9100 This chapter describes how to install the machine when using a TCP IP LPD Port 9100 protocol z Preparations 46 z Installation Procedure 46...

Страница 48: ...the machine Enable a LPD Port Port 9100 port then assign an IP address Note The configuration can also be performed using CentreWare Internet Services or CentreWare Utilities For information on how t...

Страница 49: ...xxx should be a numeric value in the range from 0 to 255 However 224 or 225 xxx xxx xxx and 127 xxx xxx xxx cannot be used Specify the subnet mask by a combination of the numbers 0 128 192 224 240 248...

Страница 50: ......

Страница 51: ...6 Installation When Using NetWare This chapter describes how to use the machine when using a NetWare network z Preparations 50 z Installation Procedure 50...

Страница 52: ...s z 100BASE TX z 10BASE T Supported frame types z Ethernet II specification z IEEE802 3 specification z IEEE802 3 IEEE802 2 specification z IEEE802 3 IEEE802 2 SNAP specification Note The machine will...

Страница 53: ...and select Change Settings 5 Select Port Status and select Change Settings 6 Select Enabled then select Save 3 Select Close repeatedly until the System Settings screen is displayed 4 Select Exit 5 Aft...

Страница 54: ...to the next value without entering all 3 digits select Next 6 Select Save 7 Configure TCP IP Subnet Mask and TCP IP Gateway Address as the above Note Enter address in the format xxx xxx xxx xxx The x...

Страница 55: ...7 Installation When Using Microsoft Network SMB This chapter describes how to install the machine when using a Microsoft Network SMB z Preparations 54 z Installation Procedure 54...

Страница 56: ...ver Configuration on the Machine The following describes the configuration procedure to connect the machine to Microsoft Networks SMB First enable the SMB port then set the TCP IP settings Note The co...

Страница 57: ...Mask and TCP IP Gateway Address as the above Note Enter address in the format xxx xxx xxx xxx The xxx should be a numeric value in the range from 0 to 255 However 224 or 225 xxx xxx xxx and 127 xxx xx...

Страница 58: ......

Страница 59: ...8 Installation When Using Internet Printing Protocol IPP This chapter describes how to install the machine when using an Internet Printing Protocol IPP z Preparations 58 z Installation Procedure 58...

Страница 60: ...t Printing IPP on the machine First enable the IPP port then set the TCP IP Note The configuration can also be performed using CentreWare Internet Services or CentreWare Utilities For information on h...

Страница 61: ...entering all 3 digits select Next 6 Select Save 7 Configure TCP IP Subnet Mask and TCP IP Gateway Address as the above Note Enter address in the format xxx xxx xxx xxx The xxx should be a numeric val...

Страница 62: ......

Страница 63: ...9 Installation When Using EtherTalk This chapter describes how to install the machine when using an EtherTalk network z Preparations 62 z Installation Procedure 62...

Страница 64: ...onfigured when a PostScript 3 Kit optional is installed The configuration can also be performed using CentreWare Internet Services For information on how to use CentreWare Internet Services refer to U...

Страница 65: ...n the User Guide Configure other EtherTalk settings as necessary Refer to EtherTalk P 73 for EtherTalk configuration Configuration on the Computer The following describes the configuration procedure f...

Страница 66: ......

Страница 67: ...entreWare Internet Services This chapter describes how to use CentreWare Internet Services z Preparations 66 z Installation Procedure 66 z Network Setting Items Port Protocol for CentreWare Internet S...

Страница 68: ...Services z Configuration on the Machine Configuring the machine to be able to use CentreWare Internet Services First enable the Internet Service HTTP port then set the IP address z Confirmation of the...

Страница 69: ...Note Enter address in the format xxx xxx xxx xxx The xxx should be a numeric value in the range from 0 to 255 However 224 or 225 xxx xxx xxx and 127 xxx xxx xxx cannot be used When you make an entry...

Страница 70: ...name server you can access the device using a combination of the host name and the domain name as the Internet address For example if the host name is myhost and the domain name is fujixerox com then...

Страница 71: ...ing items changed on the screen of the control panel are not displayed Switch the machine off and on in this case This section describes about the settings of ports and protocols Ethernet 70 Parallel...

Страница 72: ...net address 3 Click the Properties tab 4 Click on the left of Port Settings to display the items in the folder 5 Click Ethernet 6 Set the communication speed for the Ethernet interface using the Ether...

Страница 73: ...t Settings to display the items in the folder 5 Click Parallel 6 Select the Enable check box to enable Bi Directional Communications 7 Set Auto Eject Time 8 Set the protocol using the Adobe Communicat...

Страница 74: ...n the left of Port Settings to display the items in the folder 5 Click USB 6 Set Auto Eject Time 7 Set the protocol using the Adobe Communications Protocol pull down menu Note Adobe Communication Prot...

Страница 75: ...Note When specifying a port number add and a port number to the end of the Internet address 3 Click the Properties tab 4 Click on the left of Protocol Settings to display the items in the folder 5 Cli...

Страница 76: ...rotocol Settings to display the items in the folder 5 Click SMB 6 Set Workgroup 7 Set Host Name 8 Set the Maximum Sessions 9 Select the Enable check box to enable the TBCP Filter Note The TBCP filter...

Страница 77: ...address entry http 192 168 1 1 z Example of the Internet address entry http xxx yyyy zz vvv Note When specifying a port number add and a port number to the end of the Internet address 3 Click the Pro...

Страница 78: ...Select a frame type from the Transport Protocol Frame Type pull down menu 17 Select the Enable check box to enable SLP Active Discovery 18 Reflect the values as the machine s setting values 1 Click th...

Страница 79: ...col Settings to display the items in the folder 5 Click TCP IP 6 Set Host Name 7 Select how to obtain an IP address from the Get IP Address pull down menu 8 Set IP Address Note This item is not necess...

Страница 80: ...ick OK Note The default user ID is 11111 and password is x admin 4 Set IP Filter 5 Set IP Address Mask 6 Click the Apply New Settings A screen to enter the user name and password will be displayed 7 E...

Страница 81: ...isplay the items in the folder 5 Click LPD 6 Set Port Number Note Do not enter a number for the port number that is already used for other port numbers 7 Select the Enable check box to enable TBCP Fil...

Страница 82: ...Properties tab 4 Click on the left of Protocol Settings to display the items in the folder 5 Click SNMP 6 When changing the community name set Community Name Read Only Community Name Read Write and Co...

Страница 83: ...dd Port Number Note Do not enter a number for the port number that is already used for other port numbers 7 Select the Enable check box to enable TBCP Filter Note The TBCP Filter is set only when an o...

Страница 84: ...ol Settings to display the items in the folder 5 Click Port 9100 6 Set Port Number Note Do not enter a number for the port number that is already used for other port numbers 7 Select the Enable check...

Страница 85: ...ick on the left of Protocol Settings to display the items in the folder 5 Click LDAP 6 Set LDAP Server Address 7 Set Port Number Note Do not enter a number for the port number that is already used for...

Страница 86: ...Properties tab 4 Click Port Status 5 Enable the ports which are used for the E mail feature 1 Select the Enable check box for Receive E Mail when using the E mail printing or iFax feature 2 Select the...

Страница 87: ...ms 1 Start a web browser 2 Enter the machine s IP address or the Internet address to the address entry column on the browser and press the Enter key z Example of the IP address entry http 192 168 1 1...

Страница 88: ...u Note Set this item when using the E mail printing feature 12 Set the print method using the Print iFax Headers and Contents pull down menu Note Set this item when using the iFax feature 13 Set the p...

Страница 89: ...ce or job completion notice feature The setting is not necessary for pop receiving 24 Set the mail exchange restrictions Note Set this item when using the E mail priningt or iFax feature 1 Select eith...

Страница 90: ...Click on the left of Protocol Settings to display the items in the folder 5 Click HTTP 6 Set Port Number Note Do not enter a number for the port number that is already used for other port numbers 7 S...

Страница 91: ...3 Click the Properties tab 4 Click on the left of Protocol Settings to display the items in the folder 5 Click WebDAV 6 Set Port Number Note Do not enter a number for the port number that is already u...

Страница 92: ......

Страница 93: ...11 E mail This chapter describes the configuration to utilize the services using E mail on the machine z E mail Overview 92 z Preparations 93 z Installation Procedure 94...

Страница 94: ...transmit or receive scanned data as e mail attachemens using either corporate networks or the Internet Contents of E mail are processed according to the settings of Print iFax Headers and Contents in...

Страница 95: ...mask Required when the network is divided into subnets U U U U U Gateway address Required when multiple networks are connected by gateways U U U U U Administrator E mail address Set the E mail addres...

Страница 96: ...pad or a keyboard displayed by pressing Keyboard and select Confirm Note The default user ID is 11111 When using the Authentication feature a password is required The default password is x admin 3 Sel...

Страница 97: ...es If you do not set the gateway address enter 0 0 0 0 4 Select Close repeatedly until the System Settings screen is displayed 5 Select Exit 6 After the machine is restarted print out a settings list...

Страница 98: ...otocol 1 Select SMTP Server Settings and then set the following items for the SMTP server z SMTP Server Port Number Enter a value in the range from 1 to 65535 Note Do not enter a number for the port n...

Страница 99: ...Clear button and enter again When moving to the next value without entering all 3 digits select Next z SMTP Server Name Enter a server name if By Server Name is selected for SMTP Server Setup z SMTP S...

Страница 100: ...ot z Message Digest Algorithm Select a message digest algorithm from SHA1 or MD5 z Contents Encryption Method Select a contents encryption method from 3DES RC2 40 RC2 64 or RC2 128 z Digital Signature...

Страница 101: ...ation to utilize the scan services on the machine z Scan Service Overview 100 z Configuration of E mail 101 z Configuration of Scan to Mailbox 106 z Configuration of Job Template 111 z Configuration o...

Страница 102: ...ers In addition to scanned documents documents received by the Remote Mailbox feature from other fax machines can be retrieved from a mailbox Job Template Scanning A job template is a configuration fi...

Страница 103: ...mail send port and mail receive port and set an IP address of the machine Note The configuration can also be performed using CentreWare Internet Services For information on how to use CentreWare Inte...

Страница 104: ...ddress as the above Note Enter the address in the format xxx xxx xxx xxx The xxx should be a numeric value in the range from 0 to 255 However 224 or 225 xxx xxx xxx and 127 xxx xxx xxx cannot be used...

Страница 105: ...Specify a POP user name to an account name the left side of the mark and a POP3 receiving mail server to an address the right side of the mark A user can decide an alias such as mymail fujixerox co j...

Страница 106: ...OP3 Receiving Password Encryption Select On APOP to encrypt the password 2 Select Save 3 Select Close 4 Configure the E mail transmission 1 Select SMTP Server Settings and then set the following items...

Страница 107: ...ate to the machine For information on creating a certificate refer to Communication Security P 129 z S MINE Communication Set whether to enable or disable S MINE Communication when a certificate ID is...

Страница 108: ...eWare EasyOperator is stored in the CentreWare Utilities CD ROM provided with the machine For information on the installation procedure refer to the manual contained in the CentreWare Utilities CD ROM...

Страница 109: ...anything other than Manual proceed to Step 4 Note When using a DHCP server also configure the WINS Windows Internet Name Service server 4 Select TCP IP IP Address and select Change Settings 5 Enter t...

Страница 110: ...strator password is set z Check Password When the password is set configure whether each operation such as storing in a mailbox printing or deleting a document etc requires a password z Delete Documen...

Страница 111: ...ollowing items as necessary Select an item to configure and select Change Settings When the setting is completed select Save Mailbox Name Set the name used for a mailbox Up to 20 characters can be use...

Страница 112: ...d at the specified time For information on the Document Expiry Date refer to Stored Document Settings under Chapter 11Setups of the User Guide Link Job Flow Sheet to Mailbox Set or change a link to a...

Страница 113: ...for setting the machine is as follows Note The configuration can also be performed using CentreWare Internet Services For information on how to use CentreWare Internet Services refer to Using CentreW...

Страница 114: ...onfigure TCP IP Subnet Mask and TCP IP Gateway Address as the above Note Enter the address in the format xxx xxx xxx xxx The xxx should be a numeric value in the range from 0 to 255 However 224 or 225...

Страница 115: ...he default password is x admin 3 The right frame on the web browser will change to the machine reboot display 4 Click Reboot The machine will reboot and the setting value will be reflected Configurati...

Страница 116: ...etWare 5 11 or 5 12 Refer to the manual provided with the software for how to configure the FTP service Using with SMB When using with SMB transmission a computer running on the following OS which inc...

Страница 117: ...ol enable the FTP client port 1 Select FTP Client and then select Change Settings 2 Select Port Status and then select Change Settings 3 Select Enabled then select Save 4 Select Close repeatedly until...

Страница 118: ...eway address enter 0 0 0 0 5 Select Close repeatedly until the System Settings screen is displayed 6 Select Exit 7 After the machine is restarted print out a settings list to confirm that either the S...

Страница 119: ...Configuring a computer Install CentreWare EasyOperator on the computer Enabling Port and Setting TCP IP In order to use the job flow service enable the SOAP port SNMP port and Internet service HTTP po...

Страница 120: ...onfigure the WINS Windows Internet Name Service server 4 Select TCP IP IP Address then Change Settings 5 Enter the IP address using the numeric keypad Note Enter the address in the format xxx xxx xxx...

Страница 121: ...perties tab 4 Click Start Port 5 Select the UDP check box under SNMP 6 Reflect the values as the machine s setting values 1 Click the Apply New Settings 2 Enter the System Administrator user ID and pa...

Страница 122: ......

Страница 123: ...13 Using the iFax Service This chapter describes how to use the Internet fax iFax service on the machine z iFax Overview 122 z Preparations 122 z Installation Procedure 123...

Страница 124: ...ls transmitted from machines which support the iFax service Refer to About Internet Fax under Chapter 4 Fax in the User Guide for details of iFax Note This feature does not appear for some models An o...

Страница 125: ...be performed using CentreWare Internet Services For information on how to use CentreWare Internet Services refer to Using CentreWare Internet Services P 65 1 Display the System Administrator Menu scre...

Страница 126: ...teway Address as above Note Enter address in the format xxx xxx xxx xxx xxx should be a numeric value in the range from 0 to 255 However 224 or 225 xxx xxx xxx and 127 xxx xxx xxx cannot be used Speci...

Страница 127: ...POP user name to an account name the left side of the mark and a POP3 receiving mail server to an address the right side of the mark A user can decide an alias such as mymail fujixerox co jp Example m...

Страница 128: ...iving Password Encryption Select On APOP to encrypt the password 2 Select Save 3 Select Close 4 Configure the E mail transmission 1 Select SMTP Server Settings and then set the following items for the...

Страница 129: ...the machine For information on creating a certificate refer to Communication Security Service Overview P 130 z S MINE Communication Set whether to enable or disable S MINE Communication when a certifi...

Страница 130: ...elect Fax Internet Fax on the All Services screen to display the Fax Internet Fax screen 2 Select iFax Fax several times to display iFax at the destination address column 3 Enter a destination address...

Страница 131: ...ribes the configuration to utilize the communication security services on the machine z Communication Security Service Overview 130 z Configuration of HTTP Communication Encryption 131 z Configuration...

Страница 132: ...Also certificates for SSL and TLS are used to decrypt the data Registered certificates or certificates created by CentreWare Internet Services valid for 1 year can be used as the certificates for SSL...

Страница 133: ...rtificate on the machine This section describes how to create a self certificate for SSL server Important When performing SSL communication using a self certificate created on the machine or a certifi...

Страница 134: ...t password is x admin 7 Refresh the web browser 8 Click on the left of Security to display the items in the folder 9 Click General Security 10 Select the Enable check box for HTTPS 11 Set Port Number...

Страница 135: ...eflected Configuration on a Computer The following describes the configuration for a computer When encrypting communication between a web browser and the machine enter an address beginning with https...

Страница 136: ...information on how to use CentreWare Internet Services refer to Using CentreWare Internet Services P 55 1 Start a web browser 2 Enter the machine s IP address or the Internet address beginning with ht...

Страница 137: ...as the machine s setting values 1 Click the Apply New Settings 2 The right frame on the web browser will change to the machine reboot display 3 Click Reboot The machine will reboot and the setting va...

Страница 138: ...ificate refer to the CentreWare Internet Services online help Sending e mail with S MIME digital signature from a computer to the machine It is necessary to register the highest certificate issued by...

Страница 139: ...his chapter describes how to troubleshoot network related problems and important notes and restrictions z SMB 138 z NetWare 141 z TCP IP 145 z CentreWare Internet Services 149 z Scanner Features 151 z...

Страница 140: ...ferent networks consult your network administrator The host name for the machine is already in use Print out the System Settings List to confirm if Repetitive Host Name is printed in the SMB status in...

Страница 141: ...vice management consult with the NIS administrator Switching Off the Power Check the following points when switching off the machine z When the SMB Spool is set to Memory All print data spooled within...

Страница 142: ...y immediately re transmit the print data When this occurs the computer appears to be halted Deal with this problem by canceling the print data transmission from the computer z When the SMB Spool is se...

Страница 143: ...er user or group name to the User of the Print Queue Job transmission to the print queue is prohibited Use PCONSOLE to confirm if User can register to the queue is set to Yes under Current Queue Statu...

Страница 144: ...e printer type is set to Defined Elsewhere under Print Server Information Printer Printer xxx Environment Settings If not set to Defined Elsewhere change to Defined Elsewhere and propagate the configu...

Страница 145: ...t The file server is down Search for the file server using the Network Neighborhood Start the file server There is another device on the network with an identical device name Switch off the machine an...

Страница 146: ...from a computer to confirm if the user who transmitted the job or any groups which the user is a member of is listed under Print Server Information Printer Printer xxx Environment Settings Notify Add...

Страница 147: ...None Remedy Request your network system administrator to investigate the problem The machine s power was switched off after the computer instructed a print job Or the computer instructed a print job...

Страница 148: ...ontrol panel Restart the machine Switch on the machine after the display completely disappears The machine is not set to the transport protocol which matches the protocol on the computer Confirm the t...

Страница 149: ...onsult with the NIS administrator Switching Off the Power Check the following points when switching off the machine z When the lpd Spool is set to Memory All print data spooled within the machine memo...

Страница 150: ...the computer z When the lpd Spool is set to Off While the machine is receiving a print request from a computer the machine cannot accept any print requests from other computers z When a computer s IP...

Страница 151: ...tting Items Port Protocol for CentreWare Internet Services P 69 to confirm if your browser is supported Selecting the menu on the left frame does not update the right frame contents The screen display...

Страница 152: ...em Solving 150 Problem Solving 15 Cannot enter Chinese characters No Chinese characters can be entered in fields displayed with Cannot delete jobs Wait for a while and click the Refresh button Symptom...

Страница 153: ...d Mailbox Viewer2 Simultaneously You cannot use both the network scan driver and Mailbox Viewer2 on a single computer to make a connection to the machine A maximum of three computers using either the...

Страница 154: ...y Is the Domain Filter imposed Confirm if your own domain is included in the permitted domain using CentreWare Internet Services Are the SMTP server and or POP server operating properly Check with you...

Страница 155: ...confirming printer status 23 Connection Time Out 79 81 82 86 88 control panel 14 22 28 Copy button 29 Custom 2 button 29 Custom 3 button 29 D DADF 14 Delete Document after Retrieval 108 109 Delete Doc...

Страница 156: ...46 Port Number 88 PostScript 3 Kit 19 62 Power Saver button 28 power switch 14 print 18 Print iFax Headers and Contents 86 Print Mail Headers and Contents 86 Print Mode 39 43 punch scrap container 15...

Страница 157: ...B 2 0 interface connector 17 USB interface 42 USB port 42 using the Ethernet interface 27 using the parallel interface 26 using the USB interface 26 W web browser 66 WebDAV 89 107 Windows 2000 19 Wind...

Страница 158: ......

Страница 159: ...ort 550 I 450 I 350 I DocuCentre 550 I 450 I Network Administrator Guide Manual Group Human Interface Design Development Fuji Xerox Co Ltd ME3446E2 1 Edition 1 July 2005 Copyright 2005 by Fuji Xerox C...

Страница 160: ......

Отзывы: