background image

Chapter 3 - Setting Up • 18

e.

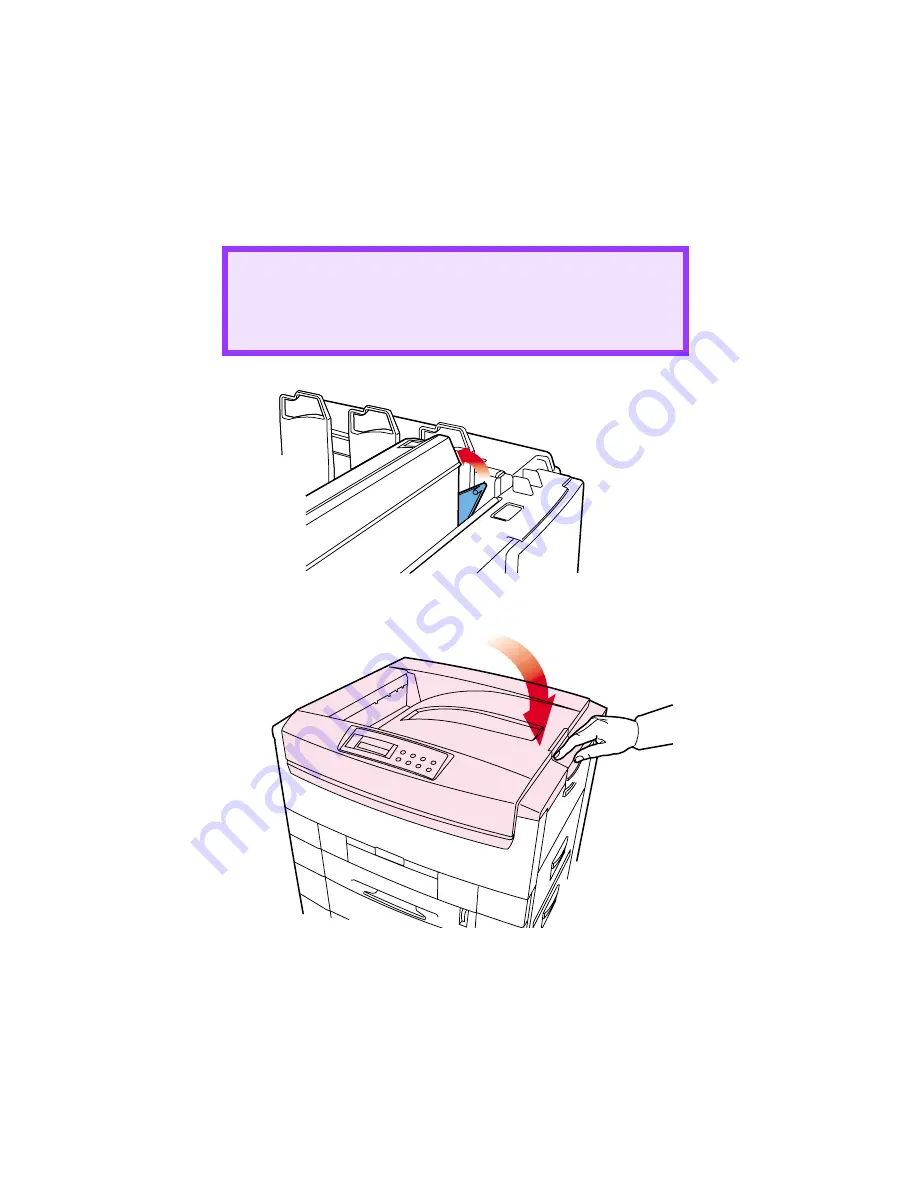
Gently

 push the colored lever toward the rear of the machine 

until it stops. This releases the toner into the image drum.

2.

Close the top cover.

CAUTION!

The lever should go back easily. If you meet any resistance, 

stop

 and push down on the cartridge to be sure that it is 

firmly in place before attempting to push the lever back.

Содержание CL30

Страница 1: ......

Страница 2: ...are available from the XANT website http www xante com Copyright 2003 2005 All rights reserved As an ENERGY STAR Program Participant the manufacturer has determined that this product meets the ENERGY...

Страница 3: ...Toner Cartridge Installation 16 Loading Paper 19 Manual Feed 22 Power Connection 23 Control Panel 24 Menu Settings 26 Changing the Display Language 26 Printing the MenuMap 27 Media Settings 28 Selecti...

Страница 4: ...Maintenance Menu 60 System Adjust Menu 61 Maintenance Menu 63 Usage Menu 63 List of Administrator Menu Settings 65 OP Menu 65 Color Menu 67 Block Device Menu 67 Peak Power Control Menu 68 Setting Colo...

Страница 5: ...r Matching 88 PostScript Color Matching 88 No Color Matching 89 Print In Grayscale 89 Job Option List 96 Job Accounting 98 Job Type 99 Secure Printing Confidential Documents 101 Proof and Print 103 St...

Страница 6: ...Multiple Pages on One Sheet 133 Duplex 134 Collating 136 Chapter 8 Mac OS 8 6 9 2 2 Utilities 137 General Information 137 Storage Device Manager 137 Fonts Downloader 138 Color Swatch Utility 138 XANT...

Страница 7: ...idge 159 Changing the Image Drum 164 Changing the Transfer Belt 167 Changing the Fuser Unit 169 Cleaning the LED Heads 172 Transporting the Printer 173 Chapter 11 Troubleshooting 175 LCD Messages 175...

Страница 8: ...219 Chapter 15 Factory default settings 221 Print Menu 221 Media Menu 222 Color Menu 223 System Config Menu 224 PCL Emulation Menu 224 Parallel Menu 226 USB Menu 227 Network Menu 227 Memory Menu 227 S...

Страница 9: ...rs like this A caution provides additional information which if ignored may result in equipment malfunction or damage WARNING A warning appears like this A warning provides additional information whic...

Страница 10: ...in features of your printer followed by some advice on how to use this User s Guide to get the most from your printer MODEL SUMMARY Model Resolution Print speed Network card Duplex Unit Memory Hard di...

Страница 11: ...tching USB High speed bi directional parallel IEEE 1284 Industry standard network connectivity via internal network interface card Environmentally friendly the advanced power save mode minimizes power...

Страница 12: ...mation in two ways In the list of bookmarks down the left hand side of your screen click the topic of interest to jump to the required topic If the bookmarks are not available use the Table of Content...

Страница 13: ...ng from Acrobat Reader is 1 From the toolbar select File then select Print or press the Ctrl P keys 2 Choose which pages you wish to print a All pages for the entire manual b Current page for the page...

Страница 14: ...enta yellow and black 3 Power cable 4 CD ROM disks 5 LED lens cleaner not illustrated 6 Light proof plastic bags not illustrated 7 Documentation not illustrated Setup Guide Software Installation Guide...

Страница 15: ...Chapter 2 Getting Started 6 CD ROM DISK CONTENTS The CD ROM disk supplied with your printer contains the following software CD Drivers Software Utilities...

Страница 16: ...the printer There must be sufficient space around the printer to allow for access and printer maintenance PRINTER COMPONENTS 1 Top cover 2 Control panel 3 Top cover release catch 4 Multi purpose MP tr...

Страница 17: ...Chapter 2 Getting Started 8 5 Paper support extension 6 Paper guides 7 Right side cover 8 Paper tray 9 Paper level indicator 10 Power switch...

Страница 18: ...Chapter 2 Getting Started 9 11 LED heads 4 12 Discharge roller 13 Fuser unit 14 Image drum cyan 15 Image drum magenta 16 Image drum yellow 17 Image drum black...

Страница 19: ...FOLLOW THESE INSTRUCTIONS WHEN THE FRONT COVER OF YOUR CL30 IS OPEN Never expose the image drum to light for more than 5 minutes Never expose the image drum to direct sunlight Never touch the surface...

Страница 20: ...Chapter 2 Getting Started 11 18 Power connector 19 Straight through exit paper tray 20 Interfaces and card slot 21 USB interface connector 22 Parallel interface connector 23 Network interface card...

Страница 21: ...Chapter 2 Getting Started 12...

Страница 22: ...y the toner cartridges must be installed and paper must be inserted in the paper tray PACKAGING AND PROTECTIVE SHEET REMOVAL 1 Remove any adhesive tape and packaging from the printer 2 Using the relea...

Страница 23: ...um and place it on a level surface 5 Remove the protective sheet CAUTION Never expose image drums to light for more than 5 minutes Always hold image drum by the ends Never expose image drums to direct...

Страница 24: ...Chapter 3 Setting Up 15 6 Put the black image drum back into the printer 1 then push the tab 2 inwards and remove the blanking plate from the drum 7 Repeat steps 4 through 6 for each color drum 1 2...

Страница 25: ...age b Shake the toner cartridge back and forth several times then holding it horizontally remove the tape and then remove the plastic clip from behind the colored lever WARNING Take extreme care when...

Страница 26: ...Insert the toner cartridge in its image drum left side first engaging the drum locating peg in the hole in the toner cartridge d Gently push the toner cartridge down engaging the locking pin into the...

Страница 27: ...the machine until it stops This releases the toner into the image drum 2 Close the top cover CAUTION The lever should go back easily If you meet any resistance stop and push down on the cartridge to b...

Страница 28: ...Chapter 3 Setting Up 19 LOADING PAPER 1 Pull out the paper tray 2 Adjust the paper guides and rear stopper for the size of paper being used...

Страница 29: ...the paper tray Capacity depends on the type of paper and the paper weight max 550 sheets of 20 lb US Bond 75 g m paper Don t load damaged paper Don t load paper of different sizes paper quality or th...

Страница 30: ...printing straight through path make sure the straight through paper exit is open and the paper support is extended Paper is stacked in reverse order Tray capacity is about 100 sheets depending on pap...

Страница 31: ...es to the size of the paper being used Load the paper into the Multi purpose tray tray with the print face upward Don t exceed the Paper Full line about 100 sheets depending on paper weight Load envel...

Страница 32: ...up sequence When the printer is ready the READY indicator comes on and stays on green and the LCD indicates ONLINE WARNING Ensure both the printer power switch and the AC supply are switched OFF befor...

Страница 33: ...l continue FLASHING indicates that attention is required but printing will stop 2 Ready indicator green ON ready to receive data FLASHING indicates processing data or error 3 Liquid crystal display LC...

Страница 34: ...t the menu item or value indicated on the LCD 5 Online button Switches between online and offline status When pressed in Menu mode it returns the printer to on line status When pressed with DATA PRESE...

Страница 35: ...G MENU is displayed 3 Press the SELECT button 4 Press the ITEM button repeatedly until LANGUAGE is displayed 5 Press the VALUE button repeatedly until the required language is displayed 6 Press the SE...

Страница 36: ...sure there is paper in the paper tray 2 Press the MENU button until the INFORMATION MENU is displayed then press the SELECT button 3 Confirm that PRINT MENU MAP is displayed on the LCD 4 Press the SE...

Страница 37: ...d NOTE If the settings in the printer differ from those selected on your computer the printer will not print and the LCD will display an error message The following printer settings are given as a gui...

Страница 38: ...t to the selected paper size 5 Press the ONLINE button to return the printer to ONLINE status 6 Select the correct paper settings in the printer driver before printing the file NOTE When using paper t...

Страница 39: ...for the required tray is displayed 4 Press the VALUE or button until the required paper type or weight is displayed then press the SELECT button An asterisk appears next to the selected paper type or...

Страница 40: ...of the image drum and give poor print quality Print quality can be improved by changing the media setting to Ultra Heavy However this will reduce the output speed and prevent the use of the duplex opt...

Страница 41: ...metal clasps Don t use envelopes with self sealing flaps Don t use damp damaged or curled paper envelopes Labels For recommended labels see your XANT CL30 Quick Reference Manual or check www xante com...

Страница 42: ...Da a S Simplex D Duplex printing on both sides of the paper Sa S Da S Da A4 S Da Sa S Da S Da A5 S Da Sa S Da S Da A6 b b Not usable Sa Sa b B4 S Da Sa S Da S Da B5 S Da Sa S Da S Da Letter S Da Sa S...

Страница 43: ...Sa 20 to 24 lb 75 90 g m2 Medium S Da a S Simplex D Duplex printing on both sides of the paper Sa S Da S Da 25 to 27 lb 91 104 g m2 Medium heavy S Da Sa S Da S Da 28 to 32 lb 105 122 g m2 Heavy b b No...

Страница 44: ...the paper tray 2 Press the ONLINE button to place the printer offline 3 Press the MENU button until the INFORMATION MENU is available 4 Press the SELECT button until the display prompts you to print t...

Страница 45: ...rive is installed The default settings are bold Item Value Description ENTER PASSWORD Sets password using a four digit number 0 7 This item is also displayed even when OP MENU ALL CATEGORY is set to D...

Страница 46: ...RINT MENU MAP Execute Prints menu list PRINT FILE LIST Execute Prints job file list PRINT PCL FONT Execute Prints PCL font list PRINT PS FONT Execute Prints PostScript font list PRINT DEMO12 Execute P...

Страница 47: ...3 Setting Up 38 Test Print Menu Item Value Description PRINT ID CHECK PATTERN Execute Prints ID check pattern to detect bad ID Displayed only if TEST PRINT MENU of the System Maintenance Menu is set t...

Страница 48: ...nting if the optional duplex unit is installed BINDING Long edge Short edge Sets binding for duplex printing Only displayed if duplex is ON OUTPUT BIN Face Up Face Down Specifies output bin JOB OFFSET...

Страница 49: ...hing MP Tray will not be used If MP Tray is designated in Paper Feed printer behaves as though Normal Tray is selected Media check Enable Disable Sets whether the printer checks the matching of paper...

Страница 50: ...3 A4 Short Edge A4 Long Edge A5 A6 B4 B5 Short Edge B5 Long Edge Custom Com 9 envelope Com 10 envelope Monarch envelope DL Envelope C5 Envelope C4 Envelope Use long edge feed Cassette size is selected...

Страница 51: ...d Recycled Card stock Rough Sets the media type for optional Tray 3 Only displayed if installed TRAY 3 MEDIAWEIGHT Auto Light Medium Light Medium Medium Heavy Heavy Ultra Heavy Selects the media weigh...

Страница 52: ...Rough Selects the paper type for multipurpose paper tray MP TRAY MEDIAWEIGHT Auto Light Medium Light Medium Medium Heavy Heavy Ultra Heavy Sets the paper weight for the multipurpose MP paper tray UNI...

Страница 53: ...nsity and reflect it in the TRC compensation Density adjustment must be executed when the printer is idling It may become invalid if executed in any other state COLOR TUNING Print pattern Prints the p...

Страница 54: ...TRC Compensation function ADJUST REGISTRATION Execute When this menu is selected the printer performs an Auto Adjust Registration Must be executed in the idle state Auto Registration OFF CYAN REGISTRA...

Страница 55: ...LIGHT sometimes helps reduce curl CMY 100 DENSITY Disable enable Selects enable disable 100 output against the CMY100 TRC compensation Ordinarily the TRC compensation function controls the appropriat...

Страница 56: ...AW mode Ctrl T is invalid NETWORK PS PROTOCOL ASCII RAW Specifies PS communication protocol mode of data from XANTELAN 6200e Plus In RAW mode Ctrl T is invalid CLEARABLE WARNING ON Job PCL emulation S...

Страница 57: ...FF Sets whether or not printing will continue after a paper jam has been cleared If set to OFF the print job that was being printed when the paper jam occurred will be cancelled after clearing the pap...

Страница 58: ...ernal resident font I000 Courier C Font stored in the printer s Flash memory S downloaded soft font stored on the printer s internal hard disk drive Applies only to printers with a hard disk drive ins...

Страница 59: ...USPSZIP Bulgarian CWI Hung DeskTop German Greek 437 Greek 437 Cy Greek 928 Hebrew NC Hebrew OC IBM 437 IBM 850 IBM 860 IBM 863 IBM 865 ISO Dutch ISO L1 ISO L2 ISO L5 ISO L6 ISO L9 ISO Swedish1 ISO Sw...

Страница 60: ...Sets functionality on receipt of LF code in PCL mode PRINT MARGIN Normal 1 5 inch 1 6 inch Sets unprintable paper area margin Normal PCL emulation compatible 1 5 inch domestic model emulation 1 6 inch...

Страница 61: ...Chapter 3 Setting Up 52...

Страница 62: ...Chapter 3 Setting Up 53 Item Value...

Страница 63: ...Chapter 3 Setting Up 54 Item...

Страница 64: ...Chapter 3 Setting Up 55...

Страница 65: ...in Busy ACK while Busy Sets output order for ACK and BUSY during reception ACK IN BUSY BUSY LOW to the end of the ACK pulse ACK WHILE BUSY BUSY LOW to the centre of the ACK pulse I PRIME 3 micro sec...

Страница 66: ...work card is installed The default settings are bold Item Value Description TCP IP Enable Disable Selects TCP IP protocol NETWARE Enable Disable Selects Netware protocol ETHERTALK Enable Disable Selec...

Страница 67: ...NT SETTINGS ON OFF Selects printing of network menu map INITIALIZE ON OFF Selects network initialization Network menu continued Only appears if the network card is installed The default settings are b...

Страница 68: ...printer RESOURCE SAVE AUTO Off 0 5 MB 1 MB 2 MB 4 MB 8 MB 16 MB 32 MB Set the size of the font cache area and depends on the amount of memory installed in the printer FLASH INITIALIZE Execute Initiali...

Страница 69: ...XANT Storage Device Manager software by the System Administrator or by someone who is knowledgeable in this area Disk Maintenance Menu The default settings are bold Item Value Description HDD INITIAL...

Страница 70: ...25 TO 2 0 MM and 2 0 TO 0 25 MM in 0 25 mm increments Adjusts overall print position of print face vertically in 0 20 increments TRAY 1 A3 NOBI PAPER A3 Nobi A3 Wide Tabloid extra Sets Tray 1 large p...

Страница 71: ...Sets Tray 4 number for PCL emulation PCL TRAY 5 ID 1 59 default 22 Sets Tray 5 number for PCL emulation PCL MP TRAY ID 1 59 default 4 Sets MP Tray number for PCL emulation DRUM CLEANING OFF ON Sets w...

Страница 72: ...also System adjust menu PAPER BLACK SETTING 0 1 2 2 1 Not normally used PAPER COLOR SETTING 0 1 2 2 1 Not normally used TRANSPR BLACK SETTING 0 1 2 2 1 Not normally used TRANSPR COLOR SETTING 0 1 2 2...

Страница 73: ...N DRUM LIFE Remaining nnn Displays the remaining life of the cyan image drum as a percentage MAGENTA DRUM LIFE Remaining nnn Displays the remaining life of the magenta image drum as a percentage YELLO...

Страница 74: ...ayed PRINT JOB MENU is displayed when this MENU setting is set to ENABLE even though ALL CATEGORY is set to DISABLE INFORMATION MENU Enable Disable Enable Disable INFORMATION MENU Set to Disable INFOR...

Страница 75: ...IEEE 1394 MENU Set to Disable IEEE 1394 MENU is not displayed NETWORK MENU Enable Disable Displayed only when the Network Interface Card is installed Enable Disable NETWORK MENU Set to Disable NETWOR...

Страница 76: ...ing For example correct values could not be taken due to out of order situation This is mainly for maintenance purposes and not ordinarily used RESET M GAMMA FILTER EXECUTE RESET Y GAMMA FILTER EXECUT...

Страница 77: ...Chapter 3 Setting Up 68 Peak Power Control Menu The default settings are bold Item Value Description PEAK POWER CONTROL NORMAL LOW Sets Peak Power Control...

Страница 78: ...sity use a higher positive setting default 0 maximum 3 To decrease the color intensity use a higher negative setting default 0 maximum 3 Important In most cases using Color Tuning is not necessary as...

Страница 79: ...er size paper is loaded in the tray b Press the MENU button repeatedly until COLOR MENU displays c Press the ITEM button repeatedly until COLOR TUNING displays d Press SELECT The Color Tuning Pattern...

Страница 80: ...isplays e g 3 c Press the SELECT button An asterisk appears at the right of the number 4 Adjust the Magenta dark color a Press the ITEM button repeatedly until MAGENTA DARK nn displays b Press the VAL...

Страница 81: ...n the printer off using the power switch CAUTION NEVER turn the printer off while it is printing If the optional hard disk has been installed The following procedure MUST BE FOLLOWED before turning of...

Страница 82: ...as 2 3 etc These numbers depend on the order of connecting or turning on each printer 5 Ethernet For network cable connection This port is standard on all n models optional on others See your printed...

Страница 83: ...Chapter 3 Setting Up 74...

Страница 84: ...rinter driver s allows to enable disable options You most likely only will need to do this once To access the Printer Driver 1 Select the Destkop Printer and leave highlighted 2 From the Menu click Pr...

Страница 85: ...Chapter 4 Mac OS 8 6 9 2 2 Printer Driver 76 4 Click Select to activate the Description file...

Страница 86: ...er and leave highlighted 2 From the Menu click Printing Change Setup The current setup appears under Installable Options To manually alter the setup a To the right of Change click on the down arrow an...

Страница 87: ...inter and leave highlighted 2 From the Menu click Printing Change Setup The current setup appears under Installable Options To manually alter the setup a To the right of Change click on the down arrow...

Страница 88: ...p Printer and leave highlighted 2 From the Menu click Printing Change Setup The current setup appears under Installable Options To manually alter the setup a To the right of Change click on the down a...

Страница 89: ...Chapter 4 Mac OS 8 6 9 2 2 Printer Driver 80...

Страница 90: ...ghted 2 From the Menu click Printing Change Setup The current setup appears under Installable Options To manually alter the setup a To the right of Change click on the down arrow and select Memory Con...

Страница 91: ...Chapter 4 Mac OS 8 6 9 2 2 Printer Driver 82...

Страница 92: ...y applications have their own color settings and these may override the settings in the printer driver Please refer to the documentation for your software application for details on how that particula...

Страница 93: ...fice fluorescent lighting Printer driver color settings The driver settings for Manual color can change the appearance of a print There are several options available to help match the printed colors w...

Страница 94: ...per type The type of paper used can also significantly affect the printed color For example a printout on recycled paper can look duller than one on specially formulated glossy paper CHOOSING A COLOR...

Страница 95: ...ing method appropriate to your monitor RGB or CMYK If you are printing photographic images from a graphics application such as Adobe Photoshop you may be able to use Soft Proofing to simulate the prin...

Страница 96: ...Colorimetric setting Printing Vivid Colors RGB only Use XANT Color Matching with either the Monitor 6500k Vivid sRGB or Digital Camera settings RGB or CMYK Use PostScript Color Matching with the Satur...

Страница 97: ...e in which the printer will display colors 1 Select the option desired XANT Color Matching This is XANT s proprietary color matching system and affects RGB data only This is the default setting and pr...

Страница 98: ...best options for your printer This selection works best for office situations Monitor 6500k Perceptual Optimized for printing photographs when using a monitor with a color temperature of 6500K This i...

Страница 99: ...rinter color space The rendering intents are essentially a set of rules that determine how this color conversion takes place 1 Select the option desired Auto The best default select as this selects th...

Страница 100: ...screen The white of a monitor is often very different from paper white so this may result in color casts especially in the lighter areas of an image Color Simulation Affects CMYK output only and usua...

Страница 101: ...tte This option uses more Black and less CMYK while producing a flatter black Separations This option affects output only allowing you to print all colors or separate plates 1 Select the option desire...

Страница 102: ...verprint This option prevents registration errors and only works for 100 black text 1 Click on the checkbox to enable the option Printer Halftone This option prevents the halftone of a high end graphi...

Страница 103: ...Operation 94 Job Option 1 To access Job Option select your desired XANT printer 2 Open the drop down menu directly underneath the printer and select Job Option Quality A straightforward selection of...

Страница 104: ...Setup documentation provides a guide for selection Feed Exit Media weight Tray 1 Tray 2 Tray 3 MP Tray Manual Rear face up Top face down Paper US Bond Metric 17 lb 64 g m2 Light Simplex Simplex Simple...

Страница 105: ...e documents and wish for them to be printed in sequence Transaprencies Media Weight Ignored Set MediaType Transparency Simplex Simplex Simplex Labels 0 1 to 0 17 mm thick Medium Heavy Simplex Simplex...

Страница 106: ...led as manual feed Checking this will cause the MP tray to be used in manual feed situations The MP tray cannot be used for duplex printing Page Rotate Checking this will rotate the printed material o...

Страница 107: ...ion Utility 1 To access Job Accounting select your desired XANT printer 2 Open the drop down menu directly underneath the printer and select Job Accounting 3 Enter your User Name and Password and pres...

Страница 108: ...sk must be installed in the printer and enabled to allow for spooling of the print job before final printing If the hard disk memory is insufficient for the spooled data DISK FULL is displayed and onl...

Страница 109: ...and select Job Type Each option on the Job Type screen is detailed below Print Type From here you will select your desired option Normal This is the default setting for which no further action is req...

Страница 110: ...6 characters next to Job Name and a four digit personal ID number in the ID Number box 3 Press Print to proceed with your print job The document will be stored on the printer s hard disk 4 Walk up to...

Страница 111: ...on The document will print and be deleted from the hard disk drive Deleting the confidential document before printing it 1 Press the MENU button to access the PRINT JOBS MENU and press the SELECT butt...

Страница 112: ...d a four digit personal ID number NOTES The internal hard disk must be installed in the printer and enabled to allow for spooling of the print job before final printing If the hard disk memory is insu...

Страница 113: ...ID number using the buttons on the printer control panel 3 Press the VALUE button until ALL JOBS or the required job name is displayed 4 Press the SELECT button to print the remaining copies of the d...

Страница 114: ...rint job The document will be stored on the printer s hard disk NOTES The internal hard disk must be installed in the printer and enabled to allow for spooling of the print job before final printing I...

Страница 115: ...NT JOBS MENU and press the SELECT button 2 Enter the personal ID number you selected above using the buttons on the printer control panel 3 Press the VALUE button until ALL JOBS or the required job na...

Страница 116: ...es not attempt to cover all the options that might occur but rather the typical printing operations that can benefit from detailed descriptions You can also refer to your Macintosh online help or manu...

Страница 117: ...ions desired a For Multiple Pages access Pages per sheet b Select the desired direction c Select a border between the sheets if desired 4 Click Print to print or Save Settings to save and close the pr...

Страница 118: ...ion 109 2 Open the drop down menu directly underneath the printer and select Layout 3 From the Layout screen select the options desired a For Duplexing printing on both sides of the sheet press the bu...

Страница 119: ...ly one collate option to prevent any conflicts in printing i e collate from the software application or collate from the printer driver The following instructions explain how to select collating using...

Страница 120: ...5 Mac OS 8 6 9 2 2 Operation 111 2 The General dialog box should be displayed already If not then select General from the menu 3 From the General screen click the button next to Collate to enable the...

Страница 121: ...Chapter 5 Mac OS 8 6 9 2 2 Operation 112...

Страница 122: ...n installing printer drivers You can also go to http www xante com to see download a copy of the Software Installation Guide or for the latest information on printer drivers ADJUSTING OPTIONS Apple Co...

Страница 123: ...Chapter 6 Mac OS 10 1 5 Printer Drivers 114...

Страница 124: ...ettings in the printer driver Please refer to the documentation for your software application for details on how that particular program s color management functions Factors that affect the appearance...

Страница 125: ...der different lighting conditions For example the colors in a print may look different when viewed standing next to a sunlit window compared to how they look under standard office fluorescent lighting...

Страница 126: ...ac OS 10 1 5 Operation 117 2 Click the arrow next to Displays and select your monitor in this example it is iMac In the Current Profile area click the down arrow and select Other to access the XANT Co...

Страница 127: ...used with the ColorSync Utility Devices Apple also provides a System Preference utility ColorSync for selection of color profiles for the printer and documents 1 Navigate to the utility by accessing y...

Страница 128: ...n usually accessed via File Print 2 Click on the drop down menu and select Printer Features and then select the Features 2 tab for Color Control Monitor Settings The brightness and contrast controls o...

Страница 129: ...glossy paper CHOOSING A COLOR MATCHING METHOD There is no one correct way to achieve a good color match between the document displayed on your monitor and its printed equivalent There are many factor...

Страница 130: ...uch as Adobe Photoshop you may be able to use Soft Proofing to simulate the printed image on your monitor To do this you can use the ICC Profiles provided by XANT and then print using the ICC profiles...

Страница 131: ...Use PostScript Color Matching with the Saturation option XANT DRIVER OPTIONS This section references only the XANT supplied driver selections Printer Features XANT Printer Features 1 Open your printe...

Страница 132: ...ow Quality A straightforward selection of the print quality desired Fast 600 x 600 dpi Fine 1200 x 1200 dpi 1 Select your desired print quality Collate Collating can be carried out with or without a h...

Страница 133: ...r documents Output Bin The Output Bin option gives you the control to choose the destination position and finishing possibilties of the print out Stacker Face down output to the top in normal order St...

Страница 134: ...aper type Normally the Printer Setting is sufficient 1 Select your desired Media Type Any option other than Printer Setting will override the setting at the printer 2 The following chart also found in...

Страница 135: ...plex Simplex Duplex Simplex Simplex Duplex Simplex Duplex 28 to 32 lb 105 122 g m2 Heavy Simplex Simplex Simplex 33 to 54 lb 123 203 g m2 Ultra heavy Simplex Simplex Transparencies Media Weight Ignore...

Страница 136: ...Control XANT Color Matching This is XANT s proprietary color matching system and affects RGB data only This is the default setting and provides the fastest best color matching for your printer Postsc...

Страница 137: ...g which style is better Glossy This option uses more CMYK and less Black while producing a shinier black Matte This option uses more Black and less CMYK while producing a flatter black Color Setting T...

Страница 138: ...itor with a color temperature of 6500K Digital Camera Optimized for printing photographs taken with a digital camera This tends to produce prints with lighter and brighter colors For some photographs...

Страница 139: ...all the colors are shifted together Saturation Best choice for printing bright saturated colors if you don t necessarily care how accurate the colors are This makes it the recommended choice for grap...

Страница 140: ...from printing 1 Click on the checkbox to enable the option Color Simulation Affects CMYK output only and usually is used in offset printer environments only This option simulates what the output will...

Страница 141: ...all colors or separate plates 1 Select the option desired Media Check Sets whether the printer checks the matching of paper size to that of the tray Only standard sizes are checked NOTE You must sele...

Страница 142: ...descriptions of common printing issues common to the Macintosh environment This section does not attempt to cover all the options that might occur but rather the typical printing operations that can...

Страница 143: ...the Layout screen select the options desired a For Multiple Pages access Pages per sheet b Select the desired Layout Direction c Select a Border between the sheets if desired Duplex 1 Open your print...

Страница 144: ...ch Binding you prefer Normally the first option is the default NOTES Duplex printing can be carried out only on standard paper sizes and paper weights between 20 and 28 lb 75 and 105 g m The optional...

Страница 145: ...to prevent any conflicts in printing i e collate from the software application or collate from the printer driver The following instructions explain how to select collating using a printer driver 1 O...

Страница 146: ...torage Device Manager Using the software improves the internal performance of the printer allowing you to adjust printer options such as paper tray and printing timeout settings Important These Utilit...

Страница 147: ...urately Things To Remember Your software may not be able to match colors using the information provided by the swatch files In that case you may need to use other means of matching Many other factors...

Страница 148: ...lick the Mac Installer icon to open and run Click Continue 4 Select Custom Install to access the Utility Installation 5 Click in the boxes on the left hand side of the Utilities you wish to install an...

Страница 149: ...ected Save button 1 Clicking this button will prompt converting the settings in this dialog box to PS commands and send them to change the printer settings 2 This button is grayed out and disabled if...

Страница 150: ...ns below 2 Closing the Option dialog box will prompt returning to the Main dialog box Help button 1 Clicking this button will prompt displaying the Help dialog box covering the items in this Main dial...

Страница 151: ...w long the the printer waits for paper to be inserted after a request After that interval the job is cancelled Media Check Sets whether the printer checks the matching of paper size to that of the tra...

Страница 152: ...em Value Description CHANGE PRINTER NAME ZONE EXECUTE Only available if printer is on an AppleTalk network DOWNLOAD FILE EXECUTE Allows a file to be loaded into the printer DISPLAY FONT LIST EXECUTE D...

Страница 153: ...tored in the PostScript interpreter in the printer However this will not change the name displayed in the Chooser only the XANT Net utility has that ability 1 Access the function from the Utilities me...

Страница 154: ...automatically will print the PS PDF files unless they are specified to be stored in the hard disk 1 After selecting Download File from the Utilities menu select the file you wish to load into the pri...

Страница 155: ...inter select Display Font List from the Utilities menu 2 Press Close to return to the main screen Initialise Disk This utility will erase the hard disk of the printer and cause it to rebuild the direc...

Страница 156: ...er with the print job 1 Because Gamma Curve profiles are tied to the displayed PPD file select the correct PPD file before proceeding 2 To add an available Gamma Curve profile highlight the desired pr...

Страница 157: ...to change the shape of the curve Or if known enter the values in the fields below 3 Once the configuration is completed name and press the save button to save the profile 4 Remember the Gamma Curve p...

Страница 158: ...ive XANT data Swatch Utility and double clicking the file You are presented with the Simple Swatch The Simple Swatch covers the commonly used colors 2 Each color block or sample is identified with inf...

Страница 159: ...ntensity 3 The utility then creates many different possibilities from which you can choose 4 Once satisfied print the swatch from the menu using File Print or repeat the steps to find the color desire...

Страница 160: ...51 XANT NET UTILITY FOR ETHERTALK This utility allows changing the Zone and Name of the XANT printer on a network Rename Printer Zone 1 After opening the XANT Net application press the Search button t...

Страница 161: ...found follow the directions by pressing Command N on the keyboard to rename the printer or Command Z to select the zone for the printer 3 Alternatively you can use the Menu at this point to rename cha...

Страница 162: ...enu select Configure Parsing 2 Select the option desired and press OK to enable Print Config 1 After selecting the printer from the menu select File Print Config to gain a printout of the current conf...

Страница 163: ...e printer from the menu select Configure Type 2 Enter the new name in and press Change Type 1 If you have altered Current Type 2 you would press the Change Type 2 button Reset Restore 1 To reset the b...

Страница 164: ...Chapter 9 Checking the Printer s Status 155 Chapter 9 Checking the Printer s Status Click the WEB SETTING button or enter your printer s IP address on your web browser The following window appears...

Страница 165: ...s below 30 1 Pull out the paper tray 2 Remove any remaining sheets of paper 3 Refill the tray with up to a ream 500 sheets of paper then place the sheets removed in Step 2 on top this ensures that the...

Страница 166: ...ll the paper tray Capacity depends on the type of paper and the paper weight max 550 sheets of 20 lb US Bond 75 g m paper Don t load damaged paper Don t load paper of different sizes paper quality or...

Страница 167: ...cartridge and check whether it is empty if so the toner cartridge needs to be replaced Cartridge life is approximately 15 000 letter size pages at 5 print density The first toner cartridge installed i...

Страница 168: ...e 2 lifting the lever end of the cartridge first to disengage the locating peg on the image drum from the toner cartridge 4 Unpack the new toner cartridge and remove the orange shipping clip CAUTION T...

Страница 169: ...toner cartridge back and forth several times Then holding the toner cartridge horizontally remove the tape 6 Insert the new toner cartridge into the image drum left side first engaging the drum locat...

Страница 170: ...g pin into the groove on the image drum 8 Gently push the lever in the direction of the arrow until it stops If you meet any resistance when pushing the lever STOP and push down on the cartridge to be...

Страница 171: ...N Do not use methyl alcohol or other solvents on the LED head otherwise damage to the lens surface will occur NOTE After installing the new toner cartridge the message on the display TONER LOW or CHAN...

Страница 172: ...d at the same time as changing the image drum Image drum life is approximately 23 000 sheets of letter size media This assumes a typical office environment where 20 of print jobs are one page emails 3...

Страница 173: ...pter 10 Maintenance 165 2 Remove the appropriate image drum toner cartridge from the printer 3 Remove the new image drum from the packaging 4 Remove the protective sheet and film from the new image dr...

Страница 174: ...ng plate 2 from the image drum 7 Install a new toner cartridge of the corresponding color see Changing the toner cartridge on page 159 8 Close the top cover WARNING Take extreme care when handling ton...

Страница 175: ...er long edge feed However this assumes a standard print job of three sheets If single sheets are printed transfer belt life is reduced 1 Switch off the printer and open the top cover 2 Remove all four...

Страница 176: ...ove the new transfer belt unit from its packaging 5 Using the handles 2 and 3 align the pins 4 with the grooves 5 on the printer and insert the new transfer belt in the printer 6 Move the lock lever 1...

Страница 177: ...s the end of its product life CHANGE FUSER UNIT is displayed in the control panel Fuser unit life is approximately 80 000 letter size sheets 1 Switch off the printer and open the top cover WARNING The...

Страница 178: ...ne to release the fuser unit then use the handle to remove the fuser from the printer 3 Remove the new fuser unit from its packaging and lift off the shipping tape 1 holding the levers at either end o...

Страница 179: ...enance 171 4 Using the handle 1 lower the new fuser unit into the printer and push down firmly to lock it in place 5 Make sure the two spring loaded locking levers lock the fuser unit into place 6 Clo...

Страница 180: ...rinting has white lines when text is blurred 1 Switch off the printer and open the top cover 2 Gently wipe each LED head surface with the LED lens cleaner or a soft tissue 3 Close the top cover CAUTIO...

Страница 181: ...power cable and printer interface cable from the printer and remove any paper from the paper trays 3 Open the top cover and remove the four image drums 4 Seal the aperture on each image drum and its t...

Страница 182: ...er onto it Then place the remaining styrofoam packing pieces around the printer 9 Place the box over the printer on the skid and secure it in place with the handle locks WARNING The printer weighs 160...

Страница 183: ...ONER LOW Toner is low indicates color TONER SENSOR ERROR Error with the toner sensor indicates color Call for service BELT UNIT MISSING Transfer belt unit is missing CANCELLING JOB Cancelling the curr...

Страница 184: ...ted data remains in buffer Waiting for data to follow DISK FILE OPERATION FAILED Error with hard disk operations DISK FILESYSTEM IS FULL Hard disk flash memory full DISK FULL The internal hard drive i...

Страница 185: ...in power save mode PRINTING Data is being printed PROCESSING Data is being processed RAM CHECK RAM is being checked after switching printer on REGISTRATION ADJUST TEST Registration adjustment being t...

Страница 186: ...e system on hard disk SIZE MISMATCH Change paper to correct size type Press On line to continue STACKER FULL Stacker is full Remove the paper UNSUITABLE SIZE Indicates wrong paper size USB I F ERROR U...

Страница 187: ...l out the paper tray and remove any jammed paper from the printer then gently push the paper tray back in NOTE Do not close the top cover completely until it latches during this process If the top cov...

Страница 188: ...a Remove all four image drums and place them on a flat surface away from light CAUTION To avoid damage to the drums Be careful to place the drums on a flat surface so that nothing contacts the shiny...

Страница 189: ...ing 181 b Carefully remove any jammed paper from the transfer belt and top paper exit c Open the right side cover and remove any jammed paper then close the right side cover d Put all four image drums...

Страница 190: ...Chapter 11 Troubleshooting 182 4 Check the straight through exit paper tray remove any jammed paper from the side exit tray if necessary open the tray and remove any jammed paper then close it...

Страница 191: ...ser unit a Release the fuser roller lock levers at either end of the fuser and slowly remove the jammed paper b Relock the levers at either end of the fuser WARNING The fuser unit is very hot after pr...

Страница 192: ...Chapter 11 Troubleshooting 184 6 Check the paper separator a Release and lift the separator 1 b Remove any jammed paper from the printer c Replace the separator...

Страница 193: ...small front cover and pull on the blue handle to slide the duplex unit and paper tray out b Lift the duplex top cover and remove any jammed paper c Close the duplex top cover and slide the duplex uni...

Страница 194: ...onal paper trays if any additional paper trays 1 or the high capacity feeder 2 are installed pull out the paper trays and check that no paper is jammed along the various parts of the exit path 9 Close...

Страница 195: ...arallel Menu and change the ECP setting to Disable 1 Press the MENU button until PARALLEL MENU is displayed then press the SELECT button 2 Press the ITEM button until ECP is displayed 3 Press the VALU...

Страница 196: ...tions The paper is moist or affected by static Store paper within specified temperature and humidity levels The paper is creased or wrinkled Remove the creased wrinkled paper from the feed tray The pa...

Страница 197: ...cable to specification Ver 1 1 Interface is disabled Check that USB interface is set to Enable Configuration procedure was not correctly followed or cancelled Configure again from the beginning USB ca...

Страница 198: ...Set correct output port to which the printer interface cable is connected Printer is not selected in the printer driver Select the printer or set to default printer Incorrect printer driver is being u...

Страница 199: ...dy LED head is dirty Clean LED head with lens cleaner or soft tissue Toner is low Change toner cartridge Paper is unsuitable for printer Use recommended paper Possible cause Remedy The toner cartridge...

Страница 200: ...occur at intervals of approximately 113 mm the fuser roller is damaged Change the fuser unit The image drum has been exposed to light Remove the image drum from the printer and store it in a dark pla...

Страница 201: ...ssible cause Remedy Printer error Check the control panel If an error message is displayed correct the problem Possible cause Remedy The printer interface cable is faulty Replace the printer interface...

Страница 202: ...ain Possible cause Remedy The printer has to warm up returning from power save mode In the printer menu settings set power save to a higher value to increase the length of time before entering power s...

Страница 203: ...ings may not be appropriate Set the value of media weight to the next heaviest one Packing materials left on the fuser when it was installed Careful Fuser may be HOT Open the top cover and check to be...

Страница 204: ...Chapter 11 Troubleshooting 196...

Страница 205: ...inter you may wish to add one or more of the following options as your needs evolve Additional Memory see page 198 Hard Disk Drive HDD see page 202 Duplex Unit see page 205 Paper Trays see page 208 Hi...

Страница 206: ...les CAUTION Due to the design of the memory modules it is very important to install the modules in sequence according to the part number capacity printed on the module Use the sequence Slot 1 Slot 3 S...

Страница 207: ...nterface cable 2 Loosen the two screws 1 and remove the main board 3 Insert the memory modules the slots as follows push out the white tabs at either end of the socket NOTE If the maximum amount of me...

Страница 208: ...firmly until you feel the board engage the connector then make sure the white tabs come up to lock the module in place 4 Replace the main board and secure it with the two screws 5 Reconnect the printe...

Страница 209: ...on page 29 and check that the Total Memory Size shown at the top of the MenuMap matches the memory now installed in the printer If it doesn t turn the printer off and pull out the main board and check...

Страница 210: ...l internal hard disk is used to store documents for proof and print password or secure printing Installing the hard disk drive 1 Switch off the printer and disconnect the power cable and printer inter...

Страница 211: ...place the main board and secure it with the two screws 6 Connect the printer interface cable and power cable then switch on the printer 7 Print a MenuMap and check that the HDD appears at the top of t...

Страница 212: ...in to initialize the hard disk before use NOTE When initializing the hard disk any fonts overlays or print jobs that have been acknowledged will be erased The Storage Device Manager can also be used t...

Страница 213: ...power cable 2 Remove the paper tray 1 slide it out until it reaches its stop then lift up to remove the tray completely from the printer 3 Remove the front cover 2 by lifting it at both ends NOTE Do...

Страница 214: ...o the printer 6 Connect the power cable and switch the printer on NOTE The printer menu will automatically configure to include this option However you can also set it manually as follows Press the ME...

Страница 215: ...duplex unit paper tray together and remove completely from the printer 4 Pull the post 2 forward and pull the two stoppers 3 forward to release the duplex unit from the paper tray then remove the dupl...

Страница 216: ...d paper tray paper capacity increases to approximately 1650 sheets Installation 1 Switch off the printer and disconnect the power cable and printer interface cable WARNING The printer weighs 160 lbs 7...

Страница 217: ...the printer with the locating pegs and connector on the additional paper tray unit 3 Load paper in each tray using the same procedure you use for loading paper in Tray 1 NOTE If installing both addit...

Страница 218: ...e tray 5 Place the appropriate self adhesive tray number identifier label 2 or 3 supplied with the optional tray on the lower rectangle at the right side of the tray 6 Connect the printer interface ca...

Страница 219: ...apacity feeder can be combined with one additional paper tray to give a maximum printer capacity of 2750 sheets Installing the high capacity feeder 1 Switch off the printer and disconnect the power ca...

Страница 220: ...printer with the pins and connector plug on the high capacity feeder 3 Load paper in each tray using the same procedure you use for loading paper in Tray 1 NOTE If installing the high capacity feeder...

Страница 221: ...the appropriate self adhesive tray number identifier labels supplied with the High Capacity Feeder on the lower rectangle at the right side of each tray 6 Connect the printer interface cable and power...

Страница 222: ...itching feature Press the MENU button until the PRINT MENU is displayed and press the SELECT button Press the ITEM button until AUTO TRAY SWITCH is displayed Press the VALUE button to change the setti...

Страница 223: ...latforms Windows XP 2000 Me 98 NT 4 0 MacOS 8 6 9 x Mac OS X 10 1 and above Classic Internal fonts PostScript 3 PCL5c fonts Time to Print Start First print time 10 secs black 11 5 secs color Warm up t...

Страница 224: ...id 20 ppm Transparencies color letter 10 ppm Paper feedb Paper tray manual feed optional additional paper tray s optional high capacity feeder Media size Trays 1 thru 5 Letter Legal 14 Legal 13 5 Lega...

Страница 225: ...g m Multi purpose tray 17 to 54 lb US Bond up to 113 lb Index 64 to 203 g m Duplex unit 20 to 28 lb US Bond 75 to 105 g m Paper exit capacity 500 sheets top face down exit see Note 100 sheets straigh...

Страница 226: ...to 110 F 0 to 43 C 10 to 90 RH Storage 14 to 110 F 10 to 43 C 10 to 90 RH Duty cycle Average 16 600 sheets per month Maximum 83 000 sheets per month Noise level Operating 55 dBA Standby 45 dBA Power...

Страница 227: ...Description Order No Black Toner 200 100161 Cyan Toner 200 100158 Magenta Toner 200 100159 Yellow Toner 200 100160 DRUMS Description Order No Black Image Drum 200 100166 Cyan Image Drum 200 100163 Mag...

Страница 228: ...Chapter 14 Consumables 220 FUSER UNITS Description Order No Fuser Unit 110V 200 100169 Fuser Unit 220V 200 100170 TRANSFER BELT Description Order No Transfer belt 200 100168...

Страница 229: ...PLEX OFF BINDING LONG EDGE OUTPUT BIN FACE DOWN JOB OFFSET ON PAPER FEED TRAY1 AUTO TRAY SWITCH ON TRAY SEQUENCE DOWN MP TRAY USAGE FEED WHEN MISMATCHING MEDIA CHECK ENABLE TRANSPARENCY DETECT AUTO RE...

Страница 230: ...2 MEDIATYPE PLAIN TRAY2 MEIDIAWEIGHT AUTO TRAY3 MEDIATYPE PLAIN TRAY3 MEDIAWEIGHT AUTO TRAY4 MEDIATYPE PLAIN TRAY4 MEDIAWEIGHT AUTO TRAY5 MEDIATYPE PLAIN TRAY5 MEDIAWEIGHT AUTO MP TRAY MEDIASIZE LETTE...

Страница 231: ...AN DARK 0 MAGENTA HIGH LIGHT 0 MAGENTA MID TONE 0 MAGENTA DARK 0 YELLOW HIGH LIGHT 0 YELLOW MID TONE 0 YELLOW DARK 0 BLACK HIGH LIGHT 0 BLACK MID TONE 0 BLACK DARK 0 CYAN DARKNESS 0 MAGENTA DARKNESS 0...

Страница 232: ...CLEARABLE WARNING ON AUTO CONTINUE OFF MANUAL TIMEOUT 60 SEC WAIT TIMEOUT 40 SEC LOW TONER CONTINUE JAM RECOVERY ON ERROR REPORT OFF LANGUAGE ENGLISH Item Factory default setting FONT SOURCE RESIDENT...

Страница 233: ...Chapter 15 Factory Default Settings 225...

Страница 234: ...15 Factory Default Settings 226 PARALLEL MENU Item Factory default setting PARALLEL enable BI DIRECTION enable ECP enable ACK WIDTH narrow ACK BUSY TIMING ack in busy I PRIME disable OFFLINE RECEIVE...

Страница 235: ...LE Item Factory default setting TCP IP ENABLE NETWARE ENABLE ETHERTALK ENABLE NETBEUI ENABLE FRAME TYPE AUTO DHCP BOOTP ENABLE RARP DISABLE IP ADDRESS 0 0 0 0 SUBNET MASK 0 0 0 0 GATEWAY ADDRESS 0 0 0...

Страница 236: ...A TRAY1 LEGAL14 PAPER LEGAL 14 TRAY2 A3 Nobi PAPER TABLOID EXTRA TRAY2 LEGAL14 PAPER LEGAL 14 TRAY3 A3 Nobi PAPER TABLOID EXTRA TRAY3 LEGAL14 PAPER LEGAL 14 TRAY4 A3 Nobi PAPER TABLOID EXTRA TRAY4 LEG...

Страница 237: ...ENU Displays printer page counts and data for printer consumables Item Factory default setting EEPROM RESET EXECUTE SAVE MENU EXECUTE RESTORE MENU EXECUTE POWER SAVE ENABLE PAPER BLACK SETTING 0 PAPER...

Страница 238: ...Chapter 15 Factory Default Settings 230...

Отзывы: