background image

13

Cordless Lawn Mower 

               EN

Attaching the grass collection bag to 

the lawn mower

NOTE: 

Depress the grass collection 

bag slightly to ensure that it is 

completely installed.

NOTE: 

Push the mulching-bag switch 

lever to open the mulching outlet 

before fitting the grass collection 

bag.

See Fig. 

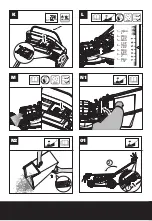
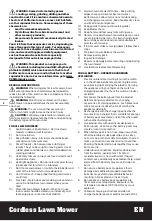
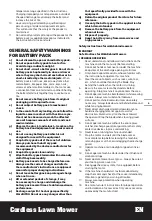
C1-C3

Assembling the side-discharge chute

NOTE:

 Remember to remove the 

grass collection bag firstly and then 

push the mulching-bag switch lever 

to close the mulching outlet before 

assembly.

See Fig. D1,D2

Removing /fitting the basecamp

NOTE: 

When fitting, gently pull the 

basecamp to ensure that it is securely 

installed. 

NOTE:

 After fitting,  tighten the 

basecamp power output and the 

mower with a cable tie to ensure 

a reliable connection. It is not 

recommended to remove the cable 

tie.

See Fig. E1-E4

Fitting/removing the battery pack

NOTE: 

This machine will only run 

when sp-batteries are installed. It is 

recommended to use the same Ah 

batteries and charge the 4 batteries 

at the same time.

When you use 4 batteries with 

different Ah, the machine will only run 

to the lower common denominator.

See Fig. F1, F2

Checking the battery charge 

condition

NOTE: 

Fig. G only applies for the 

battery pack with battery indicator 

light.

See Fig. G

Charging the battery pack

NOTE: 

The batteries are shipped 

uncharged. Each battery must be fully 

charged before the first usage.

Always fully charge the 4 batteries at 

same time. More details can be found 

in charger’s manual.

NOTE

: Always charge the battery pack 

with the basecamp on the mower.

See Fig. H

Power indicator light

See details in BATTERY STATUS part 

Press the battery indicator button, the 

light will be on to indicate the lower 

common denominator, after 3s, status 

of each battery pack will be shown on.

See Fig. I

OPERATION

Starting and Stopping

NOTE:

 Place the Mulching-Bag Switch 

Lever in the bag position after each 

use. (See Fig. C1)

See Fig. J1, J2

Operating the self-propel system

See Fig. K

Adjusting the cutting height

WARNING! 

Stop, release 

Operating Bail and wait until the 

motor stops before adjusting height. 

The blades continue to rotate after 

the machine is switched off, a rotating 

blade can cause injury. Do not touch 

rotating blades.

See Fig. L

Opening the LED headlight

See Fig. M

Removing/emptying grass collection 

bag

WARNING! 

Always check the 

safety flap close the discharge 

outlet before using. Never lift the 

safety flap when the lawn mower 

is being used without fitted grass 

collection bag.

See Fig. N1, 

N2

Storage

See Fig. O1, 

O2

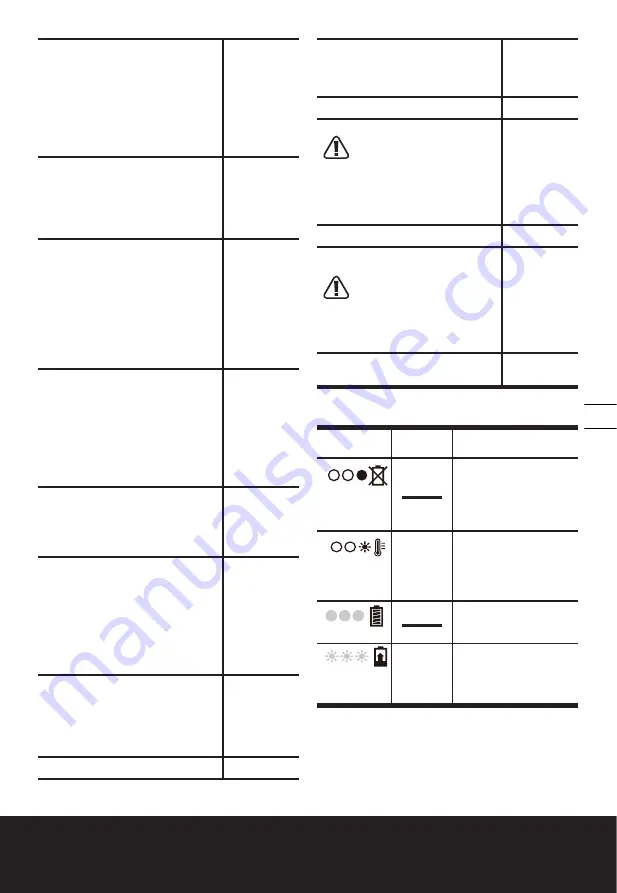
BATTERY STATUS (See Fig. I)

Light 

ON/ Flash

Status

One Red on        

Two LED-lights 

off

Defective Battery

 One Red flash

Two LED-lights 

off

----------

Battery Temperature 

Protection

The temperature of battery 

pack is less than 32

0

F (0

0

C) 

or more than 113

0

F (45

0

C).

Three Green on

Fully Charged

Three Green 

flash

---------- Charging

MULCHING MOWING TIPS

While mulching, your new mower is designed to cut the 

grass clippings into small pieces and distribute them 

back into the lawn. Under normal conditions, the mulched 

grass will biodegrade quickly and deliver nutrients to the 

Содержание WG761

Страница 1: ...P08 P16 P26 WG761 WG761 9 Cordless Lawn Mower EN Tondeuse Gazon Sans Fil F Cortacesped de bateria ES...

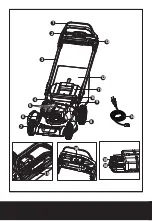
Страница 2: ...15 1 2 3 4 6 7 8 9 13 10 11 12 5 16 18 19 17 14...

Страница 3: ...A C1 C2 C3 D1 B 2 1 SIDE DISCHARGE SIDE DISCHARGE...

Страница 4: ...D2 E1 E2 E3 E4 F1 1 2 21 20 2 1 22...

Страница 5: ...F2 G H I J1 J2 1 2 100 0...

Страница 6: ...K L M N1 N2 O1 2 1 2 1 3 7 100mm 4 6 90mm 3 1 2 5 80mm 3 1 8 4 70mm 2 3 4 3 60mm 2 3 8 2 50mm 2 1 40mm 1 1 2...

Страница 7: ...O2 P Q R1 R2 S Q 1 Q 2 Q 3 24 25 23...

Страница 8: ...oor dry and locked up place out of reach of children 11 Maintain Lawn Mower With Care Keep cutting edges sharp and clean for best and safest performance Follow instructions for lubricating and changin...

Страница 9: ...rge only with the charger specified by WorxNITRO Do not use any charger other than that specifically provided for use with the equipment q Retain the original product literature for future reference r...

Страница 10: ...rly small children and pets d Do not use a mower for any job except that for which it is intended 1 2 Preparation a Thoroughly inspect the area where the equipment is to be used and remove all stones...

Страница 11: ...enance Batteries may enter water cycle if disposed improperly which can be hazardous for ecosystem Do not dispose of waste batteries as unsorted municipal waste Do not burn To reduce the risk of injur...

Страница 12: ...Input AC 220 240 V 50 Hz Output 20 V 1 A each battery slot Charging time for a single battery pack approx 5 0 Ah 5 hrs Machine Weight 77 2 lbs 35 kg 70 6 lbs 32 kg Voltage measured without workload I...

Страница 13: ...ls can be found in charger s manual NOTE Always charge the battery pack with the basecamp on the mower See Fig H Power indicator light See details in BATTERY STATUS part Press the battery indicator bu...

Страница 14: ...dtomowyourlawnmorefrequently walkatnormalpace andnottostart stopthemower too oftenduringoperation 2 For bestperformance pleaseensureuse4 fully chargedbatterypacksatthesametimeandalwayscut off1 3orless...

Страница 15: ...Plug in charger and wait for green light to come on D Avoid overloading the mower Slow down the cutting pace by pushing mower slower or raise the cut height Or both 3 Mower runs but cutting performanc...

Страница 16: ...age AVERTISSEMENT Cedispositifpeutvousexposer auxproduitschimiquesnotammentleplombet ledi phtalate de2 thylhexyle DEHP quisont reconnusdansl tatdeCaliforniecommecausantdes cancersetdesanomaliescong ni...

Страница 17: ...indiqu es L utilisationdetoute autrebatteriepourraitcr erunrisquedel sionset d incendie 5 Lorsquelabatterie n est pas utilis e tenez la l cart d autresobjets m talliques tels que les trombones lespi c...

Страница 18: ...pectateurs dans la zoneavantl op ration Arr tezlamachinesiquelqu un p n tredans lazone 6 N op rezpas lamachine pieds nus ousivous portez dessandales Portez toujours des chaussures robustes 7 Netirezpa...

Страница 19: ...autresobjets b N employez jamais latondeuse pieds nus ouenne portantquedessandales Porteztoujoursunepairede souliersquivous prot gent suffisamment c D brayezle syst me d entra nement s ilya avant de d...

Страница 20: ...otection Li Ion Batterie Li Ion les batteries doivent tre recycl es Retirez la prise de la prise murale avant d effectuer n importe quel travail de r glage de r paration ou d entretetien Afin de r dui...

Страница 21: ...L Capacit de la batterie 5 0 Ah WA3571 Type de batterie Lones de litio Mod le de chargeur WA3774 Valeurs nominales du chargeur Entr e AC 220 240 V 50 Hz Sortie 20 V 1 A each battery slot Charging tim...

Страница 22: ...V rification de l tat de charge de batterie REMARQUE La Fig G ne s applique qu aux batteries disposant d un t moin lumineux de batterie Voir Fig G Recharge de la batterie REMARQUE la batterie est livr...

Страница 23: ...se blesser sur les ar tes tranchantes de la lame La nettoyer souvent lorsque l herbe est mouill e au printemps et toujours la nettoyer apr s chaque utilisation 4 Selon le type d herbe et les conditio...

Страница 24: ...ans l angle original de coupe de la lame 3 Aff ter les ar tes tranchantes des deux extr mit s de la lame en retirant une quantit gale de mat riau aux deux extr mit s REMARQUE 1 Assurez vous que la ton...

Страница 25: ...n dommage visible la lame n est d termin et que la tondeuse vibre toujours Rel chez la poign e de caution pour teindre la tondeuse Retirez les batteries Tourner la lame sur 180 degr s et la resserrer...

Страница 26: ...do dise ado 7 No Fuerce el Artefacto Har un mejor trabajo y con menor posibilidad de accidentes si la utiliza de la forma para la que fue dise ada 8 No se Extienda de M s Mantenga una buena postura y...

Страница 27: ...ue atenci n m dica f No use ning n paquete de bater a que no est dise ado para uso con el equipo g Mantenga el paquete de bater a fuera del alcance de los ni os h Siempre adquiera el paquete de bater...

Страница 28: ...s se encuentran atra dos por la m quina y la actividad de corte de pasto Nunca presuponga que los ni os permanecer n en el mismo lugar donde los vio por ltima vez 1 Mantenga a los ni os alejados del r...

Страница 29: ...as tuercas pernos y tornillos apretados a fin de asegurarse de que la herramienta est en condiciones seguras de funcionamiento c Peri dicamente compruebe la bolsa en b squeda de deterioro y desgaste y...

Страница 30: ...CORTE 8 BASECAMP 80V POWER SOURCE CHARGER 9 BASECAMP PLUG CONNECTION 10 PUERTO DE LAVADO 11 ASA TRASERA 12 TAPA DE SEGURIDAD 13 BOLSA PARA PASTO 14 CHARGE CORD 15 BOT N DE LIBERACI N R PIDA 16 BOT N...

Страница 31: ...egurarse de que se encuentra completamente instalada Aseg rese de que la bolsa para pasto se encuentra instalada firmemente NOTA Presione la palanca del interruptor de la bolsa de pasto para abrir la...

Страница 32: ...de desmenuzado su nueva podadora est dise ada para recortar los trozos de pasto en peque as piezas y distribuirlas por todo el c sped Bajo condiciones normales el pasto recortado se degradar r pidamen...

Страница 33: ...s bater aslallavedantesderetirarlabolsade pasto NOTA Para asegurar un servicio duradero y confiable realice el siguiente procedimiento de mantenimiento peri dicamente Rev sela por defectos obvios como...

Страница 34: ...odadora funciona pero el rendimiento de corte no es satisfactorio o no corta el c sped en su totalidad A Se ha cargado la bater a por completo Enchufe el cargador y espere hasta que se prenda la luz v...

Страница 35: ...Eleve la altura de corte de las ruedas para acortar la longitud del corte No corte m s de 1 3 de la longitud total B Verifique el filo de la hoja Siempre mantenga la hoja afilada 11 El tiempo de func...

Страница 36: ...Copyright 2021 Positec All Rights Reserved Copyright 2021 Positec Tous droits r serv s Derechos reservados 2021 Positec Todos los derechos reservados www worx com...

Отзывы: