background image

32

EN

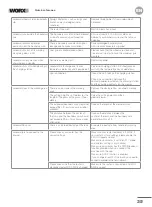
MESSAGE

CAUSE

ACTION

Wheels motor fault! 
Press START to reset.

Rear wheel is blocked 
in some way.

Turn power off and take Landroid to an area free from obstacles.
Turn power on. 
If the error message is still displayed, turn power off. Turn Landroid 
upside-down and check if there’s anything preventing the wheels from 
rotating.
Remove any obstruction, if necessary, then turn the mower upright, and 
power on.

Upside down! Press 
START to reset.

This could have 
happened when 
Landroid came into 
contact with a 
sloping surface which 
made it overturn.  

Turn Landroid upright and remove any obstruction that might have caused 
Landroid to overturn.

Mower stuck! Press 
START to reset.

Landroid is stuck.
Also, if the rear wheels 
cannot move and have 
tried to course correct 
several times in a short 
period, or the bump 
sensor has been 
activated several times 
in a short period, this 
will cause a Stuck error.

Turn power off.
Take Landroid to an area of your lawn free of obstacles, then turn power on. 
If the error message is still displayed: turn power off, turn Landroid 
upside-down. Check if there is anything preventing the wheels from rotating.
Remove any obstruction, turn the Landroid upright, turn power on.

Mower lifted! Press 
START to reset.

Landroid is lifted up.
Also, if the lift sensor 
has been activated 
several times in a short 
period, this will cause a 
Lifted error.

Turn power off.
Take Landroid to an area clear of obstacles, turn power on.
If the error message is still displayed: turn power off, turn Landroid 
upside-down and check if there is any obstruction that would prevent the 
front wheel casters from sliding into the mower body. When the mower is 
lifted, the casters should drop down away from the mower body.  When 
placed back on level ground, the casters should slide back into the body.
Remove any obstruction if necessary, then turn the mower upright, and 
power on.

Wire missing! Press 
START to reset.

Machine can’t find 
boundary wire signal.

If the LED light is red, check if  the boundary wire is well connected to the 
wire terminal clamps on the charging station. 
If the problem persists, check that the boundary wire hasn’t been cut.

Battery temperature 
out of range! 
Please wait.

Temperature is too high 
(more than 55

0

C)or 

too low(less than 0

0

C) 

when charging.

Place the charging station in a shady area or wait until it reaches the normal 
temperature

Can’t find charge 
station. 
Press START to reset.

Boundary wire is 
beyond its maximum 
length (984 ft.). 

Take Landroid to the charging station.
If the boundary wire length is beyond the rated limit, then the wire length 
should be shortened.

Quick reference

Содержание Landroid WR147

Страница 1: ...Owner s manual WR165 WR147 WR155 ...

Страница 2: ......

Страница 3: ...Owner s manual Manuel utilisateur Instrucciones de usuario P04 P37 P70 EN F ES ...

Страница 4: ...Starting Landroid Manual programming Connecting Landroid to the Internet Using the App Maintenance Blades Cleaning Charging Storage Firmware Updates Quick reference Operation messages Error messages Troubleshooting Warrranty Page 05 Page 06 Page 10 Page 11 Page 11 Page 12 Page 13 Page 14 Page 17 Page 24 Page 24 Page 27 Page 27 Page 28 Page 29 Page 29 Page 29 Page 30 Page 31 Page 31 Page 33 Page 36...

Страница 5: ...id Robot Mower This manual will help you get set up and operate your Landroid safely and efficiently Support www worx com landroid support Customer Services Helpline 800 727 6260 We re here to help Welcome Live Chat www worx com landroid support ...

Страница 6: ...ience and knowledge unless they have been given supervision or instruction concerning use of the appliance by a person responsible for their safety Children should be supervised to ensure that they do not play with the appliance WARNING For the purposes of recharging the battery only use the detachable supply unit provided with this appliance WARNING To reduce the risk of injury to persons and dam...

Страница 7: ...ting blades Never place your hands or feet close to or under the body when robotic lawnmower is in operation m To avoid using the machine and its peripherals in bad weather conditions especially when there is a risk of lightning n Not to touch moving hazardous parts before these have come to a complete stop 2 Additionally when the appliance is operating automatically a Do not leave the machine to ...

Страница 8: ...rity to operate the equipment NOTE This equipment has been tested and found to comply with the limits for a Class B digital device pursuant to Part 15 of the FCC Rules These limits are designed to provide reasonable protection against harmful interference in a residential installation This equipment generates uses and can radiate radio frequency energy and if not installed and used in accordance w...

Страница 9: ...ack out of the reach of children h Always purchase the battery pack recommended by the device manufacturer for the equipment i Keep battery pack clean and dry j Wipe the battery pack terminals with a clean dry cloth if they become dirty k Battery pack needs to be charged before use Always use the correct charger and refer to the manufacturer s instructions or equipment manual for proper charging i...

Страница 10: ...cosystem Do not dispose of waste batteries as unsorted municipal waste Do not disassemble mower Repairs should be made only by authorized repair personnel POSITEC Inc has established a partnership with the RBRC Corporation to recycle any Positec batteries with the RBRC call2recycle seal For environmental protection please do not discard batteries in the trash After the batteries life cycle is ende...

Страница 11: ...rging Station Charge base fixing screws Wire pegs Power supply Boundary wire 20V battery Boundary wire distance gauge Bertelsen Ruler Manual A B C D E F G H I J K L M The picture is only for reference 2 6 c m 1 0 c m 1 0 2 i n c h 4 c m A B C D E F G H I J K L M Get familiar with Landroid ...

Страница 12: ...Voice Control High Pitched Alarm Slot USB port Cutting height adjustment Microphone LCD Display Interface ACS slot GETTING TO KNOW LANDROID The picture is only for reference Accessories available for purchase Battery slot Battery cover button Safety stop button Get familiar with Landroid ...

Страница 13: ...g Input 120 V 60 Hz 38 W Output 20 V 1 5 A Input 120 V 60 Hz 90 W Output 20 V 3 0 A Machinery weight lbs 23 1 25 6 25 8 Protection degree III App WIFI Bluetooth Y Frequency band of embedded WLAN module 2 412GHz 2 484GHz Max radio frequency power of embedded WLAN module 802 11b 16 2dBm 11Mbps 802 11g 14 2dBm 54Mbps 802 11n 13 2dBm HT20 MCS7 Frequency band of inductive loop systems 77 Hz Max radio f...

Страница 14: ... list from the same store that sold you the mower Refer to the accessory packaging for further details INTENDED USE This product is intended for domestic lawn mowing It is designed to mow often maintaining a healthier and better looking lawn than ever before Depending on the size of your lawn your Landroid may be programmed to operate at any time or frequency ACCESSORIES AVAILABLE FOR PURCHASE Acc...

Страница 15: ...ndroid App or by using the control panel in Work time Customize Work time menus See detailed instructions at the end of this manual If you enable the Auto Schedule feature in the App you cannot manually adjust the Border Cut feature Rain sensor Landroid is weather resistant and happy to be outside But mowing wet grass does not give you the best finish or result Landroid is equipped with a rain sen...

Страница 16: ...ndroid If you want to drastically shorten the height of your grass it is recommended that you do so progressively by adjusting the cutting height in steps Hose cleaning You can hose Landroid off to get rid of dirt grass and grime that it picks up while mowing Keep Landroid looking and performing its best Security PIN Protection To prevent unauthorized usage Landroid is protected by a PIN code that...

Страница 17: ...ed to first peg it down and test the installation is successful by running Landroid over the perimeter This allows you to easily test that the installation is successful and if necessary change the layout before burying the wire Bury the wire no more than a few centimetres below ground level so that the wire maintains a good signal 2 Plan for the charging station The charging station is where your...

Страница 18: ...raight from the station before any turns are made fig 1 left side of station If the yard layout is such that the boundary wire makes an immediate right turn fig 2 then the distance requirement is not necessary 2 For the boundary wire entering charging station There should be minimum of 31 in of wire going straight to the station fig 1 fig 2 4 Placement of boundary wire on slopes Landroid can handl...

Страница 19: ... most complex of lawns Carry out a visual inspection of your lawn so you are prepared for a trouble free installation of the boundary wire 6 Identify Off Limits Areas You don t want Landroid to mow flowers dive into water or become imobilized on tree roots that are above ground Locate these areas and surround them with boundary wire to prevent Landroid from accessing them The boundary wire is a si...

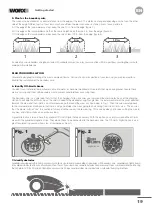
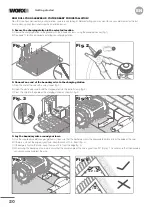
Страница 20: ...ert the stripped end into the red left clamp fig 3 C Press the wire into the guide of the charging station as shown in fig 3 3 Lay the boundary wire around your lawn A Use the supplied wire distance gauge item K to ensure that the boundary wire is the appropriate distance from the edge of the yard B If there is a step at the edge of your lawn keep the wire at 10 in from it fig 4 C If the edge is f...

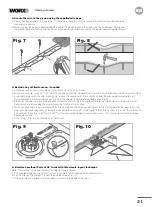
Страница 21: ...ntil you come near the off limits area B When you are able make a 90 left turn with the wire so that the the direction of the wire is directly towards the off limits area Fig 9 C Surround the area with the wire making sure to keep the appropriate 10 in of distance from the area edge according to Fig 4 Be sure to keep a minimum distance of 3 ft from the edge of the perimeter boundary wire Fig 9 D A...

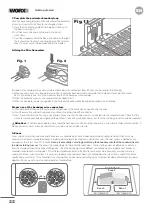
Страница 22: ...rive back to the charging station A Place the wire into the guide of the charging station up to the black clamp fig 11 B Cut the excess wire and strip the end with a pair of wire cutters C Insert the stripped end into the black wire clamp on the right There should be no excess wire hanging out of the terminal cover This may cause improper docking of the mower IN Fig 11 36 in 9 Zones If your yard h...

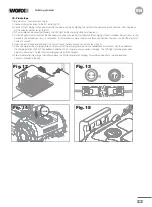
Страница 23: ...ur lawn is not broken If wire connectors were used check these connections to make sure that the electrical contact is present E Open the rear of Landroid and insert the Power Share battery into the slot until it clicks fig 14 F Place Landroid on the charging station and ensure that the charging terminals on Landroid have firm contact with the paddles on the charging station fig 15 The paddles sho...

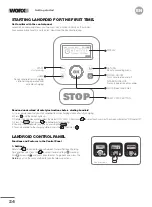
Страница 24: ...an stop Landroid at any time by pressing the F To send Landroid to the charging station press the then press LANDROID CONTROL PANEL Functions and Features in the Control Panel RETURN Back to preceding menu POWER ON OFF Turns Landroid on and off DISABLING DEVICE Prevents operation of Landroid KNOB Select and Enter SAFETY STOP BUTTON DISPLAY HOME Sends Landroid to its charging station during operati...

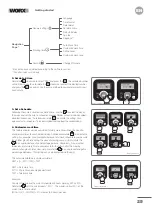
Страница 25: ...Rotate the until the screen reads 30 This would subtract 30 of the current work time to yield 300 min x 1 30 100 210 minutes 3 5 hours per day Wed 11 29 09 00PM 0 Working time adjust Total 24h45min Total 22h16min 10 Working time adjust Only for reference 2 Set date time Rotate the clockwise to select DAY and press the The selected number will be blinking continue to rotate the clockwise to select ...

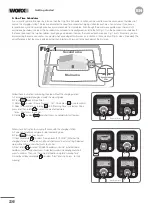
Страница 26: ...til Working Time is selected Short press and then rotate to select the pre defined work times Short press to confirm E Rotate to select and short press Landroid will start to mow Follow these instruction for mowing the area with the charging station A Power on Landroid and place inside the mowing area B Press three times quickly C Clockwise rotate to select home present YES NO Whether the charging...

Страница 27: ...tphone is connected to your home Wi Fi network C Make sure the distance between your Landroid smartphone and your router is as close as possible during connection Tip when Landroid moves to an area of your lawn with poor or no Wi Fi signal alerts from the app will only be received when Landroid returns to an area with good signal Bluetooth connection A Bluetooth function on your smartphone is acti...

Страница 28: ... replacing the blades B Each cutting blade will last up to 2 months when it is programmed to mow every day C Always check to see if the blades are chipped or damaged and replace them if necessary D When the cutting blades are dull and worn out they should be replaced with the spare blades provided with your Landroid Spare blades are also available WARNING Before cleaning adjusting or replacing the...

Страница 29: ...es for protection D Clean the blade disc the chassis and the front wheel s thoroughly with a soft brush or moist rag E Rotate the blade disc to ensure it rotates freely Remove any obstructions to avoid damage to the blade disc F Check that the blades spin freely around the fixing screws Remove any obstructions 3 Cleaning the drive wheels A Remove mud from the rear wheels with a brush in order to e...

Страница 30: ...n will display Please remove the USB key L Once the USB drive is removed the mower will reboot and if necessary install any other updates that are part of the software package This process may take a few minutes Once the update is complete the screen will go to the PIN entry screen NOTE Make sure Landroid is within the boundary when restarting Landroid 1 Getting back to work in the Spring When it ...

Страница 31: ... a powered off state ERROR MESSAGES Sometimes things can go wrong Fortunately Landroid is smart enough to tell you if it is enountering an issue so you can fix it If in doubt please visit our website at www worx com landroid support where you will find useful videos and further support MESSAGE CAUSE ACTION Outside working area Press START to reset Landroid cannot find the boundary wire signal 1 If...

Страница 32: ...er lifted Press START to reset Landroid is lifted up Also if the lift sensor has been activated several times in a short period this will cause a Lifted error Turn power off Take Landroid to an area clear of obstacles turn power on If the error message is still displayed turn power off turn Landroid upside down and check if there is any obstruction that would prevent the front wheel casters from s...

Страница 33: ...ESHOOTING If your Landroid does not work correctly follow the troubleshooting guide below If the problem persists contact Customer Service SYMPTOM CAUSE SOLUTION The LED light on the charging station does not turn on There is no power Check the charging station is connected properly to the charger and the charger is connected to a suitable power supply Red light on the charging station The boundar...

Страница 34: ...es not charge There is no power Check the power cord is connected properly to the charger and the charger is connected to a suitable power supply Make sure both the charging contacts on the mower touch the center of the contact paddles on the charging station Landroid is starting to have shorter run times between charges Something is lodged in the blade disc creating friction and increasing power ...

Страница 35: ...es located on the charging station and the charging contacts on the mower Landroid stops in the working area There is an obstacle in the working area Remove the obstacle from Landroid s working area The cutting height is set too low for the length of the grass or the grass is too dense Raise the cutting height and then gradually lower The extended boundary wire should not exceed 984 ft or it may c...

Страница 36: ... wear and tear caused by use in accordance with operating instructions Unauthorized improper maintenance handling or overload is excluded from this warranty as are accessories such as bulbs blades and bits etc Damage malfunctions or failure resulting from high pressure washer or steam cleaning the product For warranty claims please contact the WORX Helpline You will need to submit a registration d...

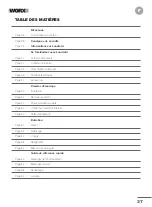
Страница 37: ...émarrer Landroid Programmation manuelle Connecter Landroid à Internet Utiliser l application Entretien Lames Nettoyage Charge Rangement Mises à jour du logiciel Guide de référence rapide Messages de fonctionnement Messages d erreur Dépannage Garantie Page 38 Page 39 Page 43 Page 44 Page 44 Page 45 Page 46 Page 47 Page 50 Page 57 Page 57 Page 60 Page 60 Page 61 Page 62 Page 62 Page 62 Page 63 Page ...

Страница 38: ... Ce manuel vous aidera à préparer et à utiliser votre Landroid de façon efficace et en toute sécurité Assistance www worx com landroid support N de tél du service à la clientèle 800 727 6260 Notre but est de vous aider Bienvenue Chat en ligne www worx com landroid support ...

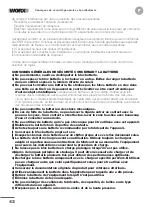
Страница 39: ...ions pour assurer le fonctionnement en toute sécurité de la machine Conservez tous les avertissements et les instructions pour une référence future Cet appareil n est pas destiné à être utilisé par des personnes y compris les enfants dont les capacités physiques sensorielles ou mentales sont réduites sans expérience et ou aux compétences insuffisantes sauf si elles ont été encadrées concernant l u...

Страница 40: ... fonctionnement et le comportement des tondeuses à gazon robot utiliser la tondeuse i Ne posez rien au dessus de la tondeuse robot ou sa station de charge j N autorisez pas l utilisation de la tondeuse robot avec un disque de coupe ou un carter défectueux Elle ne doit pas être utilisée avec des lames vis écrous ou câbles défectueux k Mettez toujours la tondeuse robot hors tension lorsque vous n av...

Страница 41: ... Portez la tondeuse avec le disque de coupe éloigné de votre corps Pour satisfaire aux exigences d exposition RF de la FCC IC une distance de séparation de 20 cm ou plus doit être maintenue entre l antenne de cet appareil et les personnes pendant le fonctionnement de l appareil Pour garantir la conformité les opérations à une distance plus proche que celle requise ne sont pas recommandées Cet appa...

Страница 42: ...t de créer un court circuit entre les bornes de la batterie peut causer des brûlures ou des incendies d Ne pas soumettre la batterie à des chocs mécaniques e En cas de fuite de la batterie ne pas laisser le liquide entrer en contact avec la peau ou les yeux Si un contact a été effectué laver la zone touchée avec beaucoup d eau et consulter un médecin f Ne pas utiliser de batterie qui n a pas été c...

Страница 43: ...iminées de manière inappropriée ce qui peut être dangereux pour l écosystème Ne pas éliminer les batteries usagées avec les déchets municipaux non triés Interdire le démontage de la machine sans autorisation POSITEC Inc a établi un partenariat avec la RBRC Corporation pour recycler toutes les batteries Positec avec le sceau RBRC call2recycle Pour protéger l environnement ne jetez pas les batteries...

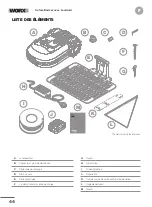
Страница 44: ...arge Vis de fixation de la station de charge Piquets Alimentation Fil de délimitation Batterie 20V Outil de mesure de distance du fil de délimitation Règle de Bertelsen Manuel A B C D E F G H I J K L M The picture is only for reference 2 6 c m 1 0 c m 1 0 2 i n c h 4 c m A B C D E F G H I J K L M Se familiariser avec Landroid ...

Страница 45: ...trol Alarme haute fréquence Port USB Réglage de la hauteur de coupe Microphone Interface d écran LCD Port ACS PRÉSENTATION DU LANDROID Illustration pour référence uniquement Accessoires en option à l achat Port de batterie Bouton de couvercle de batterie Bouton d arrêt de sécurité Se familiariser avec Landroid ...

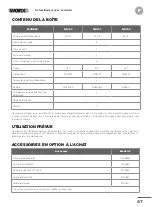
Страница 46: ...z 38 W Sortie 20 V 1 5 A Entrez 120 V 60 Hz 90 W Sortie 20 V 3 0 A Poids de la machine lbs 23 1 25 6 25 8 Degré de protection III Application WIFI Bluetooth Y Bande de fréquence de module WLAN intégré 2 412GHz 2 484GHz Puissance maximale de radiofréquence du module WLAN intégré 802 11b 16 2dBm 11Mbps 802 11g 14 2dBm 54Mbps 802 11n 13 2dBm HT20 MCS7 Bande de fréquence des systèmes à bou cle d induc...

Страница 47: ...u l appareil Référez vous à l emballage de l accessoire pour plus de détails Le personnel du magasin peut vous aider et vous fournir des conseils UTILISATION PRÉVUE Ce produit sert à tondre les pelouses de particuliers Il est conçu pour tondre fréquemment maintenir une pelouse en bon état et lui donner un meilleur aspect qu avant Selon la surface de votre pelouse votre Landroid pourra être program...

Страница 48: ...le temps de travail Voir les instructions détaillées à la fin de ce manuel Si vous activez la fonction Programmation automatique sur votre application vous ne pouvez pas régler manuellement la fonction Tonte des bordures Capteur de pluie Le Landroid est résistant aux intempéries et reste volontiers à l extérieur Toutefois la tonte d une herbe mouillée n offre pas toujours le meilleur rendu ou résu...

Страница 49: ...pelouse il est recommandé d ajuster progressivement la hauteur de coupe et de réduire progressivement la hauteur de la pelouse Nettoyage au tuyau d arrosage Vous pouvez arroser le Landroid pour nettoyer les dépôts d herbe et de terre qui adhèrent pendant la tonte Votre Landroid doit toujours rester propre et efficace Sécurité protection du code PIN Pour prévenir toute utilisation par des personnes...

Страница 50: ... de tester le succès del installation en exécutant Landroid Cela facilite le contrôle de tout et la conception si nécessaire avant d intégrer les câbles Les cablessont enterrés à quelques centimètres sous le sol afin d assurer un bon signal 2 Planifier la station de chargement La station de charge est la batterie rechargeable de Landroid C est aussi un parking garé entre la tonte et la prochaine t...

Страница 51: ...uration de la pelouse est telle le câble de délimitation fait un virage à droite immédiatement l exigence de cette distance n est pas nécessaire fig 2 2 Pour le câble de délimitation en entrée de la station de charge Il faut une trajectoire rectiligne d au moins 80 cm 31 in vers la station de charge fig 1 fig 2 4 Placement des câbles périphériques sur des pentes Le Landroid peut fonctionner sur de...

Страница 52: ... contourner les obstacles au lieu de s y heurter PATROUILLEZ VOTRE GAZON Landroid est conçu pour gérer les pelouses les plus complexes Inspectez visuellement votre pelouse pour pouvoir installerla ligne de délimitation sans aucun problème 6 Déterminer la zone restreinte Le câble périphérique est une boucle simple connectée aux deux extrémités de la station de charge et entourant votre terrain Pour...

Страница 53: ...rte el extremo pelado en la abrazadera izquierda roja Figura 3 C Pase los cables a través de los rieles de la base como se muestra en la Figura 3 3 Placez la ligne de démarcation autour de votre pelouse A Utilisez le dispositif de mesure de distance fourni article K pour régler la distance entre le fil et le bord du terrain B S il y a une marche à la limite de votre pelouse maintenez le fil à une ...

Страница 54: ...e délimitation selon les instructions jusqu au bord de la zone hors limites B Si vous le pouvez faites un virage de 90 à gauche avec le câble afin que le sens du câble soit vers la zone hors limites Fig 9 C Entourez la zone avec le fil en gardant une distance de 26 cm 10 in du bord de la zone selon la Fig 4 Veillez à toujours garder une distant de 90 cm 3 ft du bord de câble de délimitation périmé...

Страница 55: ...ndrez sur le socle de recharge A Faites passer le fil à travers le guide dans le socle jusqu à la pince noire fig 11 B Coupez l excédent de câble et dénudez l extrémité à l aide d un dénudeur C Insérez l extrémité dénudée dans la pince de câble droite noire Il ne doit pas y avoir de câble qui pende en dehors du bornier Il y a un risque de mauvais arrimage de la tondeuse IN Fig 11 36 in 9 Zones Si ...

Страница 56: ...s de câble sont usés vérifiez les pour vous assurer qu il y a un contact électrique E Ouvrez l arrière du Landroid et insérez la batterie Power Share dans le port jusqu à ce qu elle s enclenche en place Fig 14 F Mettez le Landroid sur la station de charge en vous assurant qu un bon contact est établi entre les bornes de charges et les languette de la station de charge Fig 15 Les languettes doivent...

Страница 57: ... moment en appuyant sur le bouton F Pour envoyer le Landroid à la station de charge appuyez sur le bouton puis sur PANNEAU DE CONTRÔLE LANDROID Fonctions et fonctionnalités du panneau de contrôle RETURN Revenir au menu précédent POWER ON OFF Activation ou désactivation du Landroid DÉSACTIVATION DE L APPAREIL Empêche le fonctionnement du Landroid BOUTON Sélectionner et valider BOUTON D ARRÊT DE SÉC...

Страница 58: ...endredi de 30 Faites tourner jusqu à ce que l écran affiche 30 Ainsi le temps de travail actuel devrait être réduit de 30 300 min x 1 30 100 210 minutes 3 5 heures par jour Wed 11 29 09 00PM 0 Working time adjust Total 24h45min Total 22h16min 10 Working time adjust Uniquement à titre d exempe 2 Définir la date et l heure Faites tourner le bouton dans le sens horaire et sélectionnez DAY et appuyez ...

Страница 59: ...yez brièvement puis faites tourner le bouton pour sélectionner les heures de travail prédéfinies Appuyez brièvement pour confirmer E Faites tourner le bouton et appuyez brièvement sur Le Landroid commence à tondre Suivez ces instructions pour tondre la zone avec la station de charge A Mettez le Landroid sous tension et placez le dans la zone de tonte B Appuyez trois fois sur rapidement C Faite tou...

Страница 60: ...est connecté à votre réseau Wifi domestique C Assurez vous que la distance entre votre Landroid votre smartphone et votre routeur est la plus proche possible pendant la connexion Conseil Lorsque le Landroid se déplace vers une zone de votre pelouse avec un signal Wi Fi faible ou inexistant les instructions envoyées depuis l appli ne seront exécutées lorsque le Landroid reviendra dans une zone ayan...

Страница 61: ... mois lorsqu elle est programmée pour tondre tous les jours C Vérifiez toujours si les lames sont ébréchées ou endommagées et remplacez les si elles le sont D Lorsque les lames de coupes sont émoussées et usées elles doivent être remplacées par les lames de rechange fournies avec votre Landroid Des lames de rechange sont également disponibles chez votre revendeur Landroid le plus proche AVERTISSEM...

Страница 62: ... gants de protection D Nettoyez le disque de coupe le châssis et la les roue s avant avec une brosse souple ou un chiffon humide E Faites tourner le disque de coupe pour vous assurer qu il tourne librement Enlevez toutes les obstructions afin qu elles ne provo quent pas de fissure dans le disque de coupe F Vérifiez que les lames tournent librement autour des vis de fixation Enlevez toutes les obst...

Страница 63: ...ur logicielle de votre application 3 Mises à jour manuelles A Si votre Landroid n est pas connecté à votre réseau Wi Fi vous pouvez encore le mettre à jour vers la version de logiciel la plus récente à l aide d une clé USB B Consultez la page de votre compte www account worxlandroid com pour vérifier si une nouvelle version est disponible C Téléchargez la version la plus récente du logiciel D Pren...

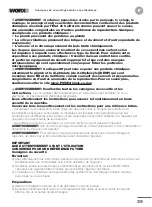
Страница 64: ...es problèmes Heureusement le Landroid est assez intelligent pour vous dire s il rencontre un problème afin que vous puissiez le réparer En cas de doute veuillez visiter notre site Web www worx com landroid support où vous trouverez des vidéos utiles et une assistance supplémentaire MESSAGE CAUSE ACTION Hors zone de travail Appuyez sur START pour réinitialiser Le Landroid ne trouve pas le signal du...

Страница 65: ... et redémarrez le Tondeuse soulevée Appuyez sur START pour réinitialiser Le Landroid est soulevé Aussi si le capteur de levage a été activé plusieurs fois sur une courte période l erreur de Landroid soulevé se déclenchera Arrêtez la machine Placez le Landroid dans un endroit sans obstacles puis démarrez le Si le message d erreur s affiche toujours arrêtez la machine puis retournez le Landroid et v...

Страница 66: ...ÉPANNAGE Si votre Landroid ne fonctionne pas correctement consultez le guide de dépannage ci dessous Si le défaut persiste contactez le Service Client SYMPTÔME CAUSE SOLUTIONS Le voyant LED du socle de recharge ne s allume pas Pas d alimentation Vérifiez que le socle de recharge est correctement connecté au chargeur et le chargeur est connecté à une alimentation électrique appropriée Lumière rouge...

Страница 67: ...élevée Placez le socle de recharge dans une zone ombragé ou attendez que la température baisse La tondeuse ne se recharge pas Pas d alimentation Vérifiez que le cordon d alimentation est correctement relié au chargeur et que le chargeur est branché à une alimentation appropriée Assurez vous que les deux bornes de recharge sur la tondeuse touchent le centre des languettes de contact sur le socle de...

Страница 68: ...u attendez que la température baisse Mauvaise connexion Vérifiez l indicateur LED sur le socle de recharge Vérifiez la connexion entre les languettes de contact situées sur le socle de recharge et les contacts de recharge sur la tondeuse Le Landroid s arrête dans le périmètre de travail Il y a un obstacle dans le périmètre de travail Enlevez l obstacle du périmètre de travail du Landroid La hauteu...

Страница 69: ...on abusive l entretien inadéquat et la surcharge sont exclus de cette garantie comme le sont les accessoires comme les ampoules les lames les mèches les embouts etc Les dommages les dysfonctionnements ou les pannes résultant d un système de lavage ou nettoyage vapeur ou de jet d eau haute pression utilisé sur le produit Pour toute réclamation liée à la garantie veuillez contacter le service d assi...

Страница 70: ...manual Conectar el Landroid a la Internet Usar la aplicación Mantenimiento Cuchillas Limpieza Carga Almacenamiento Actualizaciones del firmware Referencia rápida Mensajes operativos Mensajes de error Solución de problemas Garantía Página 71 Página 72 Página 76 Página 77 Página 77 Página 78 Página 79 Página 80 Página 83 Página 90 Página 90 Página 93 Página 93 Página 94 Página 95 Página 95 Página 95...

Страница 71: ... de Worx Este manual le ayudará a configurar y operar su Landroid de manera segura y eficiente Asistencia www worx com landroid support Línea de ayuda de servicios al cliente 800 727 6260 Estamos aquí para ayudar Bienvenida Charla directa www worx com landroid support ...

Страница 72: ...les reducidas o sin experiencia y conocimiento a menos que hayan recibido supervisión o instrucción respecto al uso del aparato por una persona responsable por su seguridad Los niños deben ser supervisados para asegurar que no jueguen con el aparato ADVERTENCIA Para propósitos de recargar la batería sólo use la unidad de suministro desprendible provista con este aparato ADVERTENCIA Para reducir el...

Страница 73: ...iratorias Nunca coloque sus manos o pies cerca o debajo del cuerpo cuando la podadora robótica esté en operación m Evite usar la máquina y sus periféricos en malas condiciones climáticas en especial cuando exista un riesgo de rayos n No toque las partes peligrosas móviles antes que se hayan detenido por completo 2 Adicionalmente cuando el aparato esté funcionando automáticamente a No deje que la m...

Страница 74: ...dad podrían anular la autoridad del usuario a utilizar este equipo NOTA Este equipo ha sido probado y se comprobó que cumple con los límites para un dispositivo digital Clase B de conformidad con la Parte 15 de las Regulaciones de la FCC Estos límites están diseñados para proporcionar una protección razonable contra interferencia dañina en una instalación residencial Este equipo genera usa y puede...

Страница 75: ... uso con el equipo g Mantenga el paquete de batería fuera del alcance de los niños h Siempre adquiera el paquete de batería recomendado por el fabricante del dispositivo para el equipo i Mantenga el paquete de batería limpio y seco j Limpie las terminales del paquete de batería con una tela seca limpia su se ensucian k El paquete de batería se necesita cargar antes del uso Siempre use el cargador ...

Страница 76: ...e puede ser peligroso para el ecosistema No deseche las baterías de desperdicio como desperdicio municipal sin clasificar Prohibido desensamblar la máquina sin autorización POSITEC Inc ha establecido una sociedad con RBRC Corporation para reciclar cualquier batería Positec con el sello de reciclaje RBRC call2 Para protección ambiental por favor no deseche las baterías en la basura Después que fina...

Страница 77: ... cuchillas de repuesto Llave Allen Estación de carga Tornillos fijadores de la base de carga Estaquillas del alambre Fuente de alimentación Alambre limítrofe Batería de 20 V Medidor de distancia para el alambre limítrofe Regla de Bertelsen Manual A B C D E F G H I J K L M La imagen es solamente para referencia Familiarícese con el Landroid ...

Страница 78: ...rol por voz Alarma de inclinación excesiva Puerto USB Ajuste de la altura de corte Micrófono Interfaz de pantalla LCD Ranura de ACS CONOCIENDO LANDROID La imagen es solamente para referencia Accesorios disponibles para comprar Ranura de la batería Botón de cubierta de batería Botón de parada de seguridad Familiarícese con el Landroid ...

Страница 79: ... 20 V 1 5 A Entrada 120 V 60 Hz 90 W Salida 20 V 3 0 A Peso de maquinaria lbs kg 23 1 25 6 25 8 Grado de protección III App WIFI Bluetooth Y Banda de frecuencia de módulo WLAN integrado 2 412GHz 2 484GHz Potencia de frecuencia de radio máx de módulo WLAN integrado 802 11b 16 2dBm 11Mbps 802 11g 14 2dBm 54Mbps 802 11n 13 2dBm HT20 MCS7 Banda de frecuencia de sistemas de circuito cerrado inductivo 7...

Страница 80: ...ó la herramienta Consulte el empaque de accesorios respecto a detalles adicionales El personal de la tienda puede ayudarlo y proporcionar consejos USO PRETENDIDO El uso previsto de este producto es cortar el césped doméstico Está diseñado para cortar el césped frecuentemente mantener un césped más saludable y de mejor apariencia que nunca antes En dependencia del tamaño de su césped su Landroid pu...

Страница 81: ...trabajo Vea instrucciones detalladas al final de este manual Si habilita la función de Programación Automática en la aplicación no puede ajustar manualmente la función de Corte de bordes Sensor de lluvia Landroid es resistente al clima y dispuesto para estar afuera Pero cortar hierba mojada no le da el mejor acabado o resultado El Landroid está equipado con un sensor de lluvia que detecta la lluvi...

Страница 82: ... la altura del césped se recomienda ajustar gradualmente la altura de corte y acortar gradualmente la altura del césped Limpieza con manguera Puede limpiar el Landroid con manguera para quitarle la suciedad la hierba y la mugre que recoge mientras corta el césped Mantenga el Landroid con su mejor apariencia y rendimiento Seguridad protección de PIN Para impedir el uso no autorizado Landroid está p...

Страница 83: ...cable se recomienda arreglarlo primero y probar el éxito de la instalación ejecutando Landroid a su alrededor Esto facilita la comprobación de todo y el diseño si es necesario antes de incrustar los cables Los cables están enterrados a unos pocos centímetros por debajo del suelo para que los cables aseguren una buena señal 2 Estación de carga del plan La estación de carga es donde está la batería ...

Страница 84: ...que haga cualquier giro Fig 1 lado izquierdo de la estación Si la disposición del patio es tal que el alambre limítrofe hace un giro derecho inmediato Fig 2 entonces no es necesario el requisito de la distancia 2 Para el alambre limítrofe que entra en la estación de carga Debe haber un mínimo de 79 cm de alambre que va recto hacia la estación Fig 1 Fig 2 4 Colocación de cable de límite sobre pendi...

Страница 85: ... su césped para que pueda instalar lalínea de límite sin ningún problema 6 Identificar áreas fuera de los límites No quieres que Landroid corte flores se sumerja en el agua o se imovilice en las raíces de los árboles que están sobre el suelo Localice estas áreas y rodeándolas con alambre de límite para evitar que Landroid acceda a ellas El alambre limítrofe es un lazo simple que comienza en la est...

Страница 86: ...tremo pelado en la abrazadera izquierda roja Figura 3 C Pase los cables a través de los rieles de la base como se muestra en la Figura 3 3 Coloque la línea de límite alrededor de su césped A Use el medidor de distancia del alambre suministrado artículo K para asegurar que el alambre limítrofe esté a la distancia apropiada del borde del patio B Si hay un escalón en el borde de su césped mantenga el...

Страница 87: ...nes hasta que llegue cerca del área fuera de límite B Cuando pueda haga un giro de 90 a la izquierda con el alambre de manera que la dirección del alambre sea directamente hacia el área fuera de límite Fig 9 C Rodee el área con el alambre asegurando mantener los 25 cm apropiados de distancia desde el borde del área de acuerdo con la Fig 4 Asegure mantener una distancia mínima de 90 cm desde el bor...

Страница 88: ...ón de carga hasta la mordaza negra Fig 11 B Corte el exceso de alambre y pele el extremo con un par de cortaalambres C Inserte el extremo desnudo en la mordaza de alambre negra de la derecha No debe haber un exceso de alambre colgando de la cubierta de los terminales Esto puede provocar el acoplamiento incorrecto de la cortadora de césped IN Fig 11 36 in 9 Zonas Si su patio tiene más de un área y ...

Страница 89: ...edor de su césped no está roto Si se usaron conectores del alambre compruebe estas conexiones para asegurarse de que hay contacto eléctrico E Abra la parte trasera del Landroid e inserte la batería Power Share en la ranura hasta que haga clic Fig 14 F Coloque el Landroid en la estación de carga y asegure que los terminales de carga del Landroid tienen contacto firme con las paletas de la estación ...

Страница 90: ...roid en cualquier momento presionando F Para mandar el Landroid hacia la estación de carga presione después presione LANDROID CONTROL PANEL Funciones y características en el Panel de Control ATRÁS Regresar al menú anterior ENCENDIDO APAGADO Enciende y apaga el Landroid DESHABILITAR EL DISPOSITIVO Impide el funcionamiento del Landroid BOTÓN Seleccionar y Aceptar BOTÓN DE PARADA DE SEGURIDAD PANTALL...

Страница 91: ...ras por día L V en 30 Gire OK hasta que en la pantalla se lea 30 Esto restaría 30 del horario de trabajo actual para dar 300 min x 1 30 100 210 minutos 3 5 horas por día Wed 11 29 09 00PM 0 Working time adjust Total 24h45min Total 22h16min 10 Working time adjust Solo para referencia 2 Establecer fecha y hora Gire en sentido horario para seleccionar DÍA y presione El número seleccionado estará parp...

Страница 92: ... gire para seleccionar los horarios de trabajo predefinidos Presione brevemente para confirmar E Gire para seleccionar y presione brevemente Landroid comenzará a cortar el césped Siga estas instrucciones para cortar el césped del área con la estación de carga A Encienda el Landroid y colóquelo dentro del área de cortar el césped B Presione tres veces rápidamente C Gire en sentido horario para sele...

Страница 93: ...rese de que su teléfono inteligente está conectado a su red Wi fi doméstica C Asegúrese de que la distancia entre su Landroid su teléfono inteligente y su enrutador es tan pequeña como sea posible durante la conexión Consejo cuando el Landroid se mueve hacia un área de su césped con señal Wi fi débil o sin señal las alertas desde la aplicación se recibirán solamente cuando el Landroid regrese a un...

Страница 94: ...lla de corte durará hasta 2 meses cuando se programe para cortar el césped todos los días C Compruebe siempre para que vea si las cuchillas están desconchadas o dañadas y sustitúyalas si es necesario D Cuando las cuchillas de corte están melladas y desgastadas se deben sustituir con las cuchillas de repuesto suministradas con su Landroid También hay cuchillas de repuesto disponibles ADVERTENCIA Ci...

Страница 95: ...con sus manos Use guantes para protección D Limpie el disco de cuchillas el chasis y la s rueda s delantera s meticulosamente con un cepillo blando o trapo mojado E Gire el disco de cuchillas para asegurar que gira libremente Retire cualquier obstrucción para evitar daños al disco de cuchillas F Compruebe que las cuchillas rotan libremente alrededor de los tornillos fijadores Retire cualquier obst...

Страница 96: ... está conectado a su red Wi fi aún puede actualizarlo a la última versión del software con una unidad de USB B Revise la página de su cuenta por medio de www account worxlandroid com para que vea si hay publicada una nueva versión del firmware C Descargue la última versión del software D Asegúrese de que la unidad de USB está formateada con FAT32 E Copie el fichero de software descargado a la unid...

Страница 97: ...rgando en un estado apagado MENSAJES DE ERROR A veces las cosas pueden ir mal Afortunadamente el Landroid es suficientemente inteligente para decirle a usted si él está encontrando un problema de manera que usted pueda arreglarlo Si tiene dudas visite nuestro sitio web en www worx com landroid support donde encontrará videos útiles y más asistencia MENSAJE CAUSA ACCIÓN Fuera del área de trabajo Pr...

Страница 98: ... También si el sensor de elevación se ha activado varias veces en un periodo corto esto provocará un error de elevación Apague Lleve el Landroid a un área despejada de obstáculos encienda Si el mensaje de error sigue en la pantalla apague voltee el Landroid al revés y compruebe si hay cualquier obstrucción que impediría el deslizamiento de las ruedas giratorias delanteras en el cuerpo de la cortad...

Страница 99: ...LUCIÓN DE PROBLEMAS Si su Landroid no funciona correctamente siga la guía de solución de problemas debajo Si el problema persiste contacte el Servicio al Cliente SÍNTOMA CAUSA SOLUCIÓN La luz LED en la estación de carga no se enciende No hay energía Compruebe que la estación de carga está conectada correcta mente al cargador y el cargador está conectado a una fuente de alimentación adecuada Luz ro...

Страница 100: ...de carga en un área a la sombra o espere hasta que la temperatura haya bajado La cortadora de césped no se carga No hay energía Compruebe que el cordón de alimentación está conectado correctamente al cargador y que el cargador está conectado a una fuente de alimentación adecuada Asegúrese de que los dos contactos de carga en la cortadora de césped tocan el centro de las paletas de contacto de la e...

Страница 101: ...a bajado Mala conexión Compruebe la luz LED en la estación de carga Compruebe la conexión entre las paletas de contacto ubicadas en la estación de carga y los contactos de carga en la cortadora de césped El Landroid se detiene en el área de trabajo Hay un obstáculo en el área de trabajo Retire el obstáculo del área de trabajo del Landroid La altura de corte se fijó demasiado baja para la longitud ...

Страница 102: ...es sujetas a desgastes naturales provocadas por uso en acordancia con las instrucciones operativas Los mantenimientos o manejos impropios o no autorizados o sobrecargas están excluídas en esta garantía como también accesorios de bombilla sierras y brocas etc Daños fallas o errores resultantes del lavado de alta presión o la limpieza a vapor o con agua corriente del producto Las herramientas de ree...

Страница 103: ......

Страница 104: ......

Отзывы: