


Start the System
Run your local Test Server. Make sure the settings are correct and click on the “Start” button.
The Test Server then attempts to evaluate its link with the Connection Host, and you will see a count-down
displayed on the log.
Initializing Server in 5 Seconds...
If there is a problem, you will see an error message. Once the Server connects with the Connection Host,
you will see.
Application Server started successfully
Once you have successfully started your Application Server, now it is time to sign-on a Terminal.
Install Cloud Server
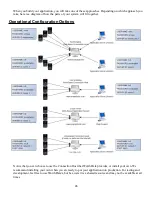
Overview
A “Cloud Server” is a web-based Application Server installed on a standard web server. It is a program that
resides on the internet (in the “Cloud”) and controls the data collection Terminals and interacts with you
through a web browser or some custom software that you design that communicates with the Cloud Server
via the internet.
A Cloud Server does not require a Connection Host. Your Terminals communicate directly with the web-
based Application Server.
A Cloud Server can be installed on almost any web server. It can be put on a typical hosted web site account
(like you might find with GoDaddy or HostMonster) or it can be installed on a web server (typically an
Apache installation) that is part of your LAN.
Worth Data provides a sample Cloud Server that you can use as a starting point for developing your own.
Of course, installing and working with this software requires some basic knowledge of server-side scripting
(PHP in particular) and general knowledge of how the parts of such a system fit together.
Details
The first step in installing a the demo Cloud Server is to
prepare your web site host
. You will need to have
a database set up to hold the necessary data tables used by the Cloud Server. A typical web hosting service
provider will use a tool called “cPanel” as your control system for your web site. This includes tools like
“MySQL Databases” and “phpMyAdmin.”
Use these to create a new empty database (if you need a new one). You can also use an existing database and
the new required tables will be automatically added by the install.php. You will need to know a username
and password for accessing your database (the cPanel tools will give you access to this).
Set the necessary database access parameters in
varstermrouter.inc
.
Enter the appropriate database
name, user name, and password. Open this file in your text editor and set the variables as required by your
57


